How can I use Task Management in PheedLoop
Our Task Management system is a feature that can be used with any stakeholder in PheedLoop. Its main priority is to save yourself and your stakeholders a ton of time whilst setting up your event.
Task Management is a feature set that is connected to a stakeholder portal. The stakeholder portal is a personalized portal for your attendee, exhibitor, sponsor, or speaker. These are individuals who are important and need to do certain tasks before the event starts. Task Management is a powerful way of managing and working with these individuals.
In this example, we will be showcasing the speaker portal but this can be applied to the exhibitor and sponsor portal just the same.
Please note, whenever a task is completed by an Attendee, Speaker, Exhibitor, or Sponsor, the task must be approved by an Administrator or Team Member in the Event Dashboard for there to be an update to the system. Please see 4. Approving Tasks for instructions.
Contents
- 1. Enable Task
- 2. Create Task
- 3. Assign Tasks
- 4. Approving Tasks
- 5. Setting Reminders for Tasks
- 6. Download Task Assignment Data
- 7. Assigning Tasks Based on Exhibitor and Sponsor Products
1. Enable Task
The first step before working with tasks is enabling them to appear in your stakeholders' portal. You can enable tasks for attendees, speakers, exhibitors, and sponsors. The instructions below are for speakers.
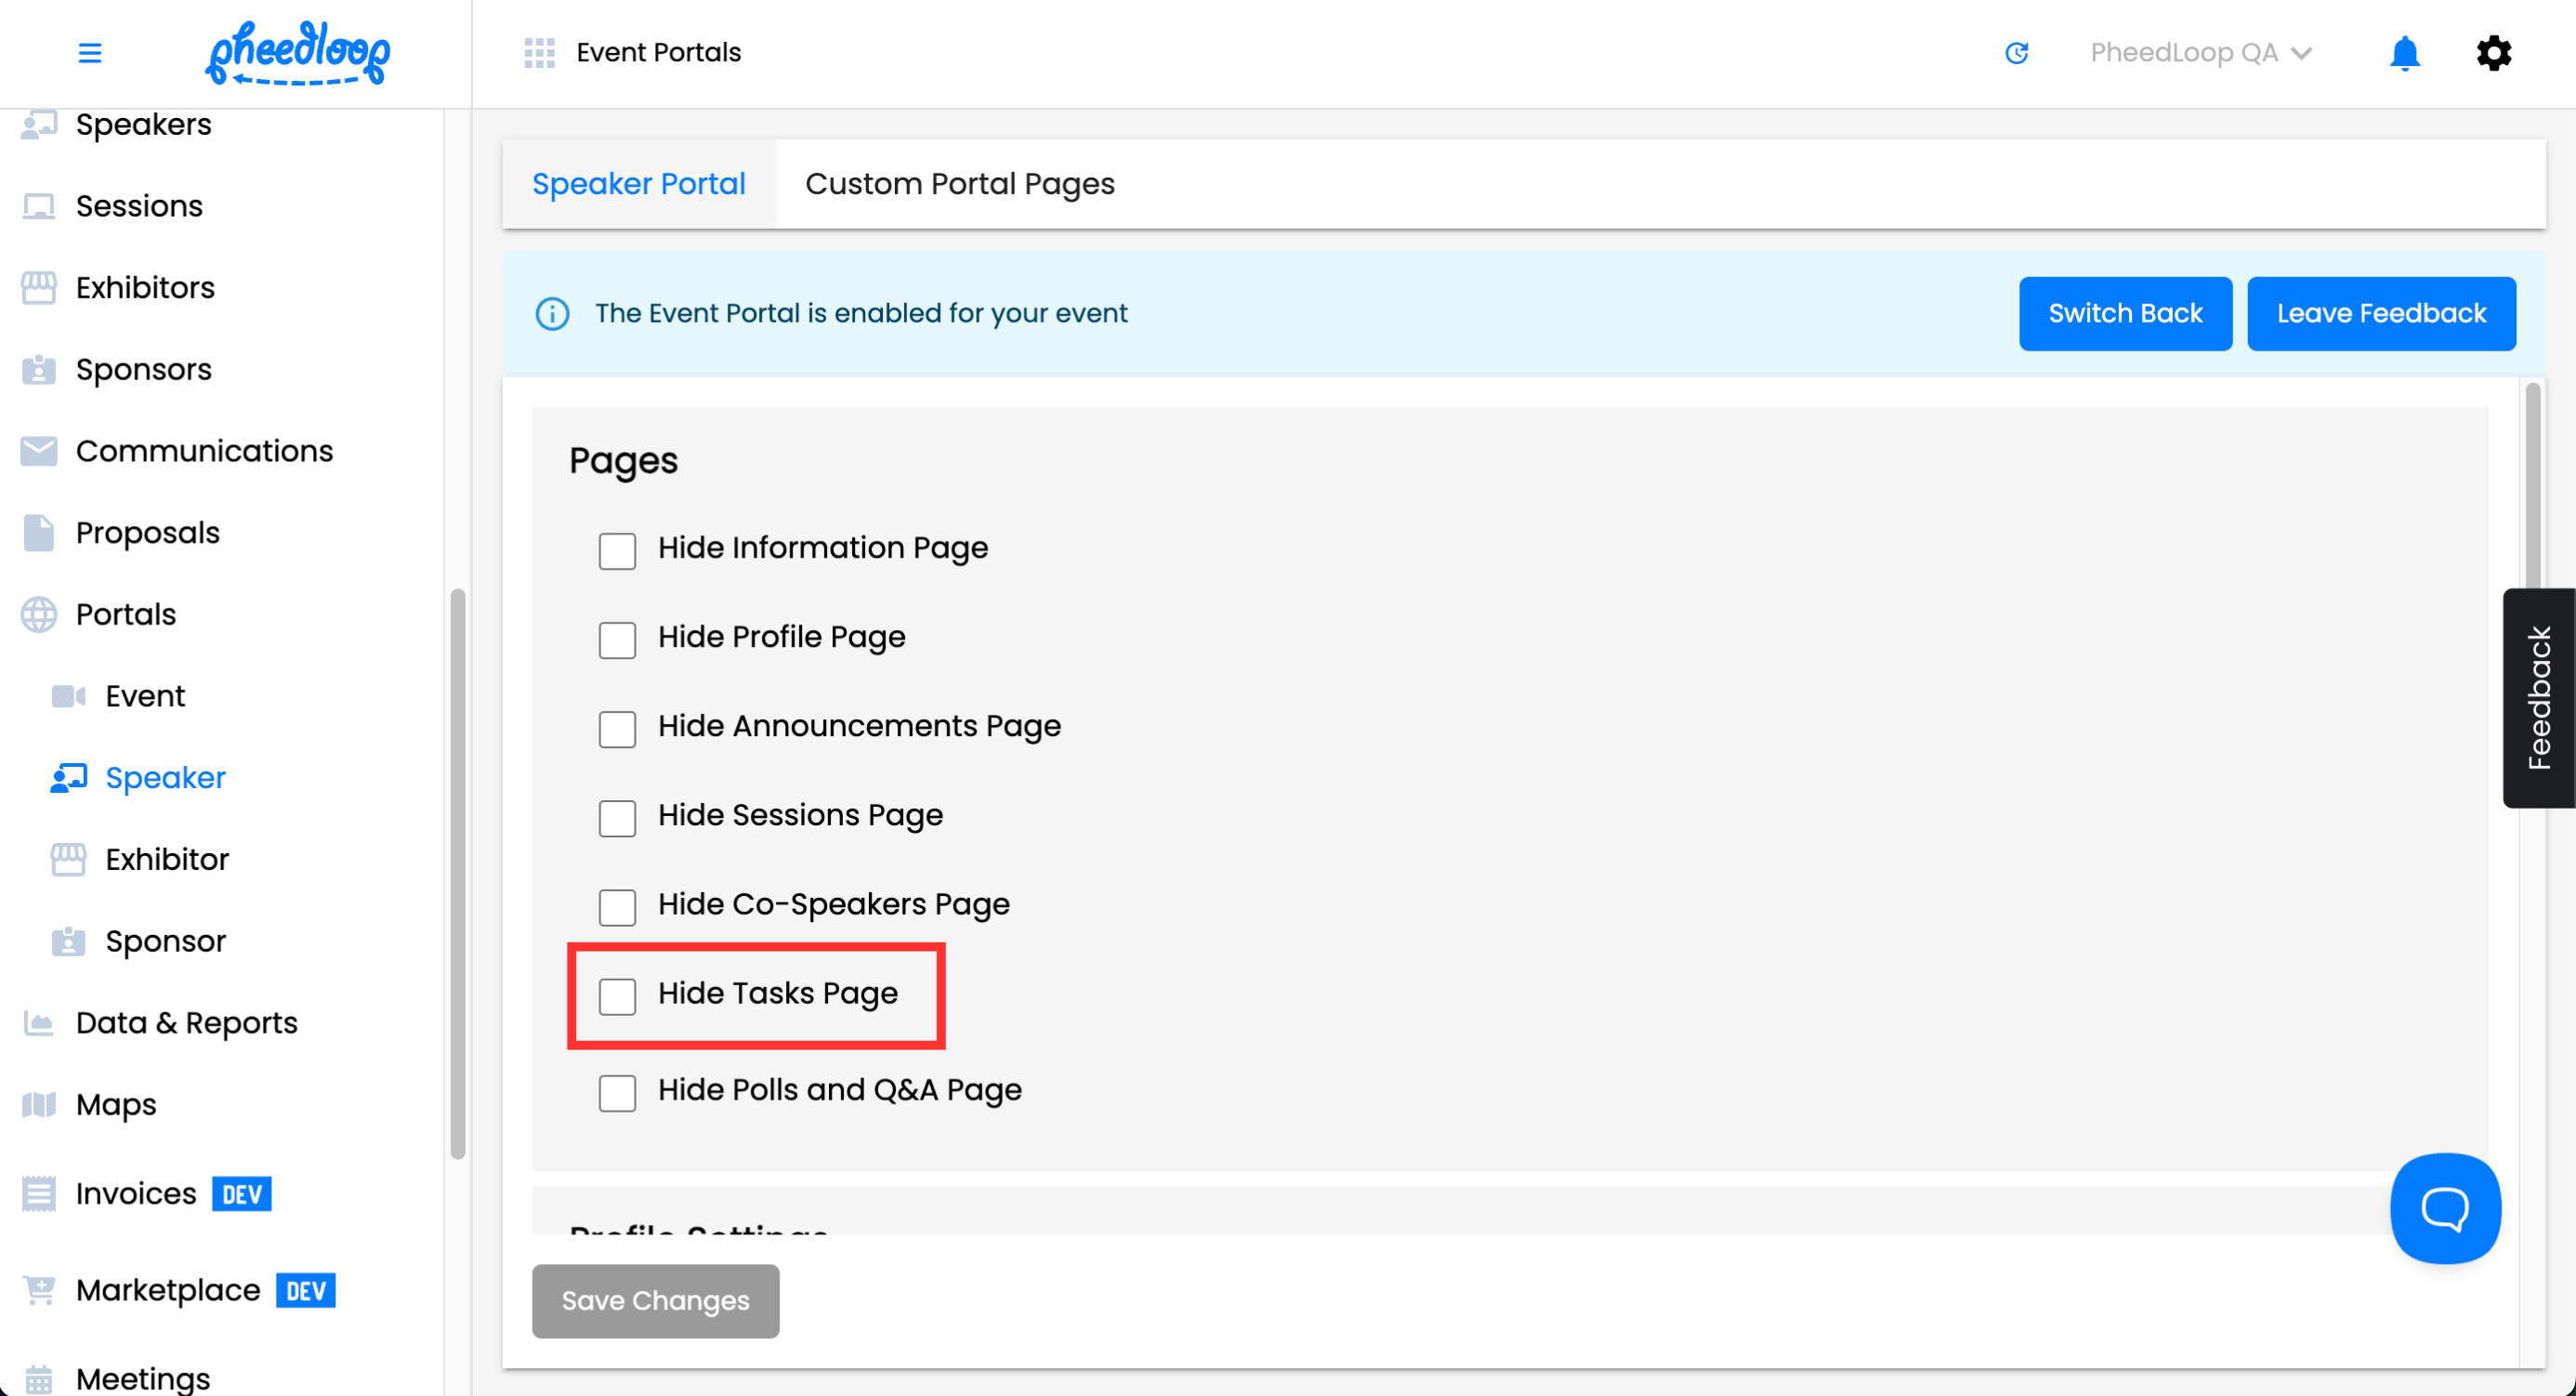
- From the Event Dashboard, navigate to Portals > Speaker > Speaker Portal
- Scroll down to Pages
- Toggle off the Hide Tasks Page checkbox
-
Select Save Changes

2. Create Task
You will find that when creating your task, you will find a wide range of customizable fields and options to make your desired task for your stakeholders.
-
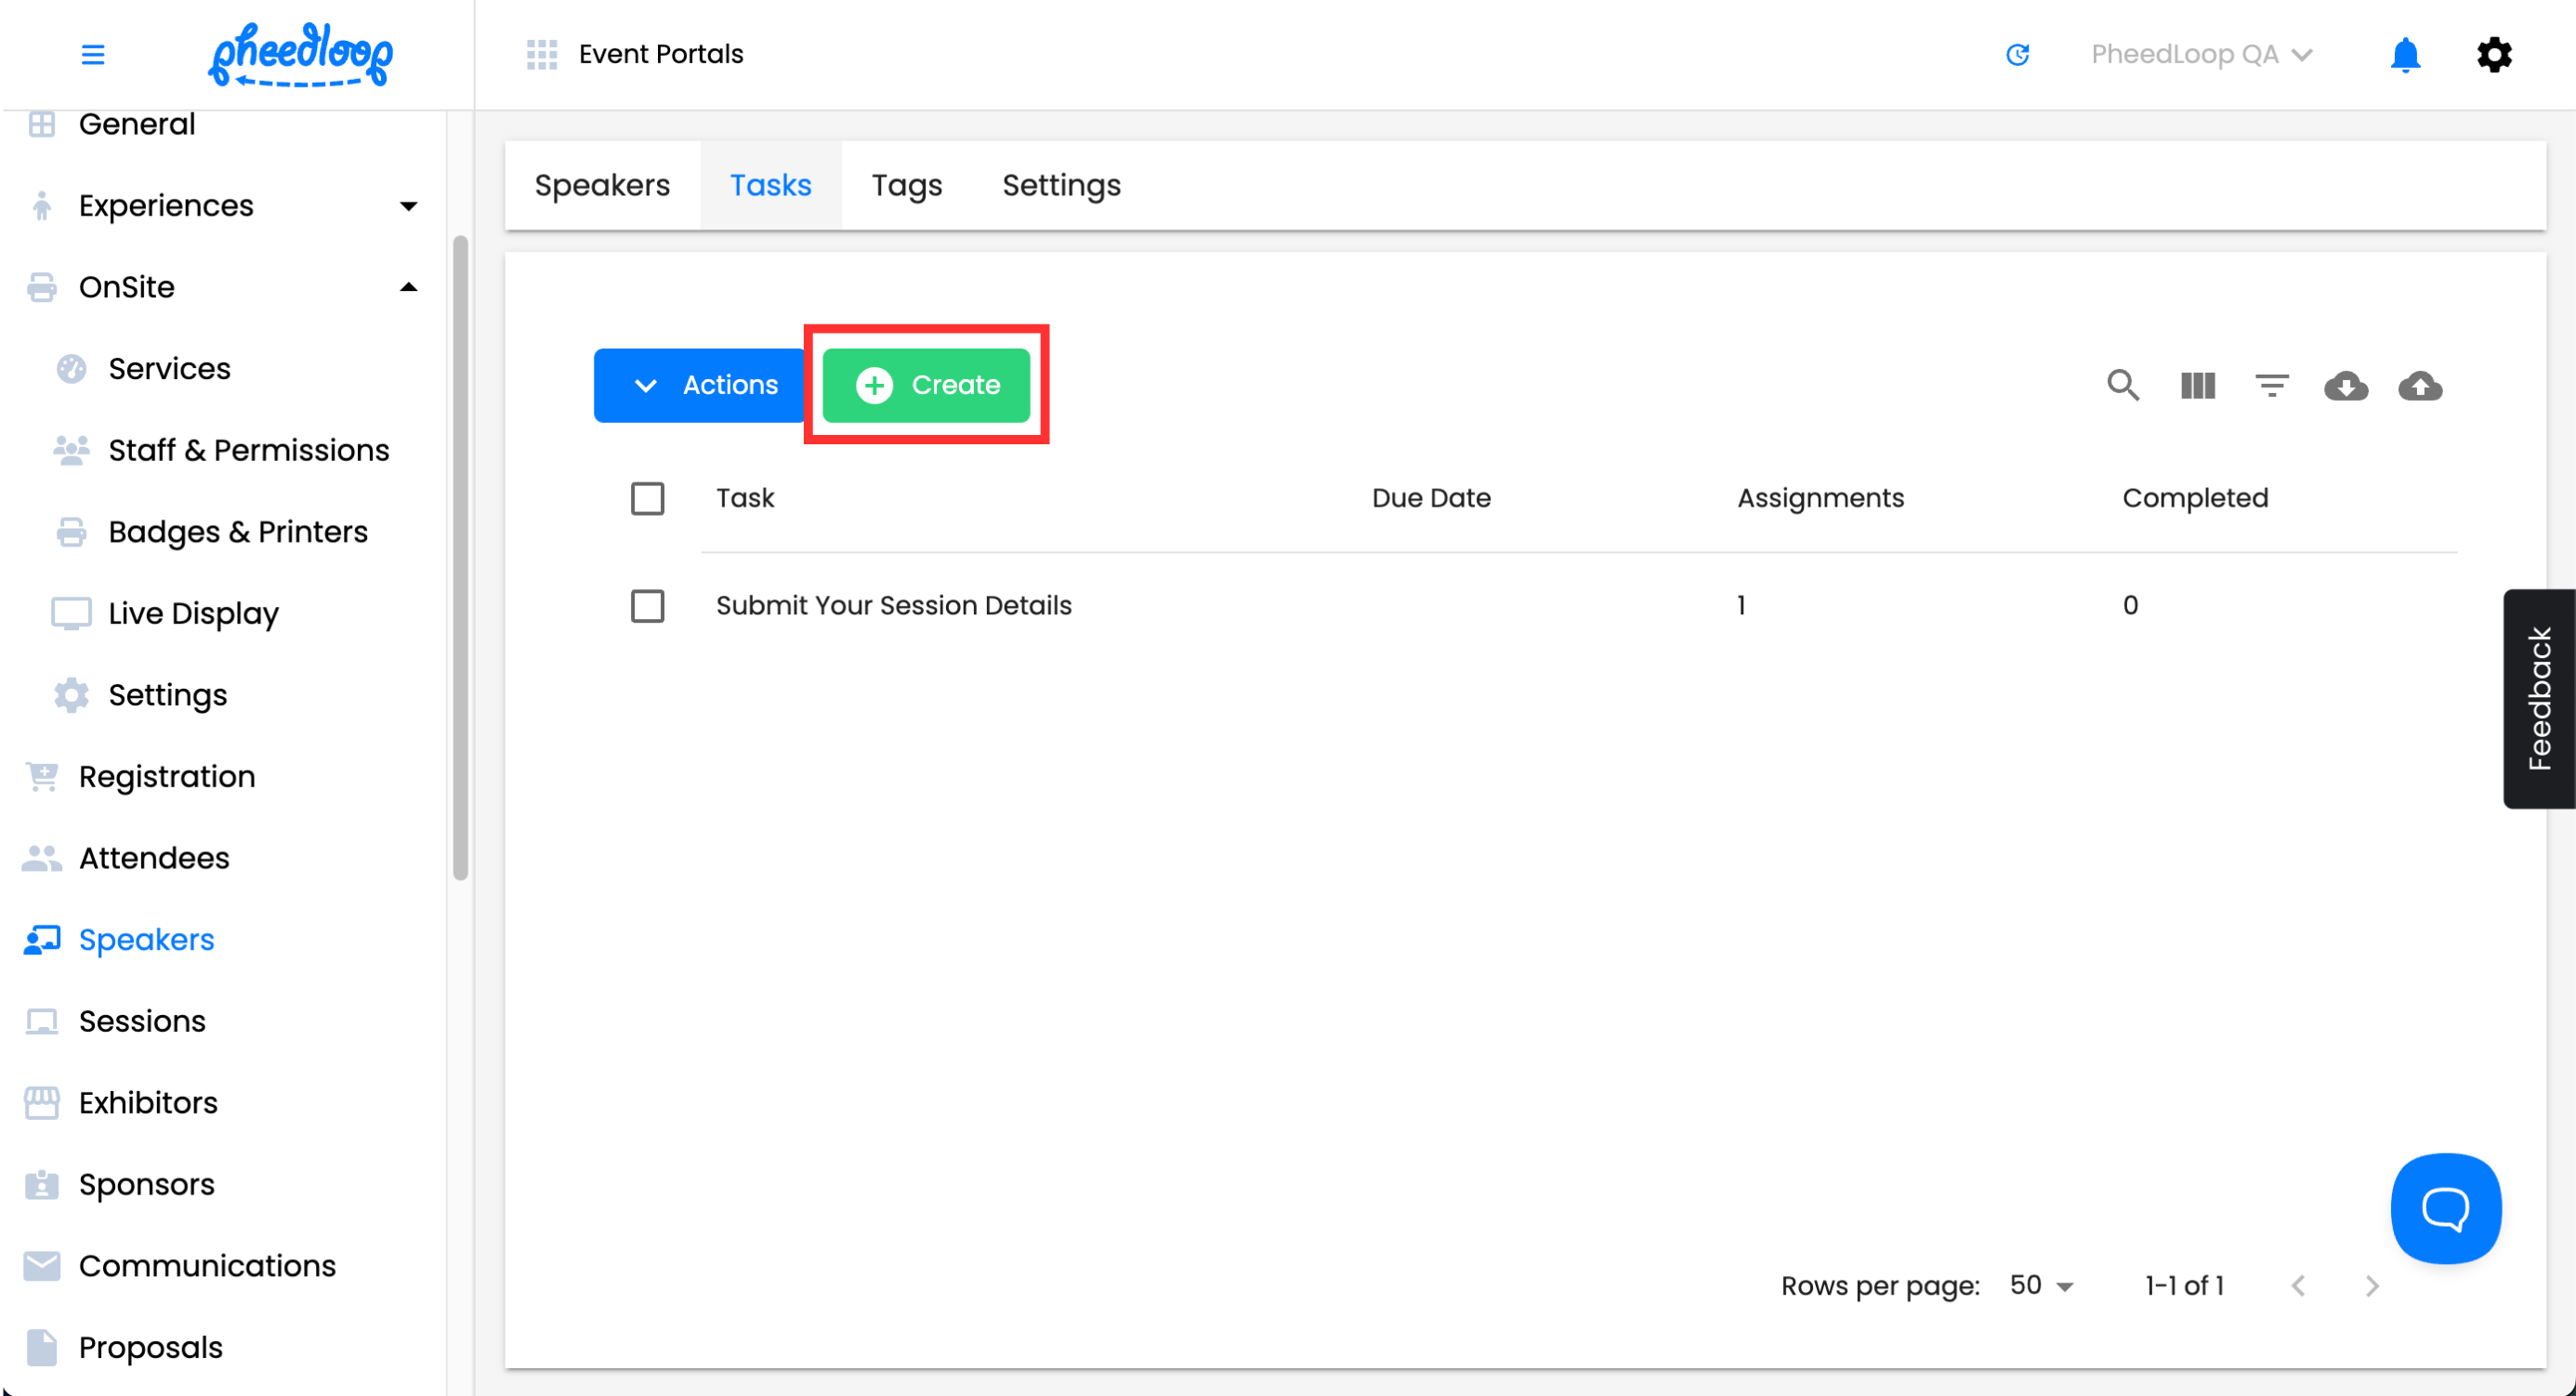
From the Event Dashboard, navigate to the Tasks page for your desired stakeholder
Above the Tasks table, select Create, and customize your task with the available fields
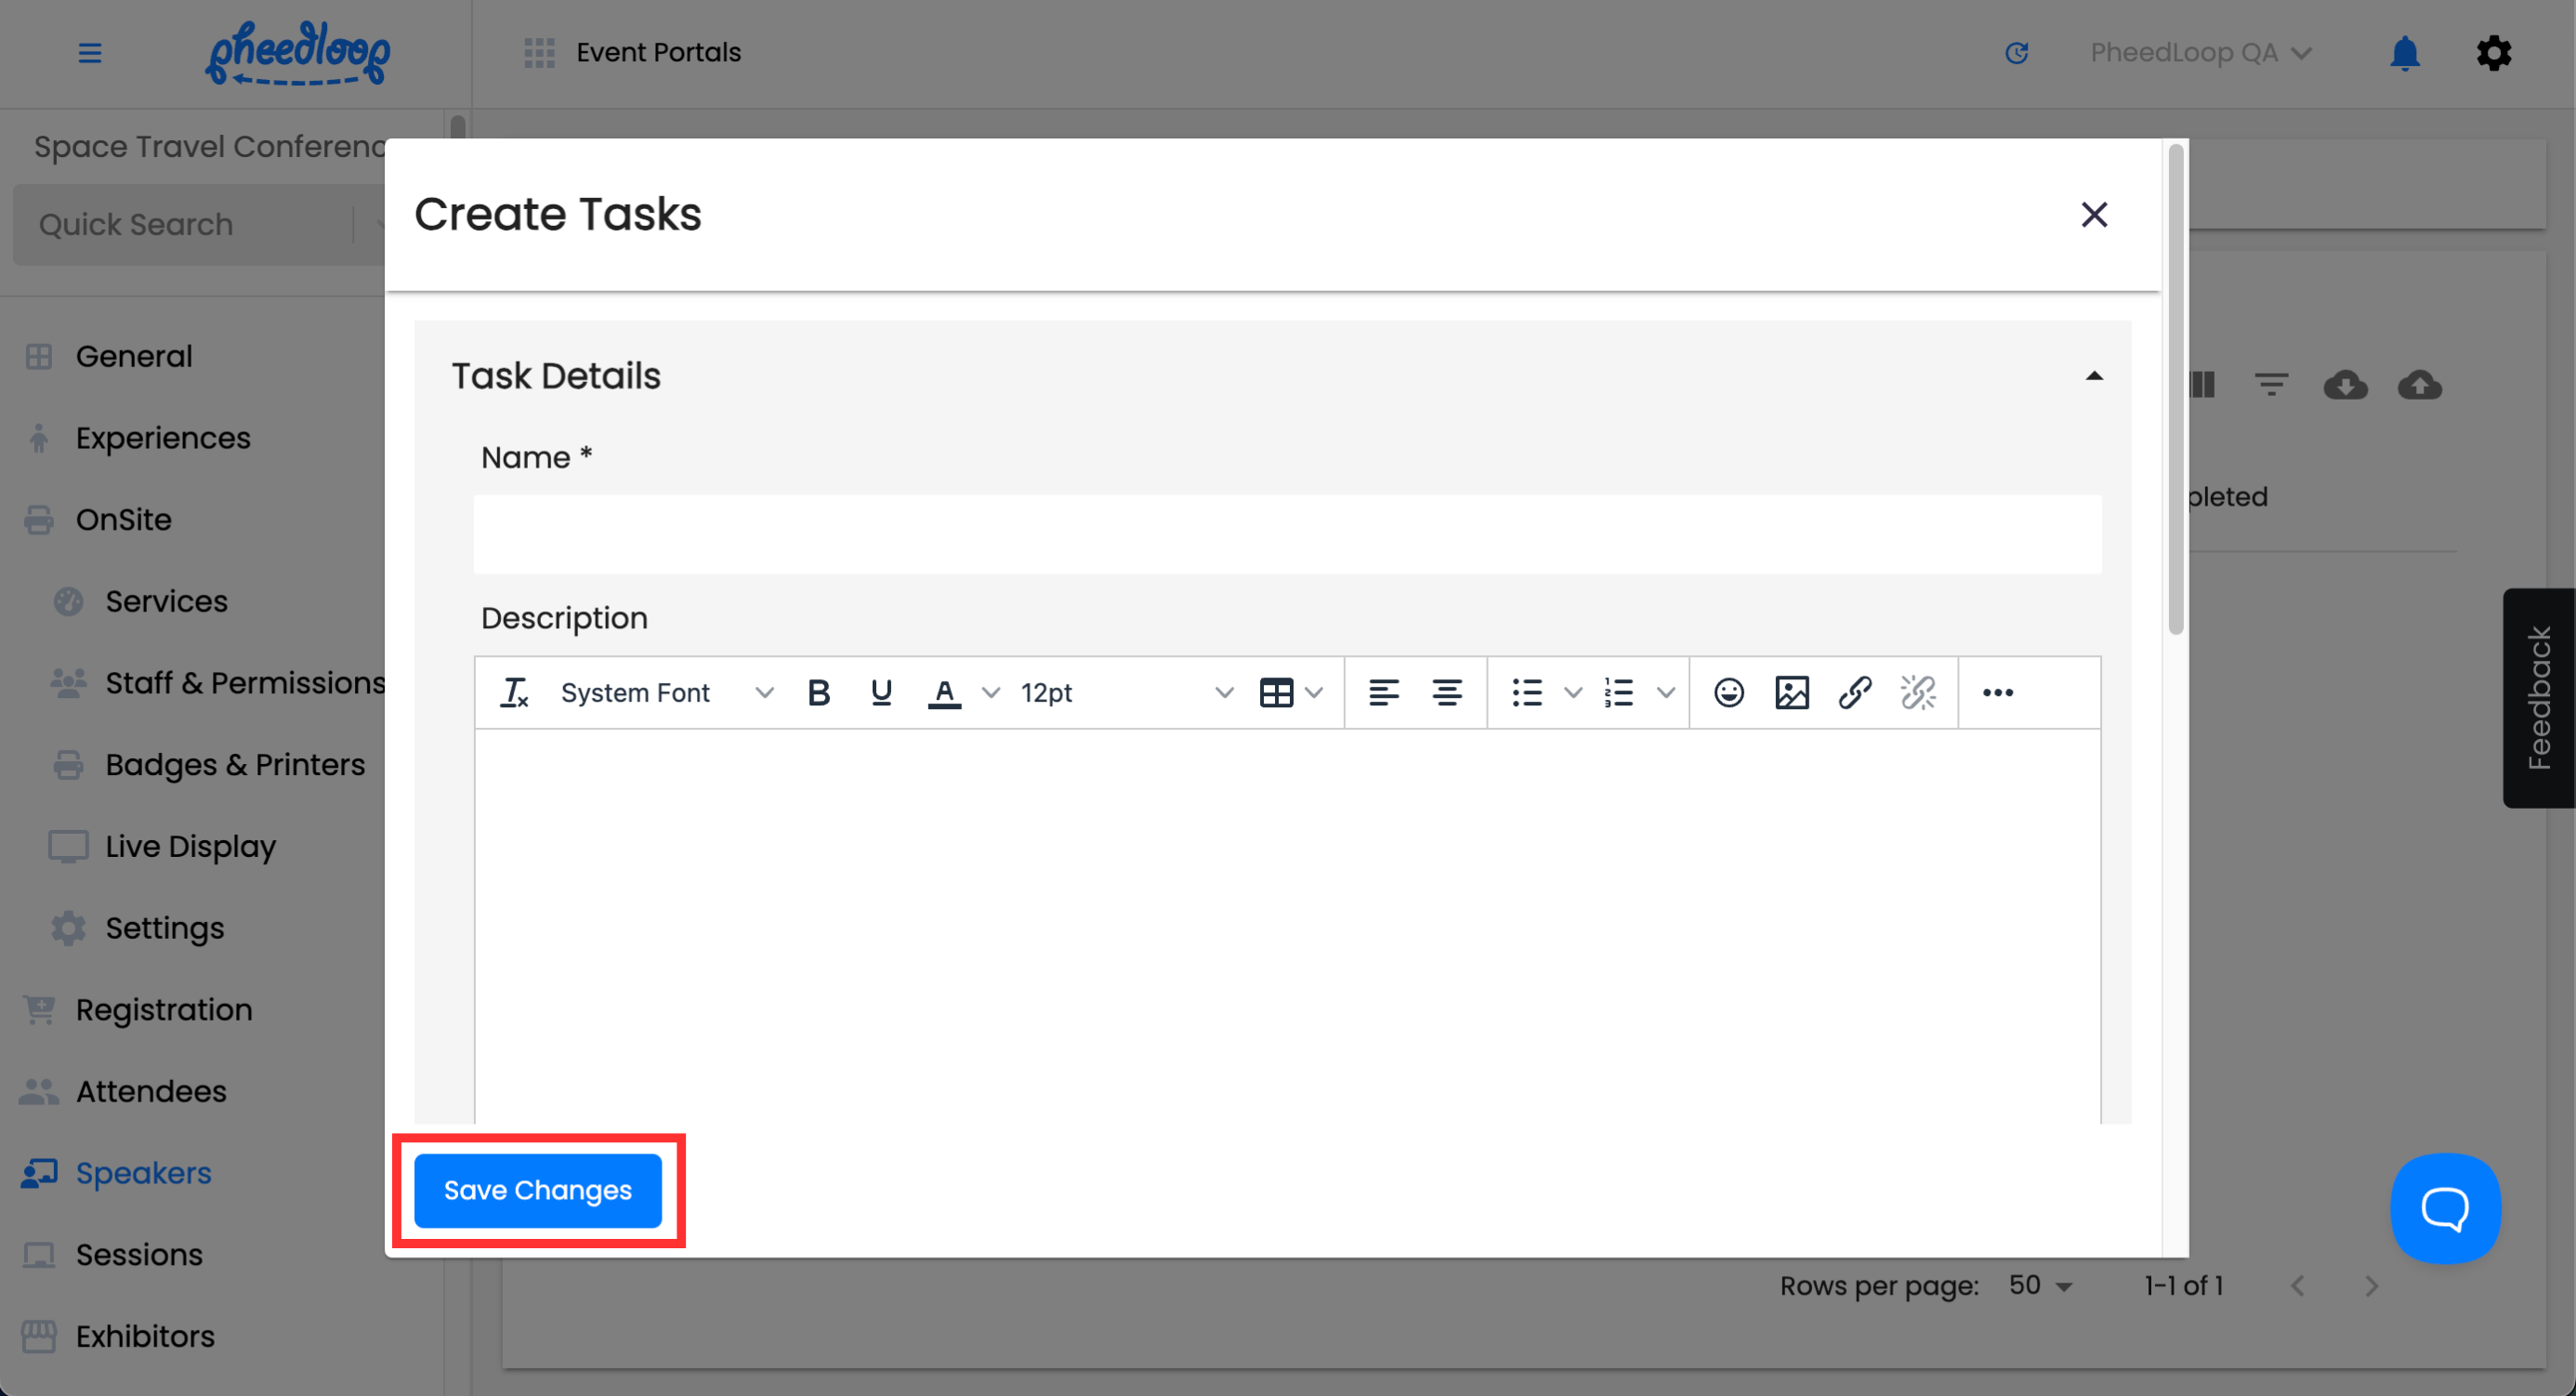
- name - enter the name of your task under this field.
- description - enter the description of your task under this field
- link - paste a link/URL so your stakeholders can go right into the page you are directing them to.
- due date - assign a due date to the Task for its completion.
- form - select a custom form under this field
- require file upload - toggle this checkbox on to require the submission of a file before the stakeholder can complete the task.
- task file - upload a file so your stakeholders can download or review.
- notification list - enter enter any email addresses to be notified when the stakeholder marks a task as complete. Separate multiple emails with commas.
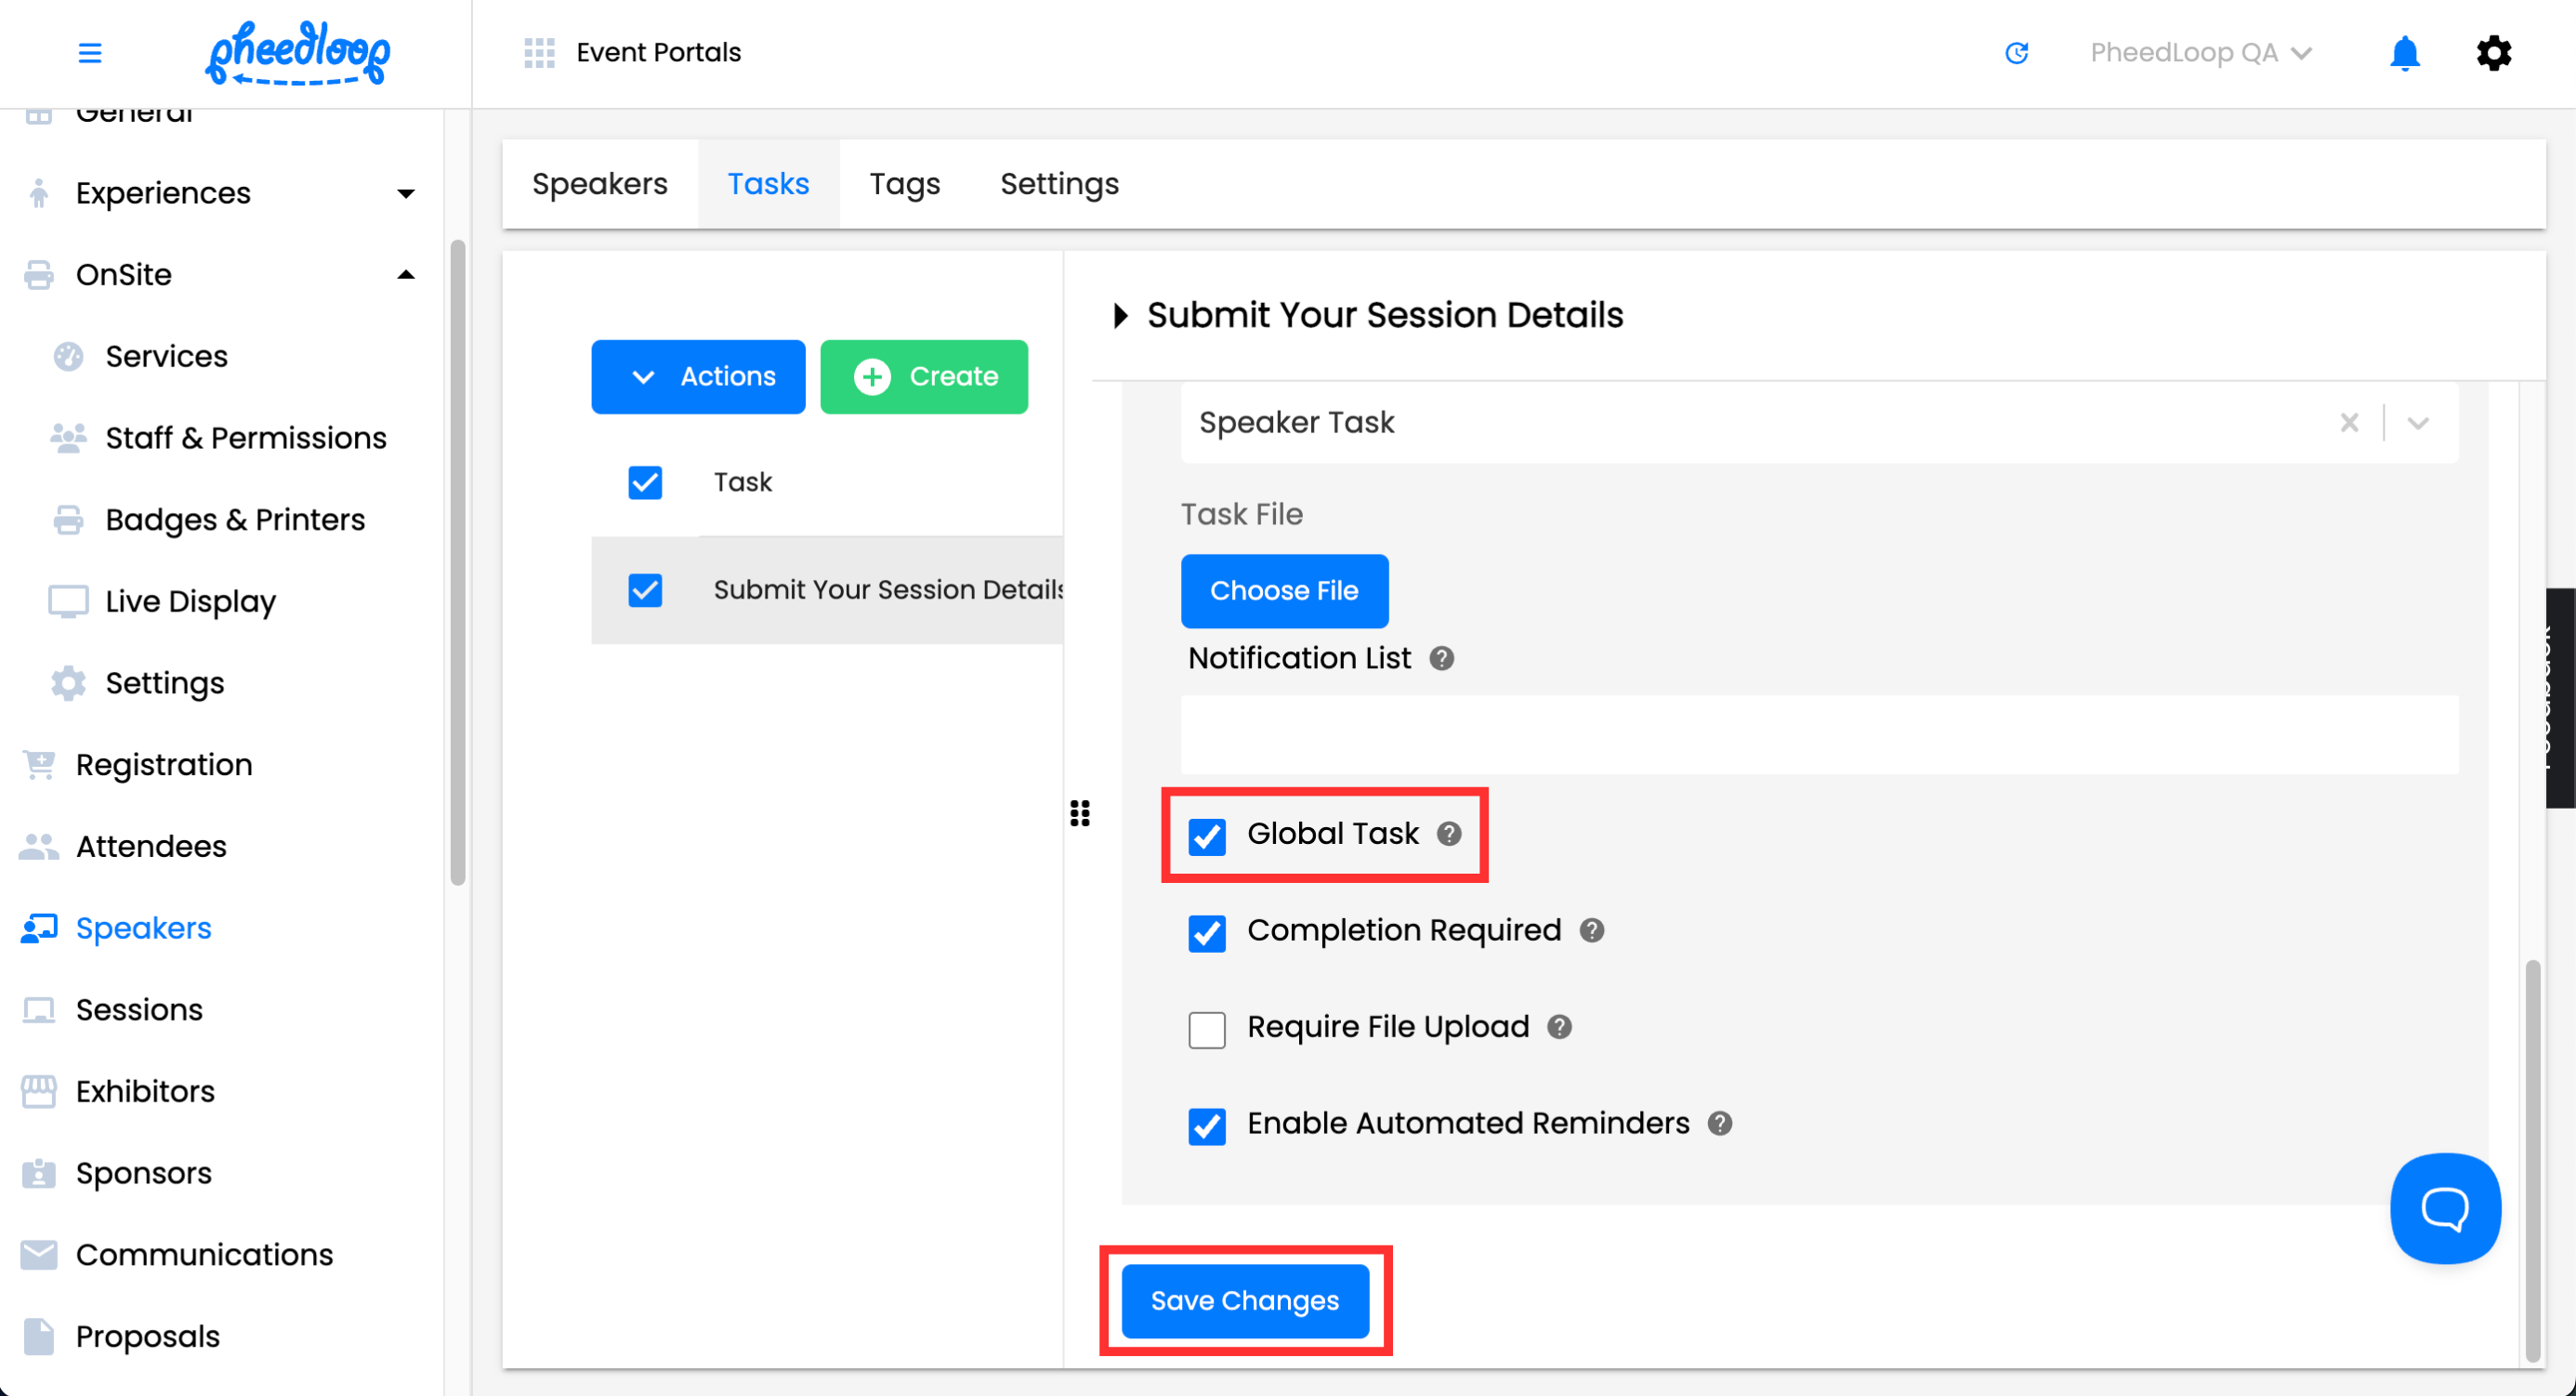
- global task - toggle on this checkbox to make this task available to all stakeholders in their respective category
- completion required - toggle this checkbox on to require the stakeholder to mark the task as complete once they have finished the task.
- require file upload - toggle this checkbox on to require the stakeholder to upload a file as part of the task.
- enable automated reminders - toggle this checkbox on to send automated reminders to the stakeholder to complete their task.
- Tags - Only available for Attendee Task Management. Any tags added to this field will assign the task to attendees with the matching tag.
-
Select Save Changes to create your task


Bulk Uploading Tasks
Multiple tasks can be uploaded into the Event Dashboard at once.
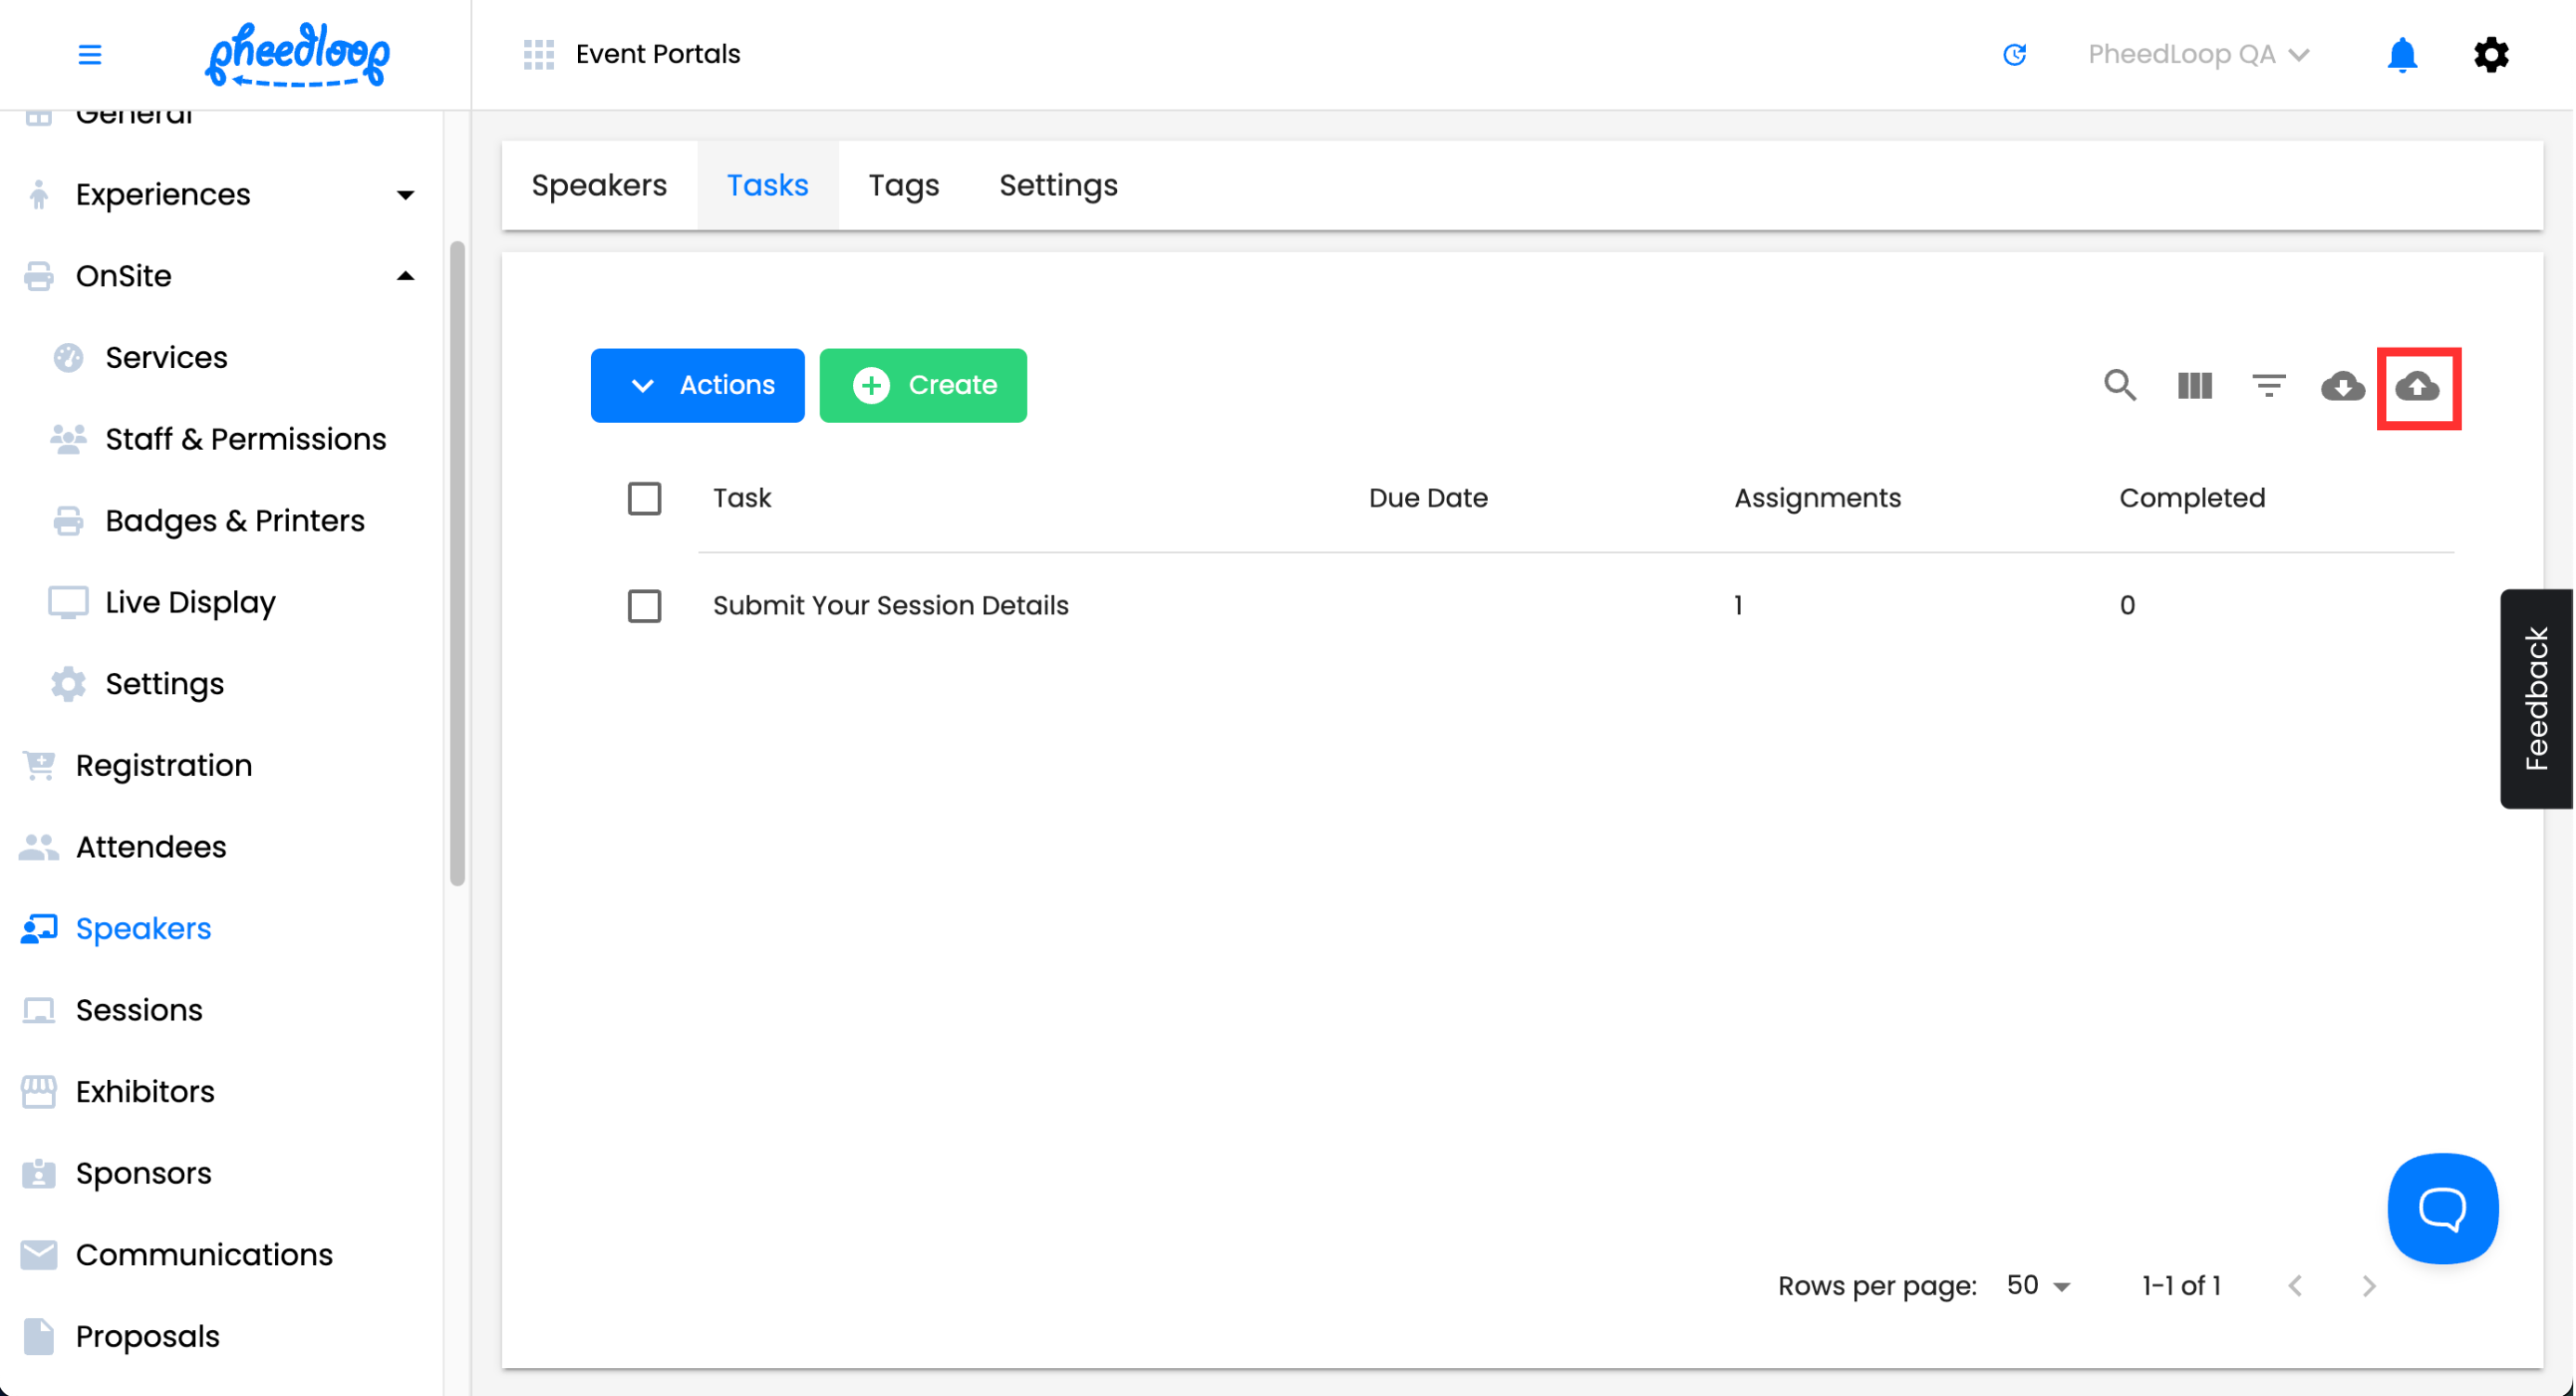
- From the Event Dashboard, navigate to the Tasks page for your desired stakeholder
-
Above the Tasks table, select the upload button
-
Select Download Template
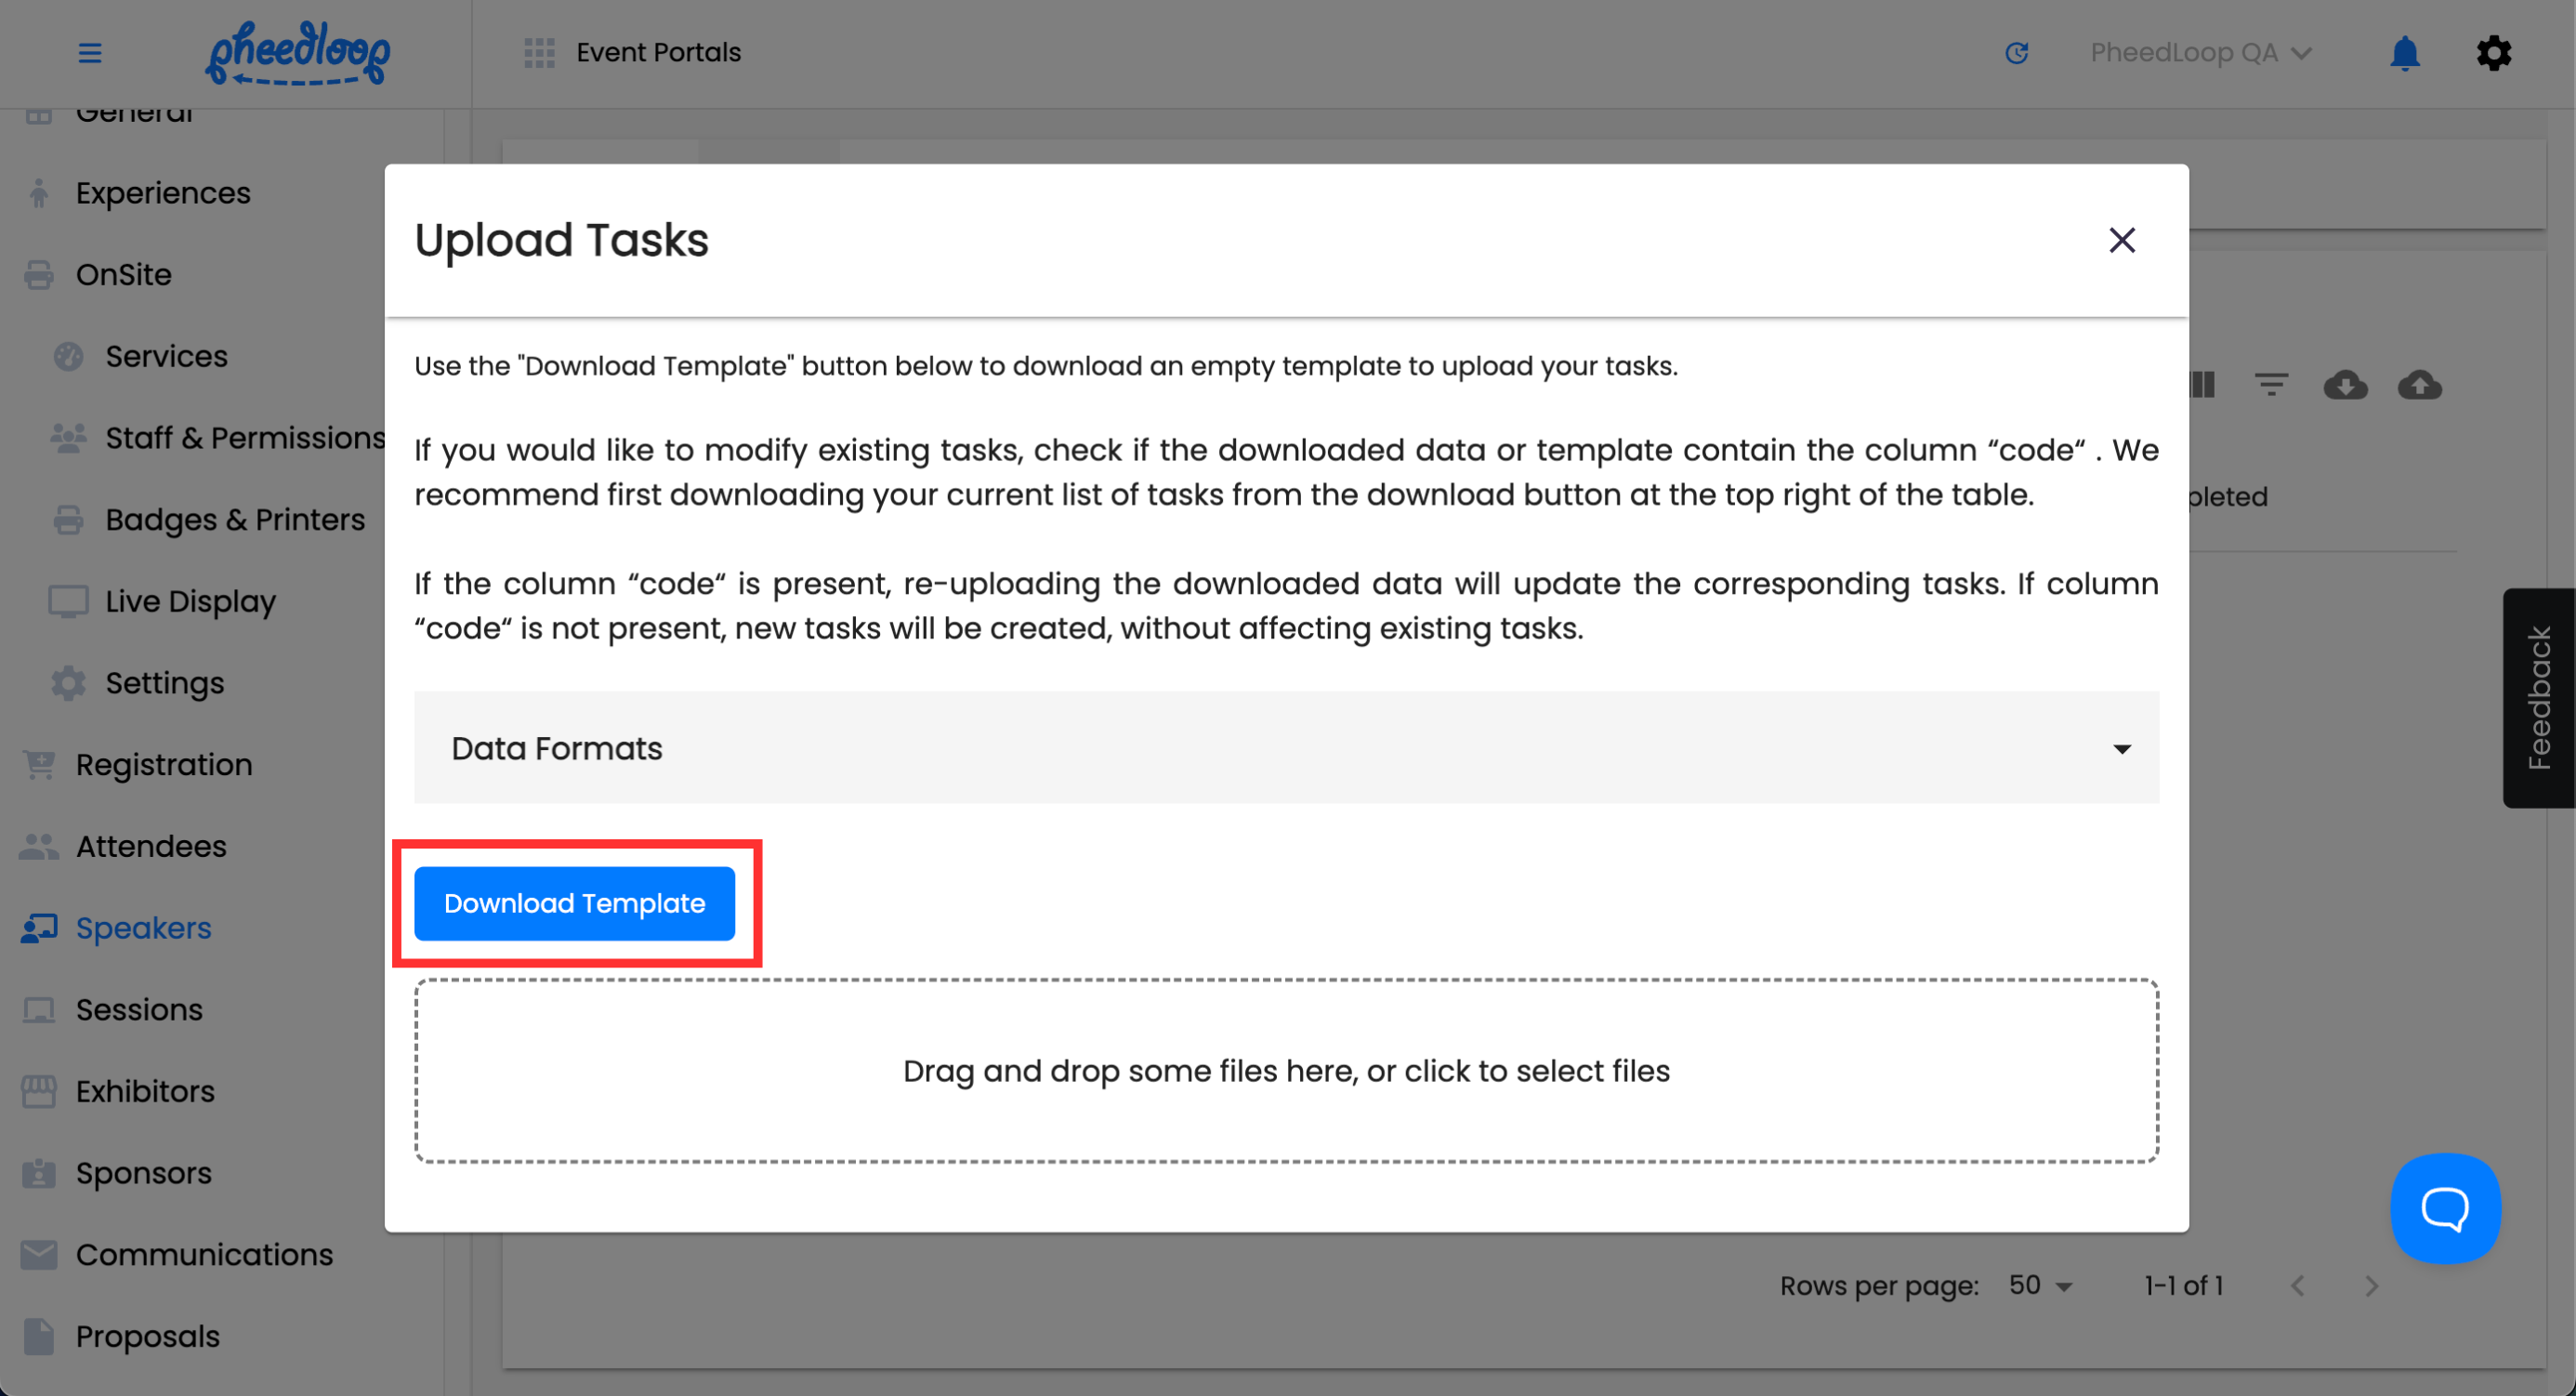


The Tasks template will now be downloaded onto your device.
- Open the Tasks template file
- Fill out the information outlined in the Headings in the Tasks Template step below
- Save the document as a CSV file
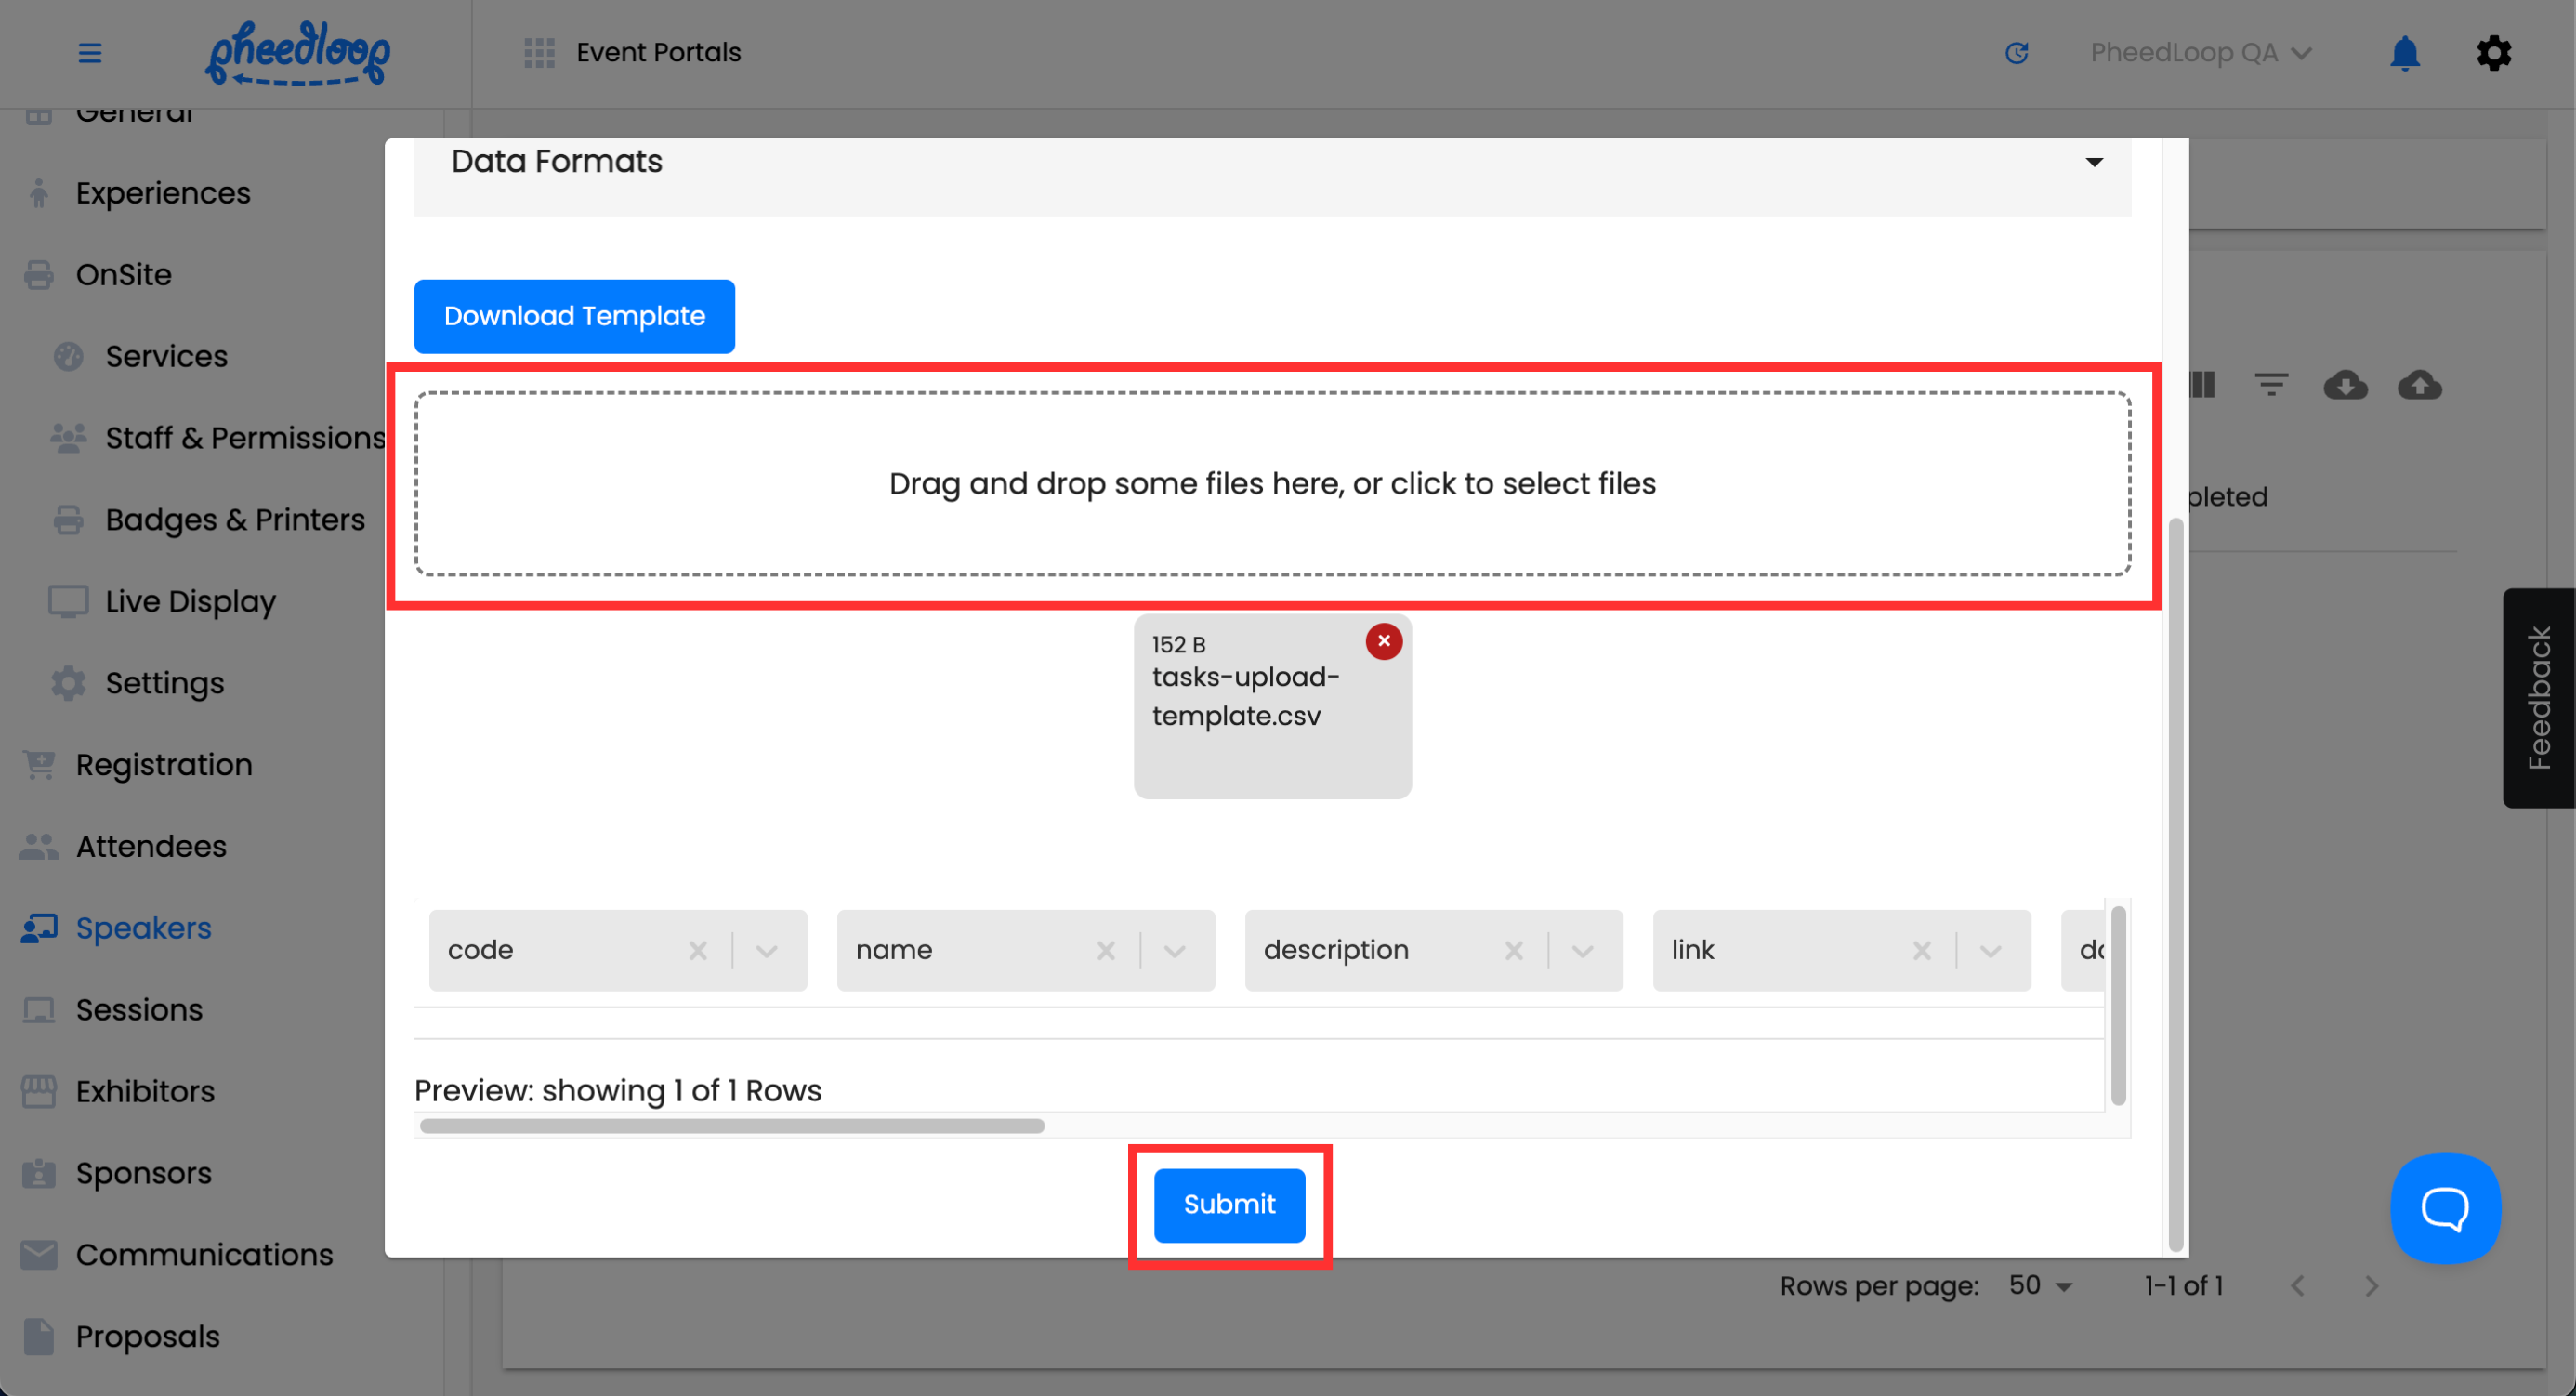
- Select the Drag and drop some files here, or click to select files button to upload your template
-
Select Submit

Headings in the Tasks Template
| code | This field is only necessary if you intend to edit a task. Enter the Task code under this column to edit their information. The task code can be found by selecting the download button to the left of the upload button. Leave this field blank to create new tasks. |
| name | Enter the name of the task under this field. |
| description | Enter the description of the task under this field. |
| link | Enter an external link to your task to redirect stakeholders from their respective portals. |
| date_due | Enter the date that the task is due. The date must be written in YYYY-MM-DD format. |
| notification_list | Enter any email addresses to be notified when the stakeholder marks a task as complete. Separate multiple emails with commas. |
| Is_global | Enter TRUE to toggle on the Global Task checkbox. Enter FALSE or leave blank to toggle this checkbox off. |
| Is_completion_required | Enter TRUE to toggle on the Completion Required checkbox. Enter FALSE or leave blank to toggle this checkbox off. |
| Is_reminders_enabled | Enter TRUE to toggle on the Require File Upload checkbox. Enter FALSE or leave blank to toggle this checkbox off. |
| Is_file_upload_required | Enter TRUE to toggle on the Enable Automated Reminders checkbox. Enter FALSE or leave blank to toggle this checkbox off. |
| Category | The category field will display the category the task was created under. It is not necessary to enter anything under this value as this is used to display the category the task was uploaded under when exporting tasks from the page. |
3. Assign Tasks
Whether you want one specific person to receive a task or every stakeholder, assigning tasks is an essential step.
The Global Task checkbox is a feature that, when activated, assigns the task to everyone in that stakeholder category. This is applicable for all stakeholders but we will be using speakers for this example.
- From the Event Dashboard, navigate to Speakers > Tasks
- Select the task you would like to adjust from the list
- In the task’s editor form, go to the Task Details section and toggle on the Global Task checkbox
-
Select Save Changes

If you want to assign a task to one specific stakeholder there are two ways to manually accomplish this:
- From the Event Dashboard, navigate to Speakers > Tasks and select the task you would like to adjust from the list
-
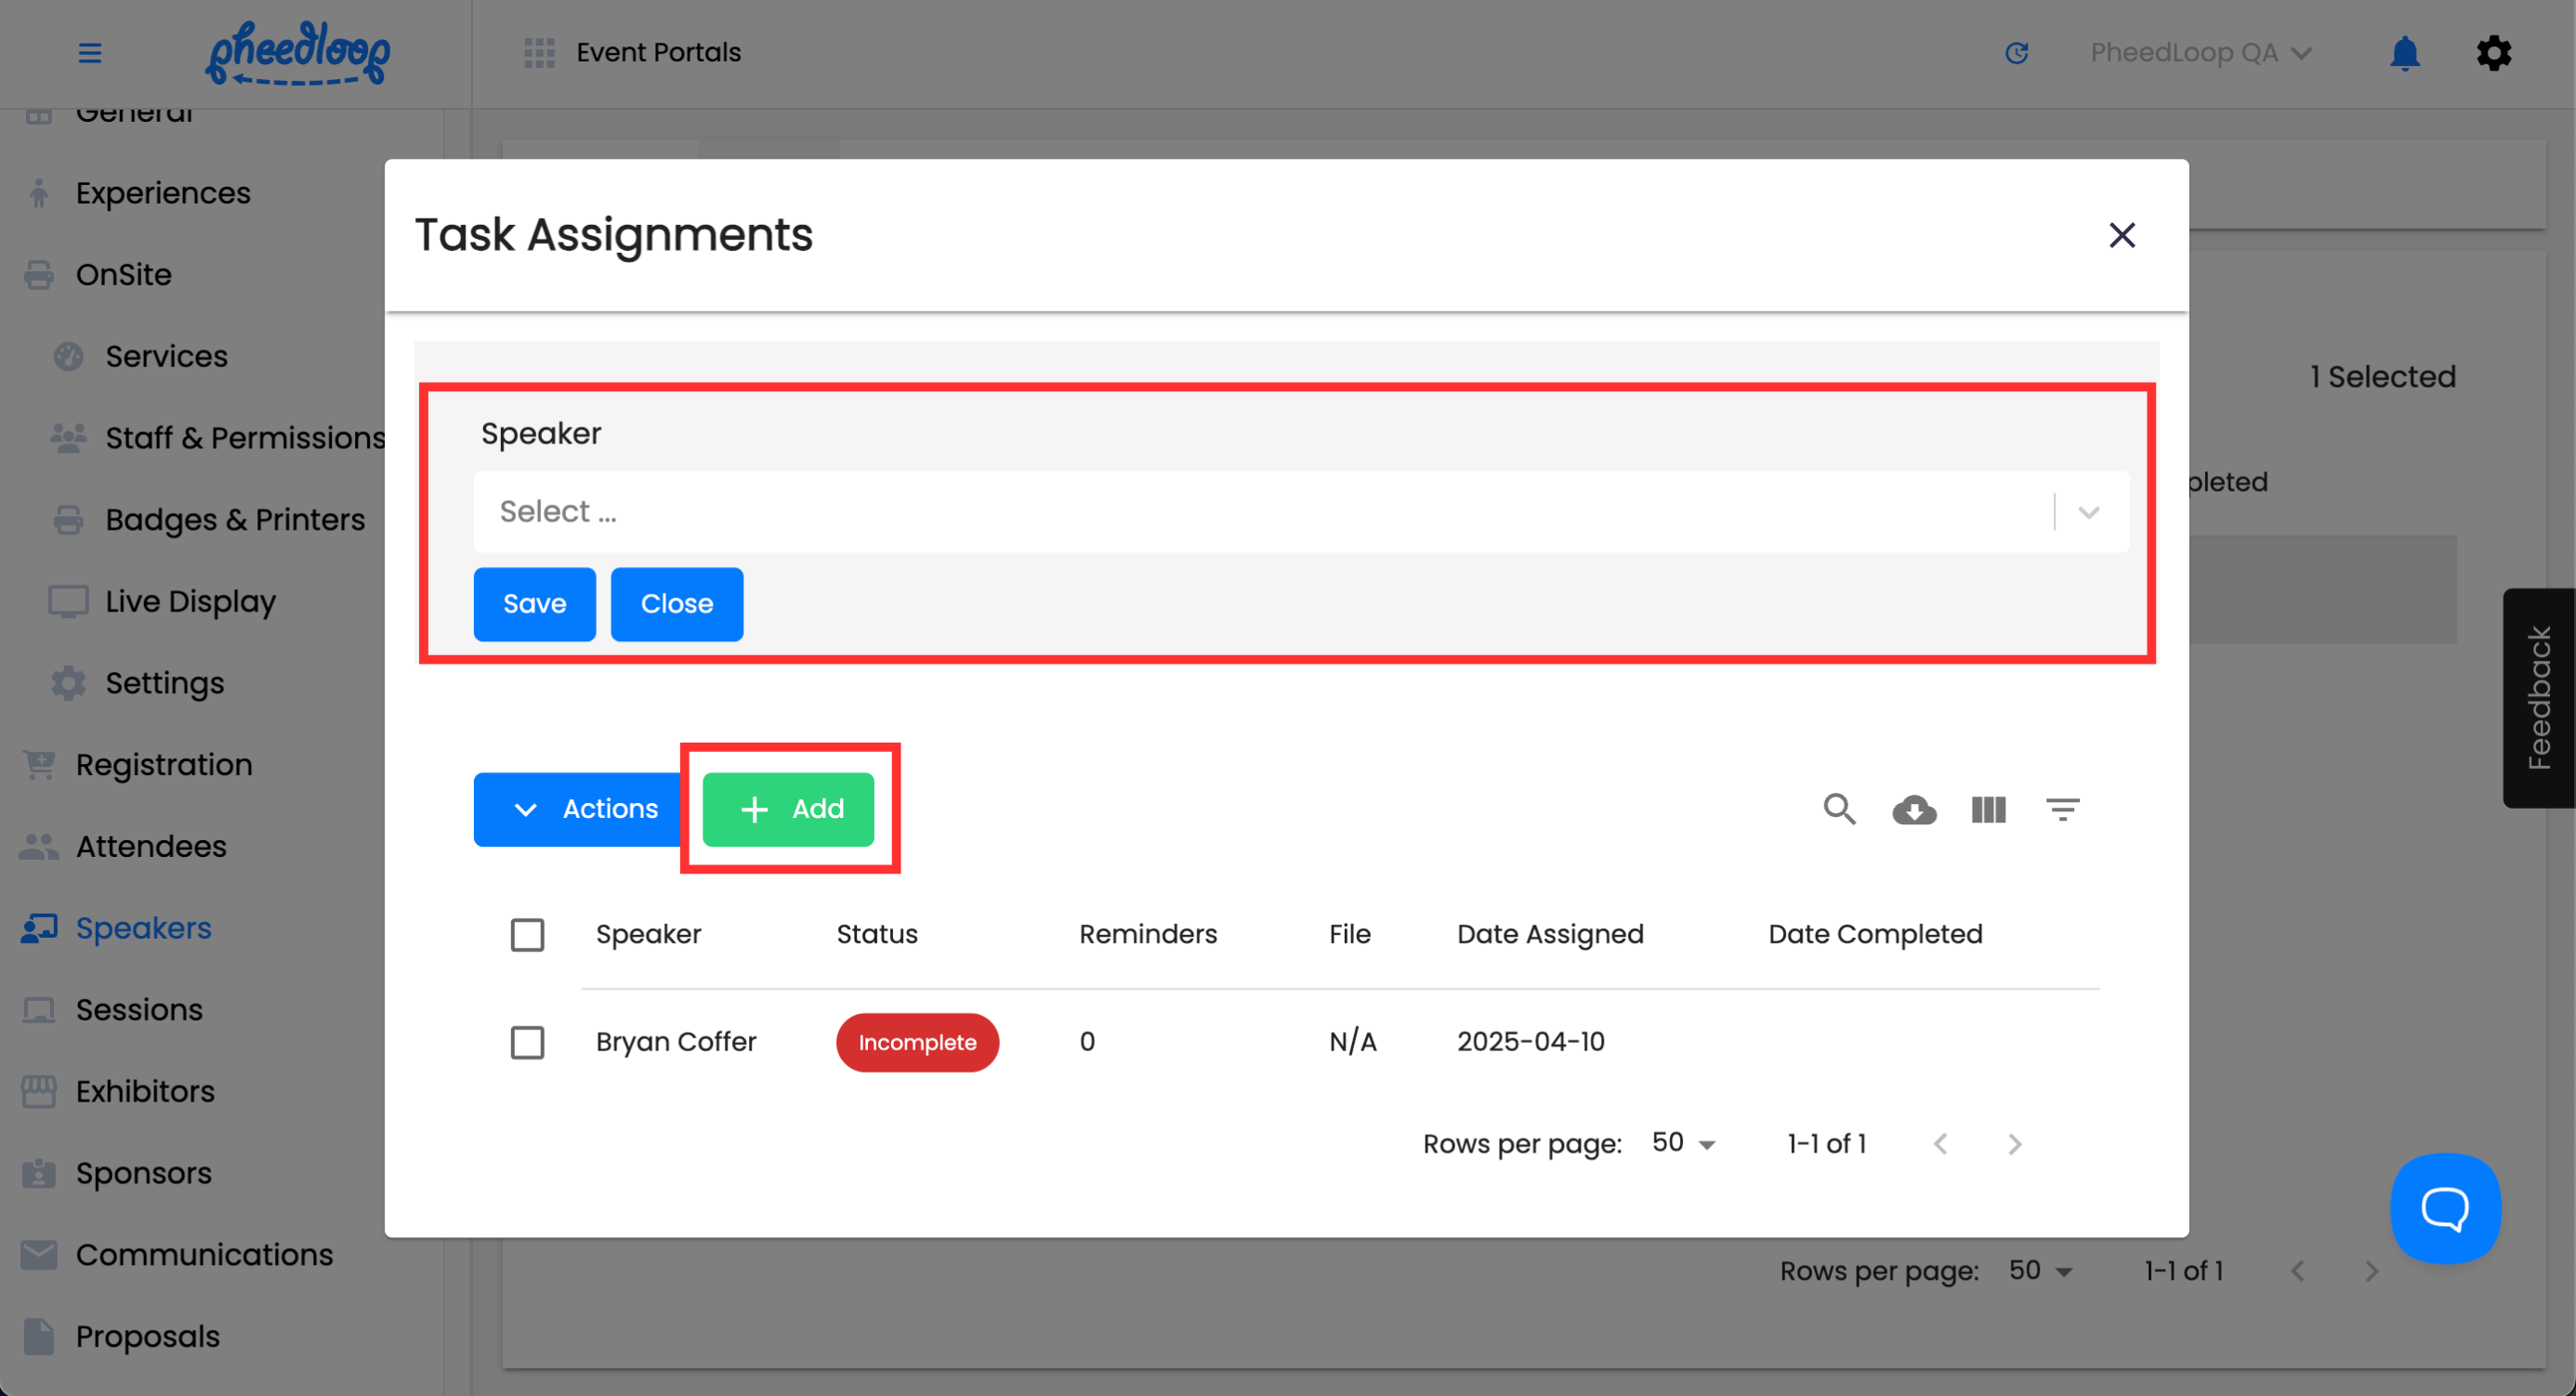
Above the tasks table, Select Actions > View Assignments
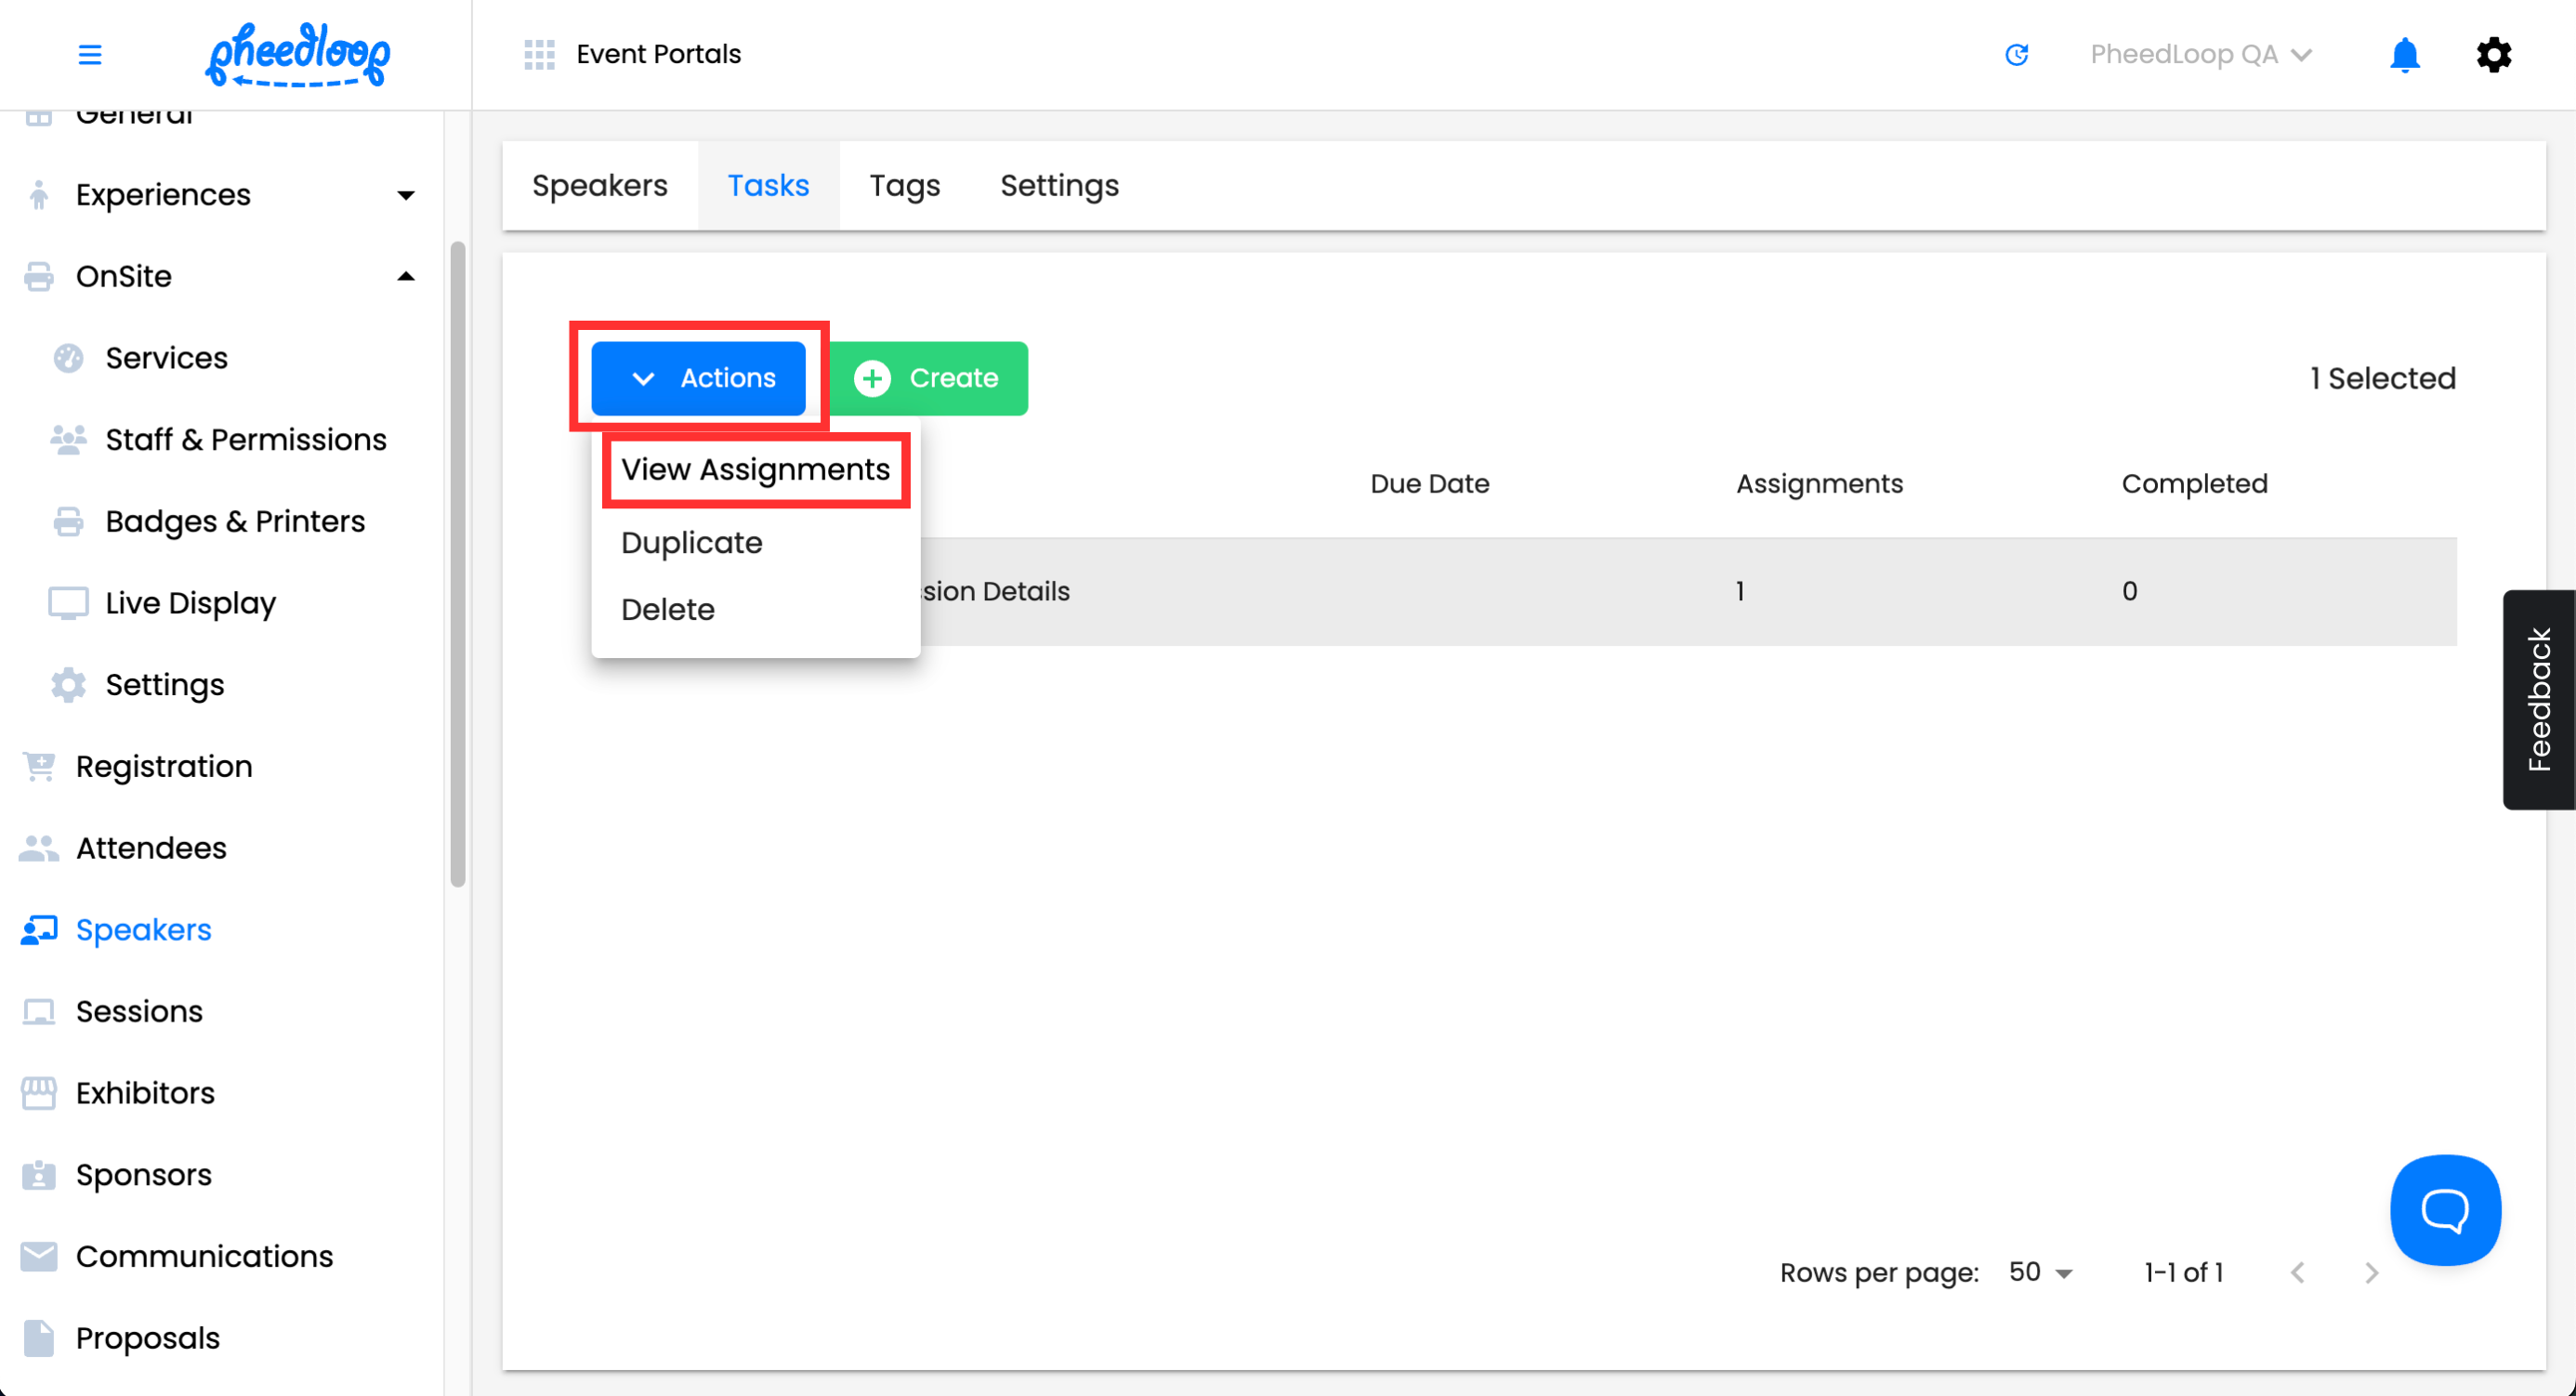
- In the View Assignments editor form, select Add and choose a stakeholder from the list to attach an assignment to
- Quick Tip - The Actions option can also be used to duplicate or delete tasks.
-
Select Save to add the stakeholder


The alternative method is to assign the task directly from the attendee, speaker, exhibitor, or sponsor page.
- From your Event Dashboard, navigate to your stakeholder and select the stakeholder you would like to adjust from the list
- In the editor form, go to the Task Assignments section
- Select Add, choose the task you would like to manually add
-
Select Save
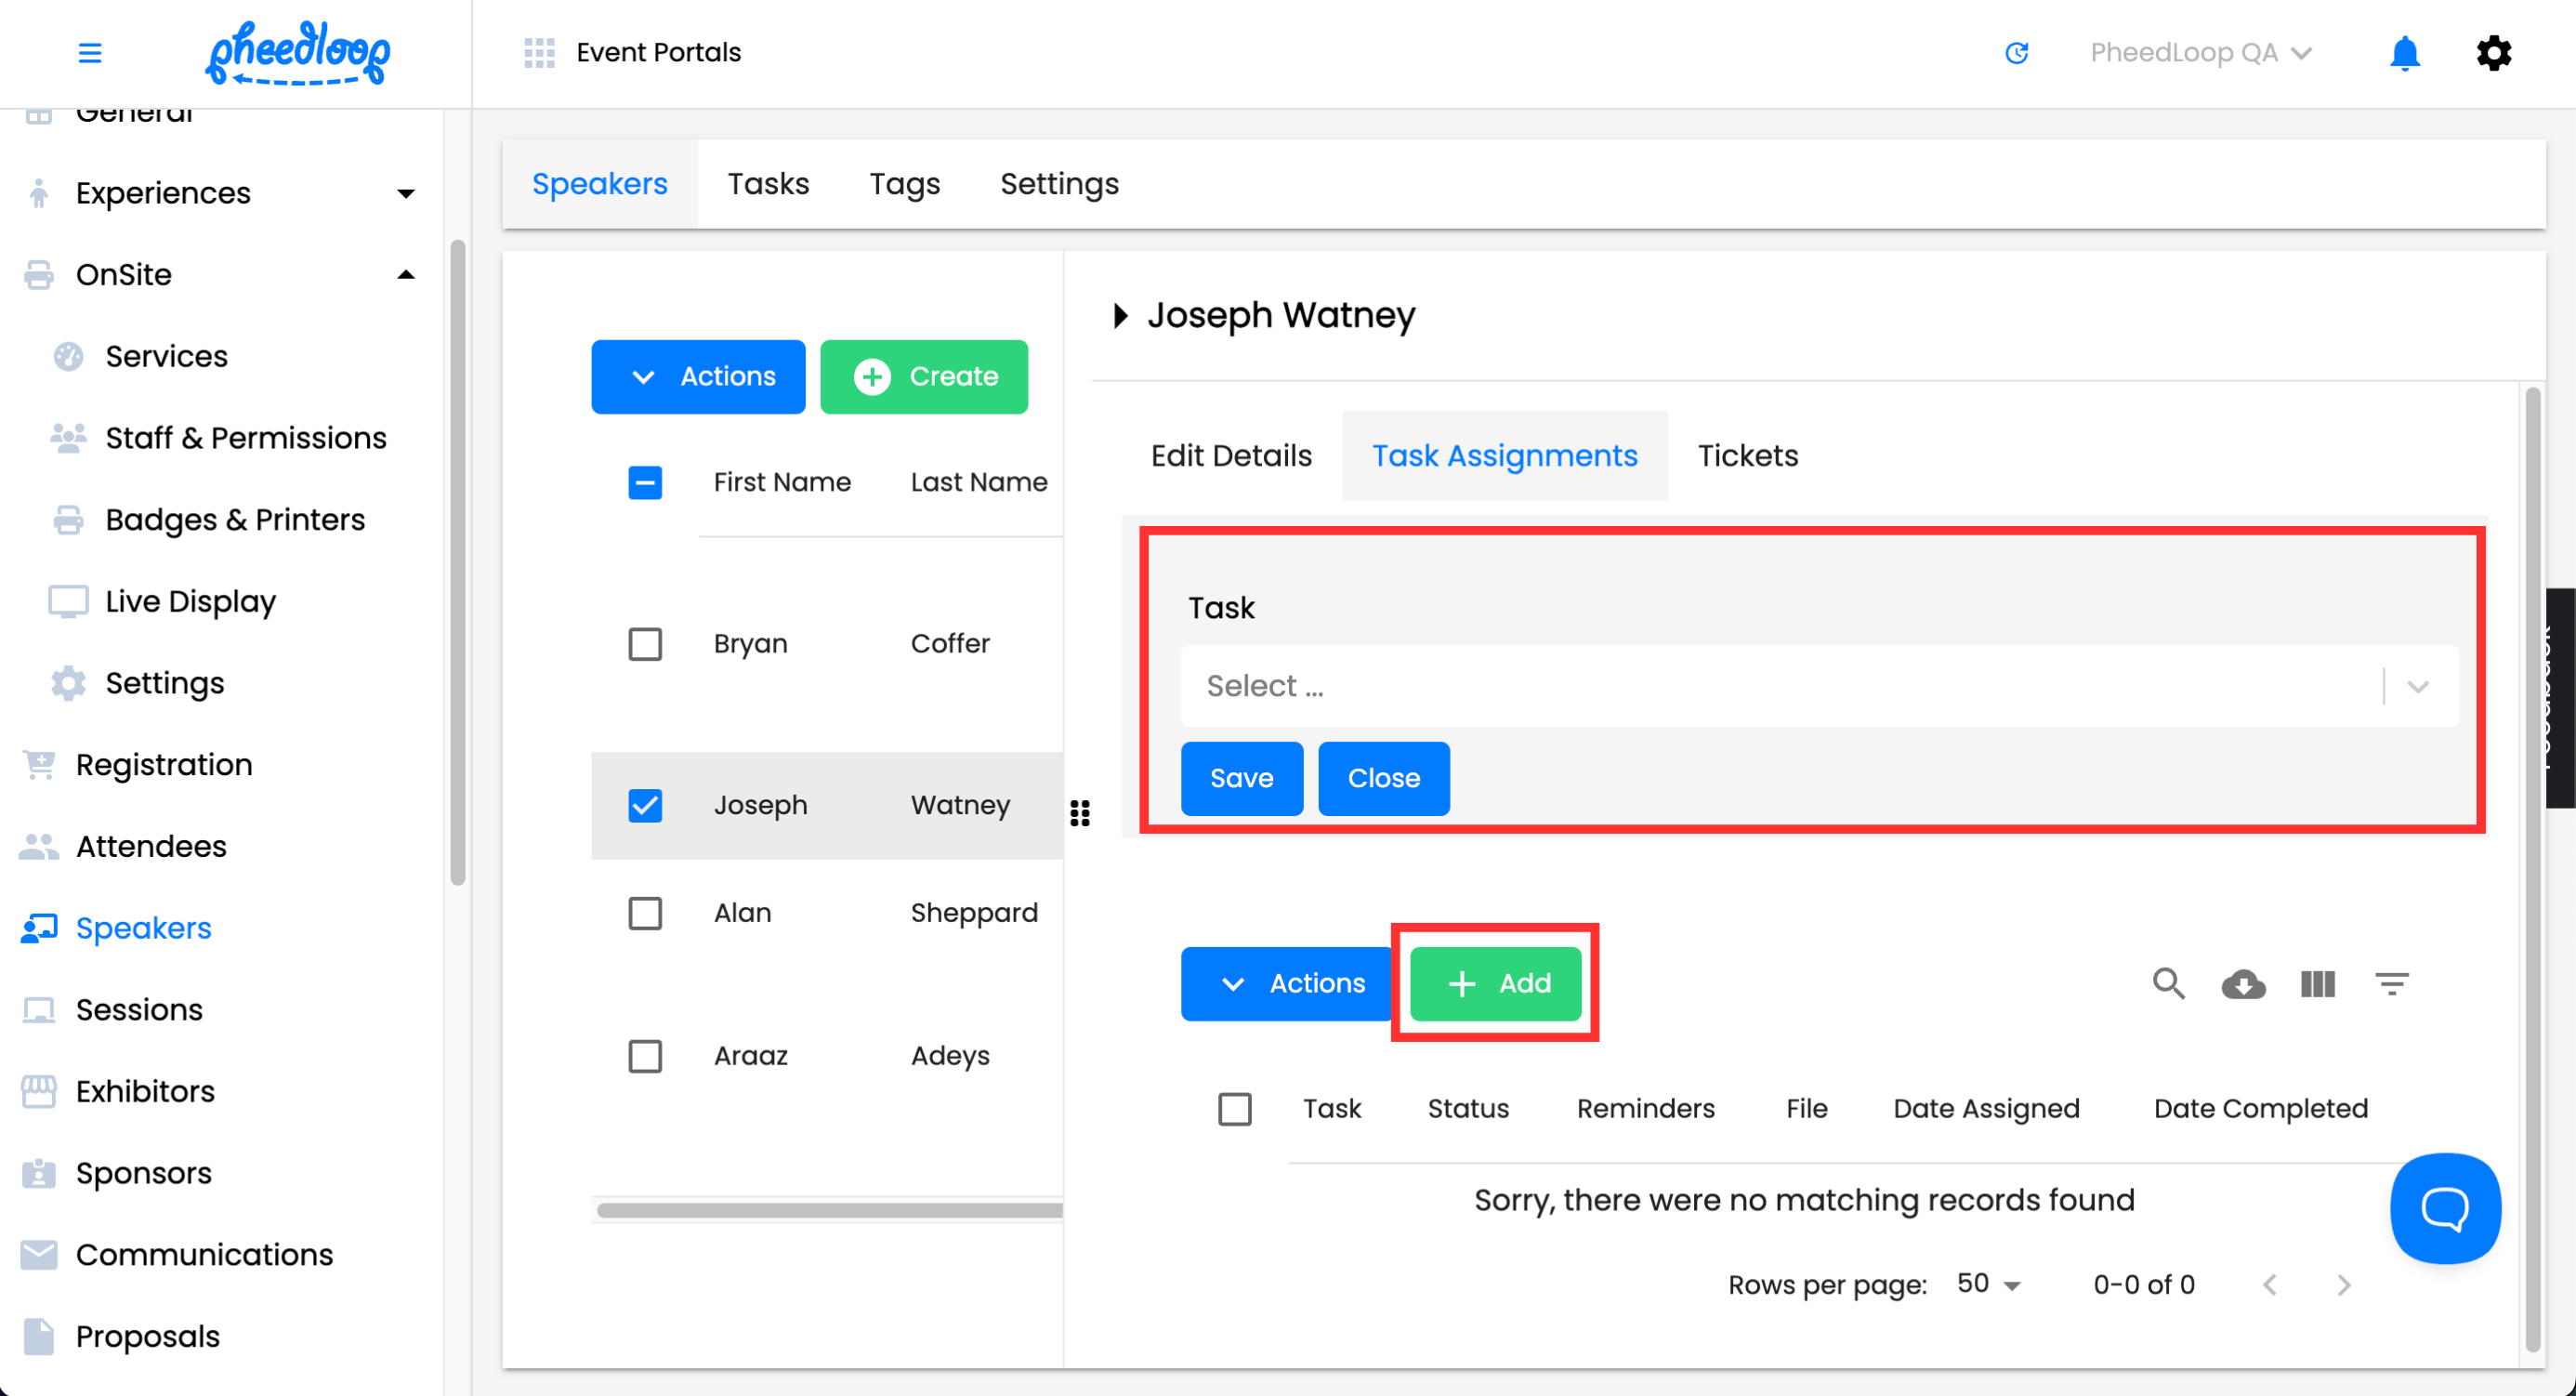

Quick Tip - You can also use the Actions option in this page to send reminders, change the status of the task, and remove assignments from the stakeholder.

Understanding Task Status
A task’s status will update based on certain conditions:
| Approved | This means that the task has been approved by a team member. |
| Pending | This means that the stakeholder has selected submit in the task page, and a reviewer can mark the task as completed, assuming all conditions have been met. |
| Incomplete | This means that the stakeholder has not submit in the Task Assignments page yet. |
4. Approving Tasks
Please note, this step is a required step in order for the task status to be changed in the Event Dashboard.
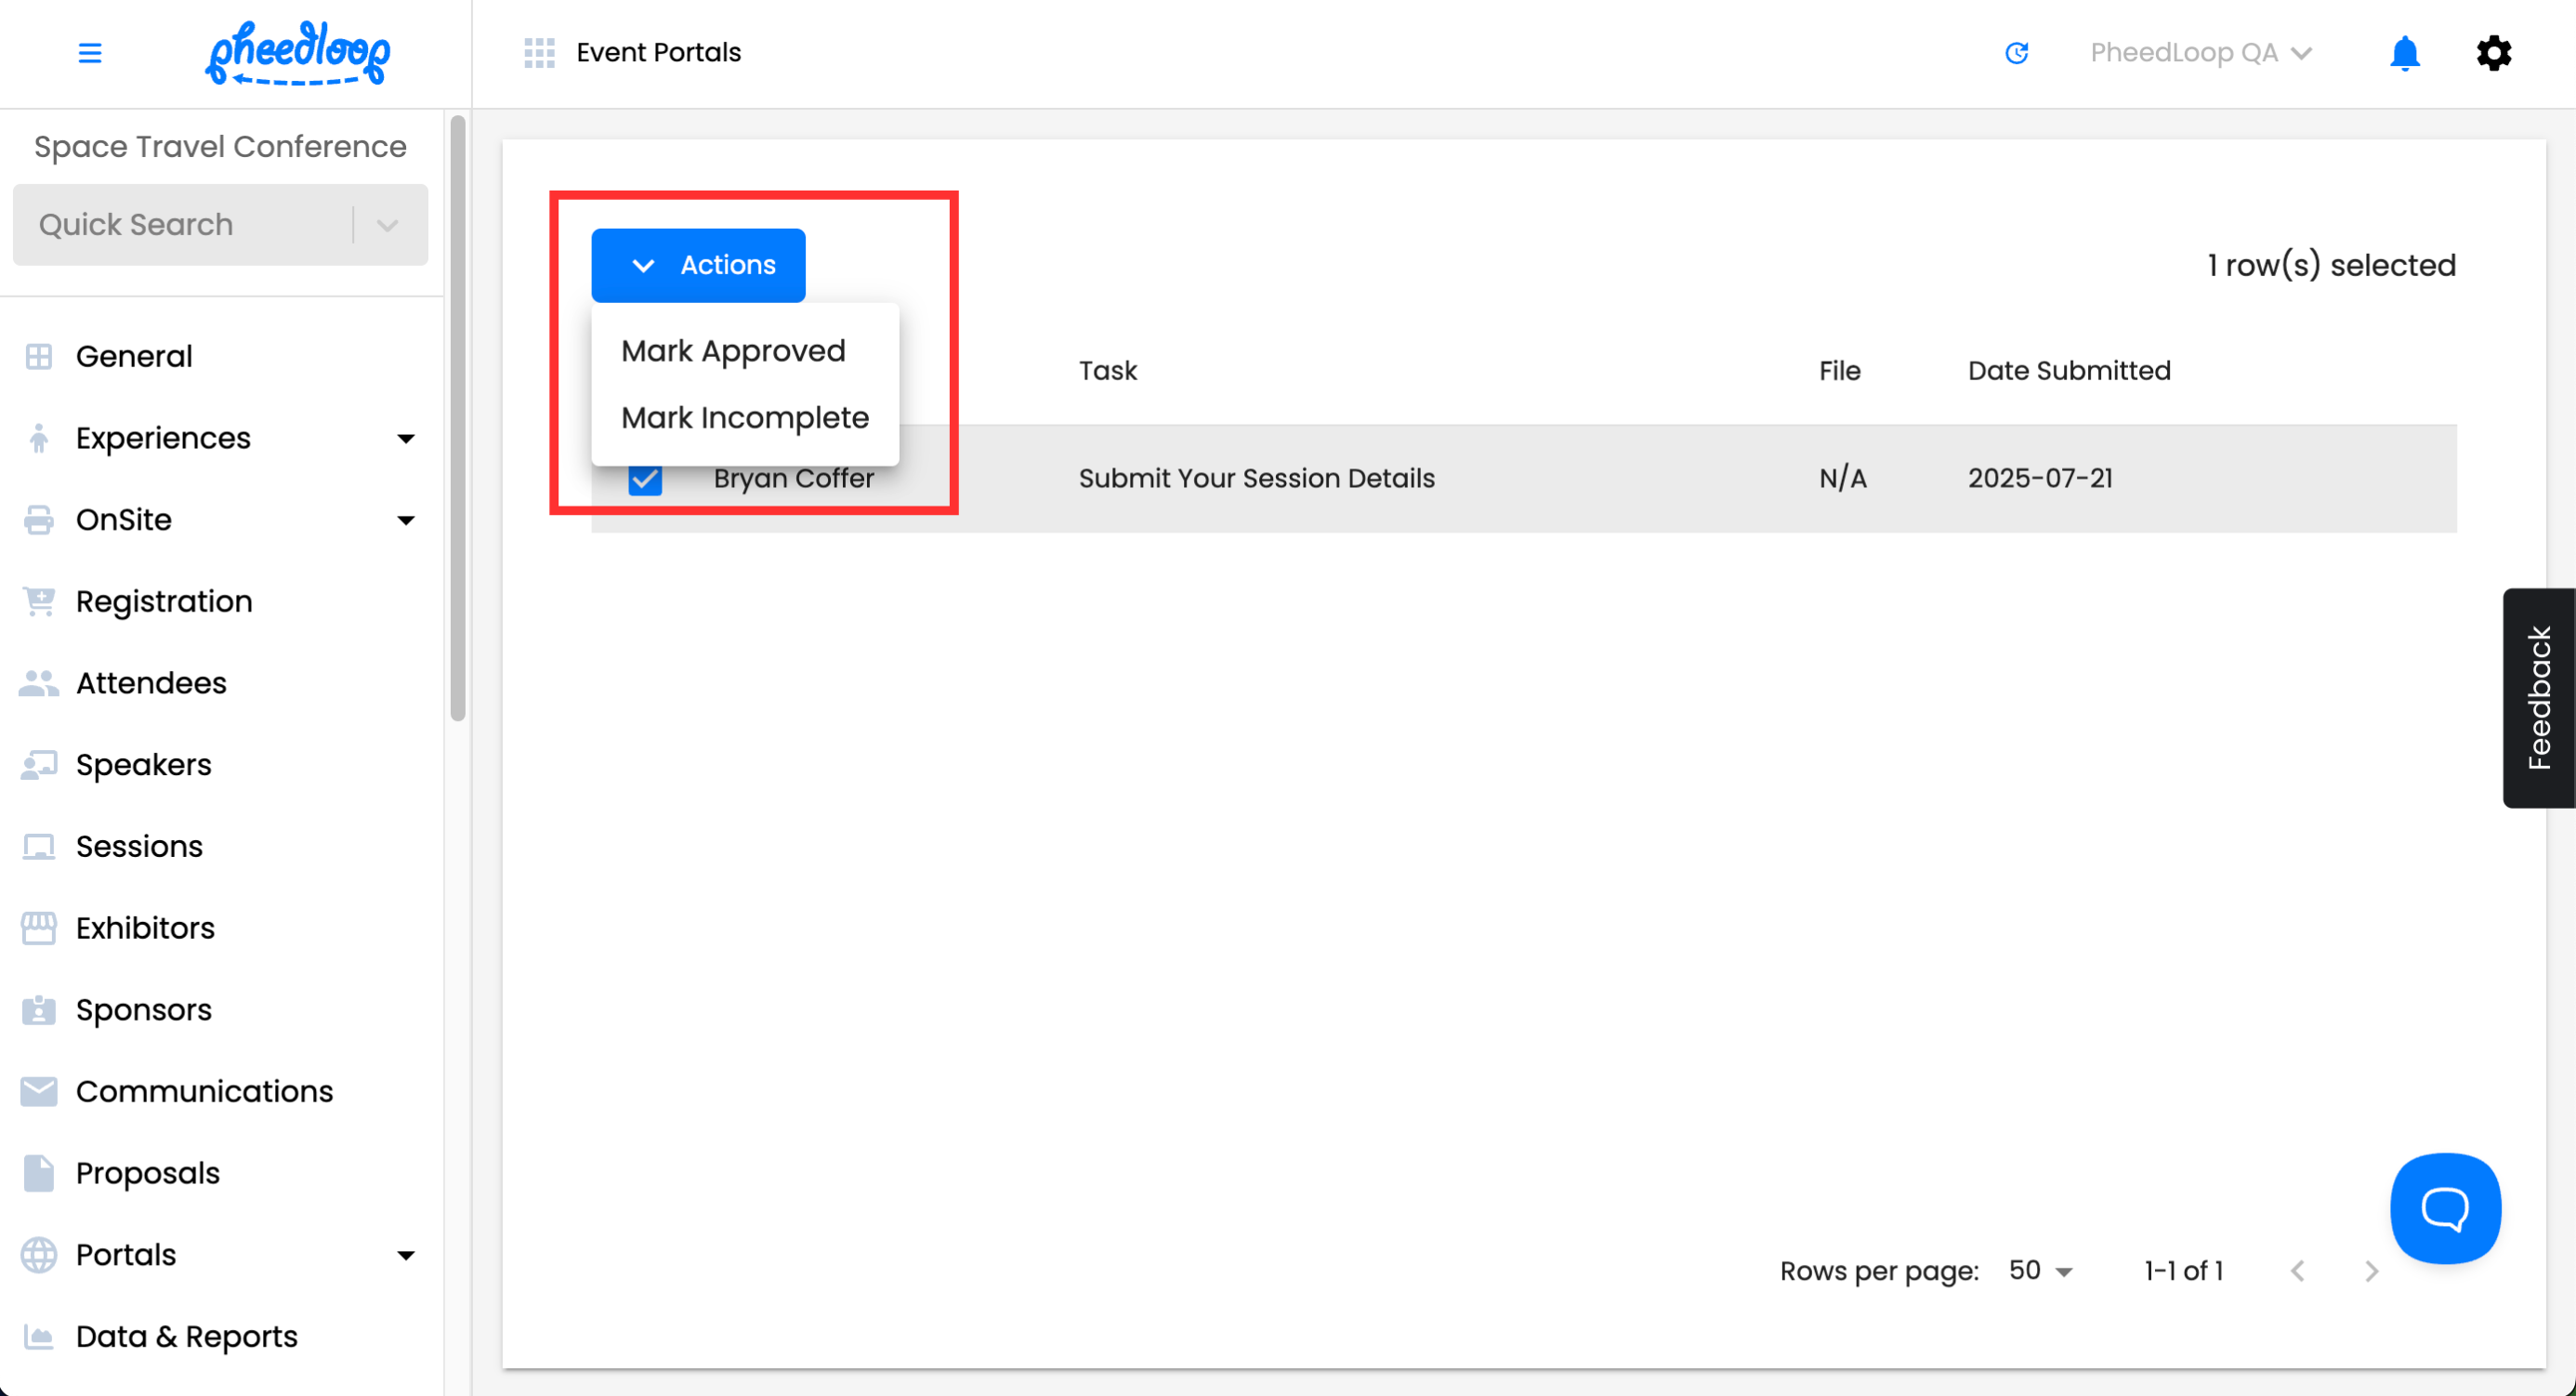
While a stakeholder's obligation largely stops at completing their tasks, this is just the first step for Event Admins. Admins can review task responses, approve them, and unapprove them. This is found under Advanced > Task Queue.
- From the Event Dashboard, navigate to Advanced > Task Queue
- Select a task you would like to adjust from the list
- Above the Task Queue table, select Actions
-
Select either Mark Approved or Mark Incomplete

5. Setting Reminders for Tasks
Please note, Automated Task Reminders are sent at 10:30am EST, 2, 5, 10, 15, 25, 35, 45, 55, 70, 85, 105, 130, 160, 200 days before the Event Start Date.
A reliable feature with PheedLoop’s Task Management is sending reminders to your stakeholders about the tasks they have to complete. Automatic reminders will send reminders automatically without requiring the Event Administrator to send them out manually.
Automatic Reminders
- From the Event Dashboard, navigate to the Settings page for your stakeholder
-
In the General Settings section, toggle on the Send Automatic Task Reminders checkbox
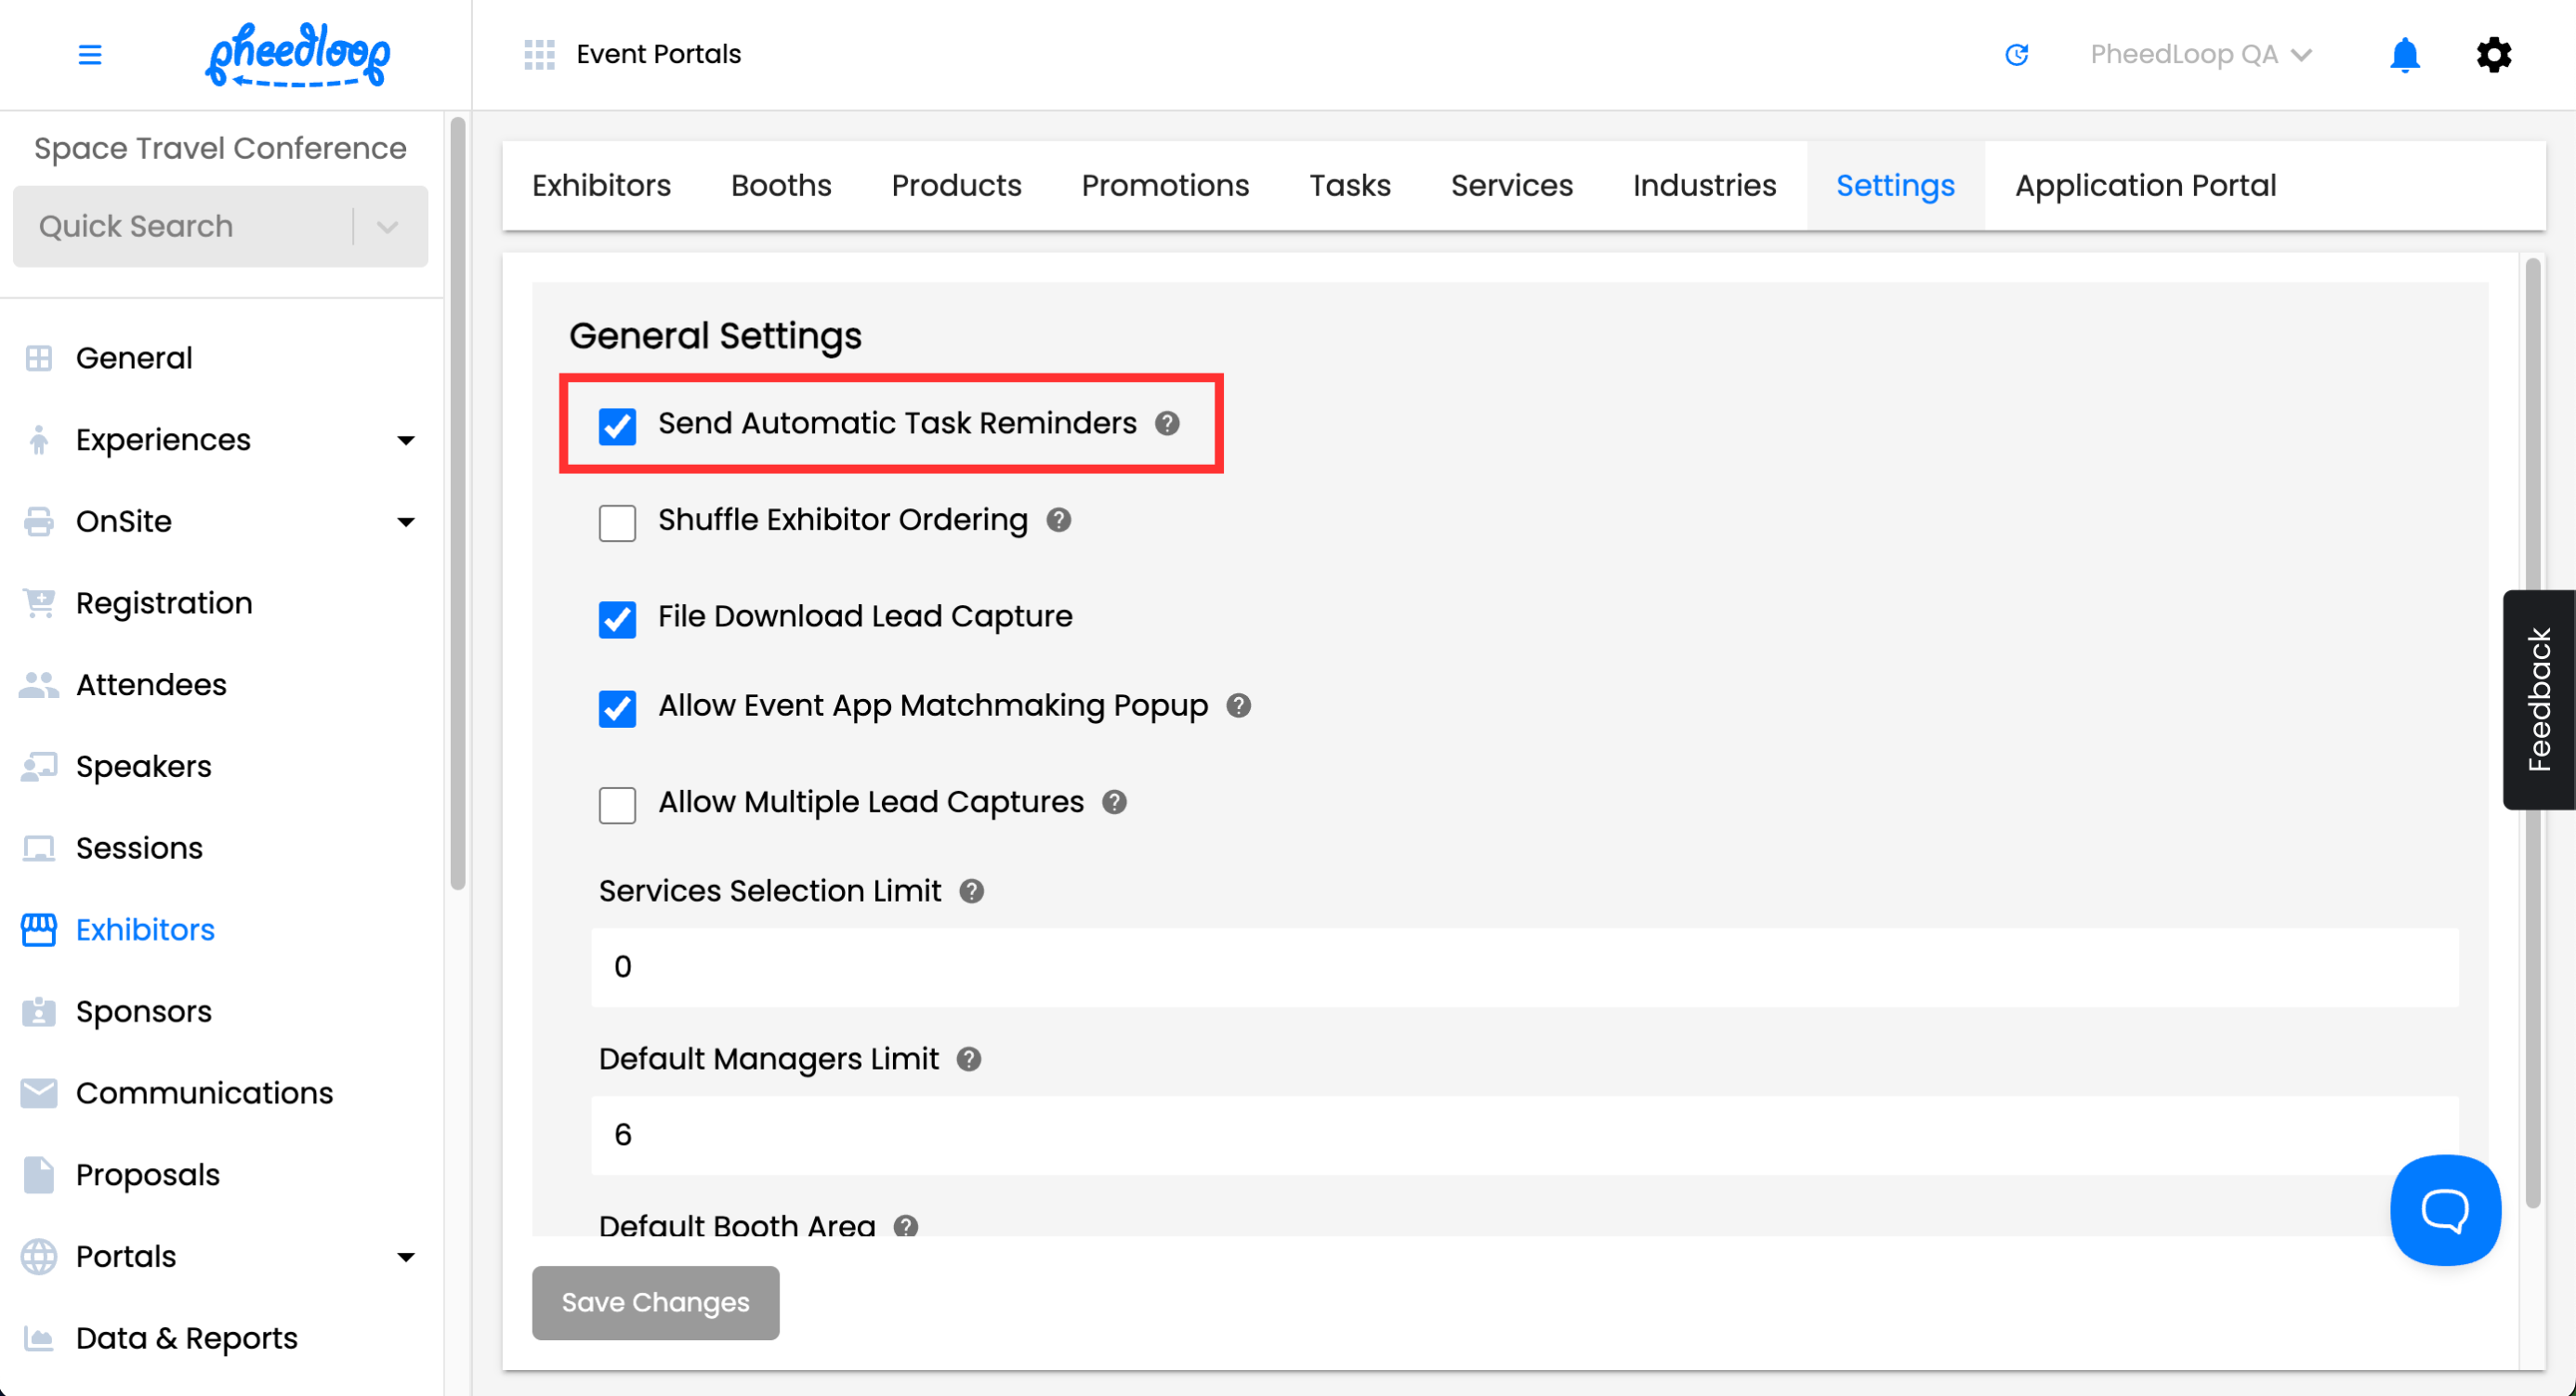

Only tasks that have enabled reminders will receive these reminders.
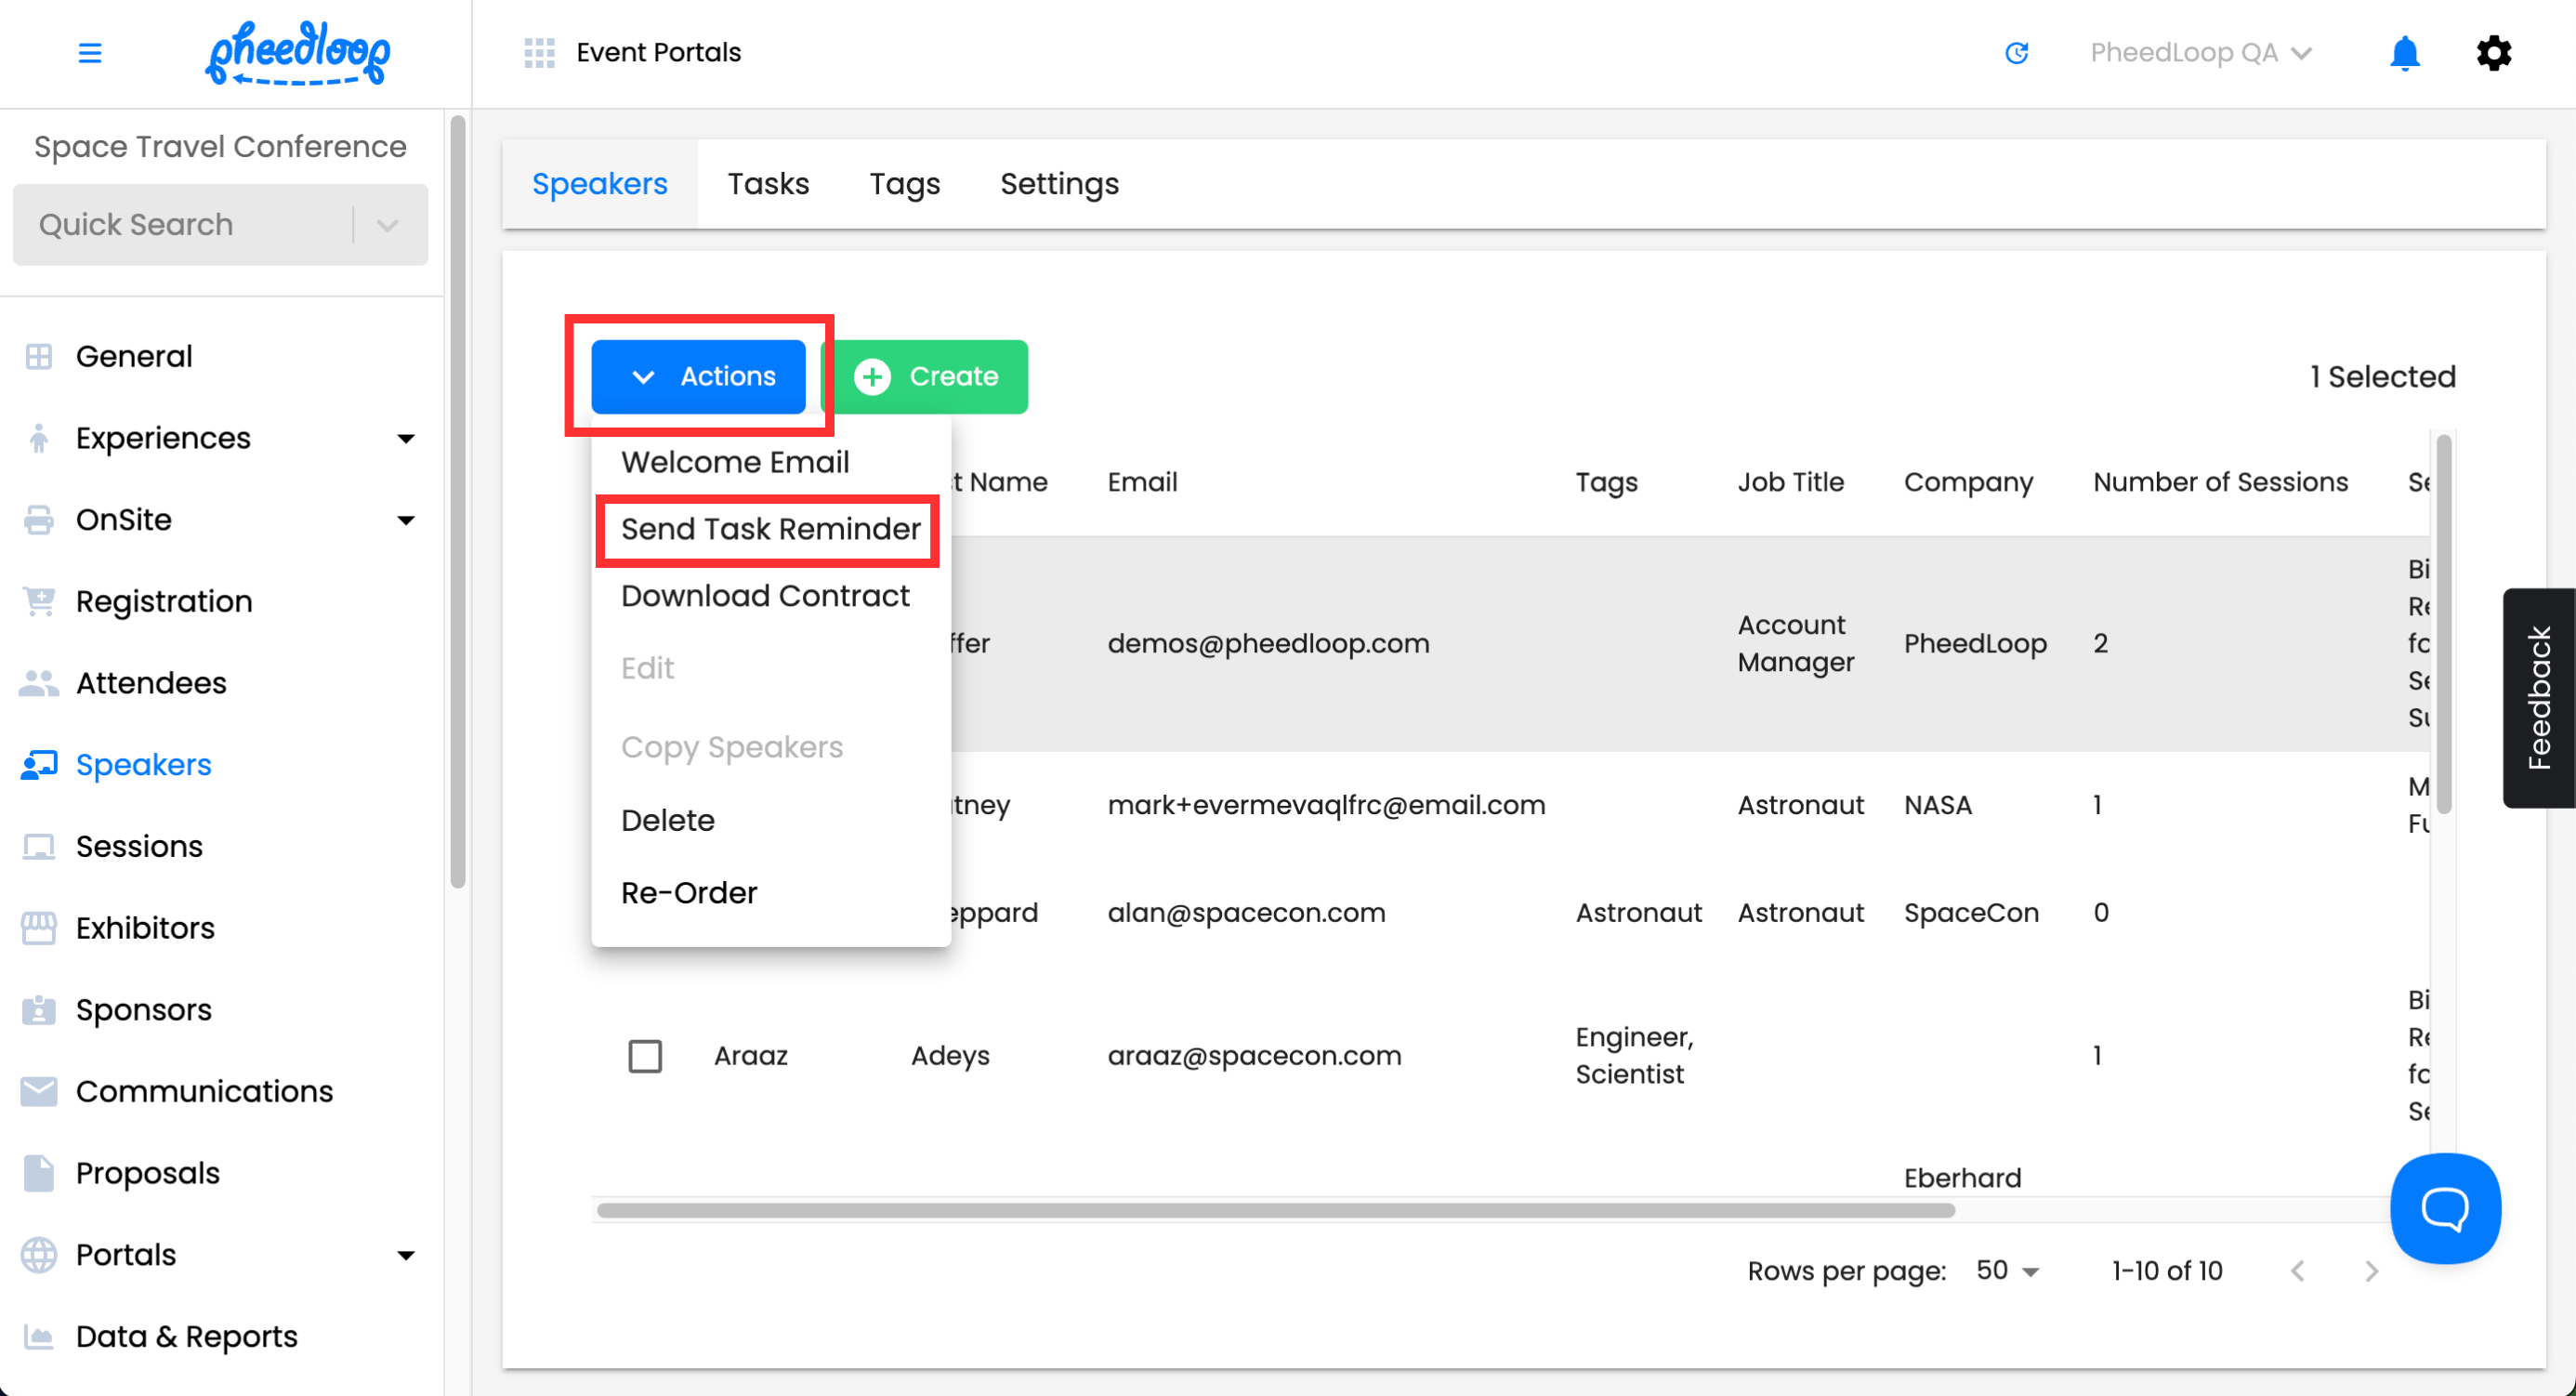
Manually Reminding Stakeholders
- From the Event Dashboard, navigate to your stakeholder's page
- Select a stakeholder (or multiple) you would like to adjust from the list
- Above the speaker's table, select Actions
-
Select Send Task Reminder

6. Download Task Assignment Data
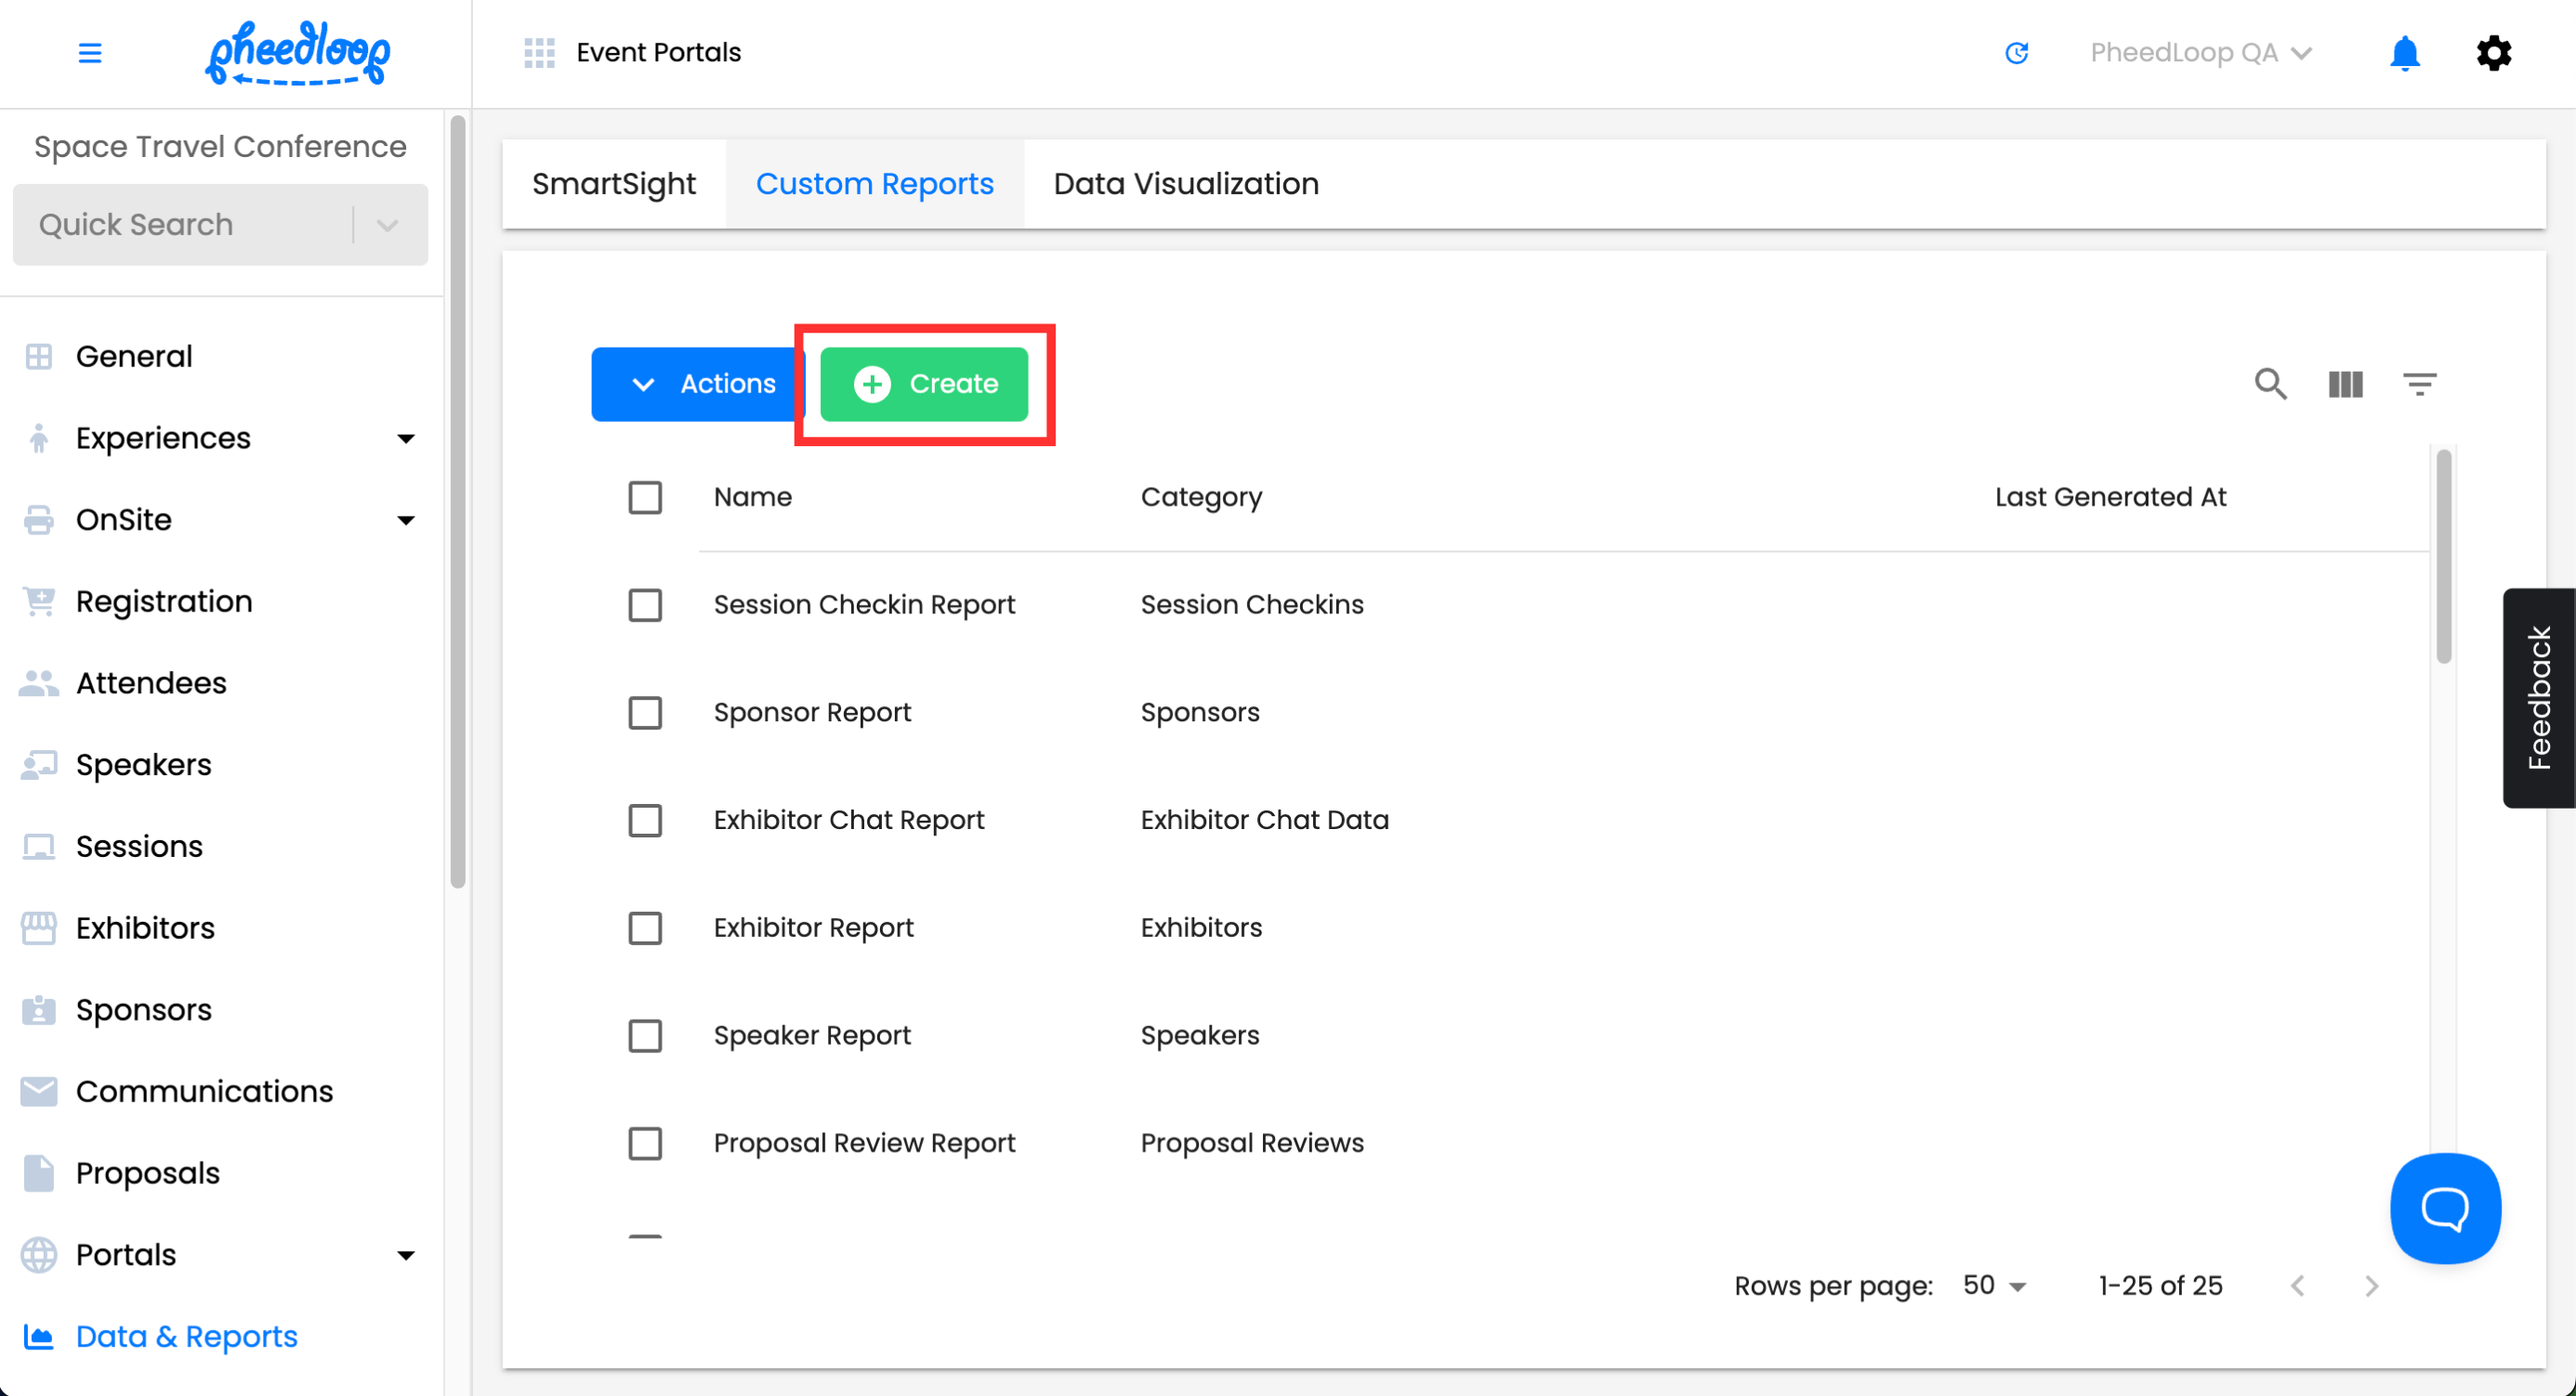
Like the majority of the data in PheedLoop, tasks can be compiled and exported as a custom report for your organization's use. You can download task responses after they are completed.
- From the Event Dashboard, navigate to Data & Reports > Custom Reports
-
Above the Custom Reports table, select Create
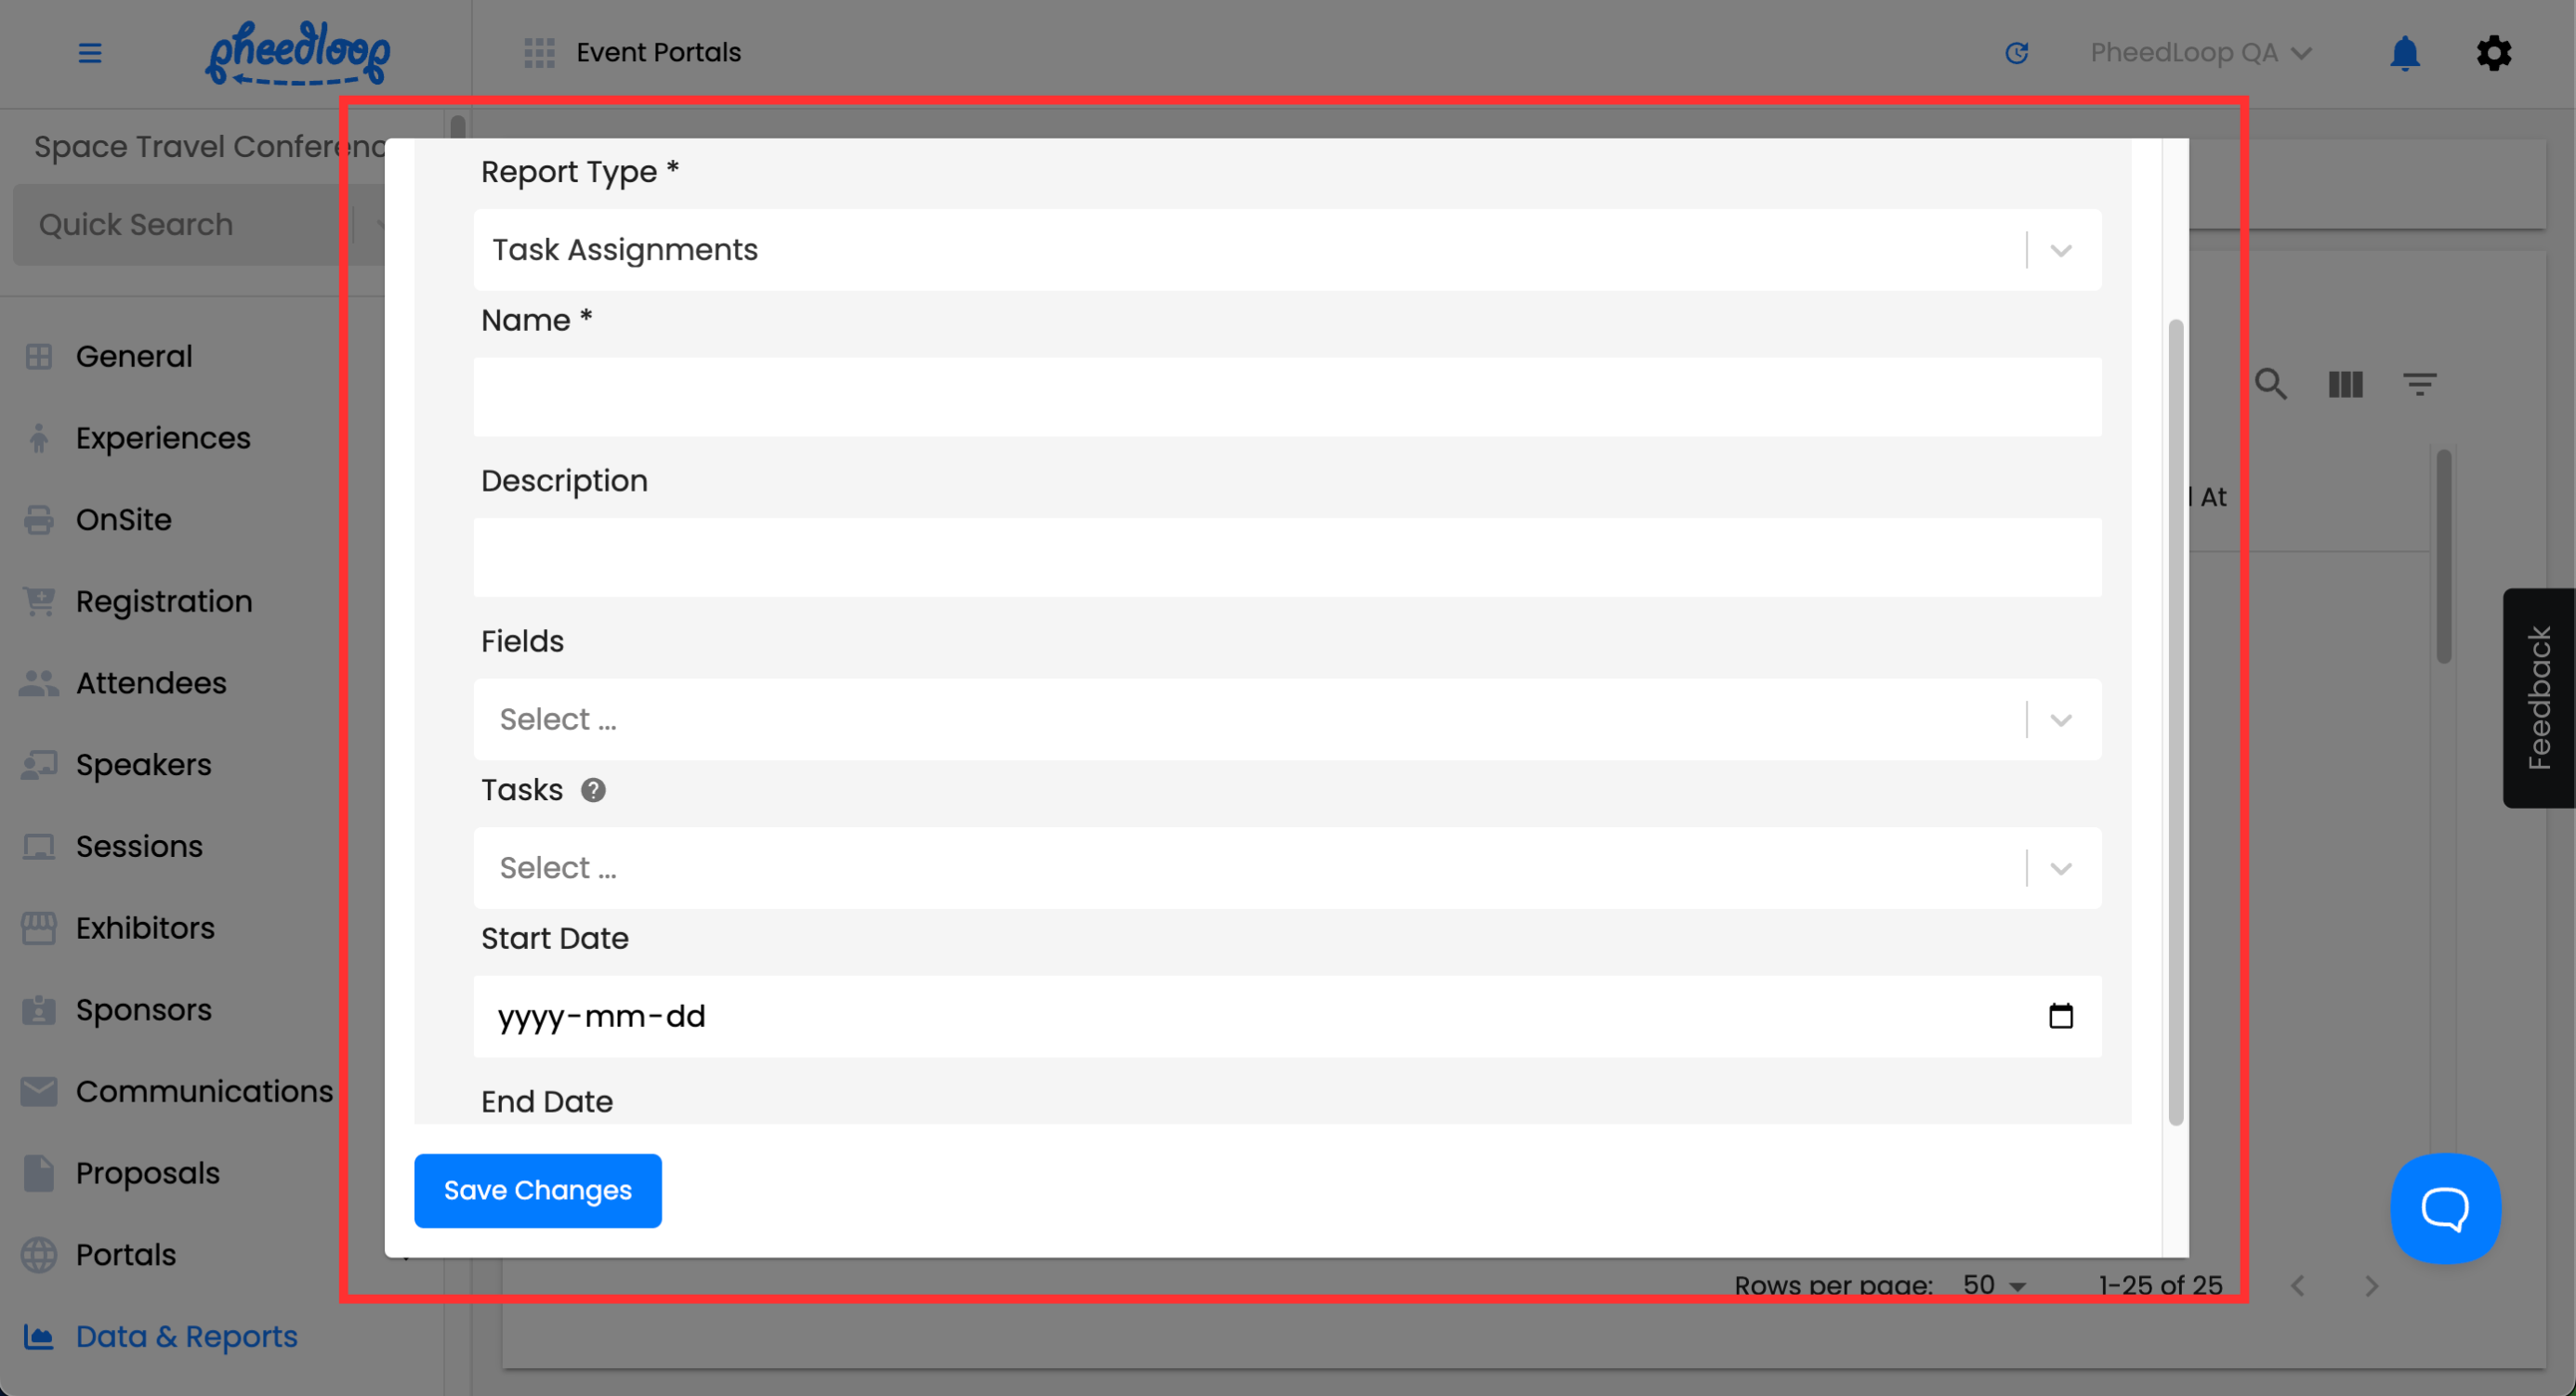
- Under the Report Type field, select Task Assignments from the list
- Under the Name and Description fields, enter a name and description for your report
- Under Fields, choose the fields appropriate for your report
- Under Tasks, choose the task you would like to isolate the report to or leave blank to not filter any results
- Use the Start Date and End Date fields to gather results from a specific time period or leave blank to not filter any results
-
Once satisfied, select Save Changes to create your report
-
Above the Custom Reports table, select Actions > Generate Report
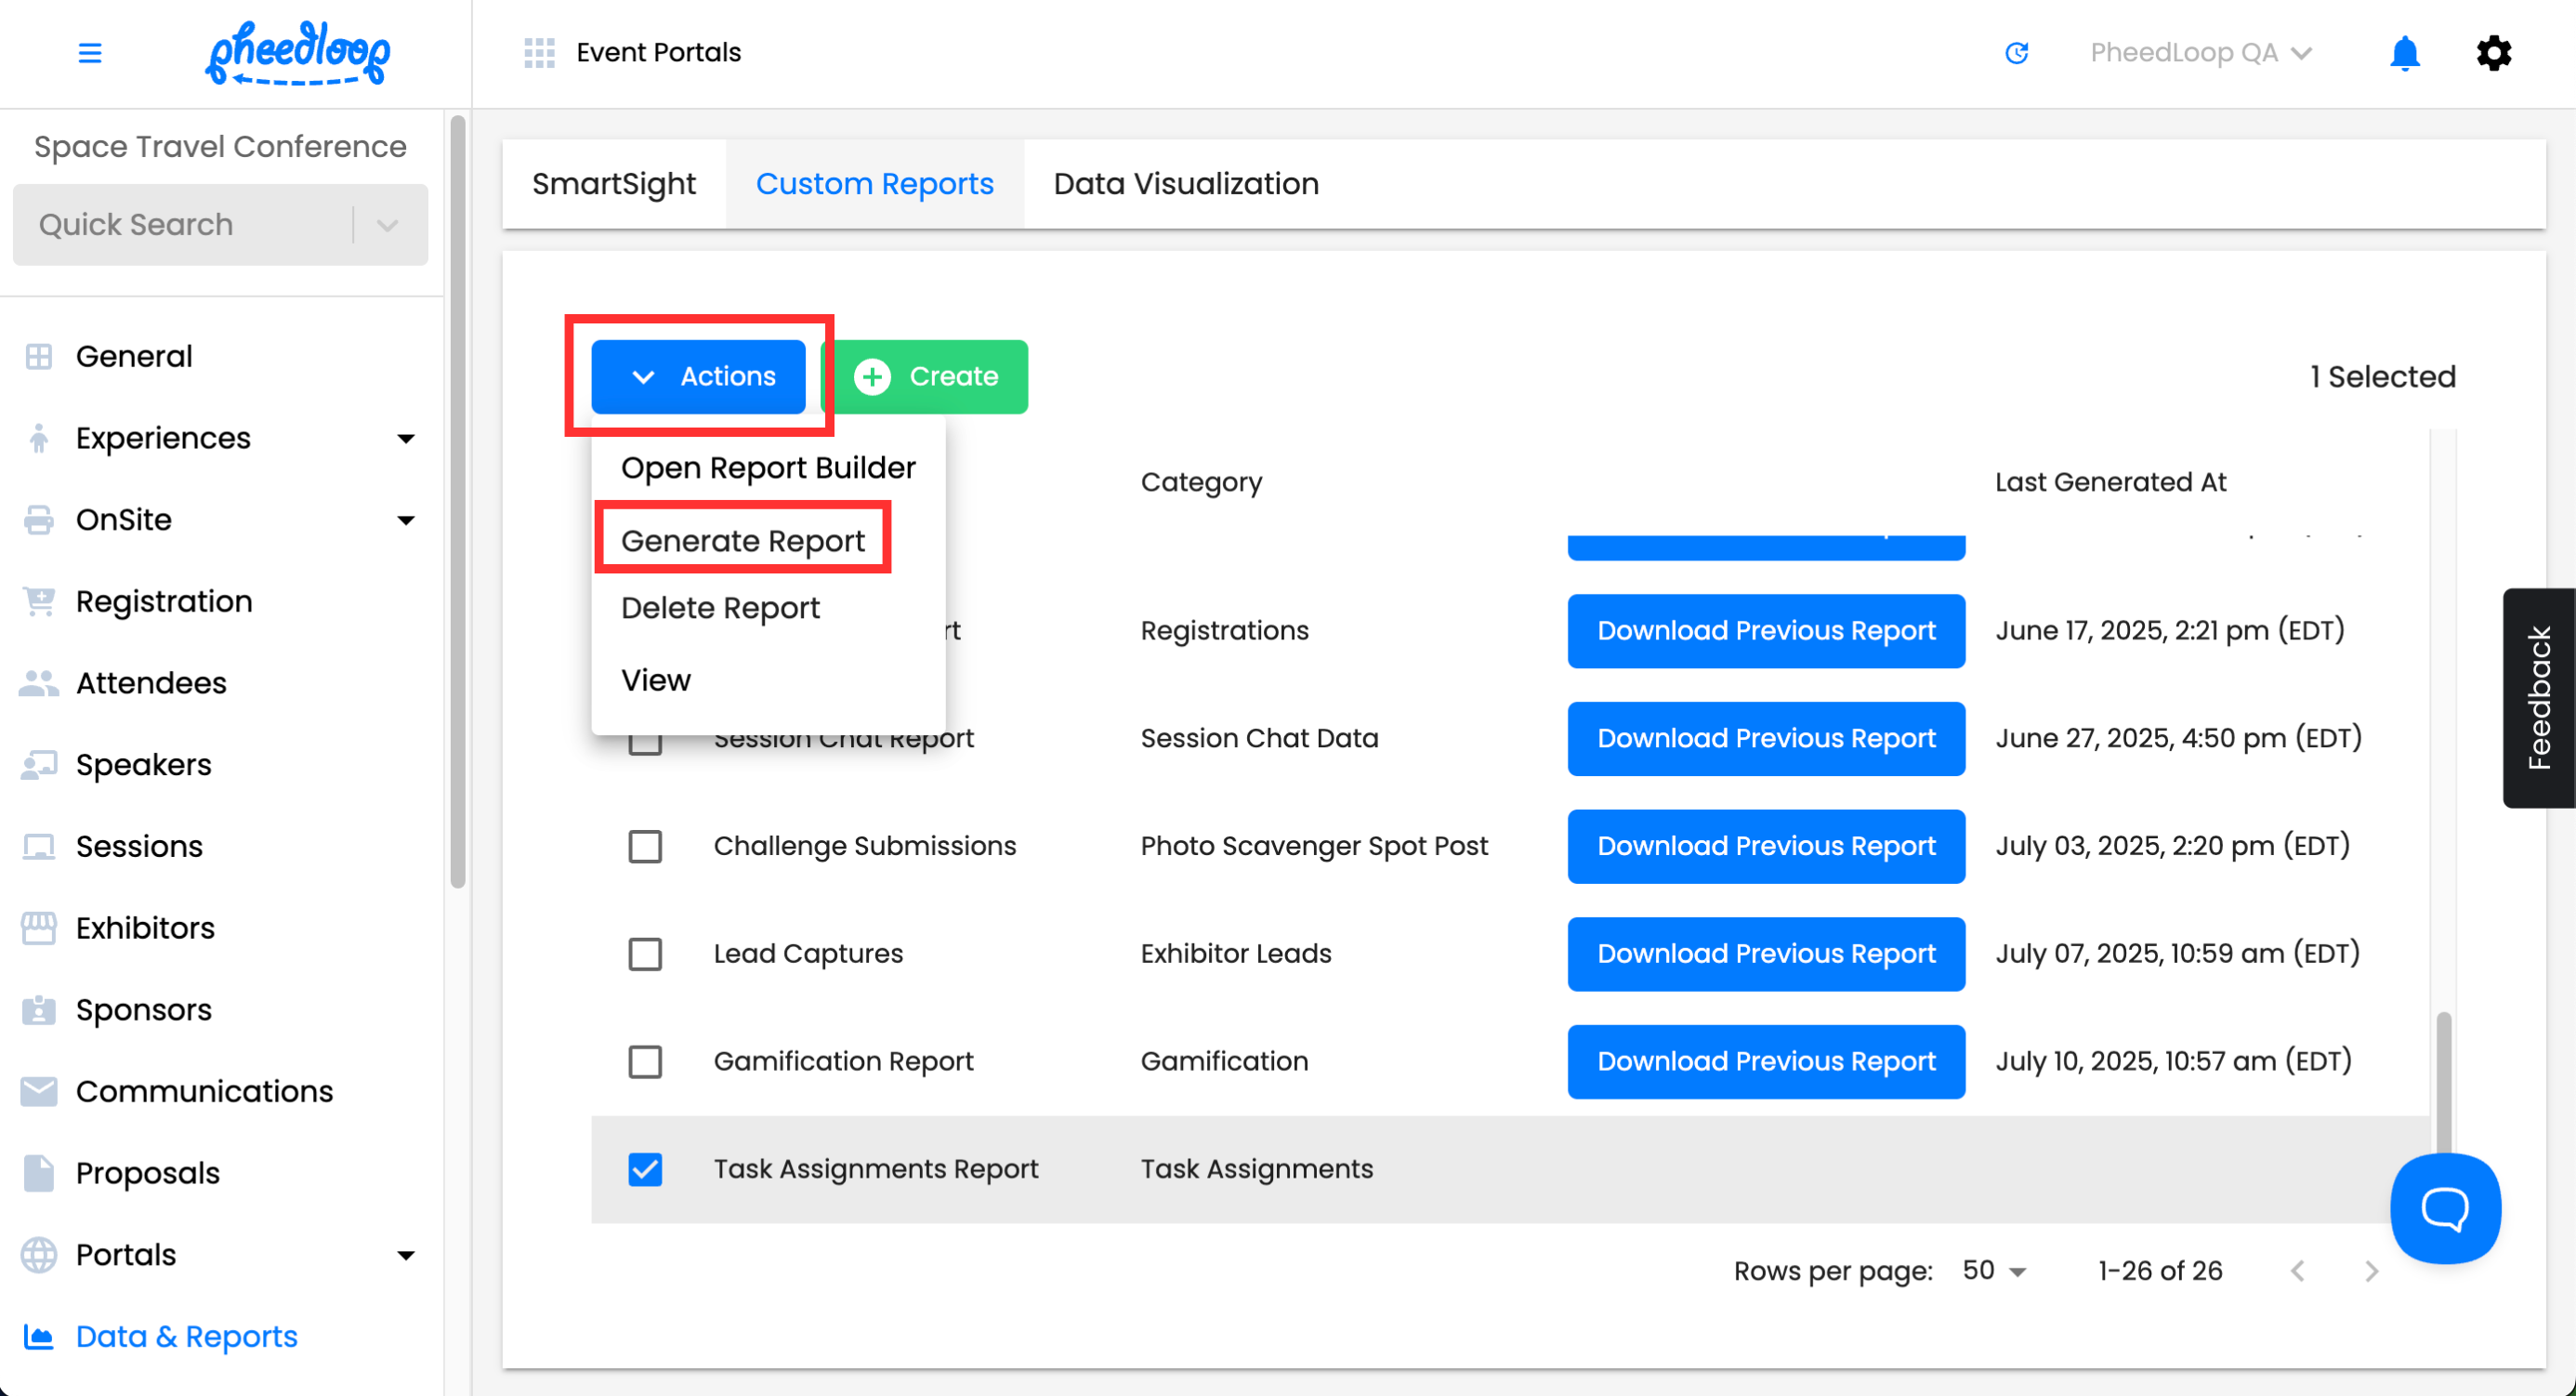
-
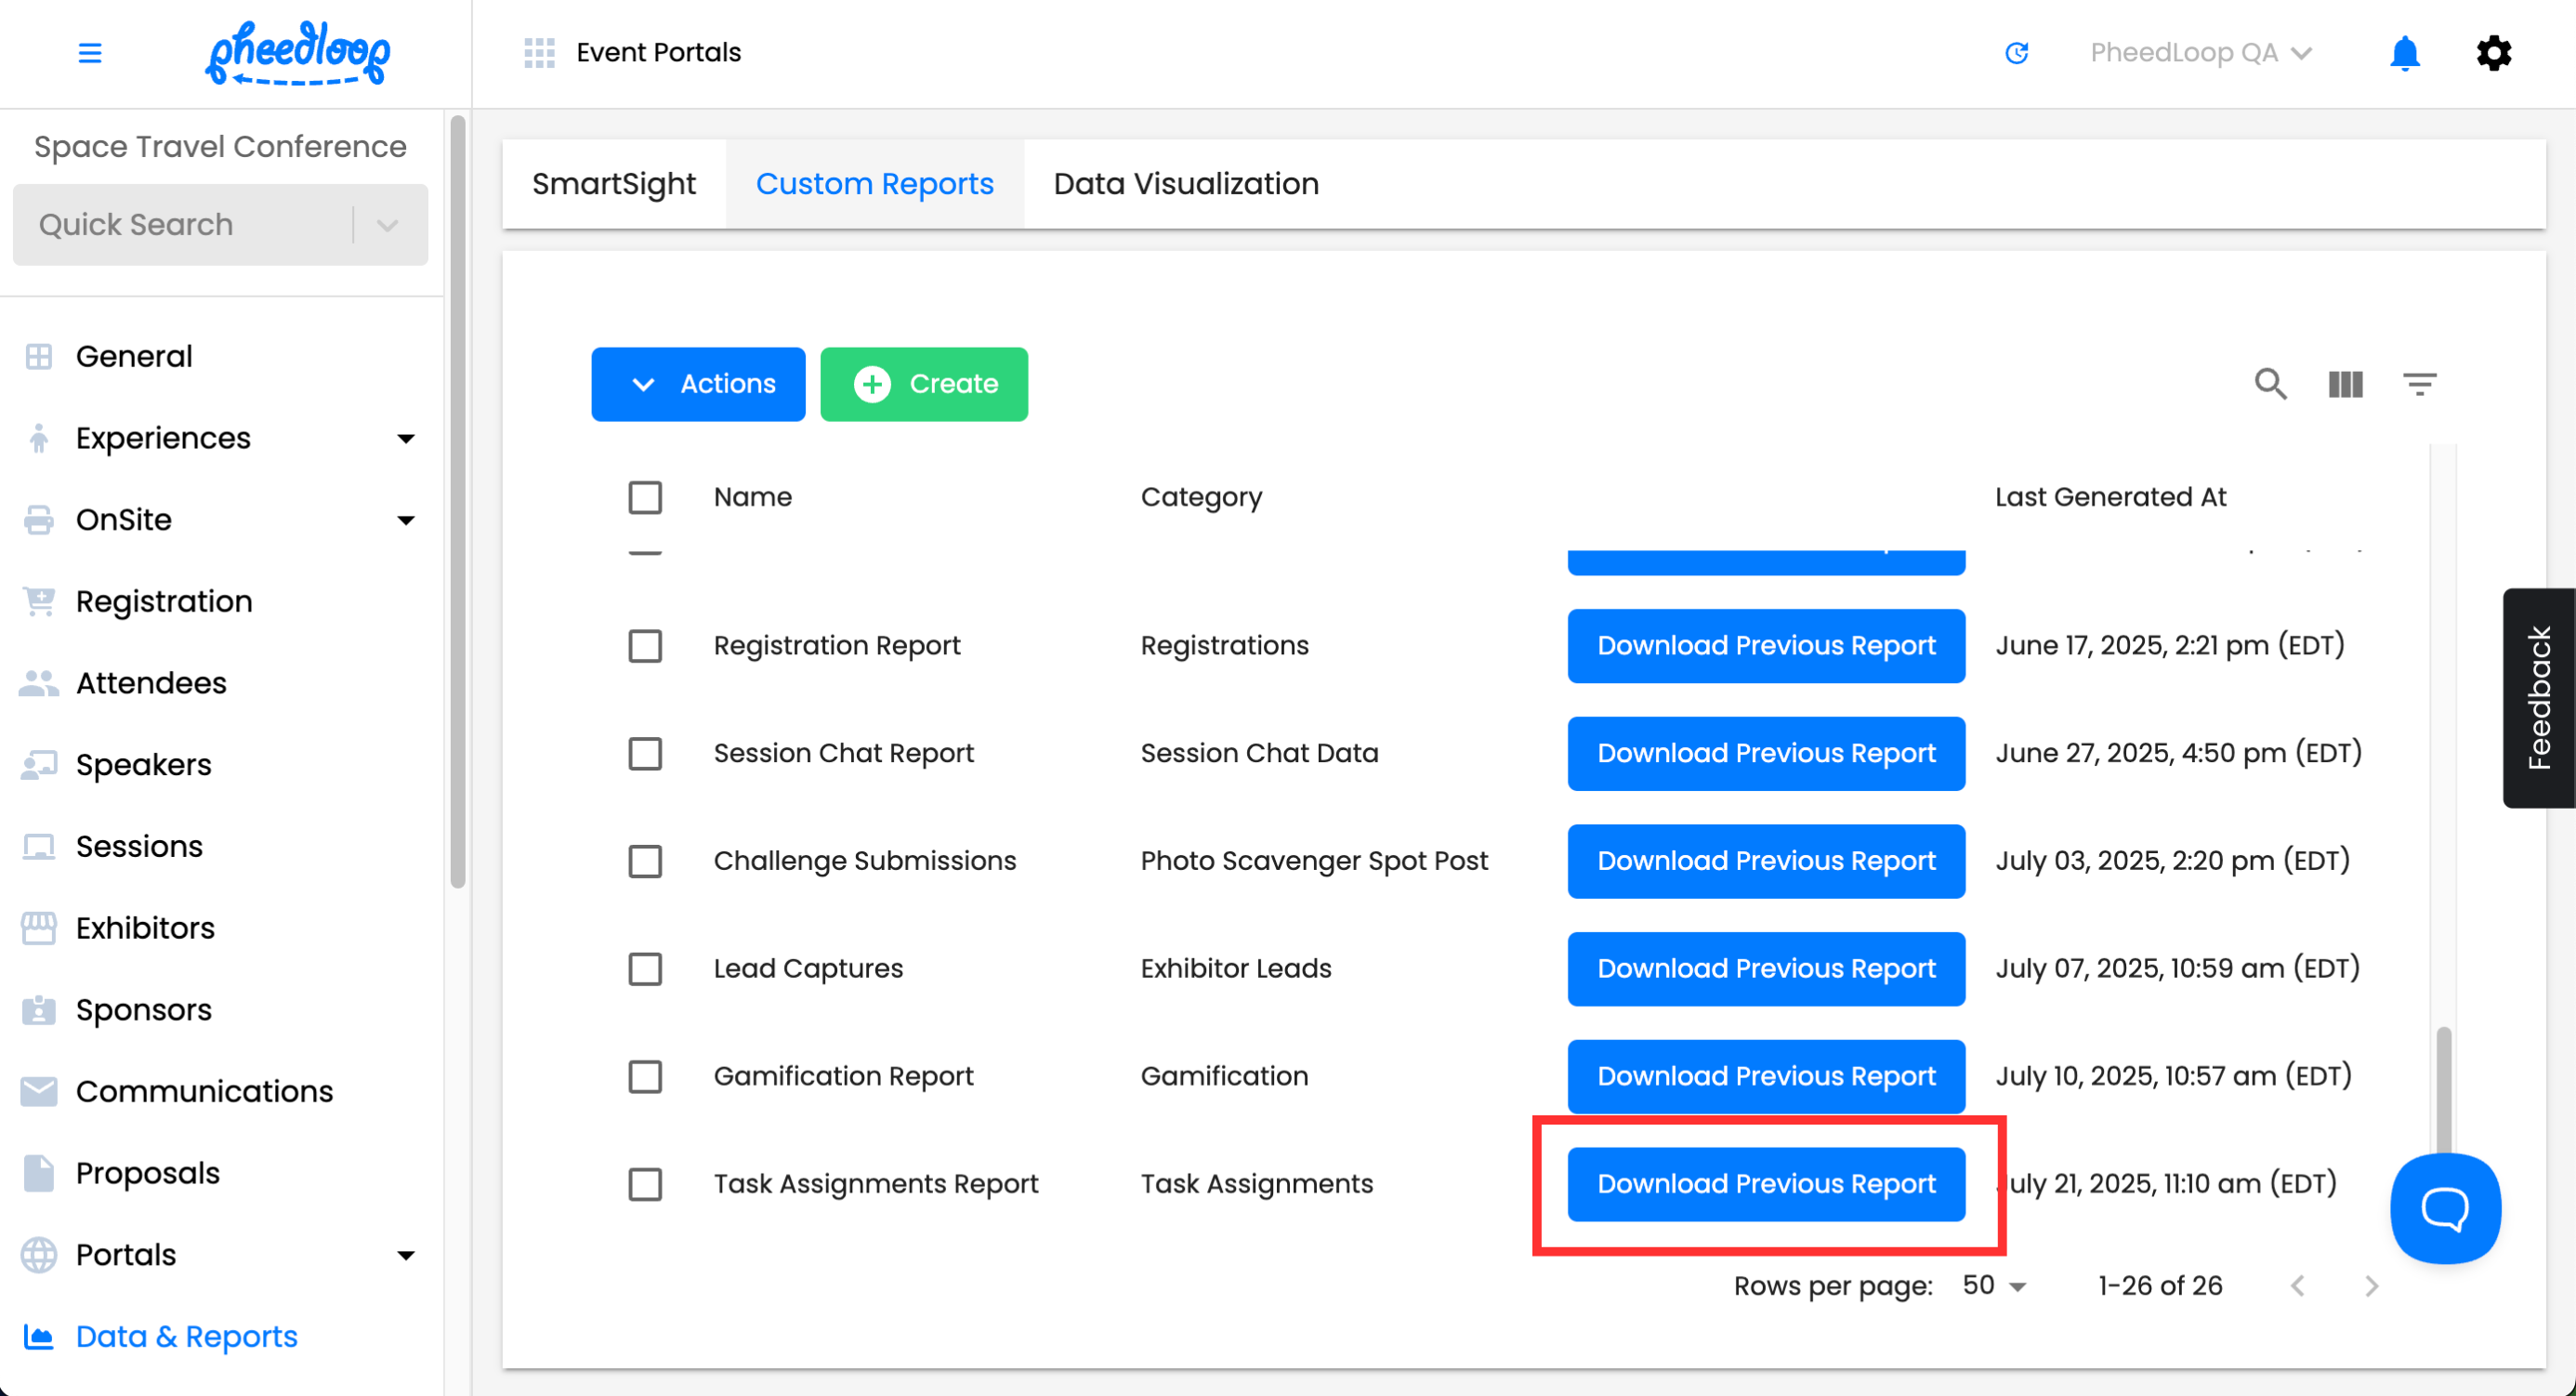
Refresh the site and select Download Previous Report once that option becomes available


7. Assigning Tasks Based on Exhibitor and Sponsor Products
Products can be used to assign tasks for Exhibitors and Sponsors. If an exhibitor or sponsor has purchased the relevant product during the application process, they will automatically be assigned the task connected to the product.
Tasks will also be assigned automatically if the product was added from the Event Dashboard.
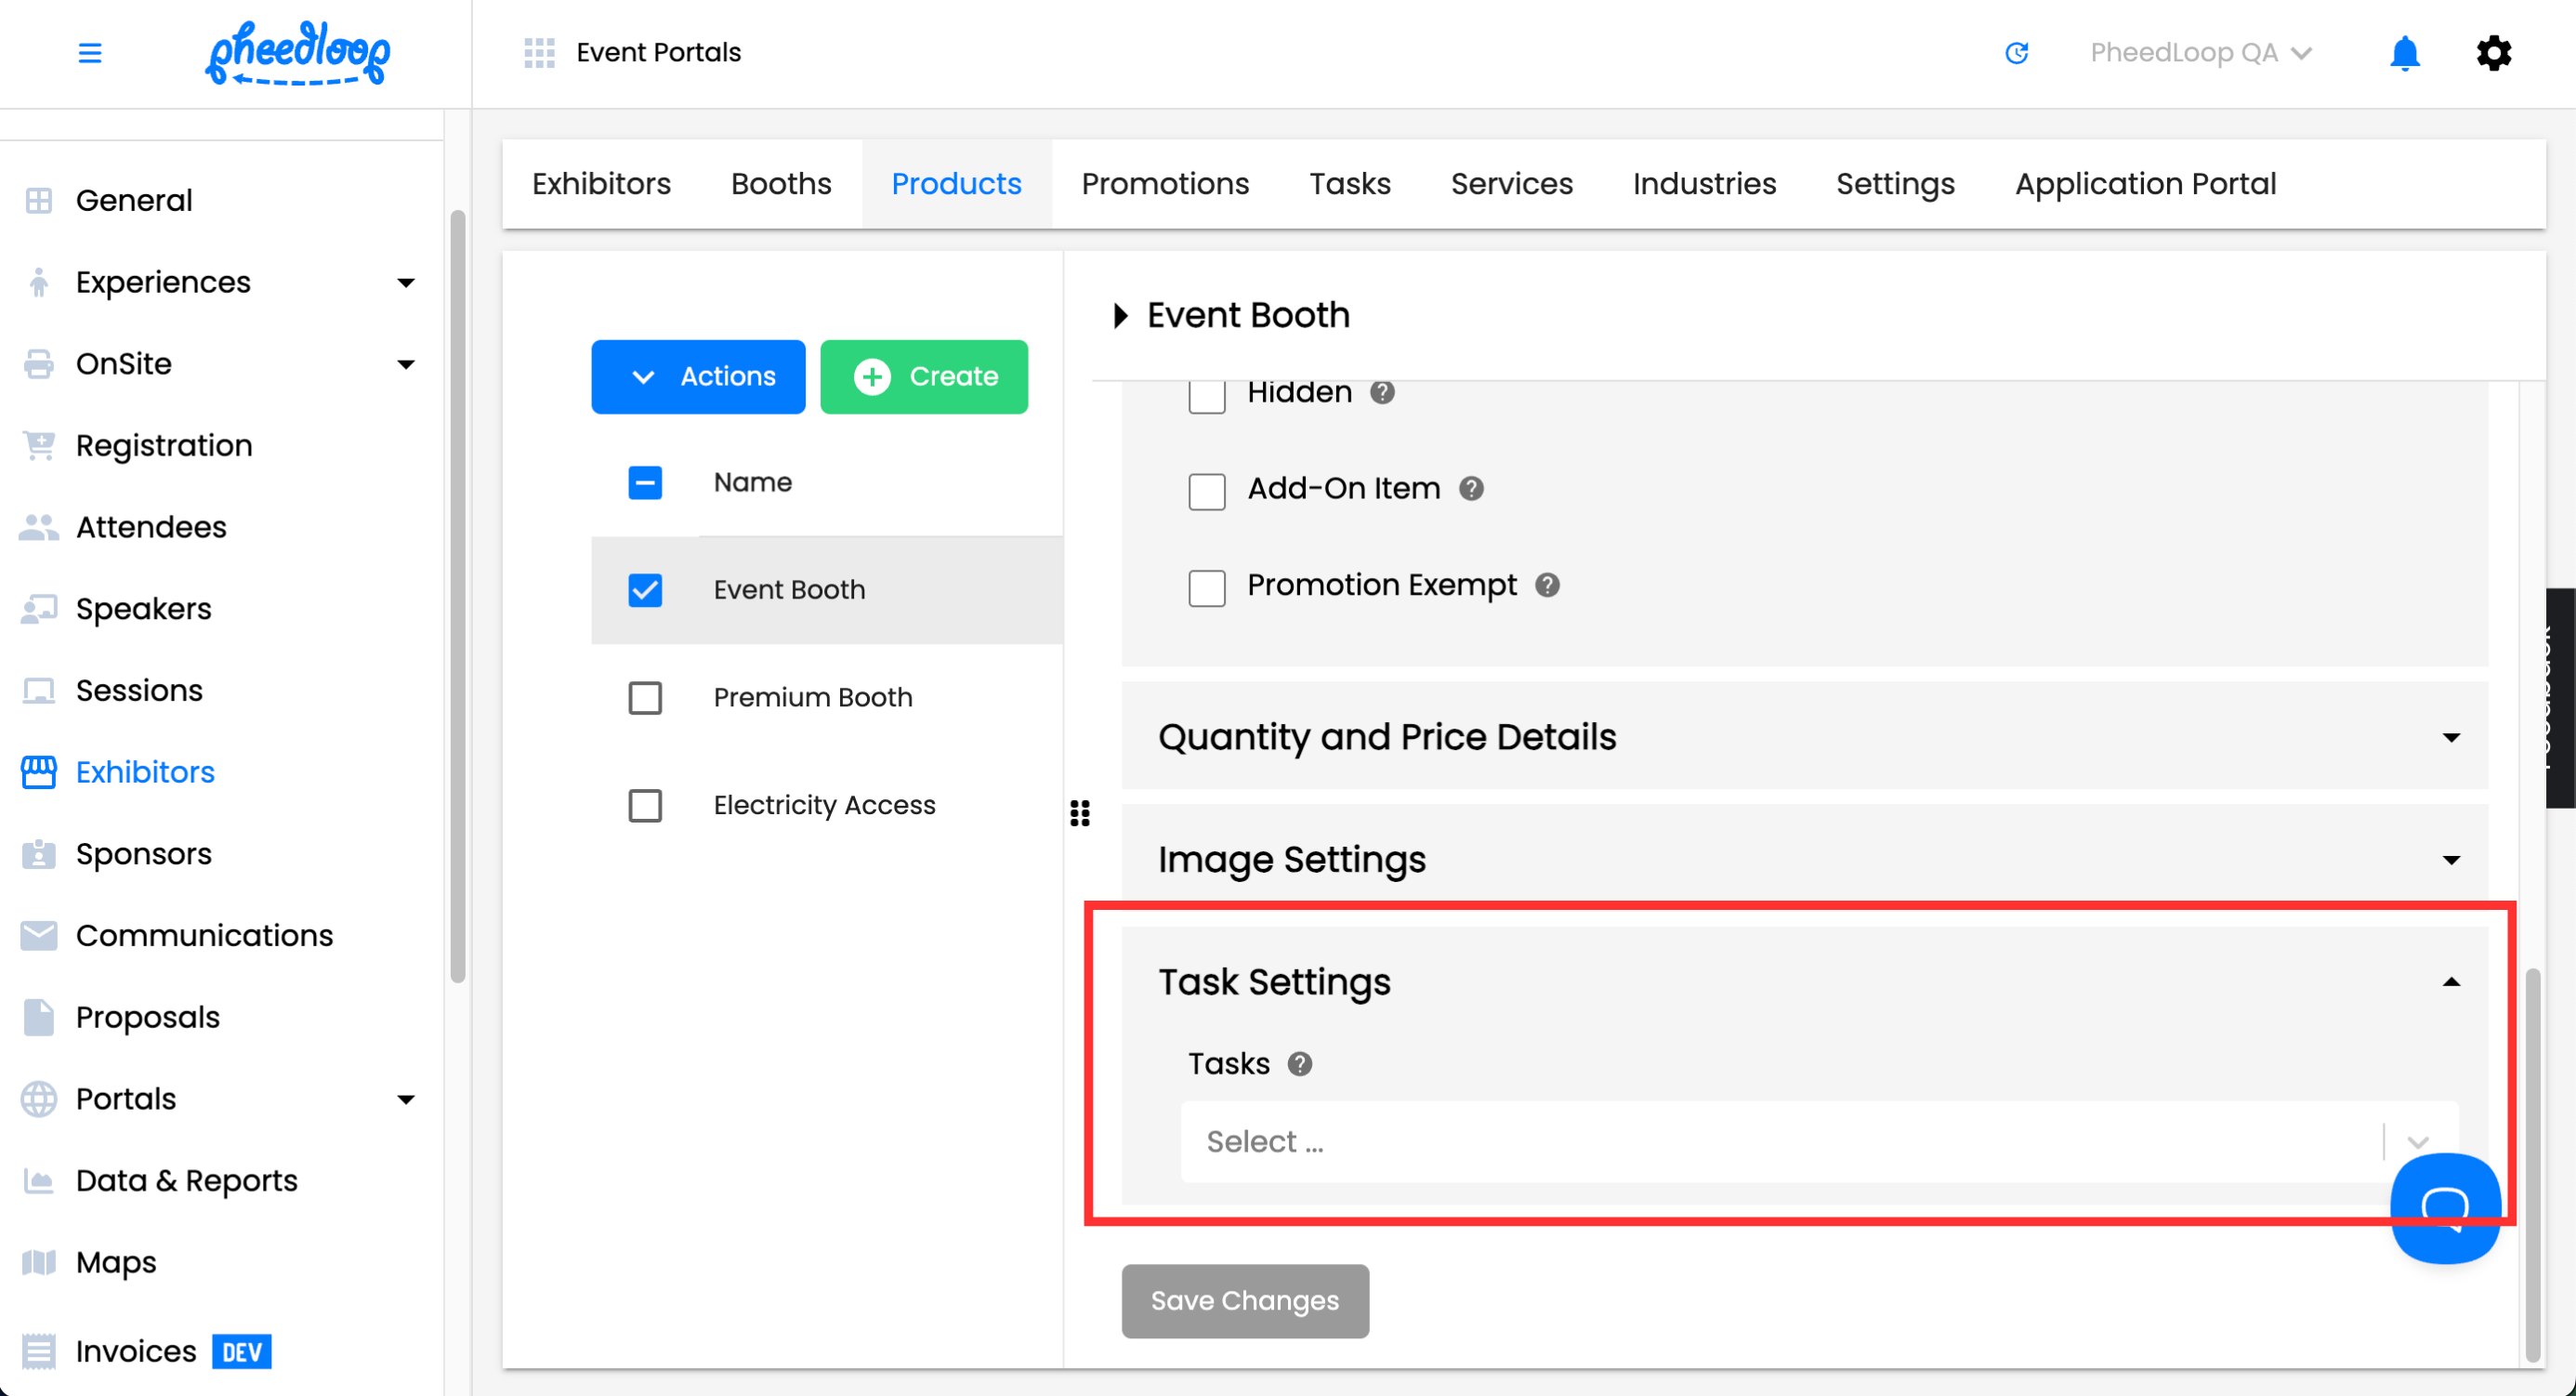
Assigning Tasks to Products
- From the Event Dashboard, navigate to Exhibitors > Products or Sponsors > Products
- Select the product you wish to edit from the list
- Scroll down to Task Settings
- Under the Tasks field, select the task(s) you wish to assign
-
Select Save Changes

Assigning Products to Exhibitors or Sponsors from the Event Dashboard
If your exhibitors or sponsors are already in the Event Dashboard, you may still assign the product from the Event Dashboard. Products added from the Event Dashboard will still have their respective tasks assigned to them.
- From the Event Dashboard, navigate to Exhibitors > Products or Sponsors > Products
-
Select the exhibitor/sponsor you wish to edit from the list and navigate to the Order Summary tab
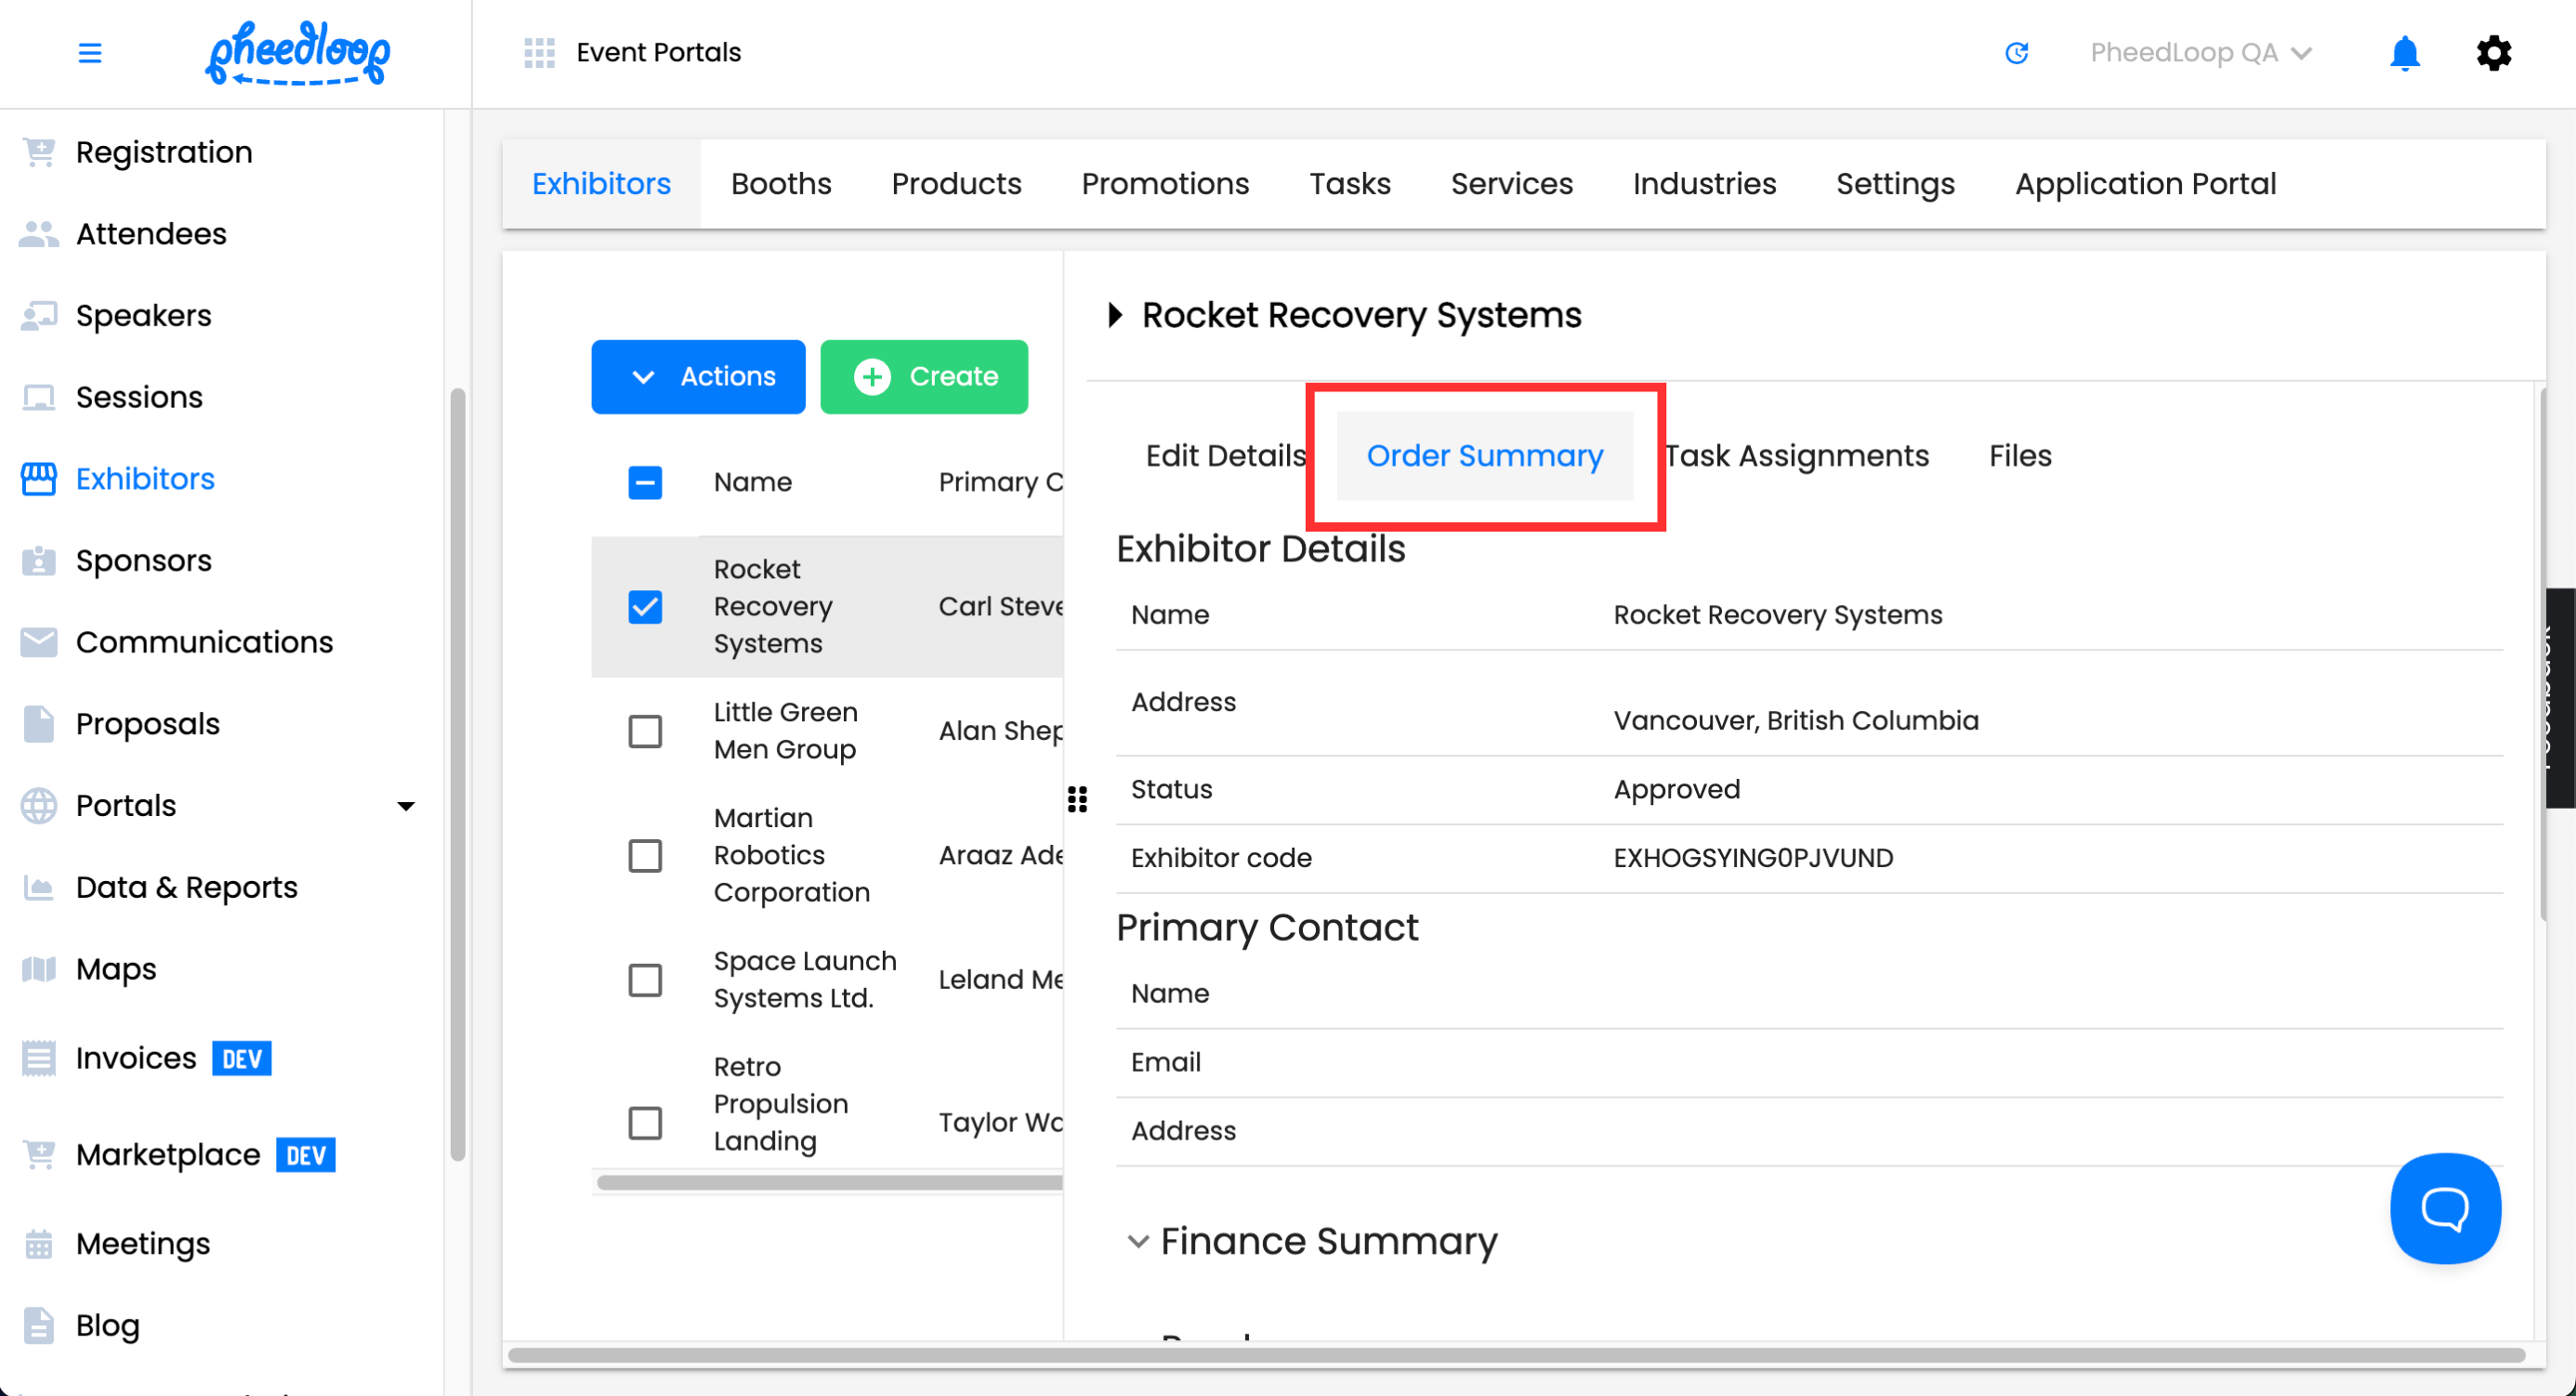
-
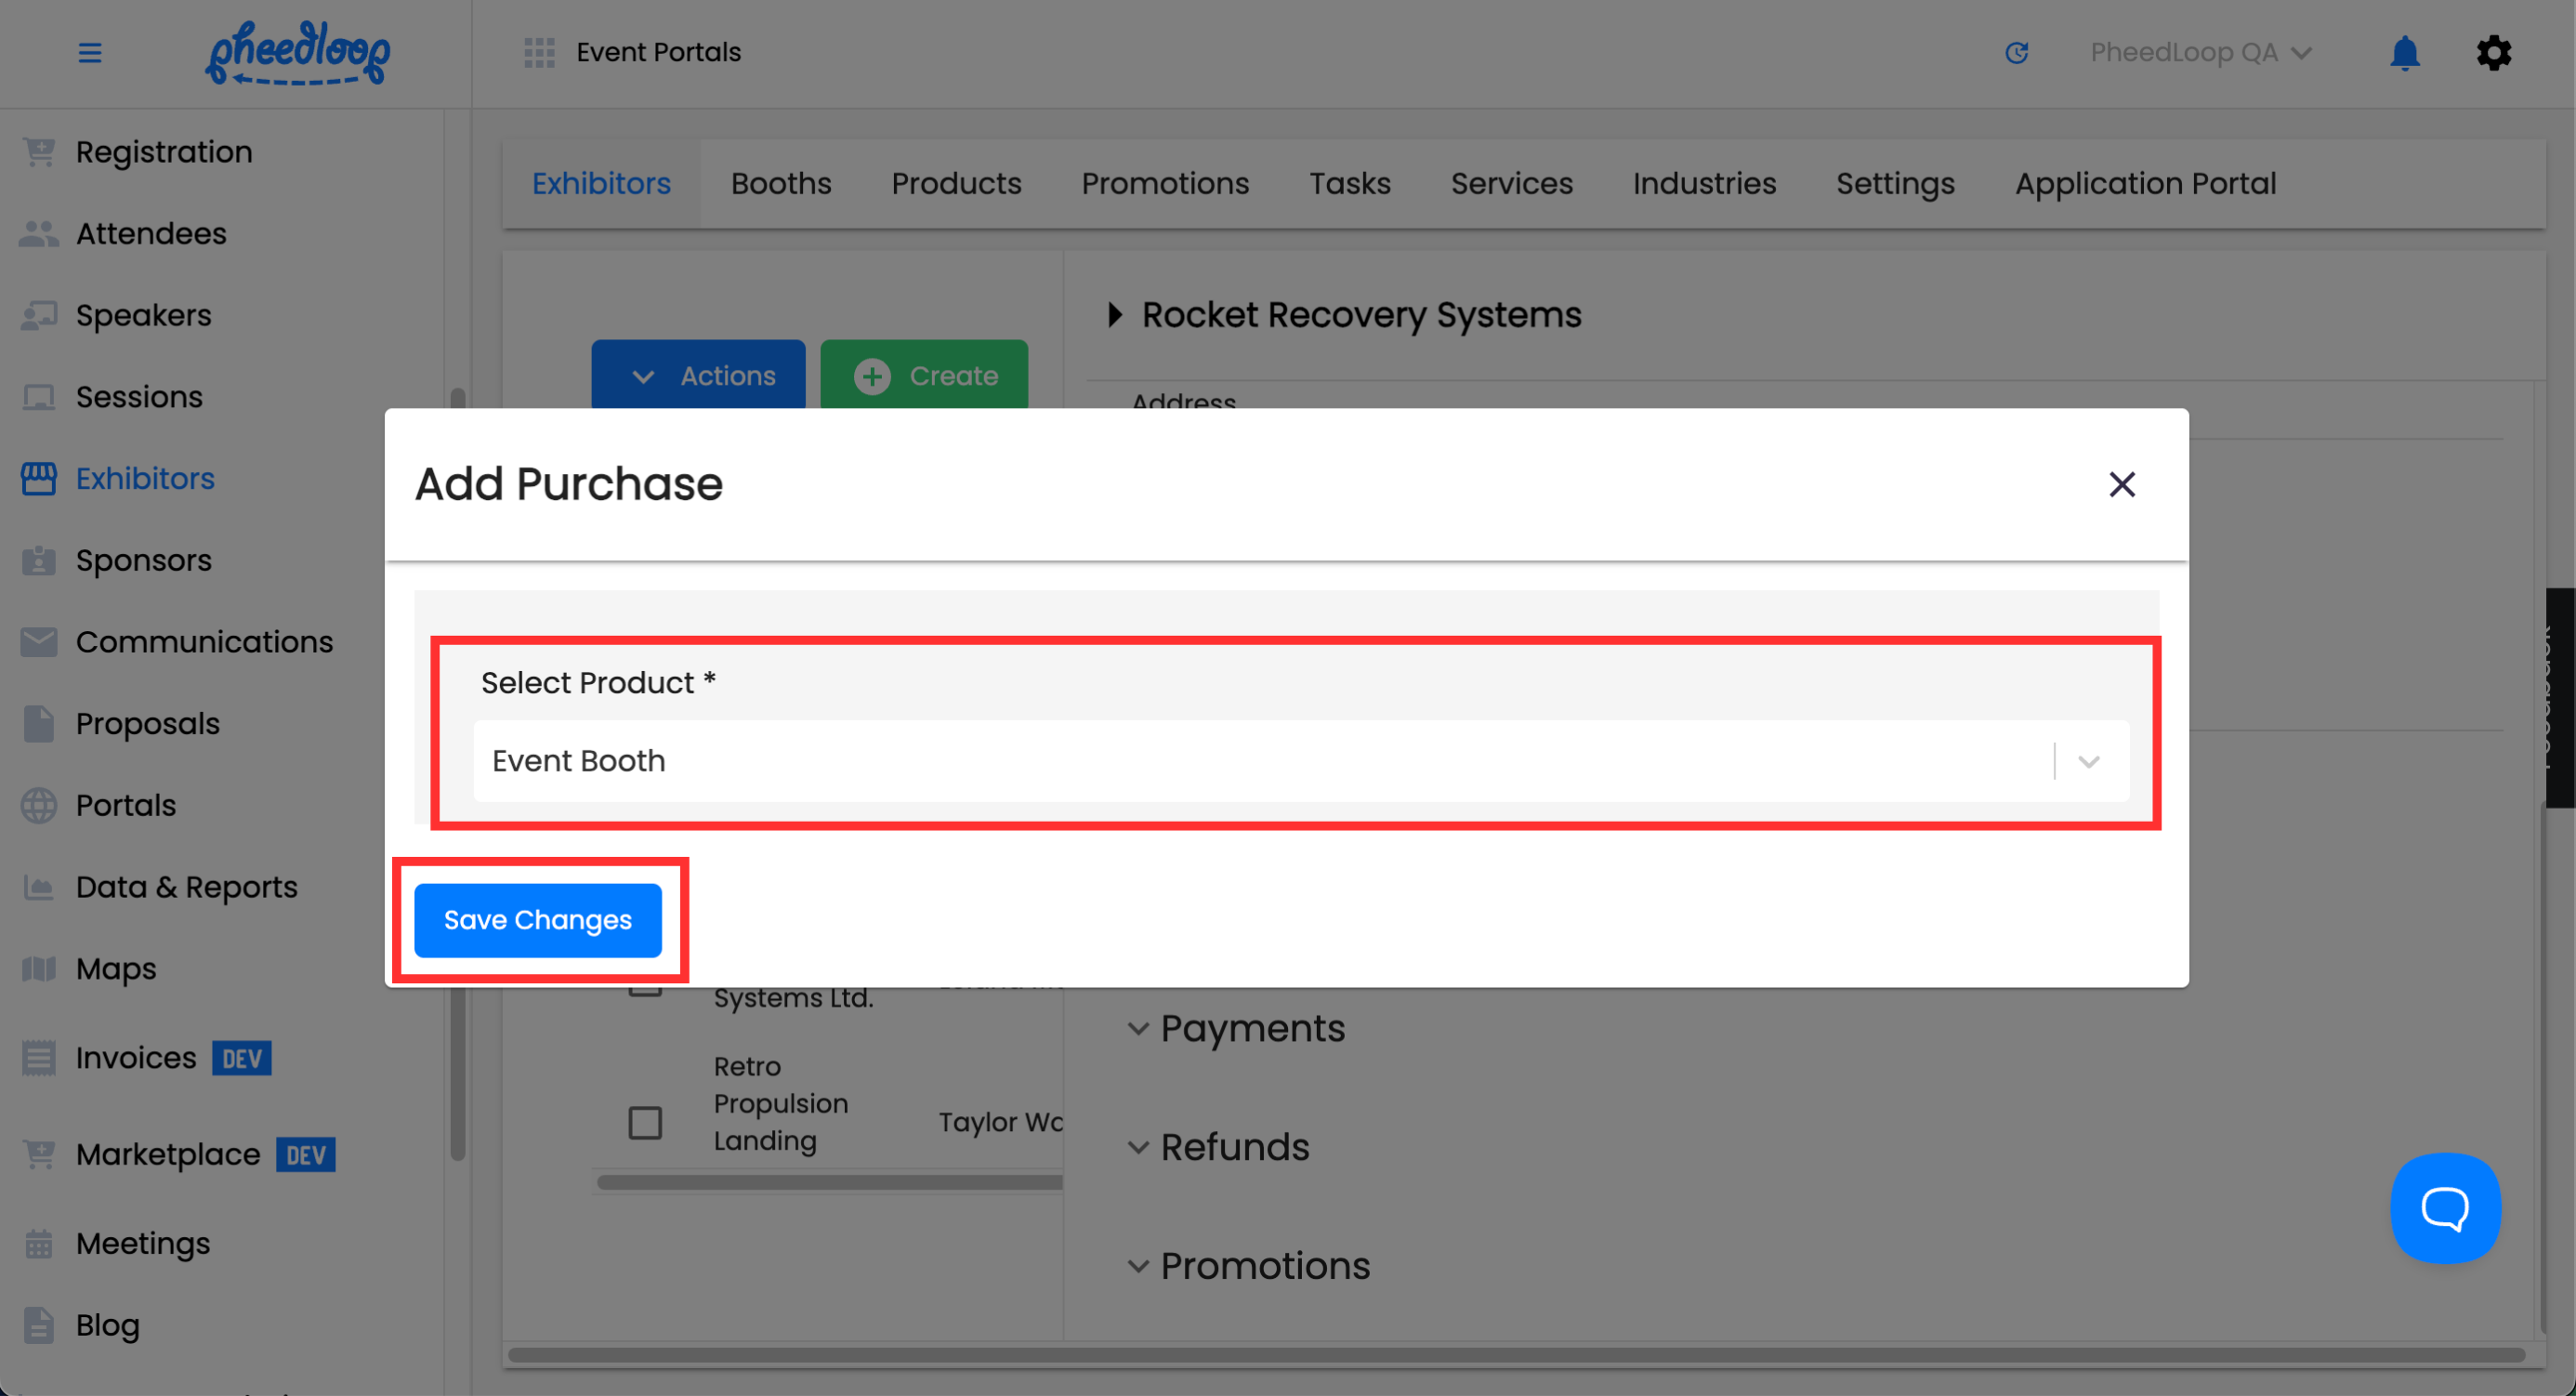
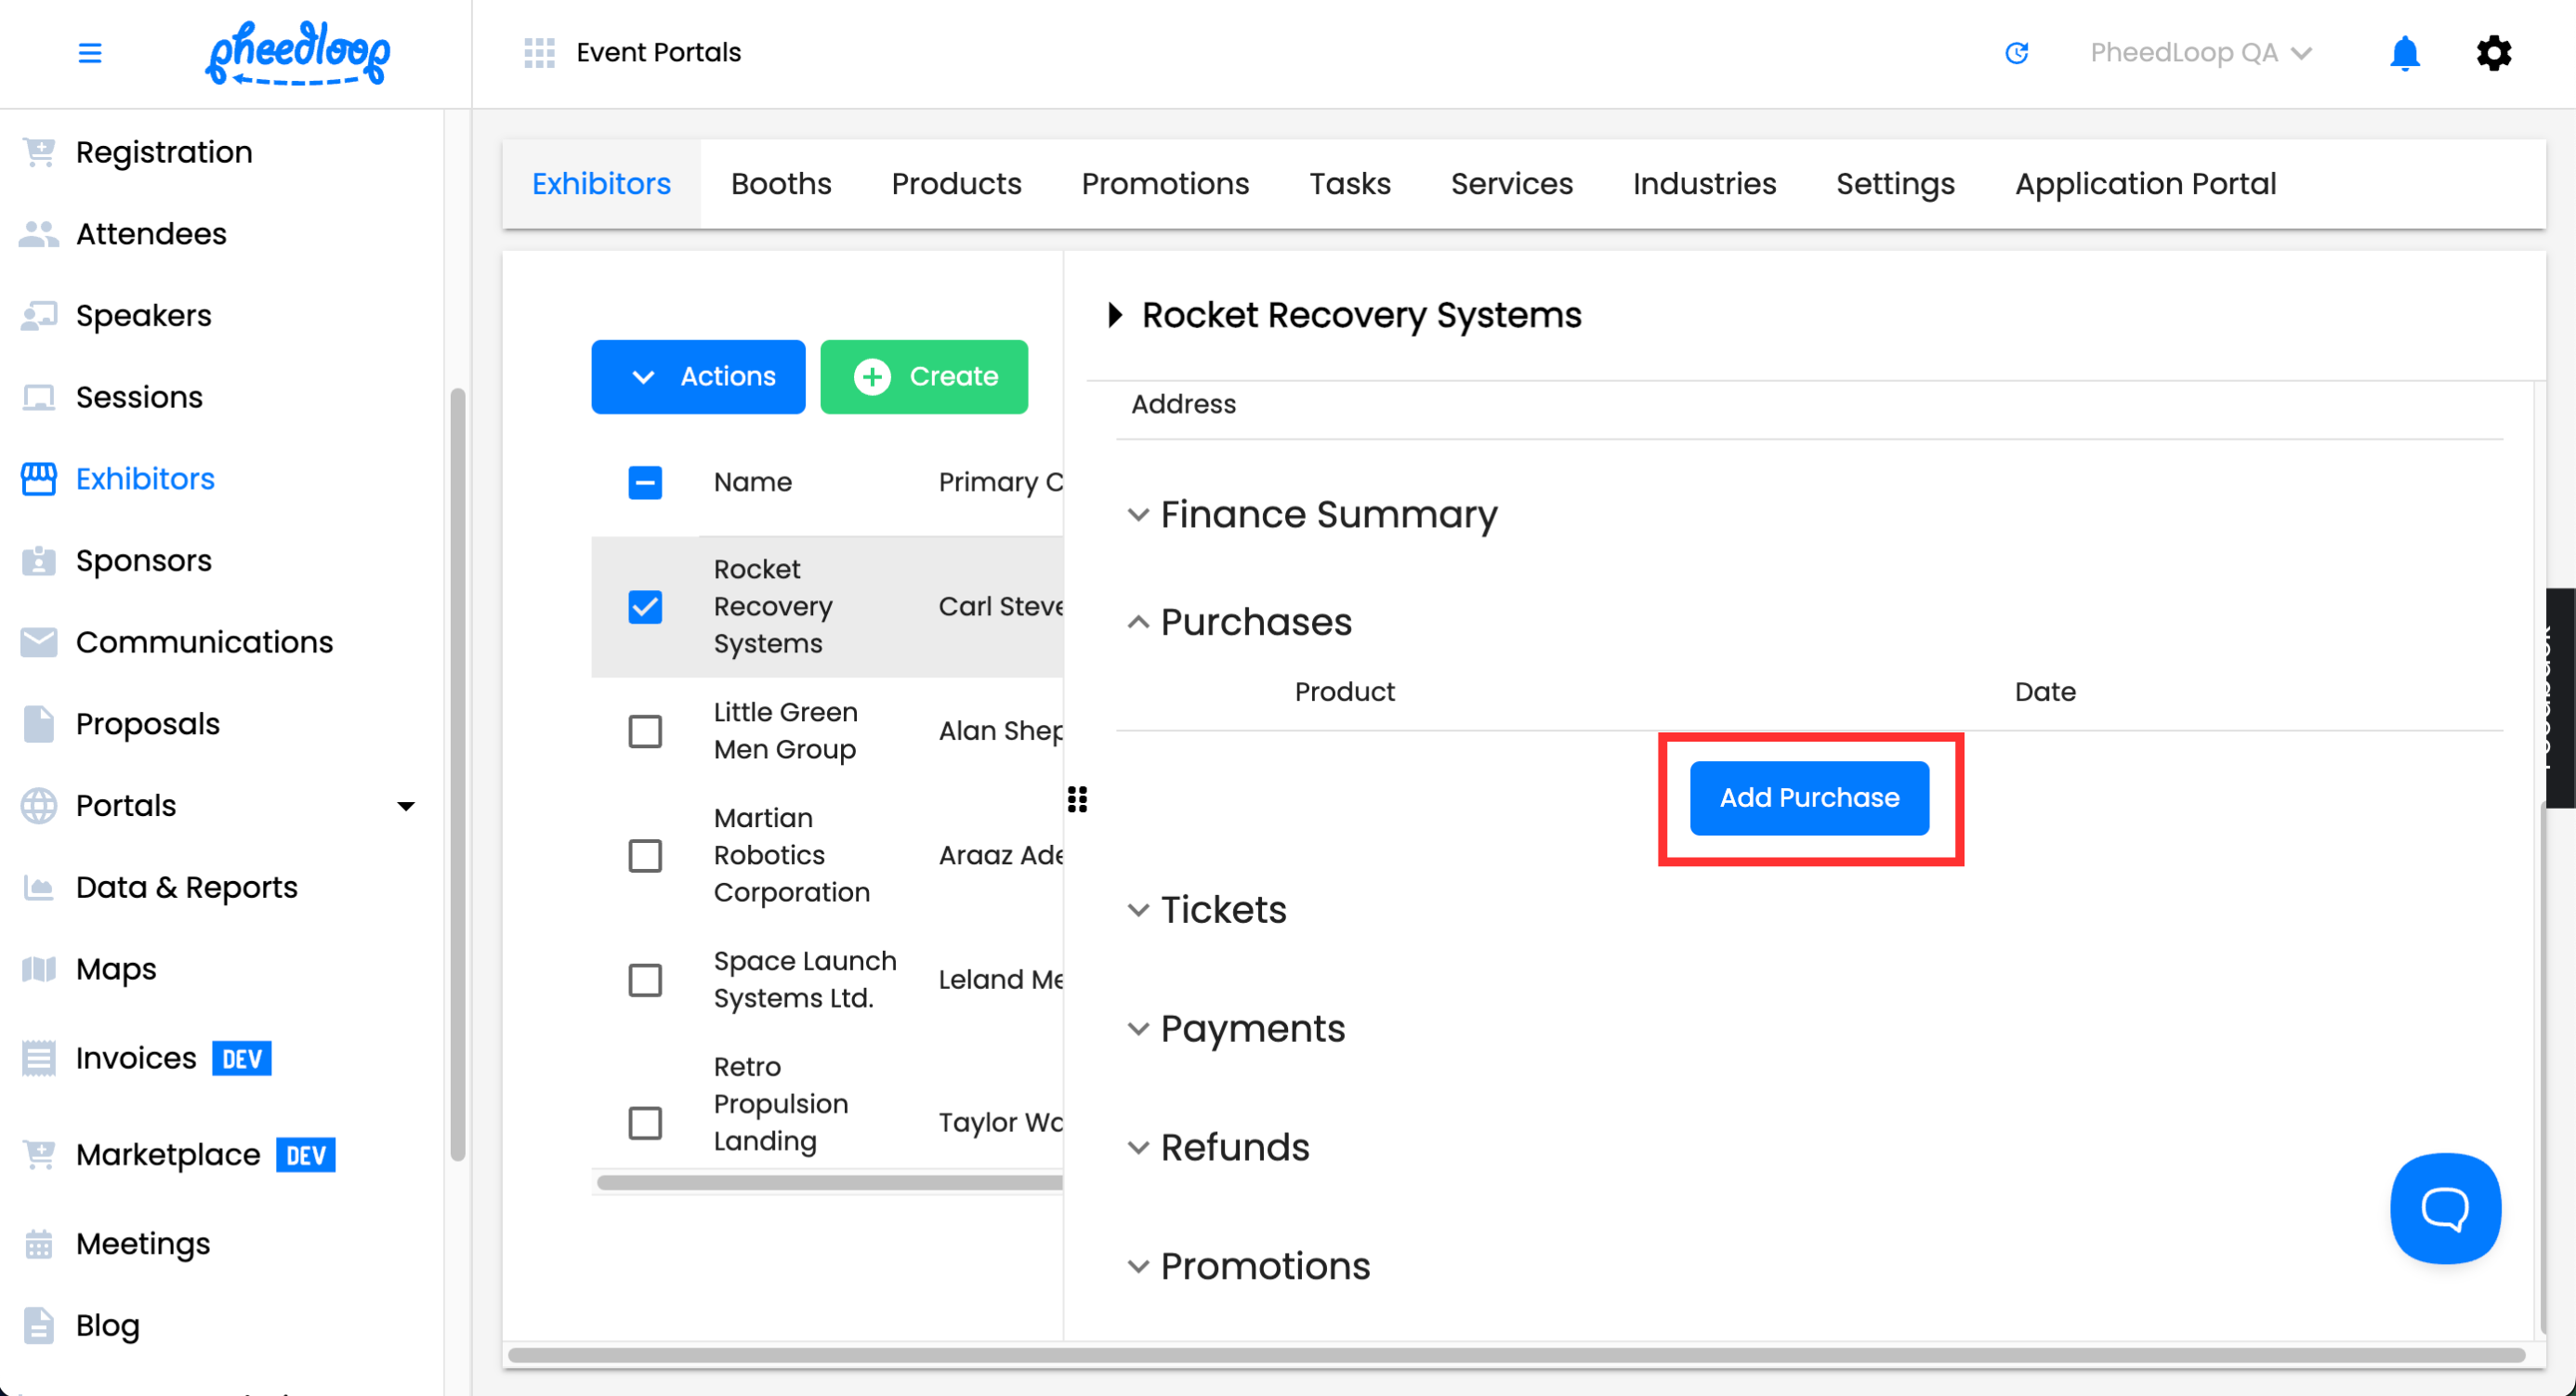
Scroll down to Purchases and select Add Purchase
- Under the Select Product field, select the product you wish to assign
-
Select Save Changes