Customizing, Sending, and Automating Announcements
Please note, all announcements, including tests, will remain visible in the Virtual Portal and PheedLoop Go! if published. If testing the announcement feature is necessary, we recommend sending an actual announcement such as a welcome email or another announcement prewritten by your team’s organization. Alternatively, configure the setting so that only test accounts recieve the email and not real atttendees.
Announcements are how Event Planners communicate with attendees before, during, and after their events. In PheedLoop, you control how, when, and to whom announcements are delivered.

Contents
- Creating an Announcement
- Sending Announcements Manually
- Sending Announcements Automatically
- Advanced Features
Creating an Announcement
Creating an announcement is straightforward, though some settings may require additional explanation to fully understand. To get started, let’s walk through the Announcement creation window.
- From the Event Dashboard, navigate to Communications > Announcements
-
Above the Announcements table, select Create
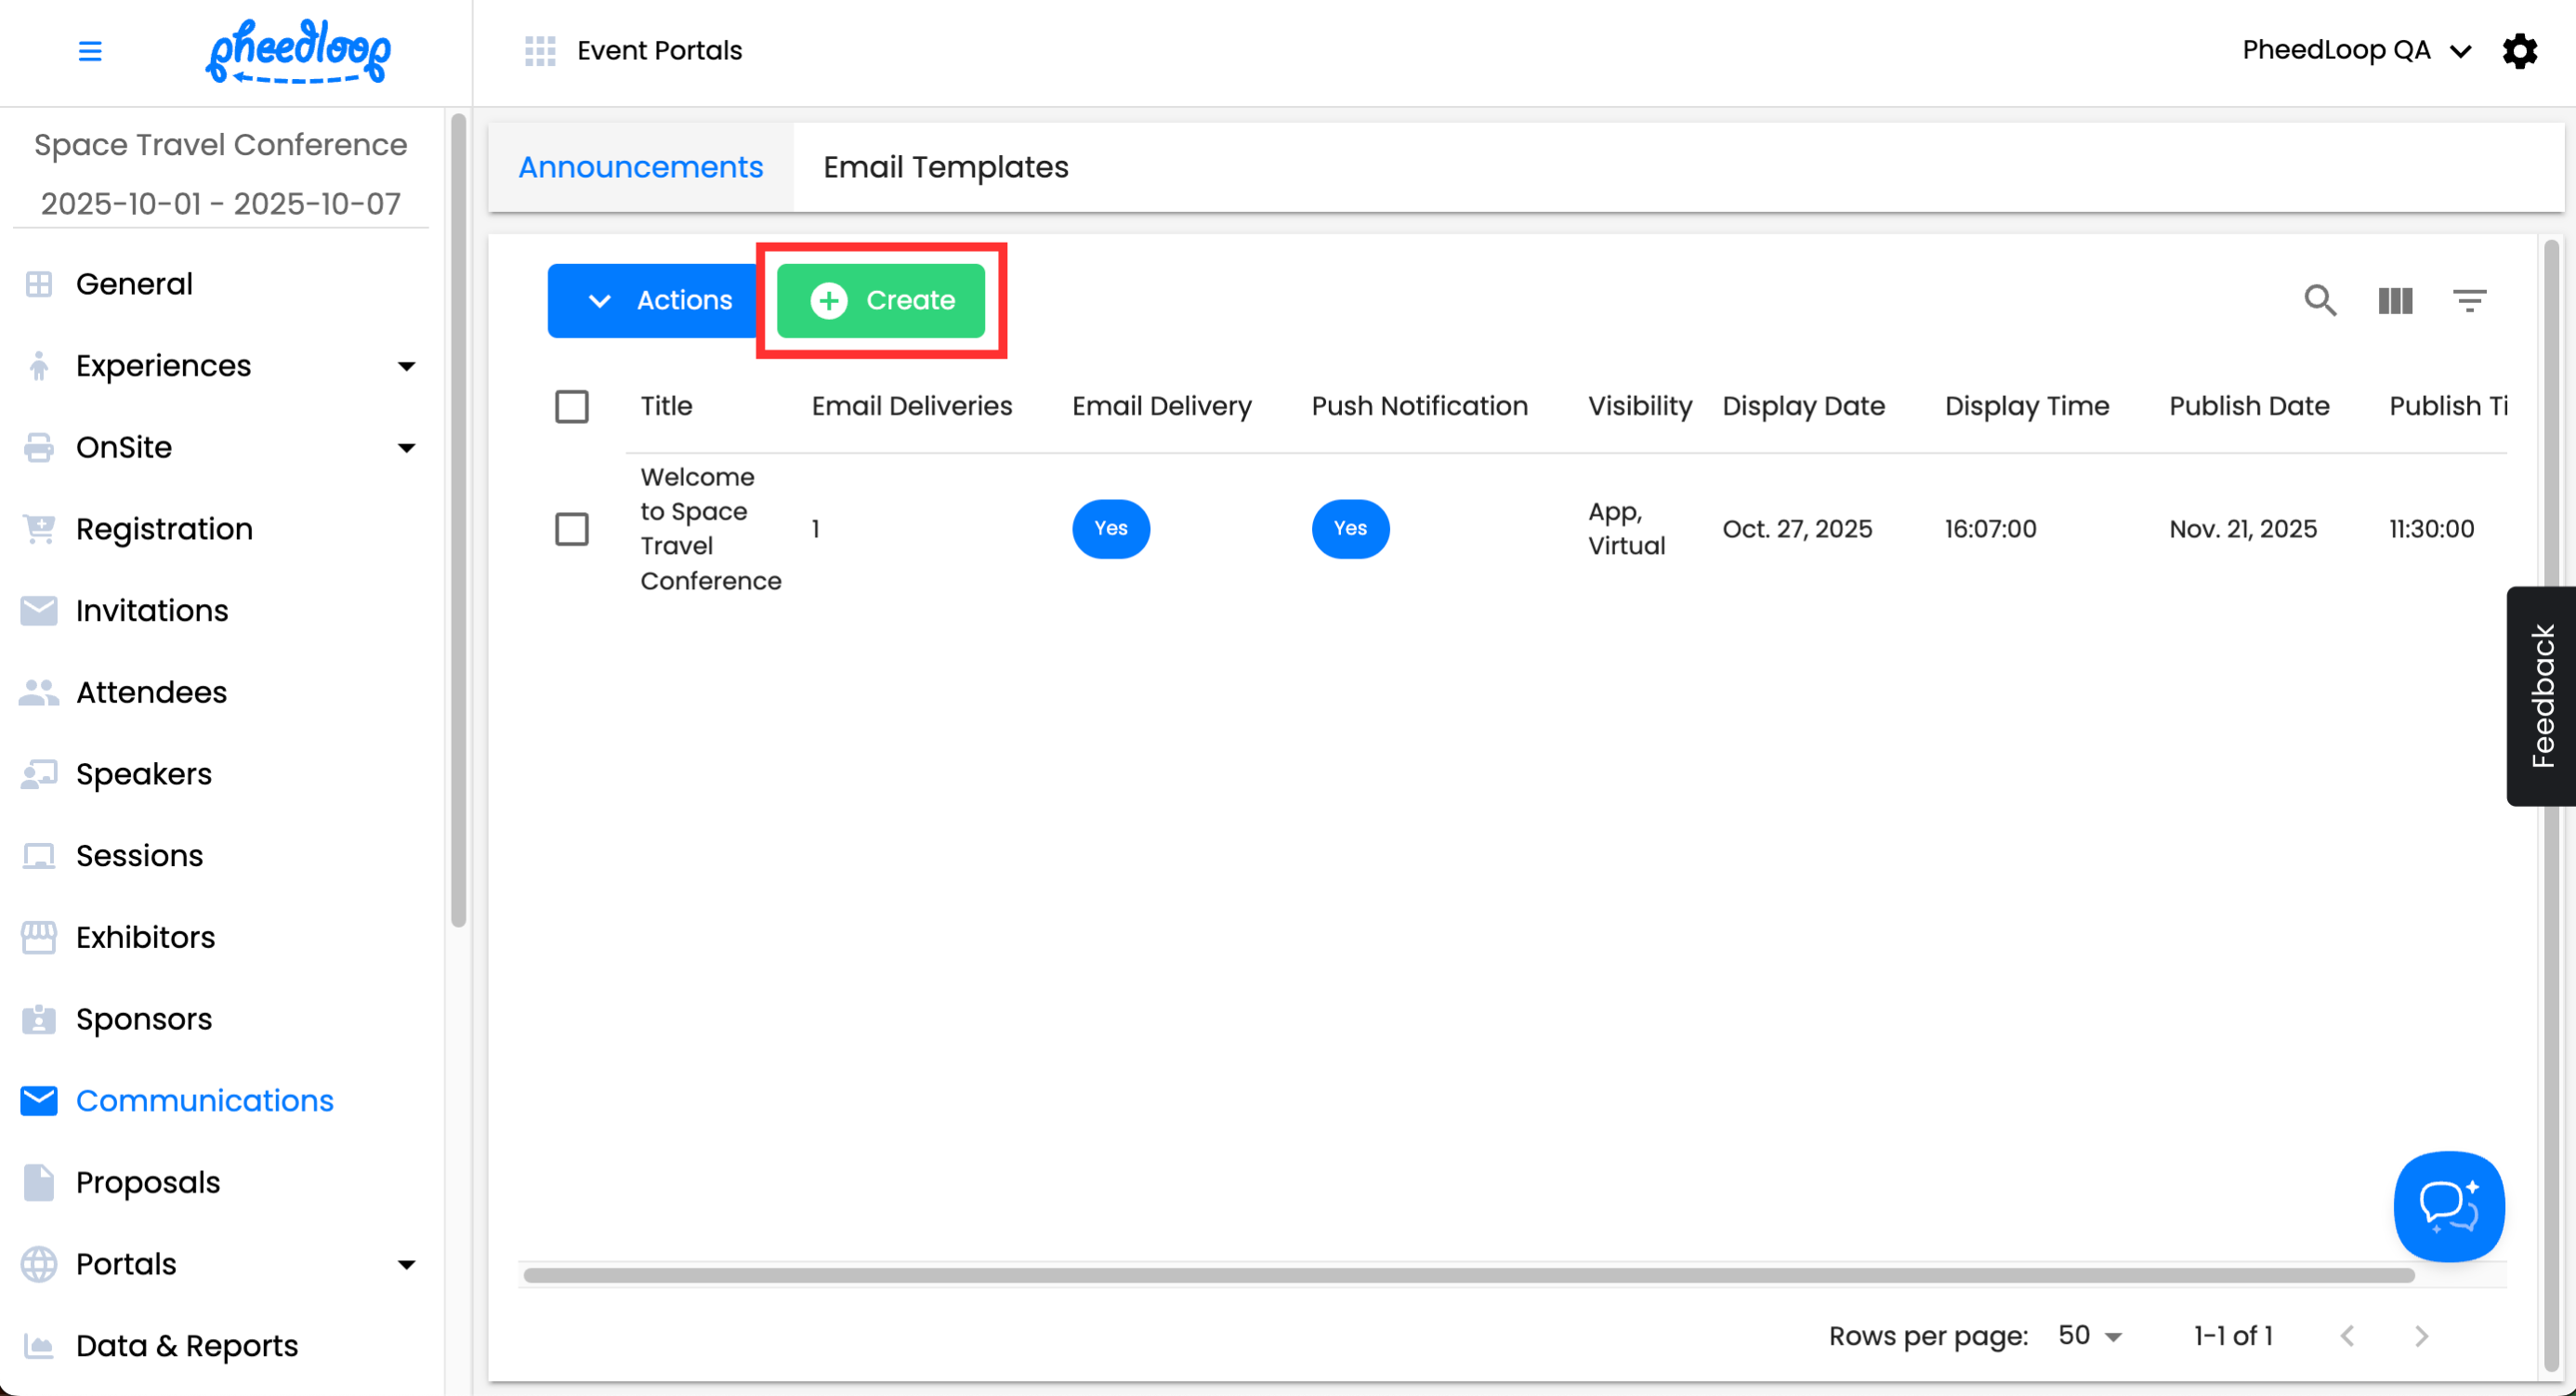

You don't need to fill in anything more than the Announcement Title and Description fields, but you can fill in the rest of the fields depending on your requirements. The Announcement Title field is the subject line for your email, while the Description field serves as the email's body. We recommend creating your announcements first for convenience before configuring them extensively.
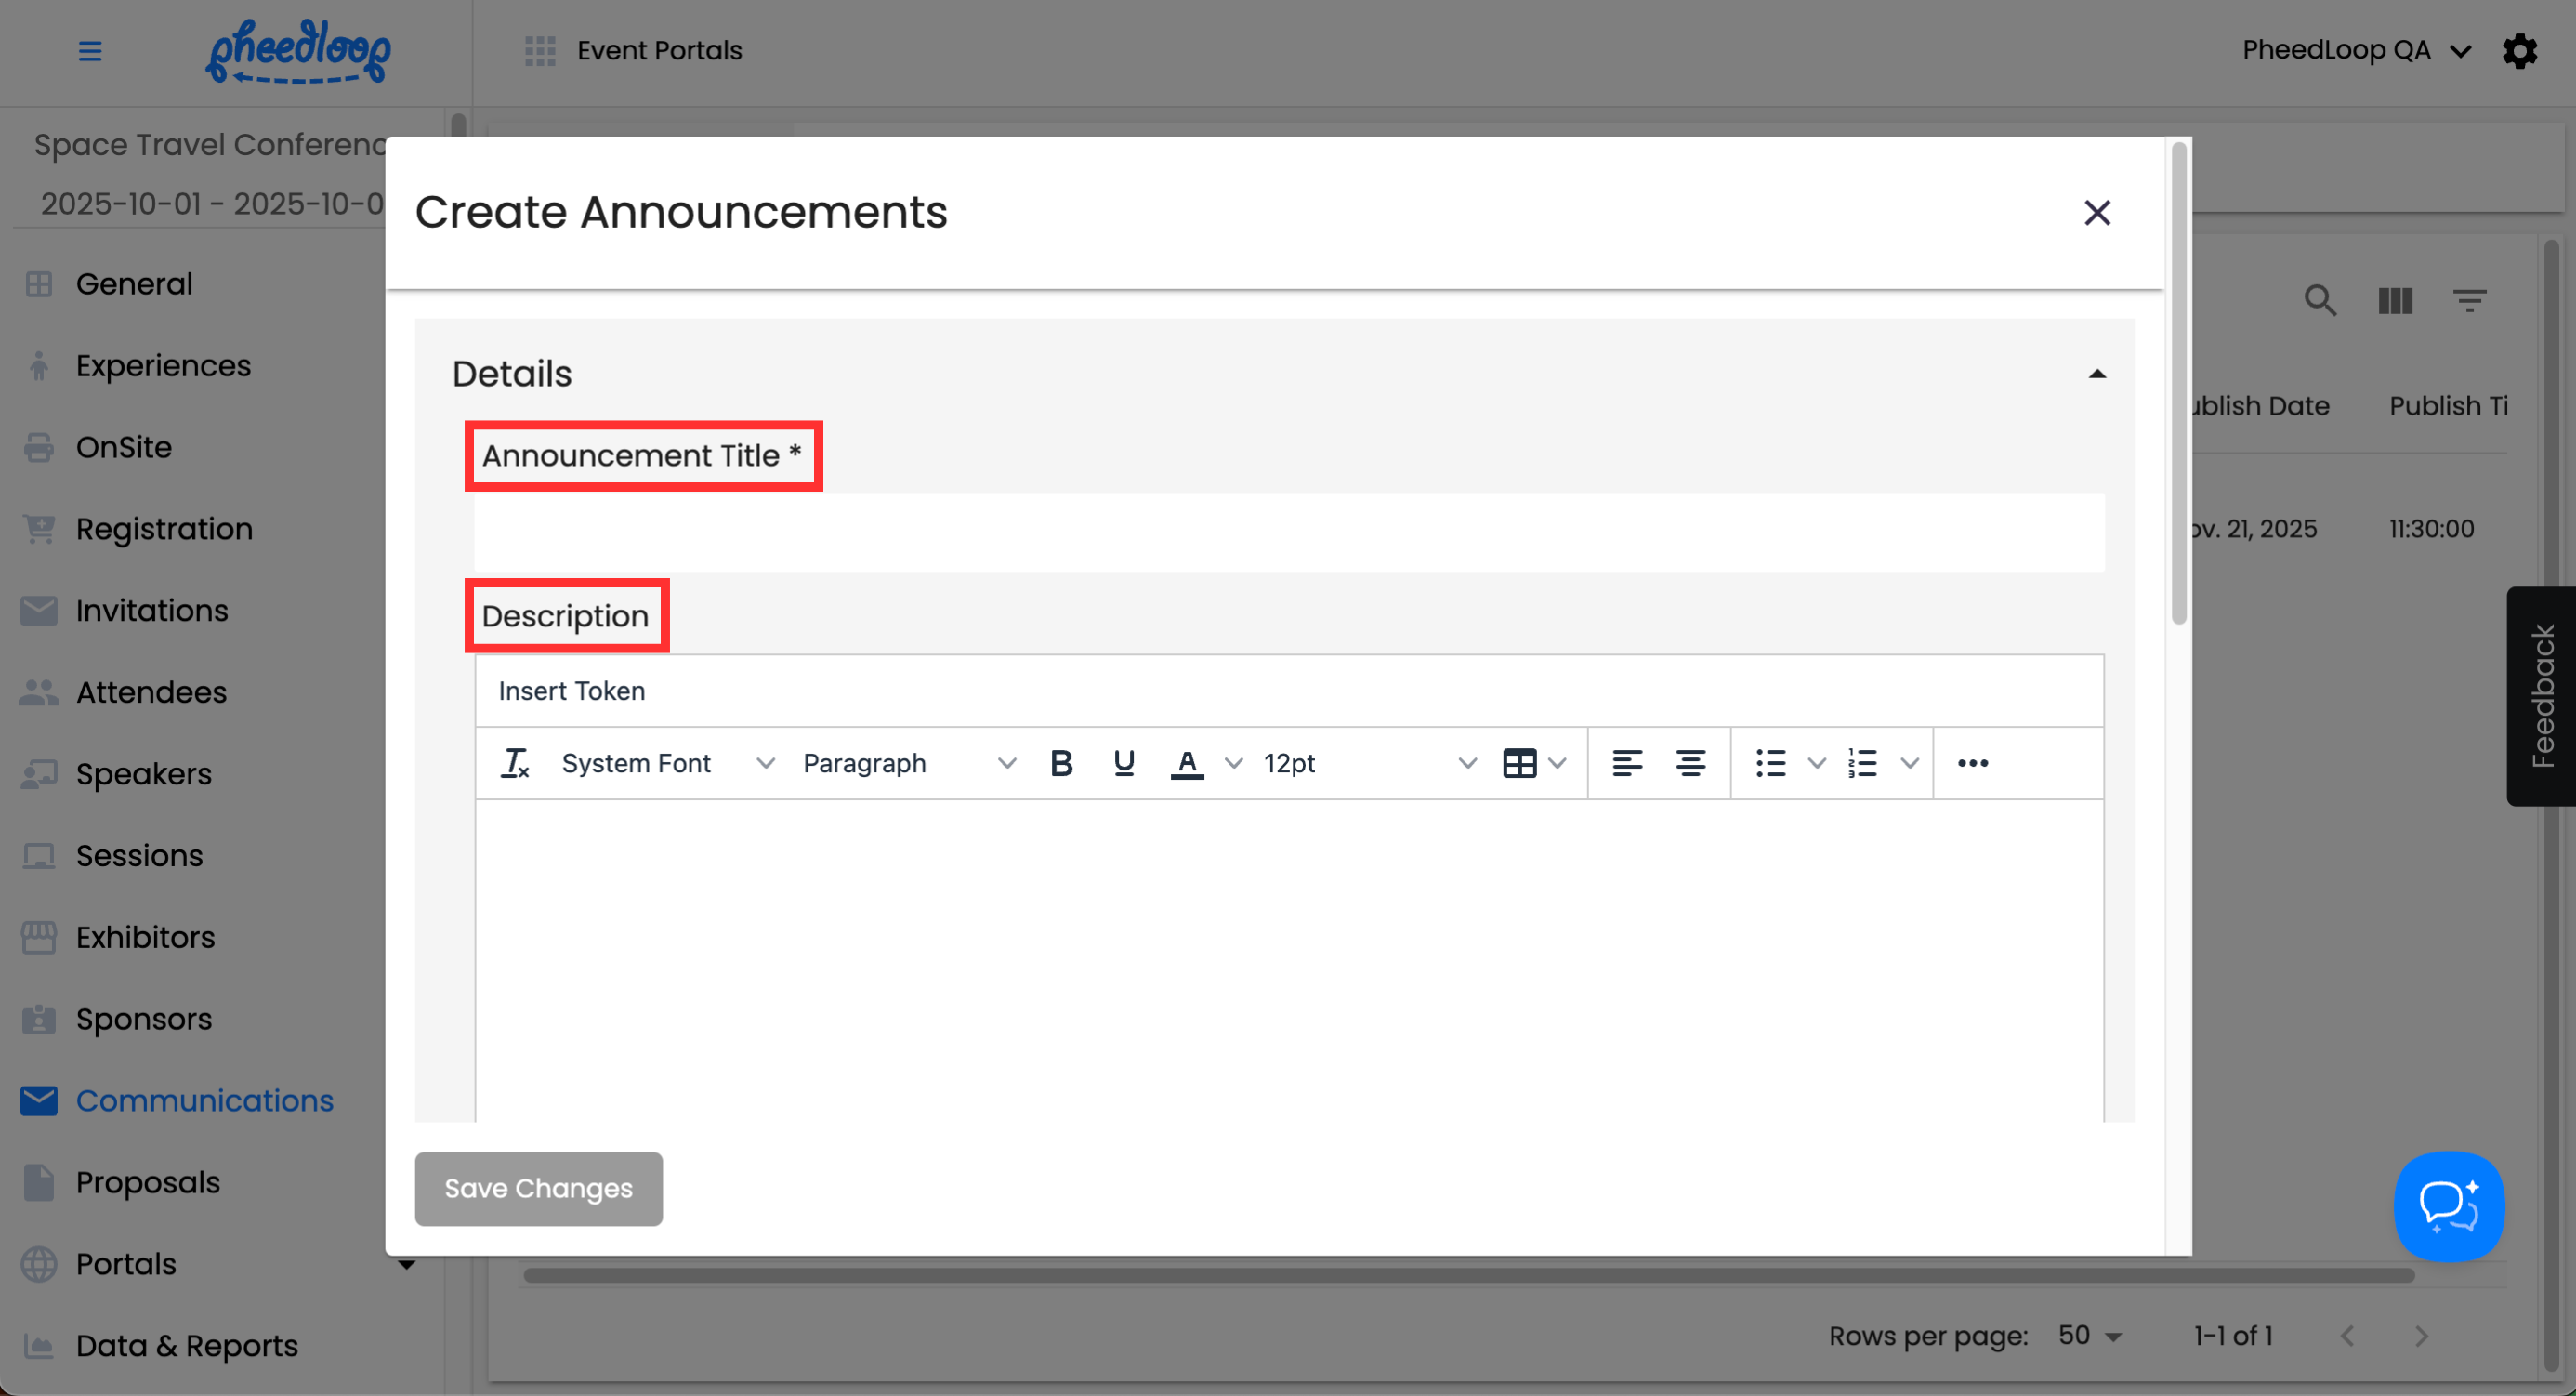
Quick Tip - You can add tokens to the email’s subject line and body to personalize your messages. A common example is including the attendee’s name directly in the email, allowing you to create a customized experience without sending separate announcements to each attendee.
Once you've created the basic announcement, you can proceed to configure a few more of the fields. Let's go over some of the important ones:
Delivery
This section covers how the email will be delivered. Depending on your choice, the email will be delivered through email and/or PheedLoop Go! and the Virtual Portal, both dependent on your contract. You can also enable multiple deliveries, which allows recipients to receive the same announcement more than once.
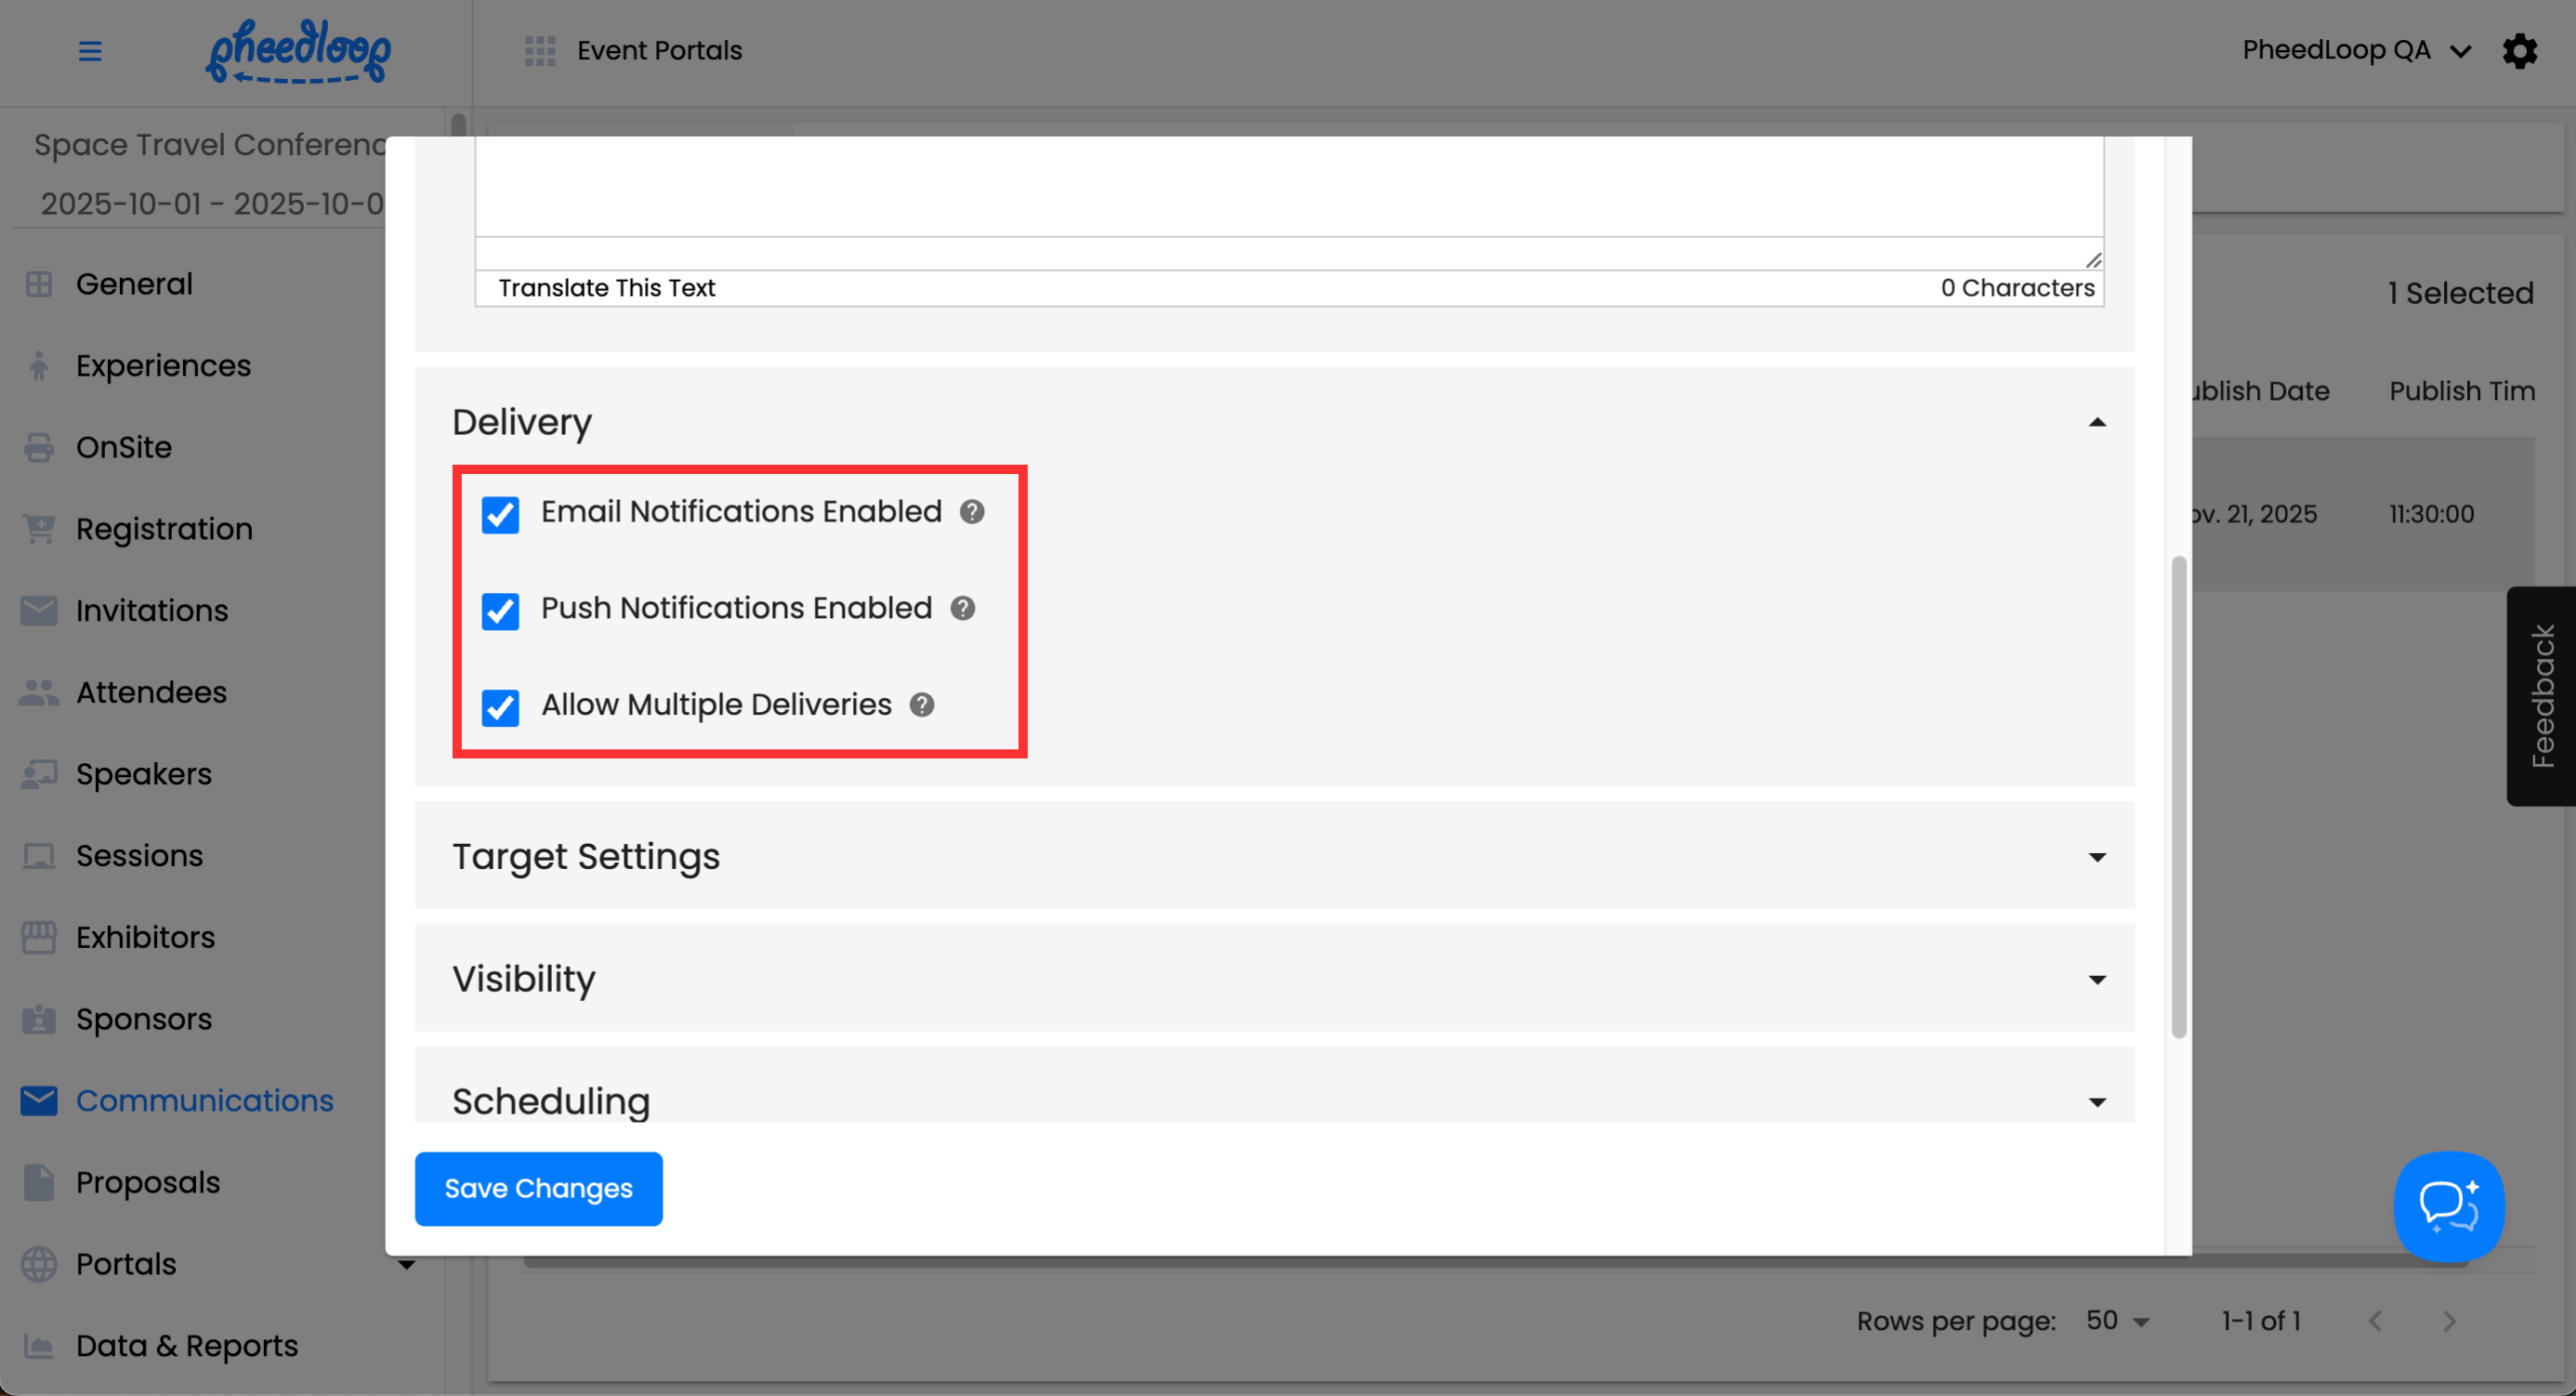
To summarize each setting:
| Title | Description |
|---|---|
| Email Notifications Enabled | Select this option if you would like any notifications, automatic or manual, launched for this announcement, to be sent as an email notification. Email notifications are sent to all your attendees, whether they have downloaded PheedLoop Go or not. It is recommended to select this option for announcements being published before the event. |
| Push Notifications Enabled | Select this option if you would like any notifications (automatic or manual) launched for this announcement to be sent as a push notification. Push notifications are sent in the background and foreground to attendees in the virtual event portal and mobile event app, depending on which systems you are using. |
| Allow Multiple Deliveries | Enable this option if you want the announcement to be sent multiple times. By default, this setting is turned off to prevent duplicate notifications, since most announcements, especially email, are typically intended to be delivered only once. |
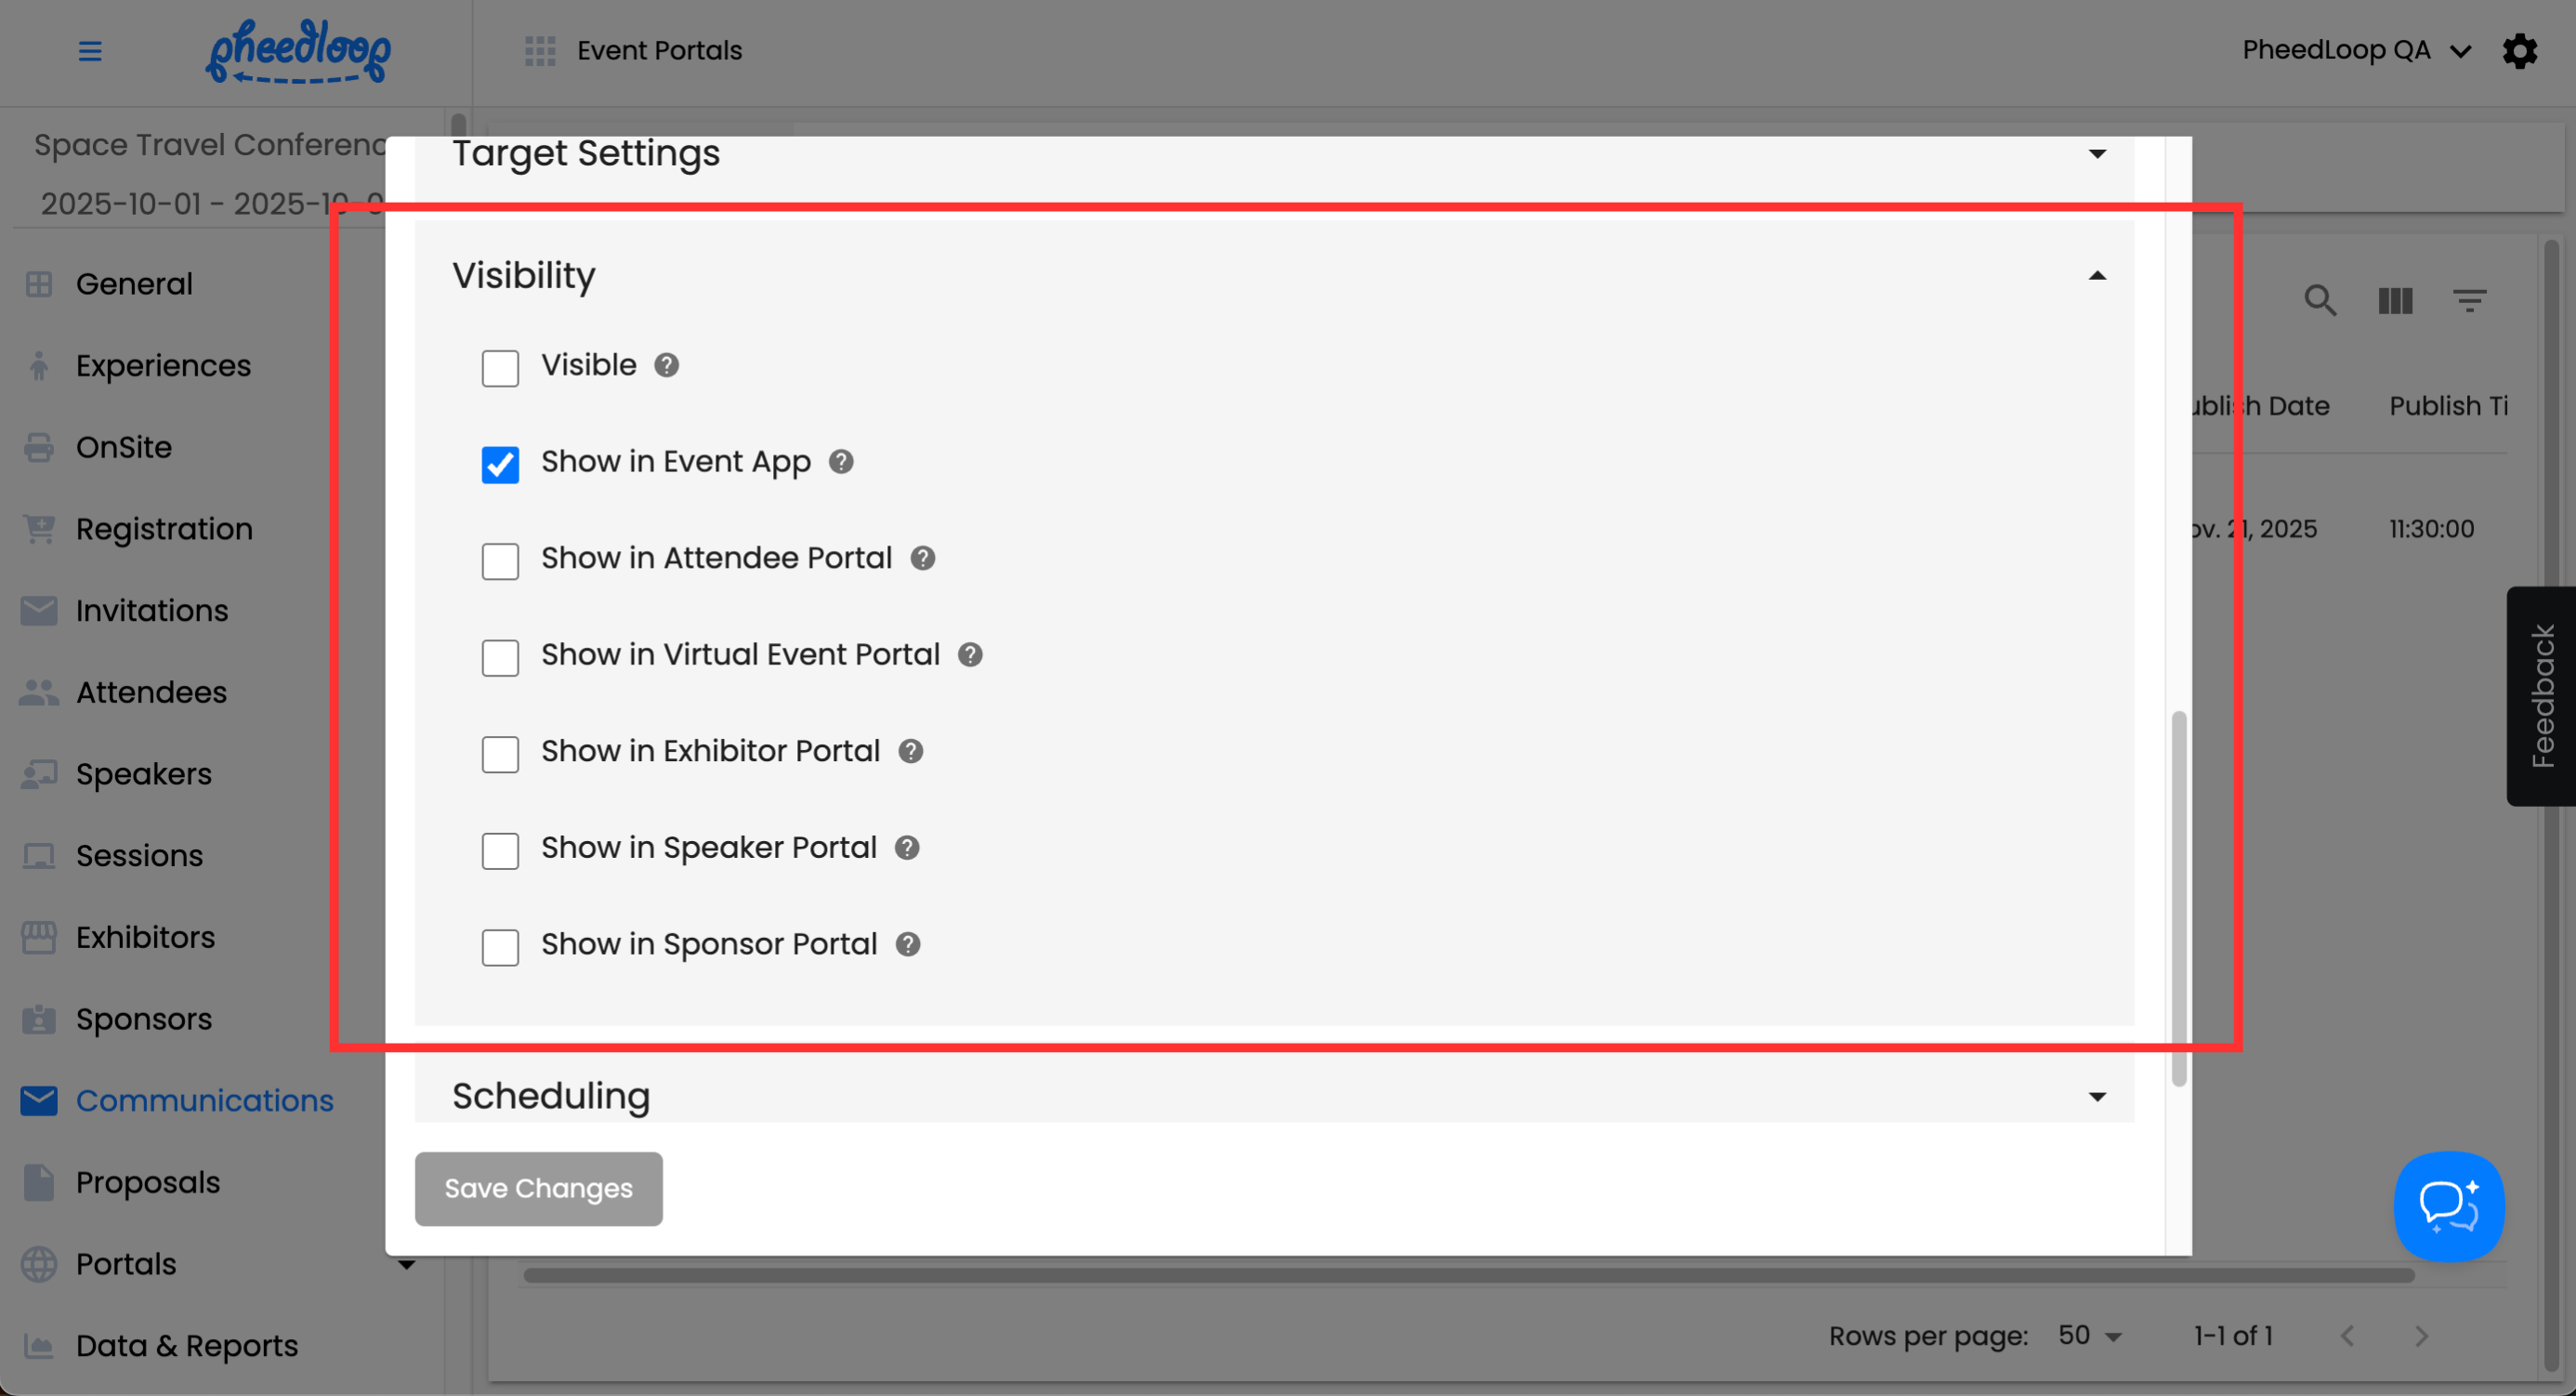
Visibility
In addition to being a delivered message, announcements can also appear on the various front-end portals powered by PheedLoop. When configured, they will appear in designated announcement sections within those portals.

Where the announcement appears can be configured from the Event Dashboard under the Visibility section.
To summarize each setting:
| Title | Description |
|---|---|
| Visible |
Depending on whether your announcement is meant to be an email/push notification or appear in the front-end portals like PheedLoop Go!, your use of this toggle will vary. When it should be toggled off: For announcements scheduled or manually sent via email and push notification, this setting should always be toggled off. This setting will automatically be enabled at the scheduled time or when it is manually sent. When it should be toggled on: If the announcement is only meant to appear on the front-end portals, toggle this setting on when you are ready to display the announcement. |
| Show in Event App | Toggle this on to have the announcement appear in PheedLoop Go!. |
| Show in Attendee Portal | Toggle this on to have the announcement appear in the Event Portal. |
| Show in Virtual Event Portal | Toggle this on to have the announcement appear in the Virtual Portal. |
| Show in Exhibitor Portal | Toggle this on to have the announcement appear in the Exhibitor Portal |
| Show in Speaker Portal | Toggle this on to have the announcement appear in the Speaker Portal |
| Show in Sponsor Portal | Toggle this on to have the announcement appear in the Sponsor Portal. |
Sending Announcements Manually
Now that your announcement is created and settings configured, you are now ready to send these announcements out to your attendees. Announcements can be delivered manually or on an automtated schedule. This section will cover manual deliveries while the next section will go over automatic deliveries.
You have two options when sending announcements out manually. You can send the announcement to a single individual, or you can send it out in bulk to the full list of eligible attendees. Sending announcements manually is ideal when you want immediate control and feedback, want to send the same announcement multiple times, etc.
To send an announcement to a single attendee:
- From the Event Dashboard, navigate to Communications > Announcements
- Select the checkbox next to your announcement
-
Above the Announcements table, select Actions > Send Single Announcement
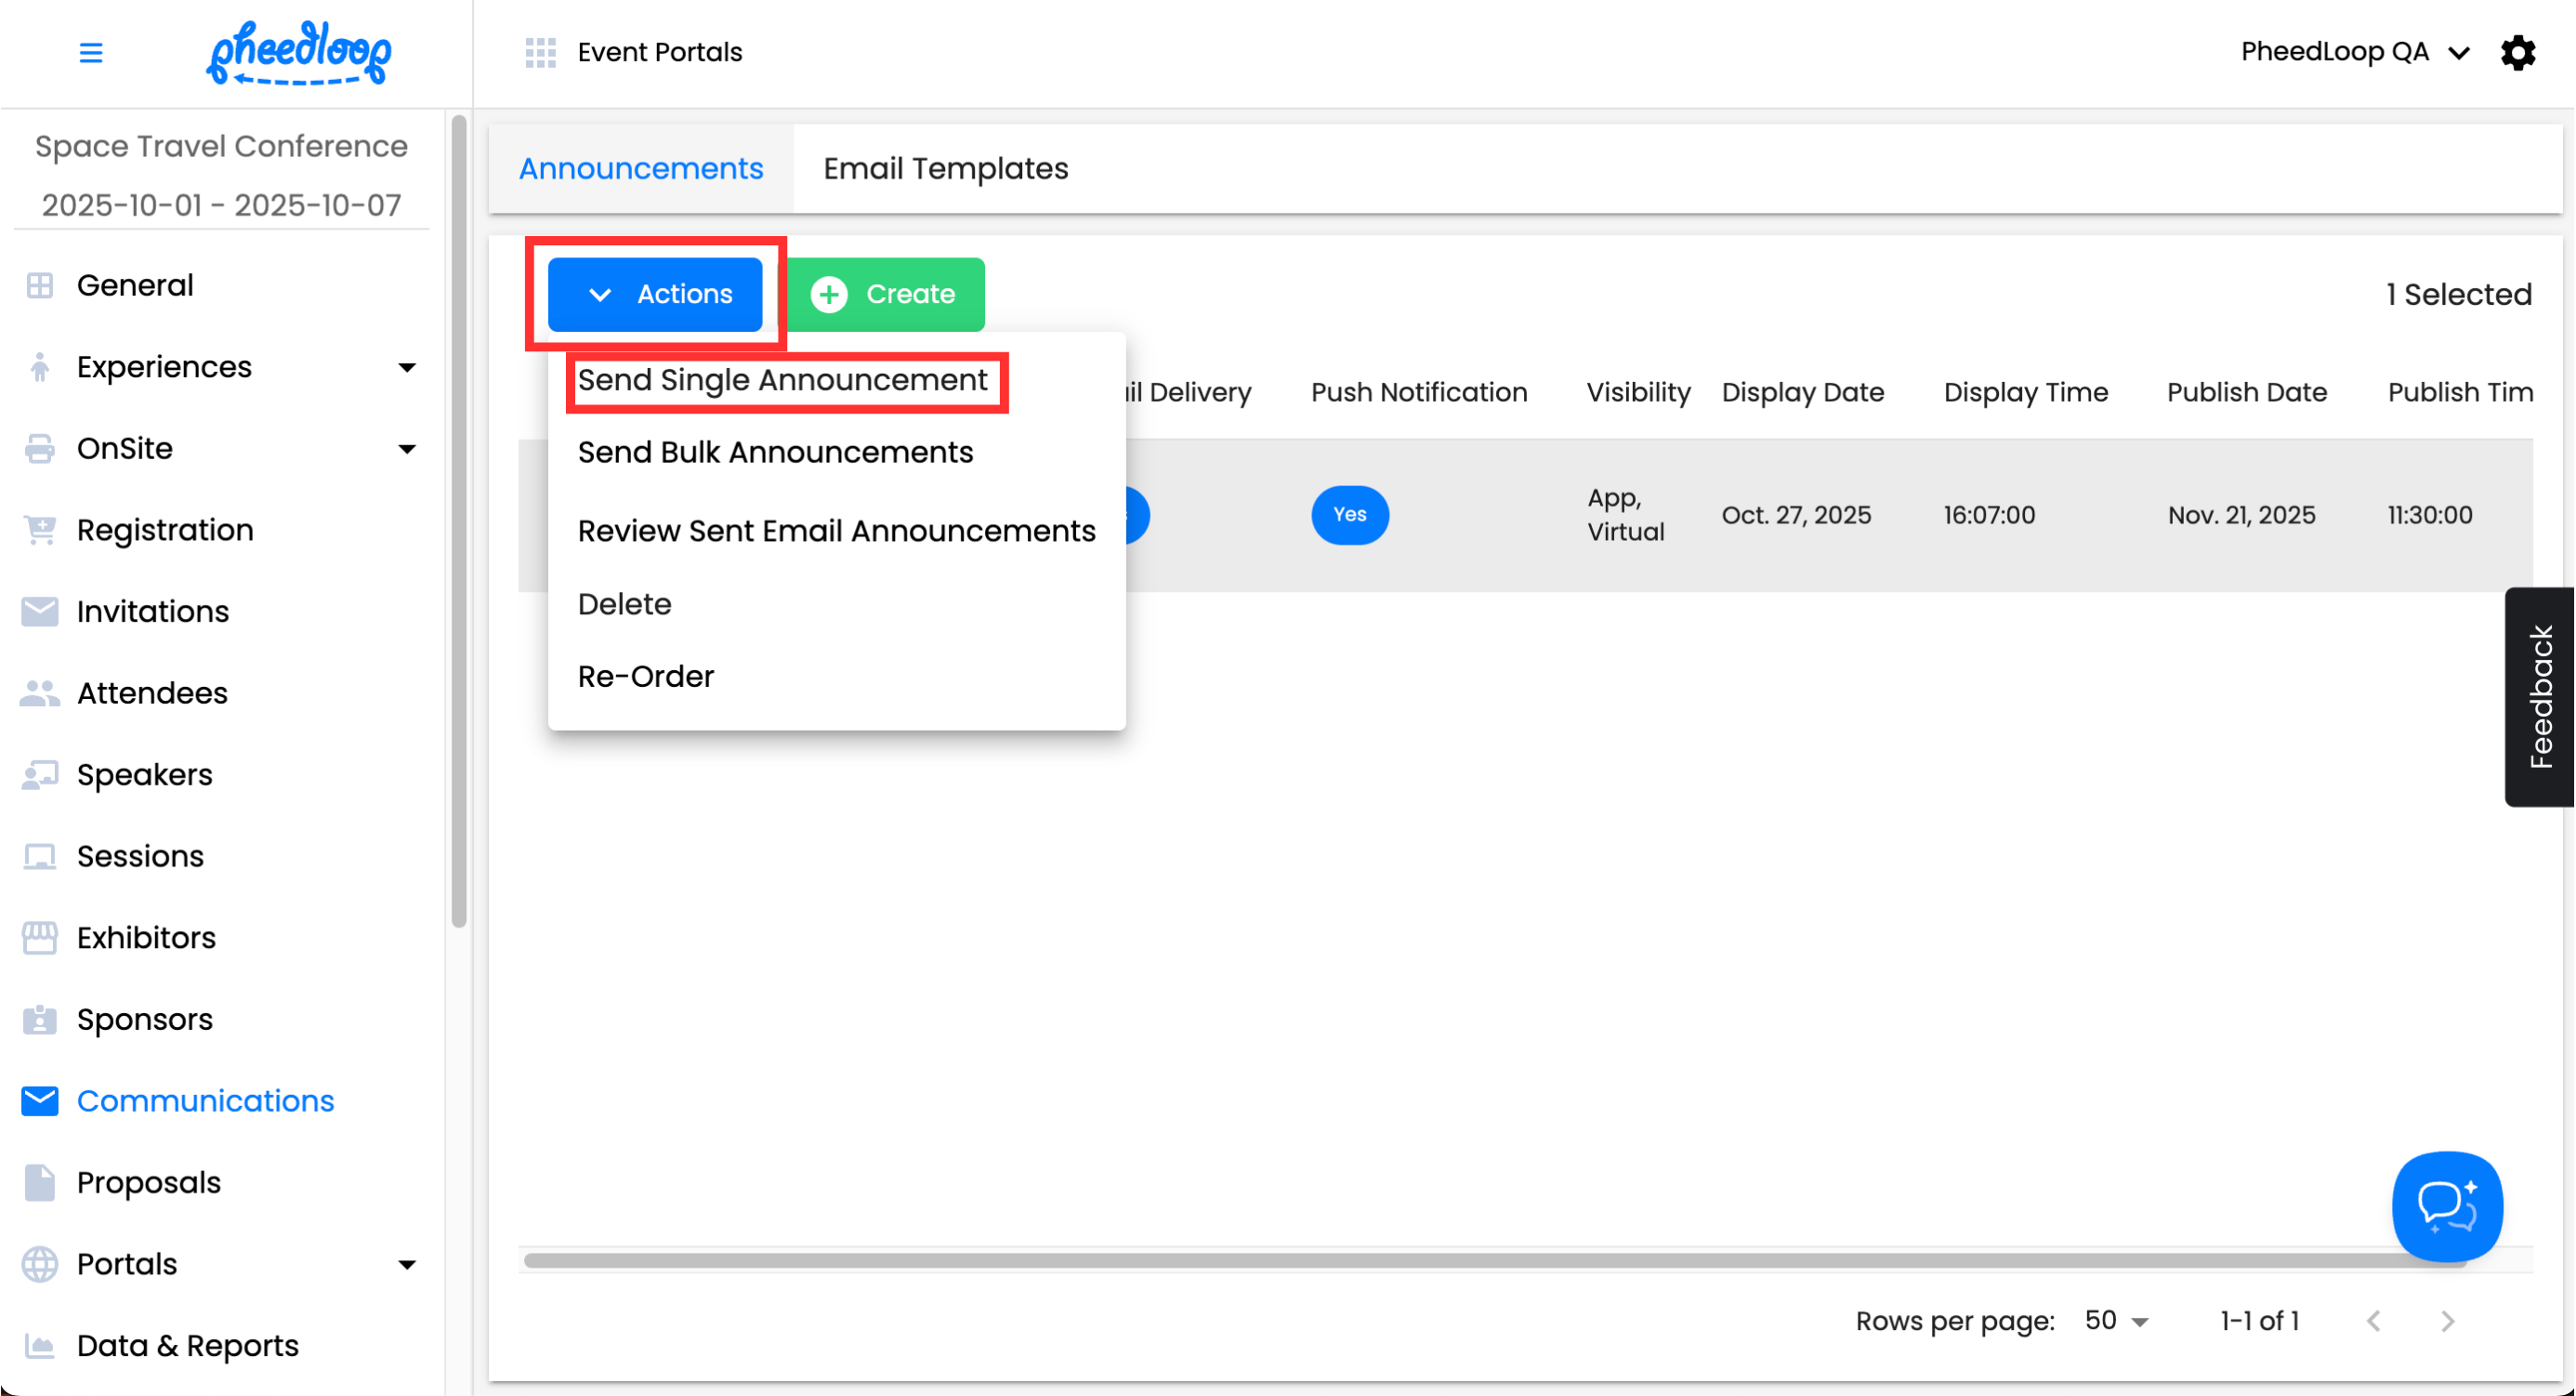
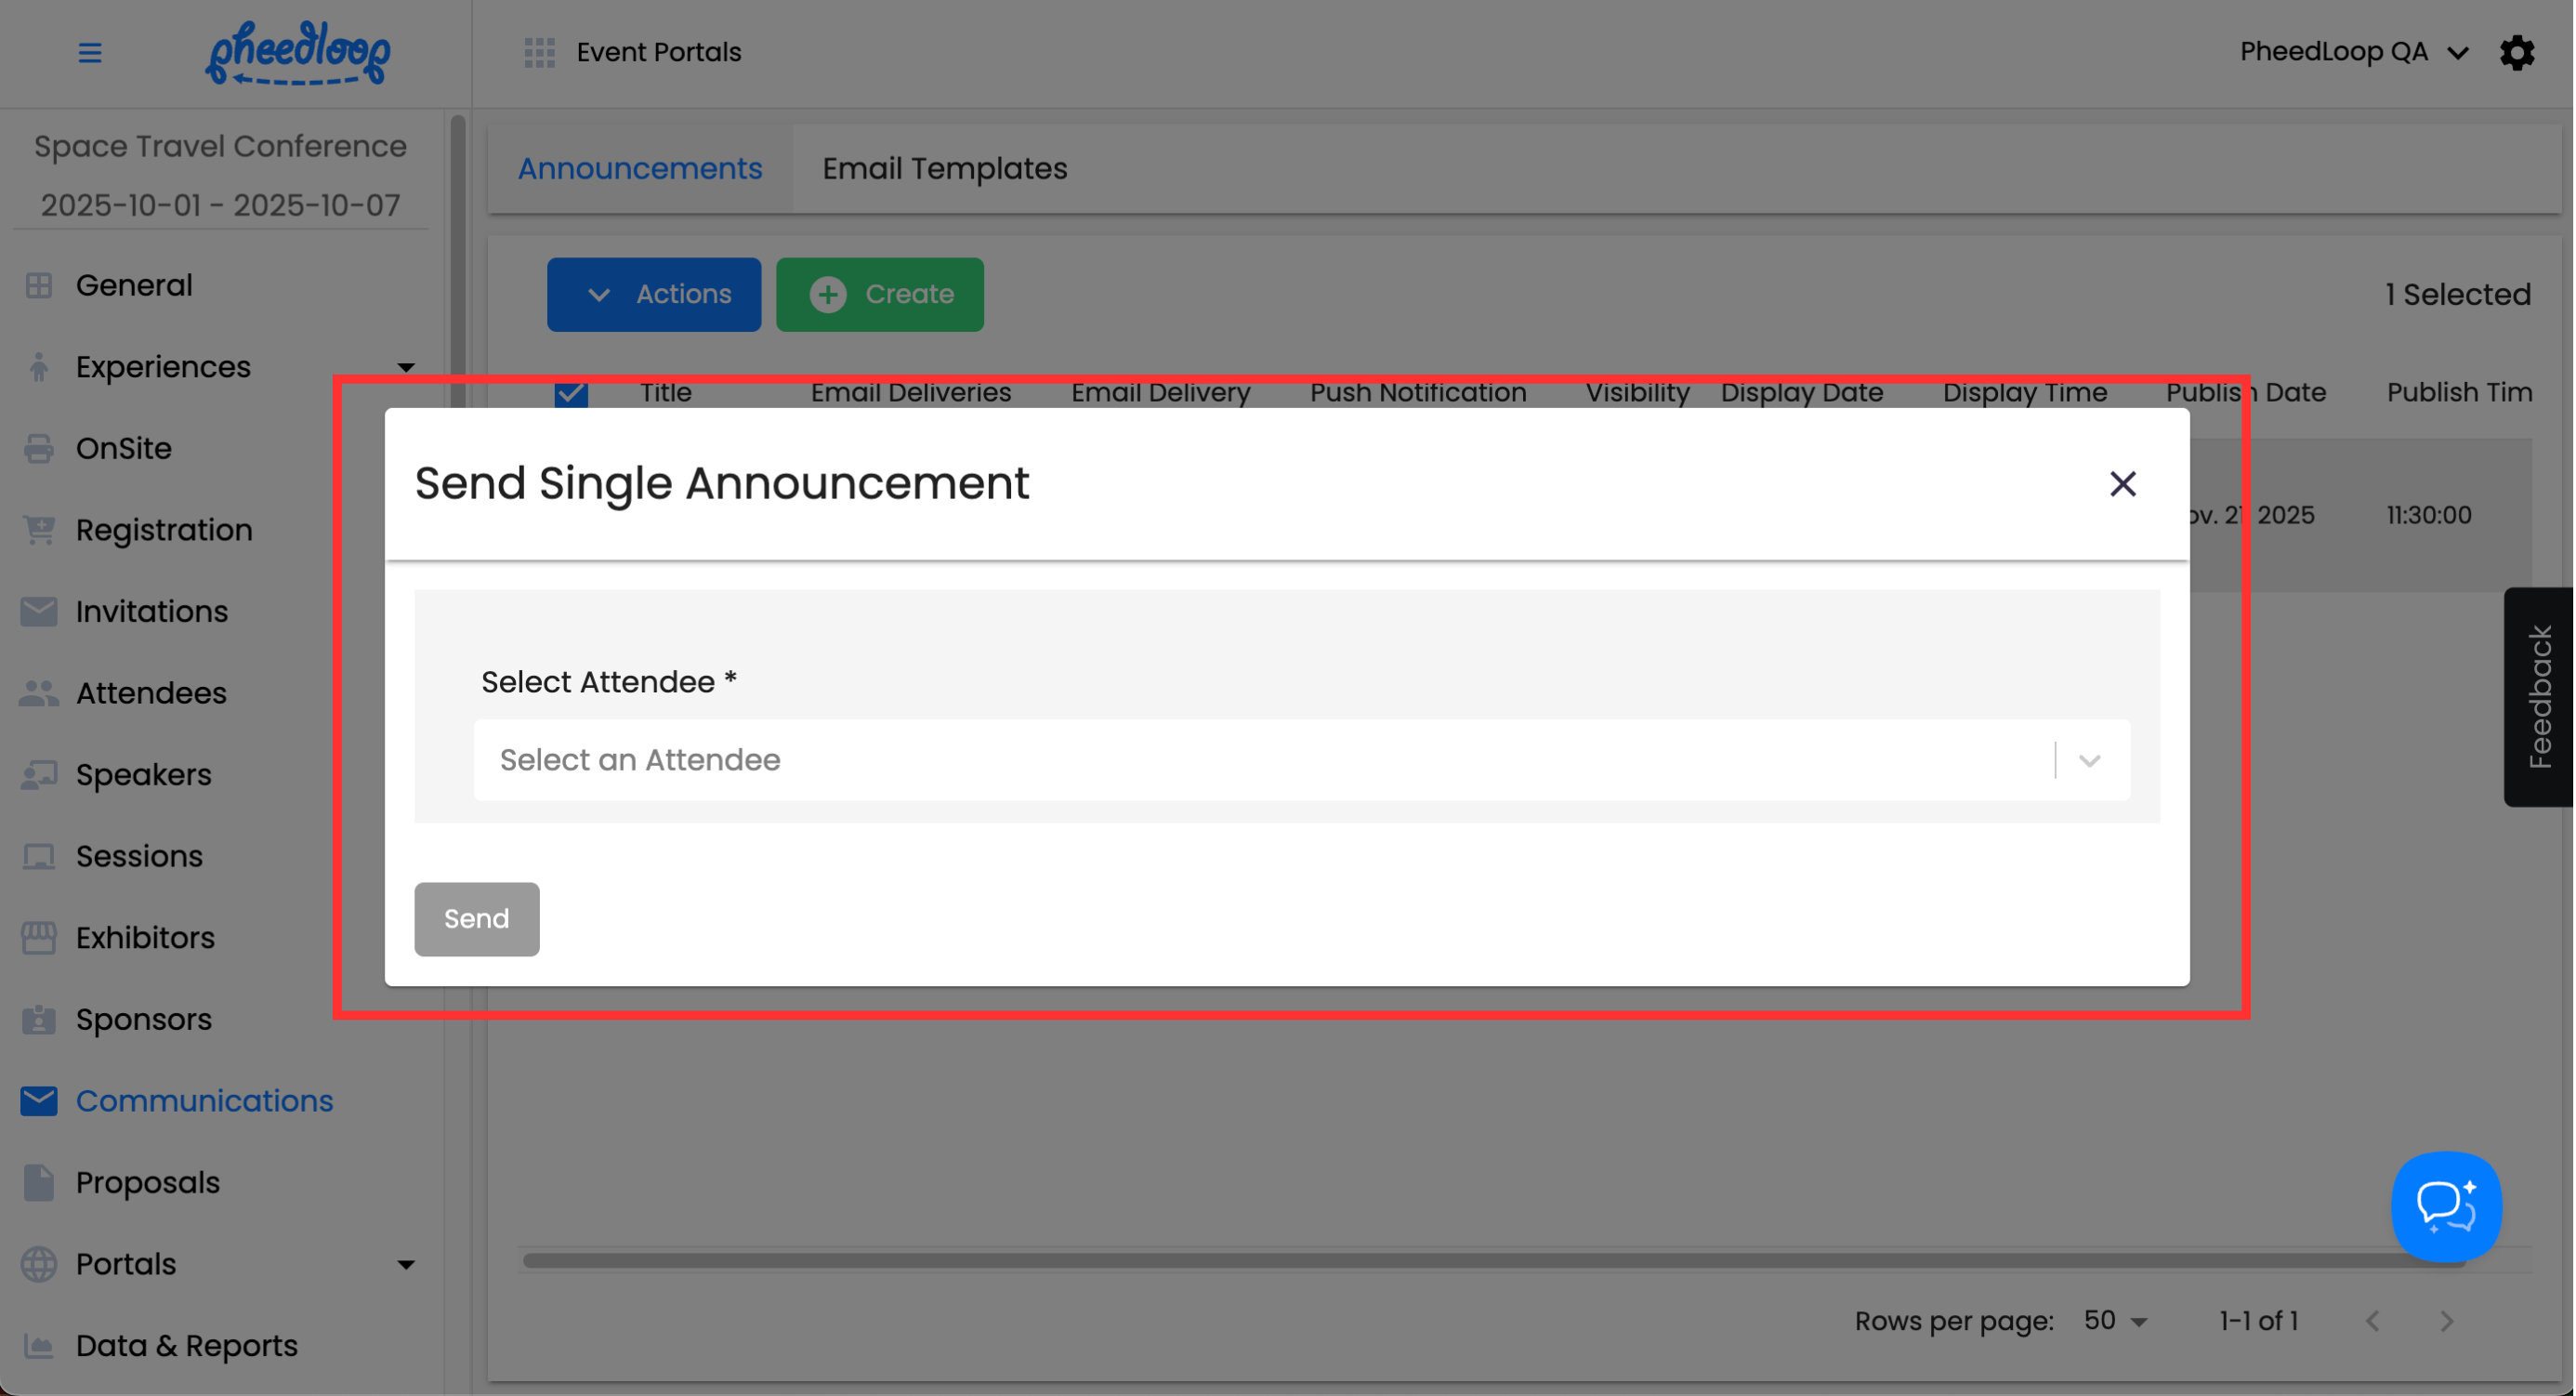
- Under the Select Attendee field, select the attendee you wish to email from the list
-
Select Send


The announcement will now be delivered to your attendee. Please note, the email will be sent regardless of whether the Allow Multiple Deliveries checkbox is enabled.
To send an announcement out to all eligible attendees in bulk:
- From the Event Dashboard, navigate to Communications > Announcements
- Select the checkbox next to your announcement
-
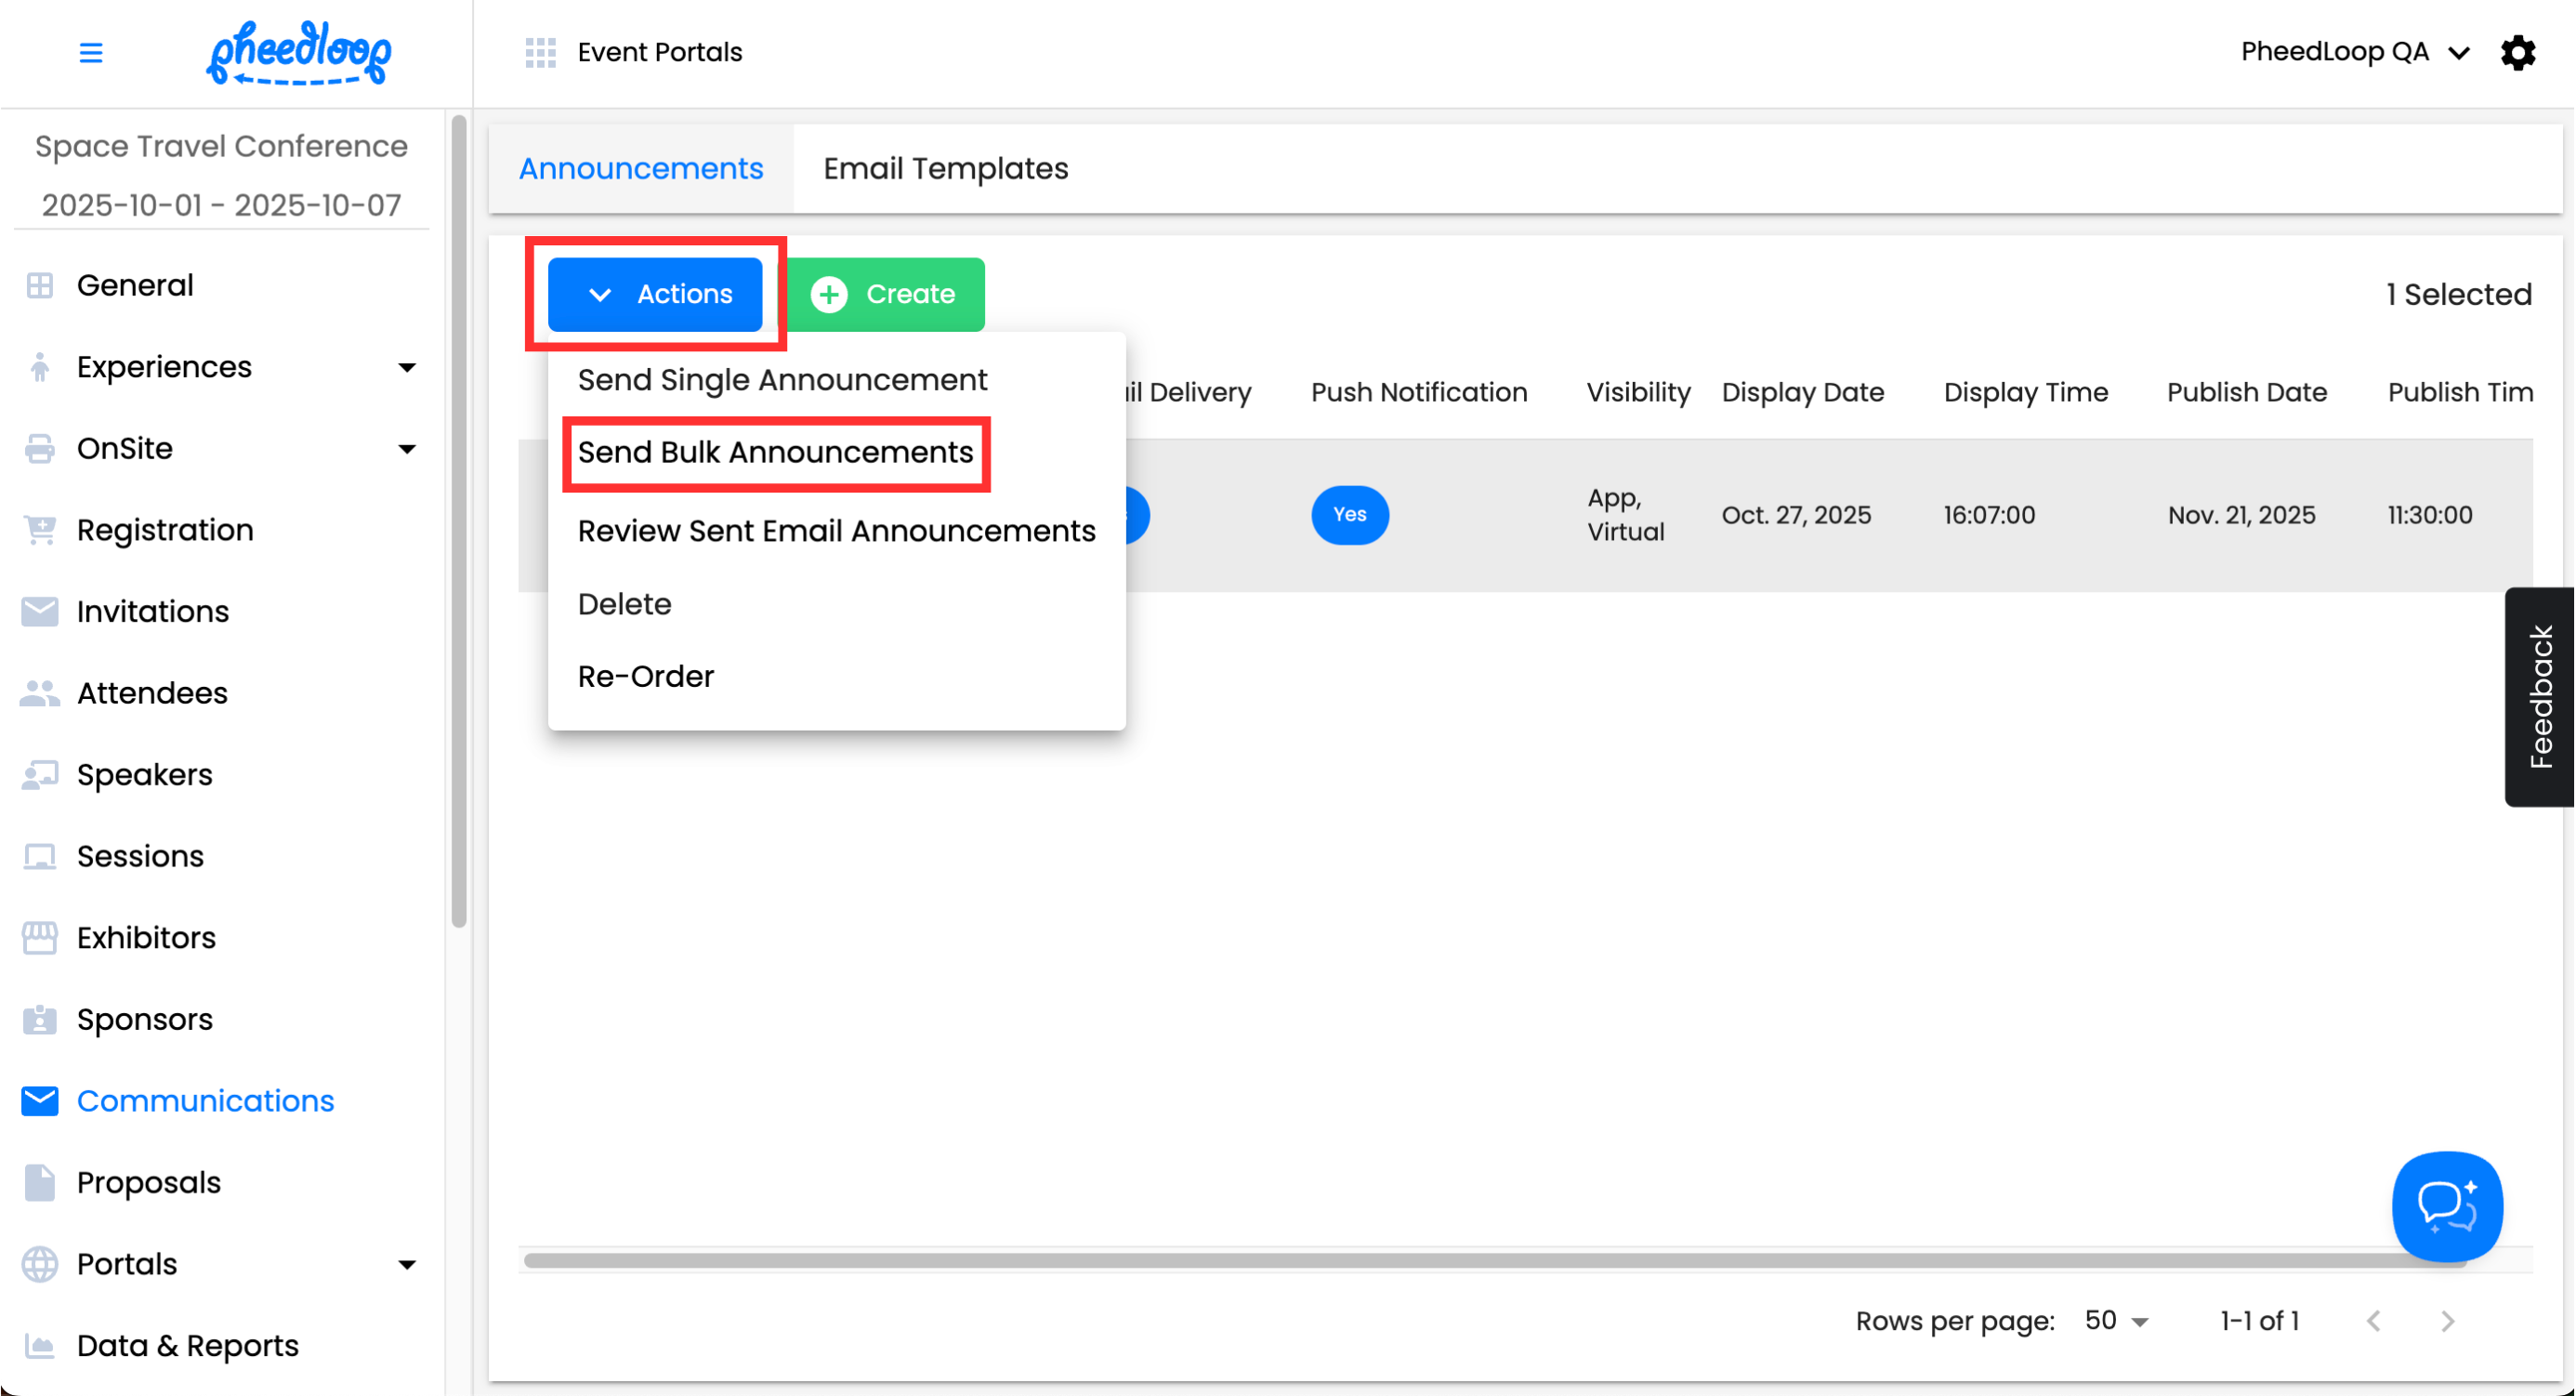
Above the Announcements table, select Actions > Send Bulk Announcements
-
Select Send To
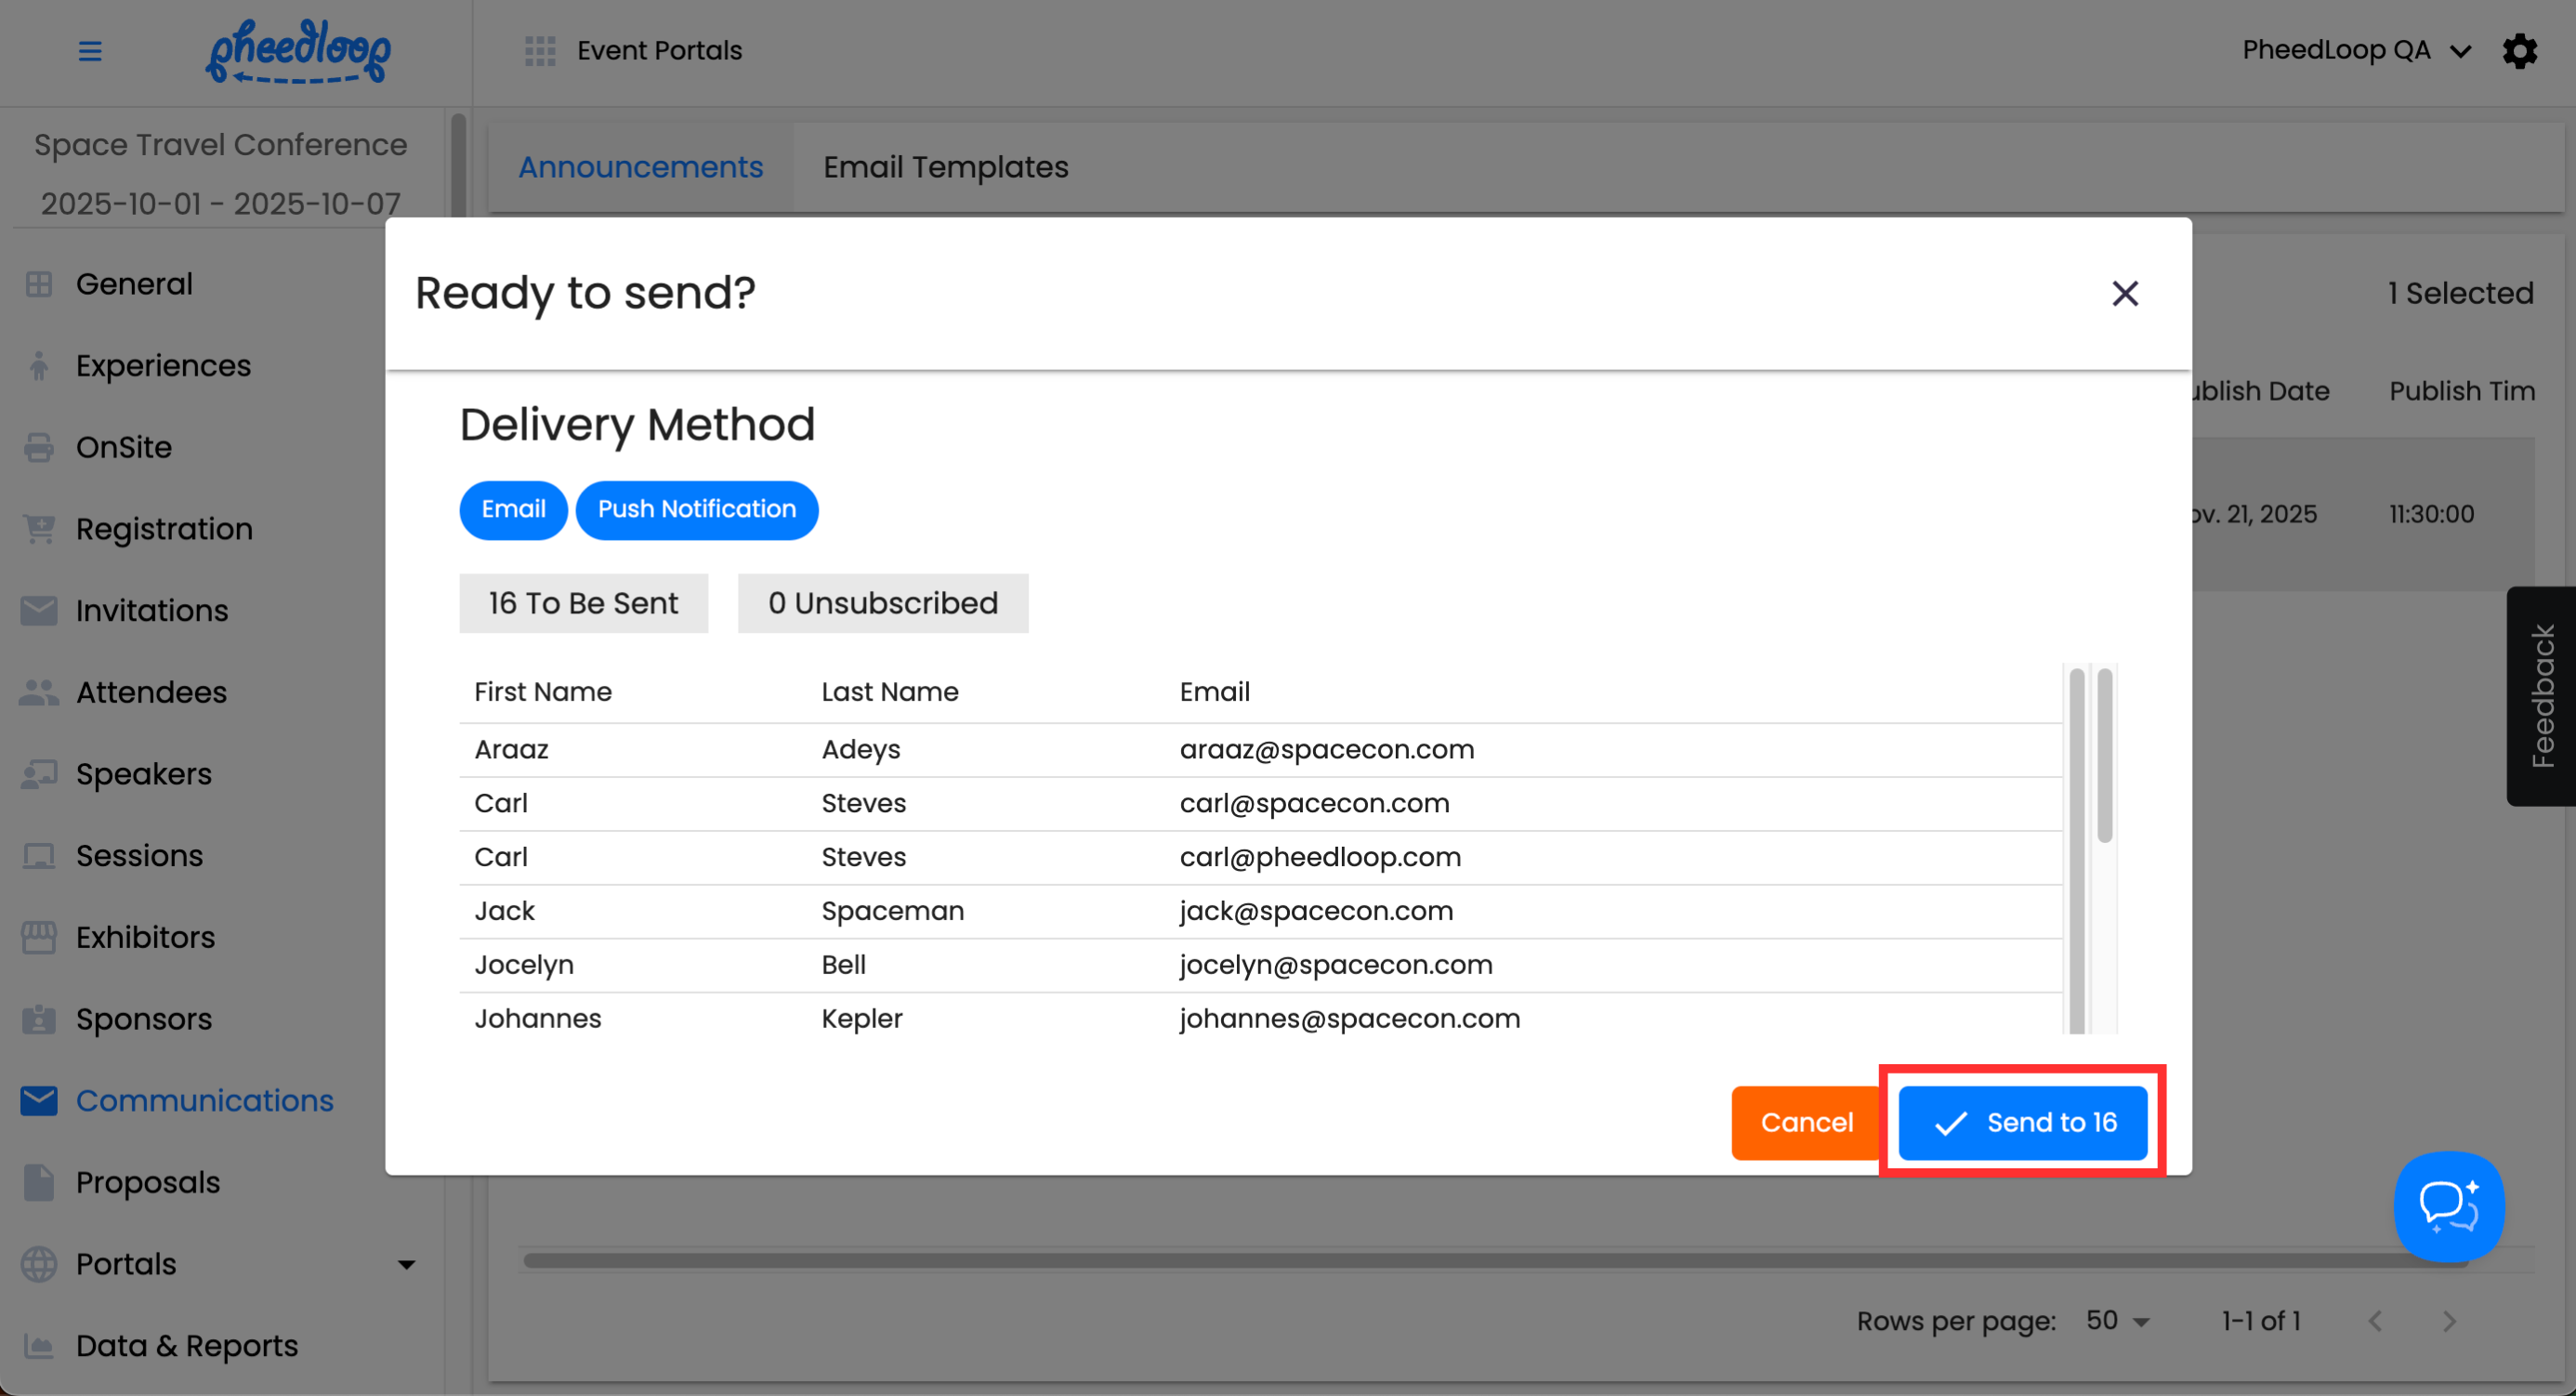


Just like with Send Single Announcement, the email will be sent out as a push notification, email, or both, depending on the options toggled on. If Allow Multiple Deliveries is enabled, attendees who have already been sent the email will be excluded.
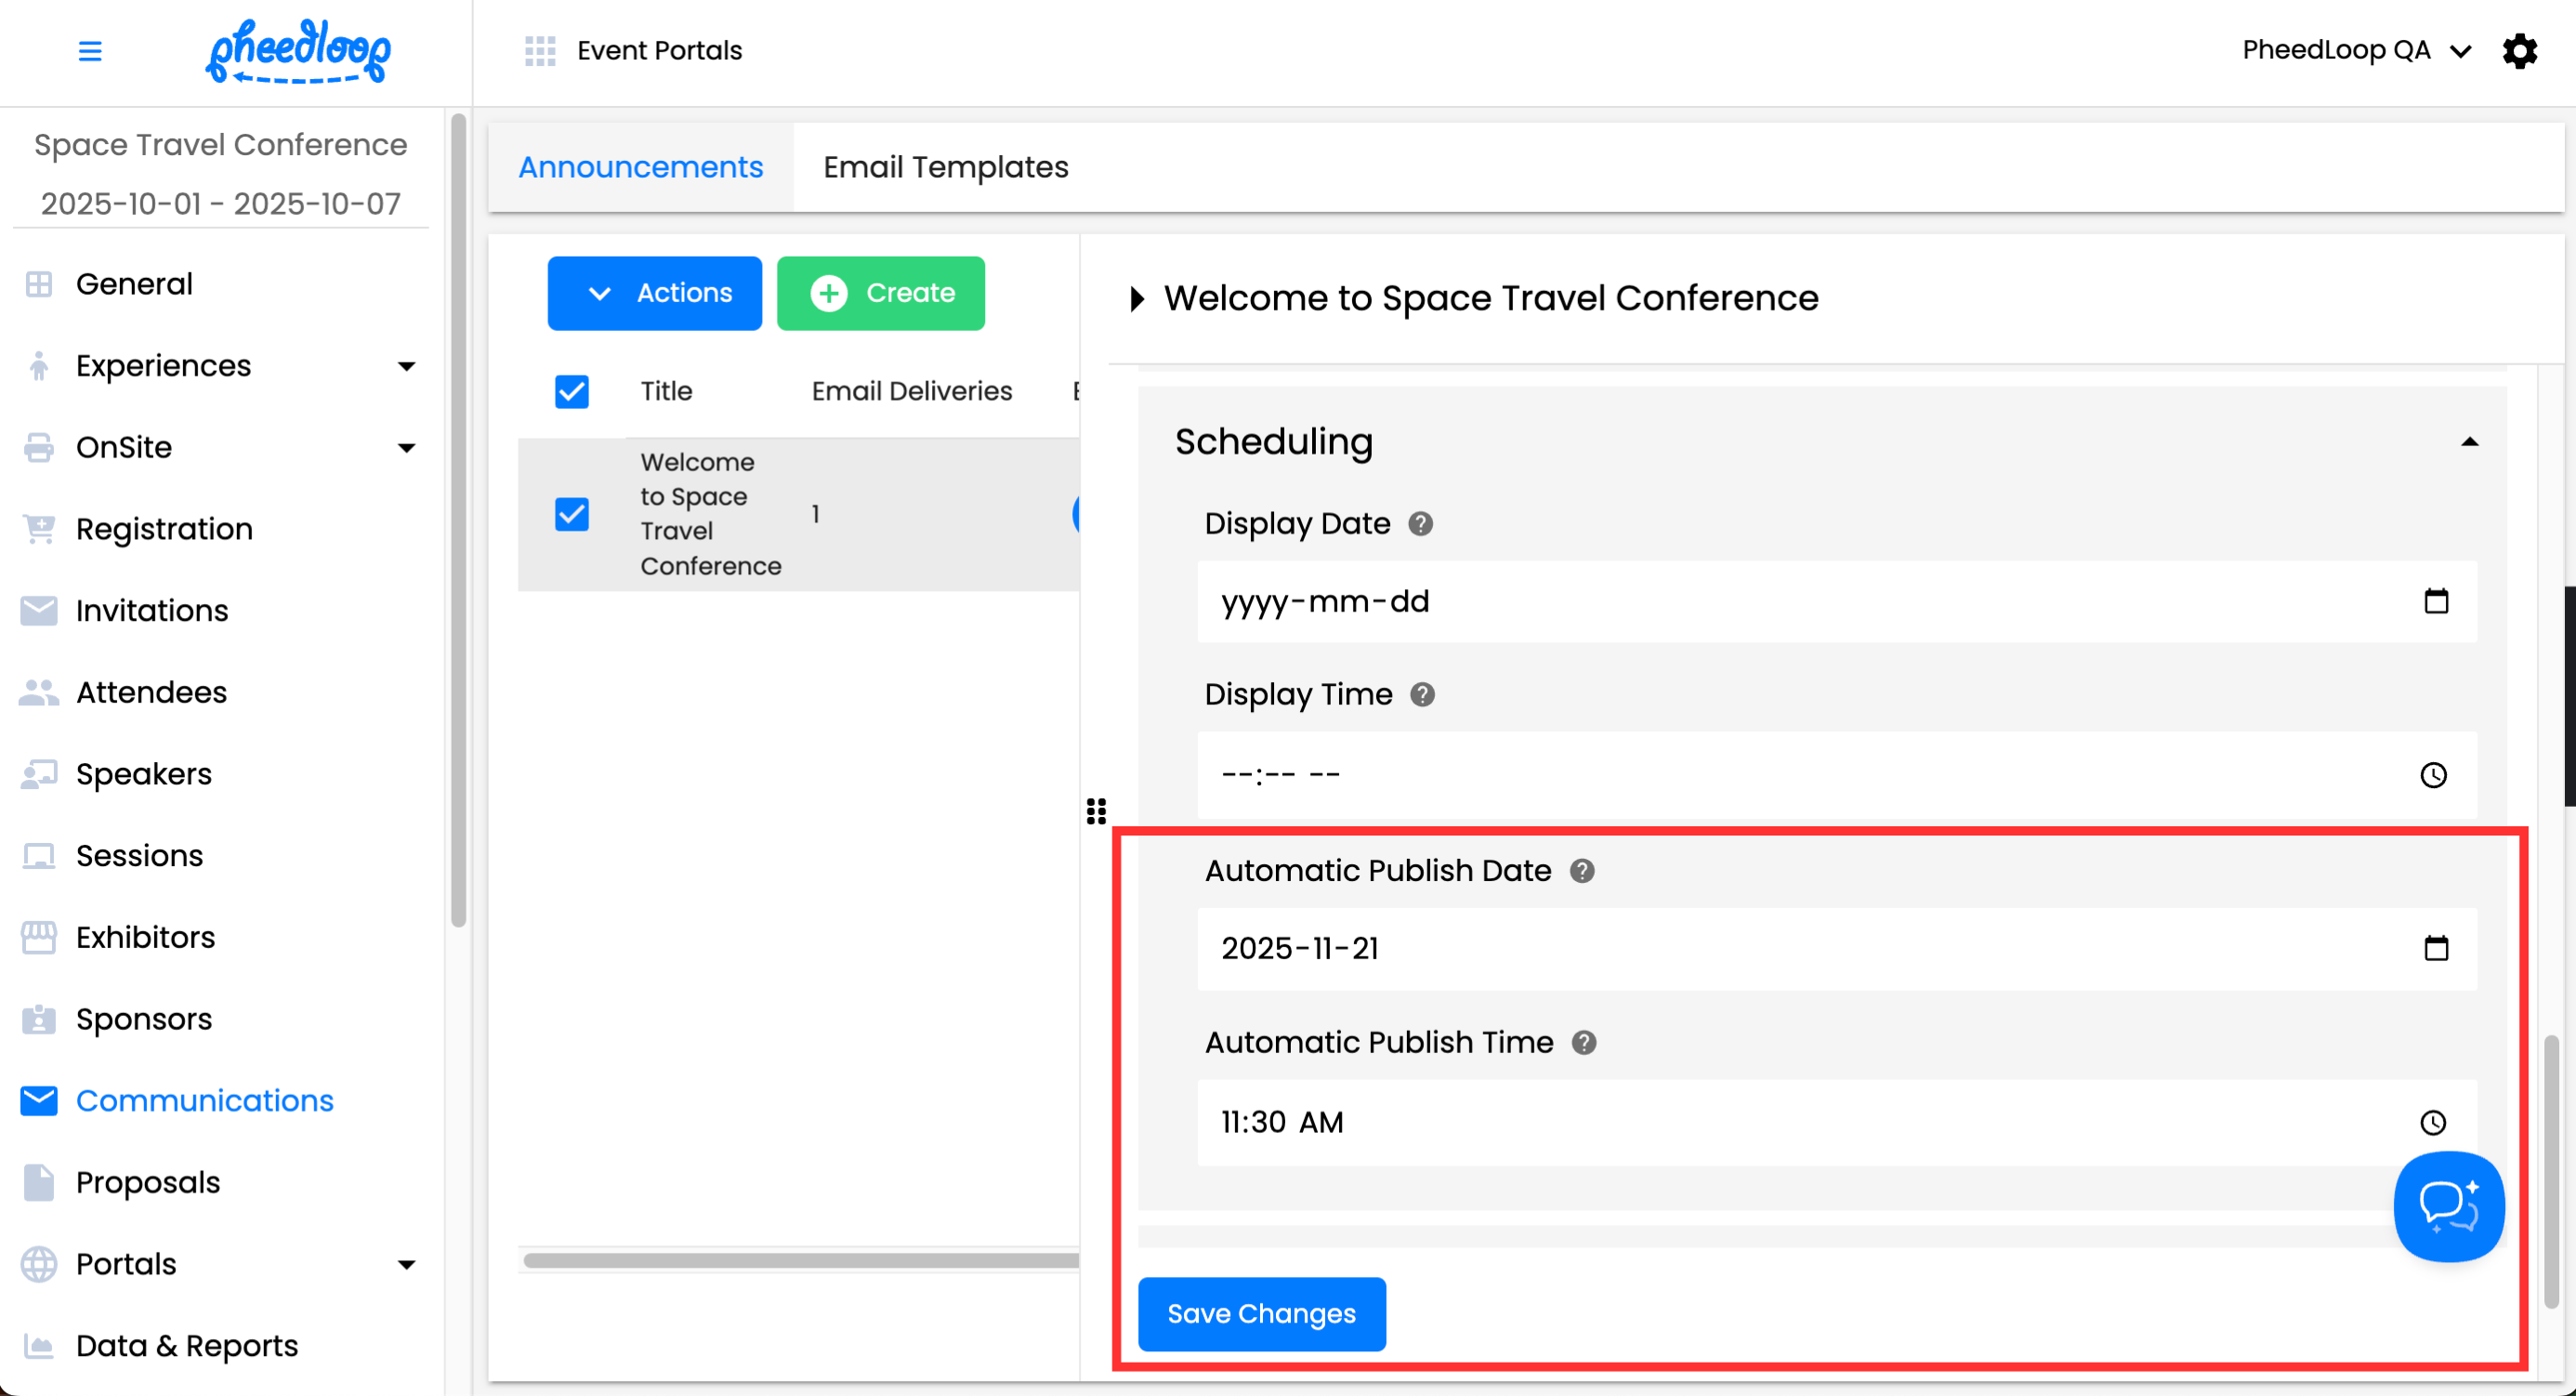
Sending Announcements Automatically
If you prefer a set-and-forget approach or have too many announcements to manage manually, the automatic sending feature can help. It lets you schedule announcements in advance by selecting a specific date and time, and PheedLoop will send them out automatically.
Please note, the Visible checkbox must be toggled off or the announcement will not sent out.
Ensure you have set the Timezone field correctly for your event under General > Details, as this will determine when the announcement is released.
- From the Event Dashboard, navigate to Communications > Announcements
- Select your announcement from the list
-
Scroll down to Visibility and toggle off the Visible checkbox

- Scroll down to Scheduling and fill out the Automatic Publish Date and Automatic Publish Time
-
Select Save Changes


You can adjust any of the remaining options based on your needs, such as selecting which portals (if any) the announcement will appear in, adding a call-to-action button, or including the recipient’s login credentials. Once everything is configured, PheedLoop will automatically send the announcement at the scheduled time (rounded to the nearest 5-minute mark).
Depending on the number of recipients, it may take several minutes for all announcements to be delivered. If the message is time-sensitive, we recommend setting the scheduled time a few minutes earlier to ensure it reaches everyone on time.
Please note that upon release, the announcement's Visible checkbox will be automatically toggled on, and the Display Date and Display Time will be automatically updated based on the Automatic Publish Date and Automatic Publish Time fields.
Advanced Features
While we have covered the basics of announcements, there are many features available with announcements. We have excluded those in this article for simplicity but we recommend glancing at the following articles in case they prove useful.