Enabling and Using Lead Retrieval for In-Person Events
The lead retrieval and video booth combination is an add-on event that organizers can apply per exhibitor at a standard rate of $199 / exhibitor. Lead Retrieval works for virtual, hybrid, and on-site events.
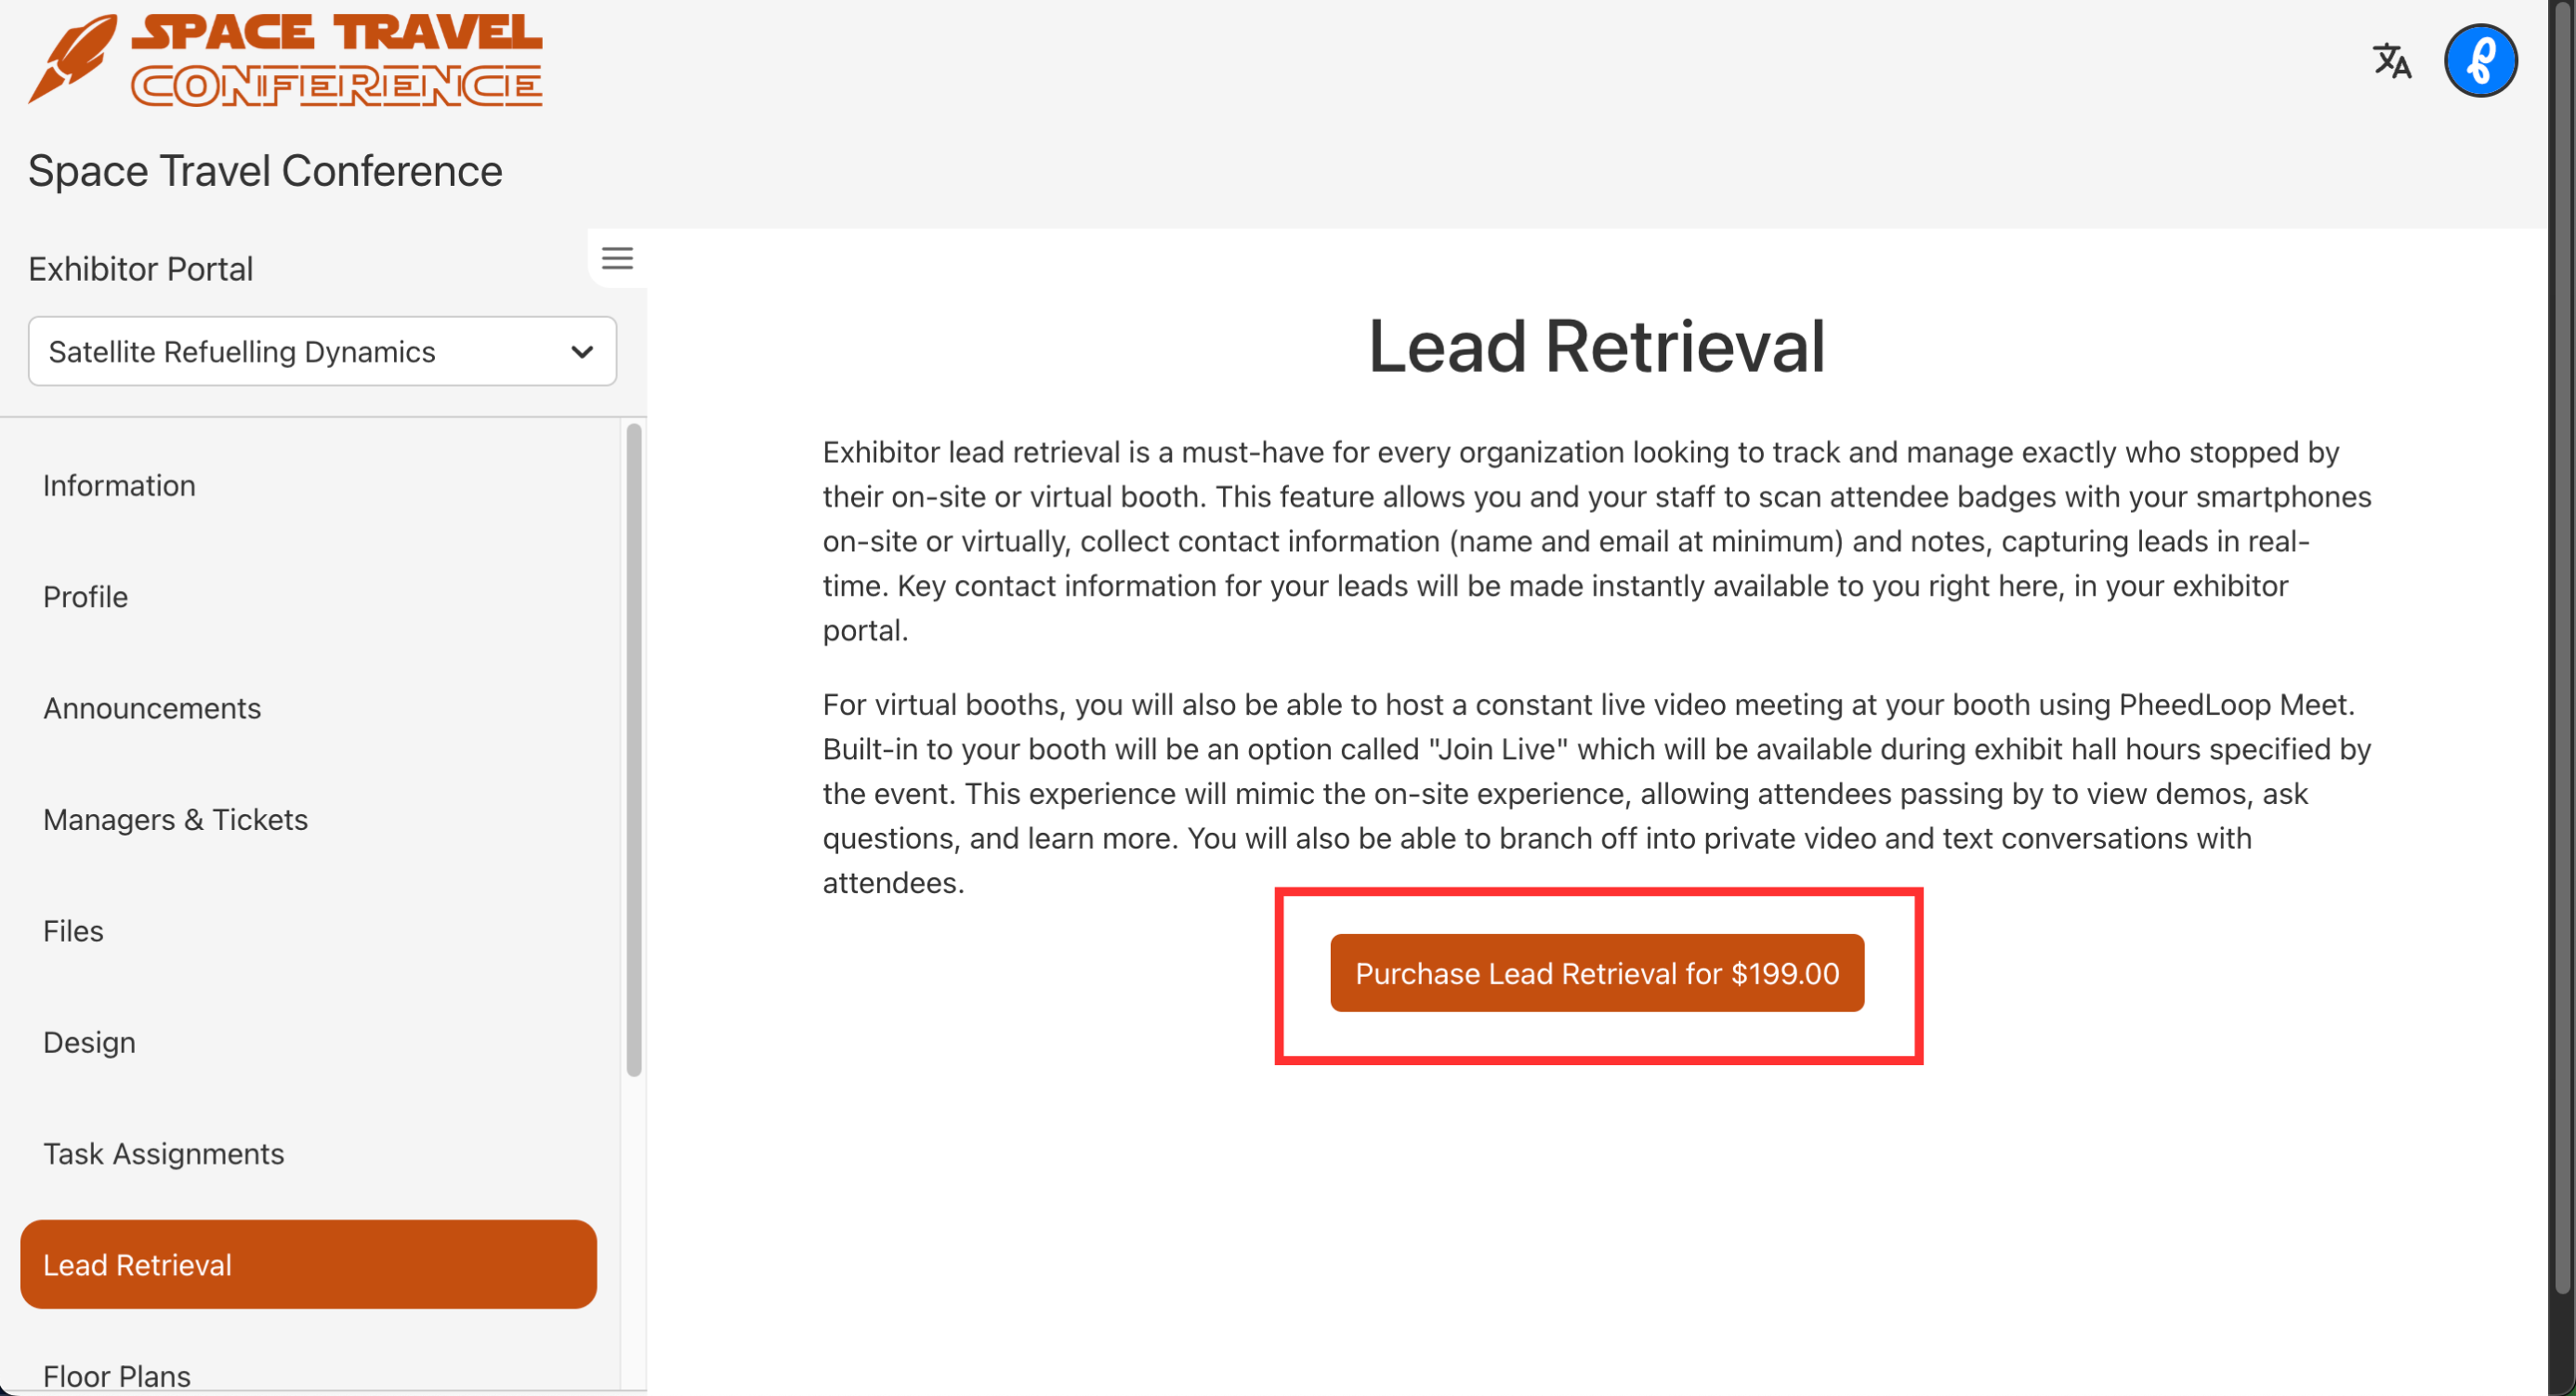
Exhibitor lead retrieval is ideal for organizations looking to track and manage exactly who stopped by their on-site or virtual booth. This feature allows staff to scan attendee badges with their smartphones on-site or virtually, collect contact information and notes, and capture leads in real-time. Key contact information for your leads will be made instantly available in the exhibitor portal.
Event organizers can also retrieve this information through the Event Dashboard.
If interested, exhibitors can purchase lead retrieval via the exhibitor portals, or event organizers can purchase the credits with their admin account and enable the feature for the exhibitor. This article will cover Lead Retrieval from the perspective of both an event organizer and an exhibitor.
Purchasing Lead Retrieval from the Exhibitor Portal
If access to the Exhibitor Portal is not available, please contact the Event Administrator(s). Once access is granted, lead retrieval can be purchased through the following:
- From the Exhibitor Portal, navigate to Lead Retrieval
Select Purchase Lead Retrieval for $199 USD
Fill out the payment information and select Confirm


Using Lead Retrieval On-Site
When using Lead Retrieval for in-person events, exhibitors will need to use PheedLoop's Mobile Event App.
Download PheedLoop Go!
The Mobile Event App can be downloaded from both the Play Store for Android devices and App Store for iOS devices.
Accessing the Lead Capture Tool
- From the Mobile Event App, navigate to left hand side navigation menu

- Under Exhibitor Tools, select Lead Capture

- Select Launch Scanner

- Scan the QR code

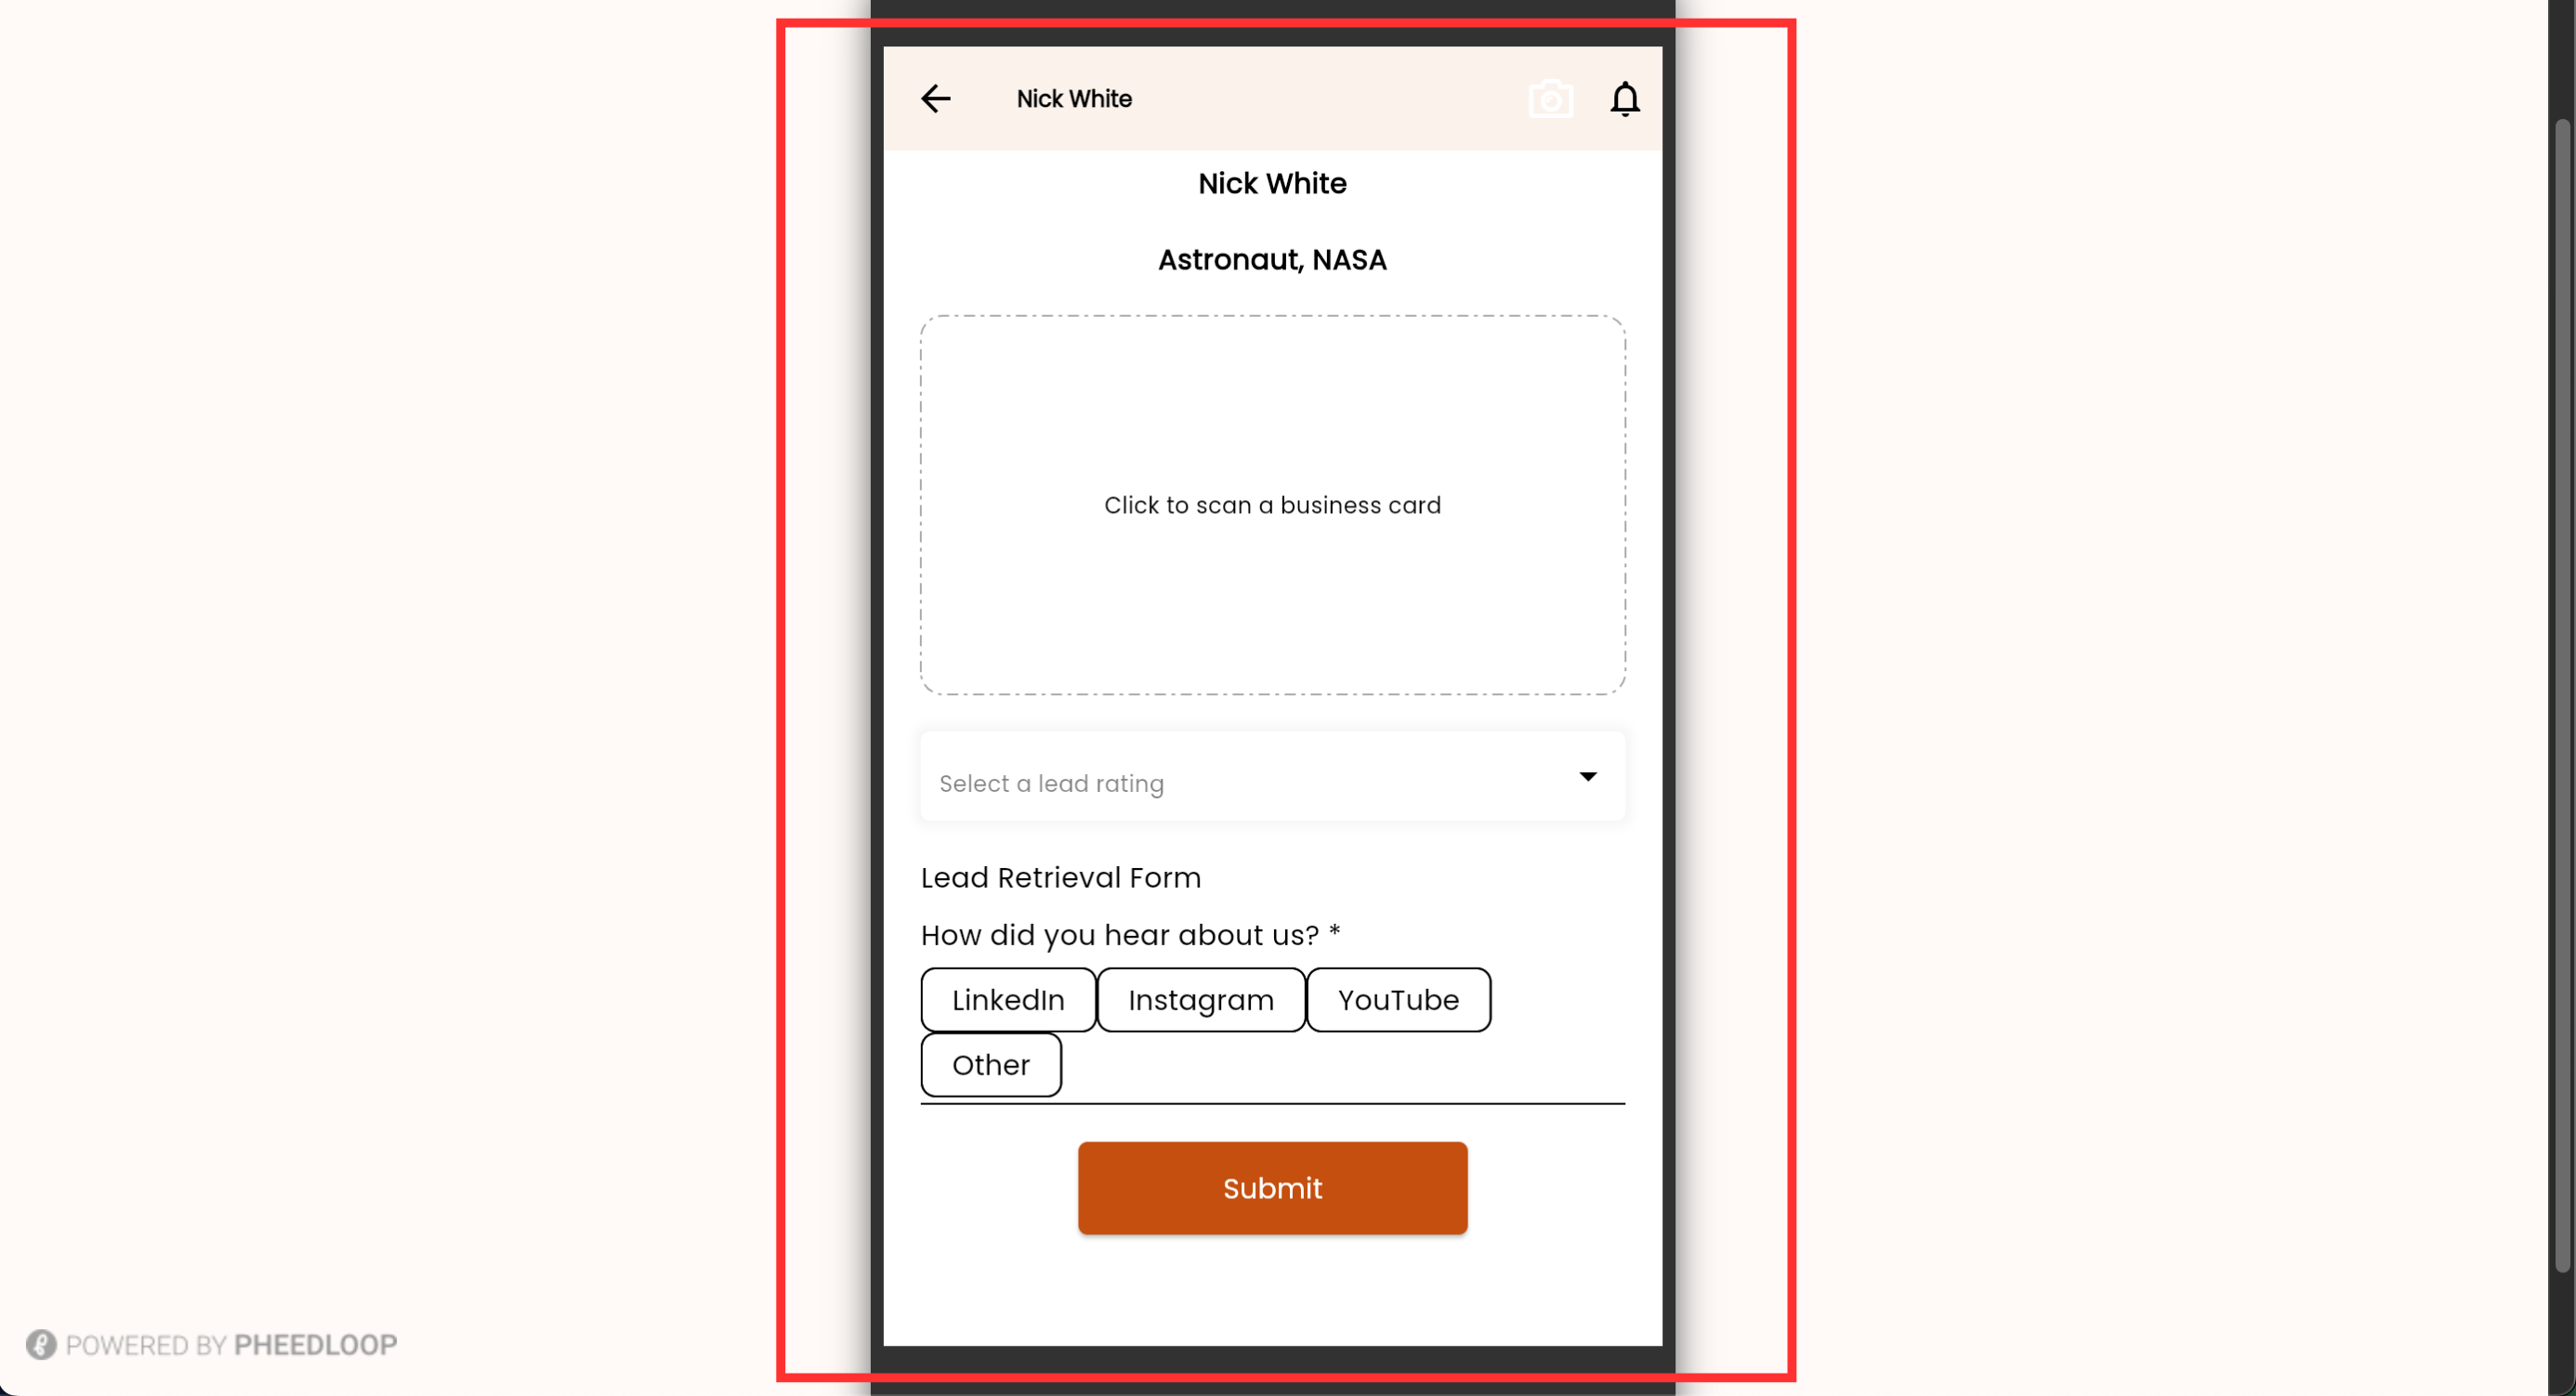
- Under the Click to scan a business card field, select this option to include an optional business card along with the captured lead

- Under the Select a lead rating field, select URGENT, HOT, WARM, or COLD, based on how high of a priority the captured lead is

- If you have attached an exhibitor form, the form will be available at the bottom of the page

- Select Submit

Offline scanning is available for attendee badge scanning and exhibitor lead capture. Once your device reconnects to wifi, the leads that were captured will sync in real time.
Revisiting Your Leads from the Event App
- From the Mobile Event App, navigate to left hand side navigation menu
Under Exhibitor Tools, select Lead Capture

- Select View Leads
Select the lead you would like to view/edit from the list

- Edit any information similar to when you scanned them originally
Select Submit


Providing the QR Code to the Exhibitor
Typically, attendees will have their badges printed with the QR code already on them. However, if the attendee would like to provide it using the mobile event app, you can follow the instructions below.
- From the Mobile Event App, navigate to the left hand side navigation menu
Select eBadge
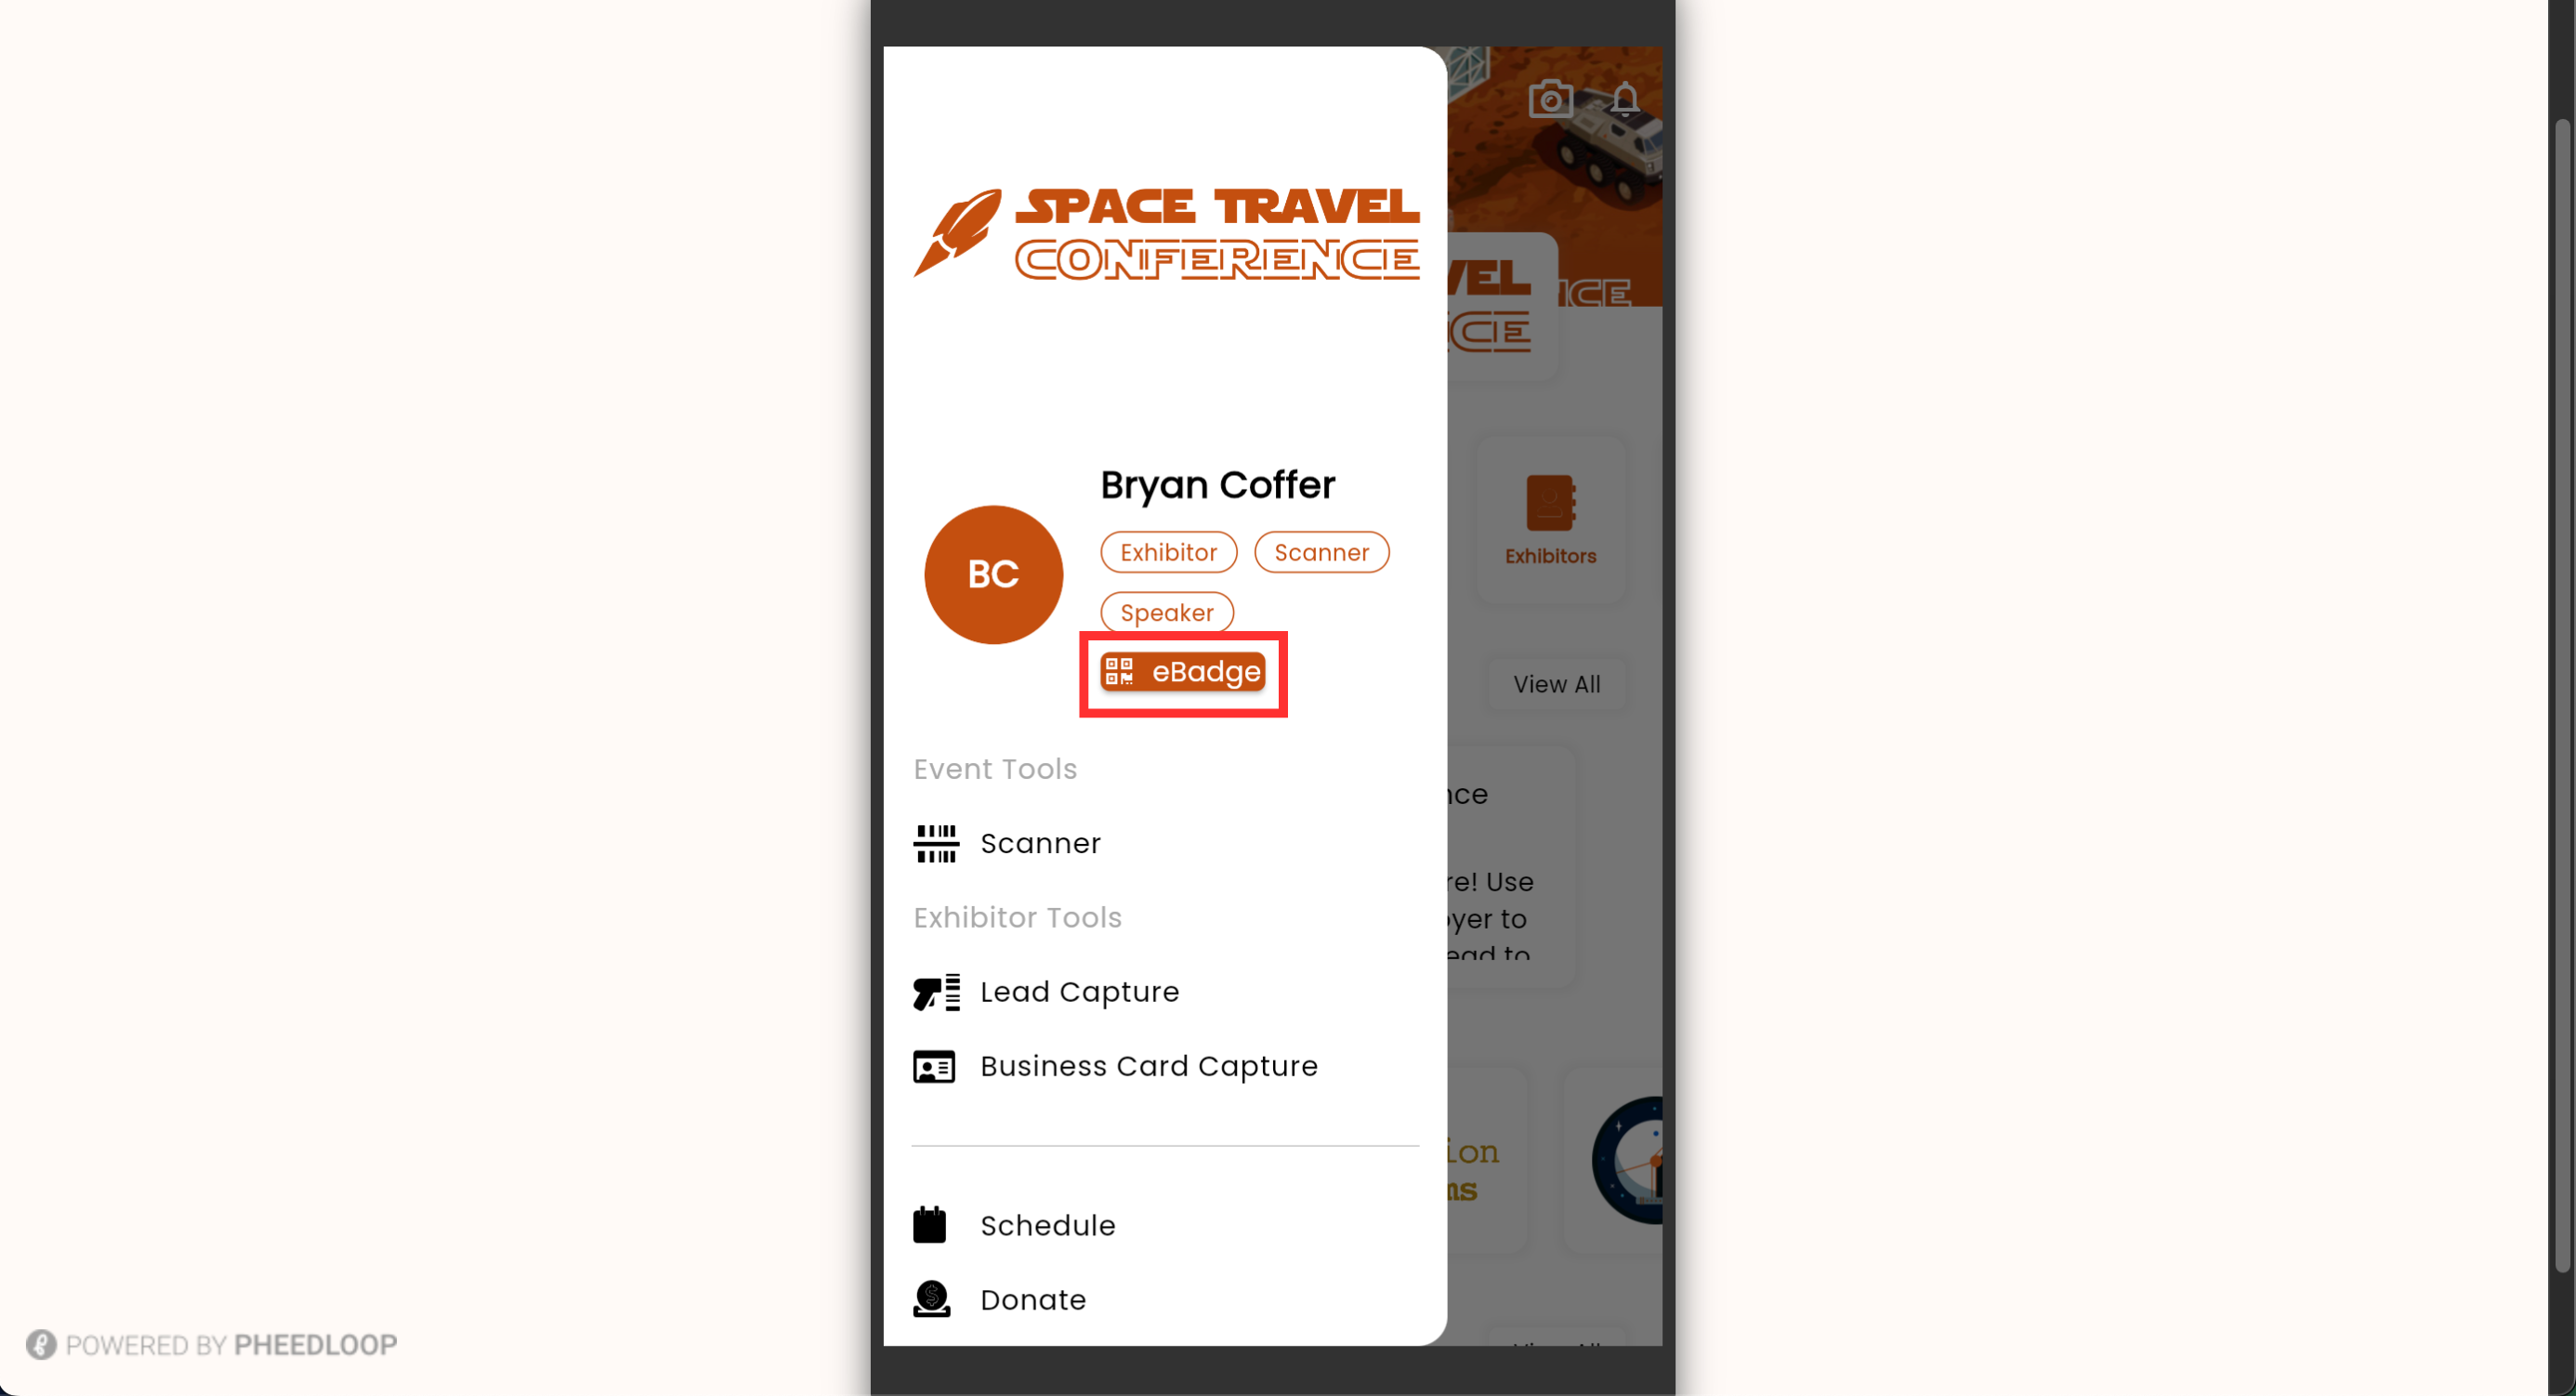

The attendee’s QR code is now visible in the app. Show this QR code to the exhibitor so they can scan you as a lead.
Sharing Leads as an Attendee
As Attendees can be scanned for Lead Retrieval, attendees can also scan QR Codes for Exhibitors to submit their information. The main benefit of this is removing the need for a third party to scan the attendee.
The Exhibitor QR Code is accessible from the Exhibitor Portal and Event Dashboard.
Accessing the Lead Capture QR Code from the Exhibitor Portal
- From the Exhibitor Portal, navigate to Lead Retrieval > Instructions
- Scroll down to the QR Code
Under the QR Code, select Download
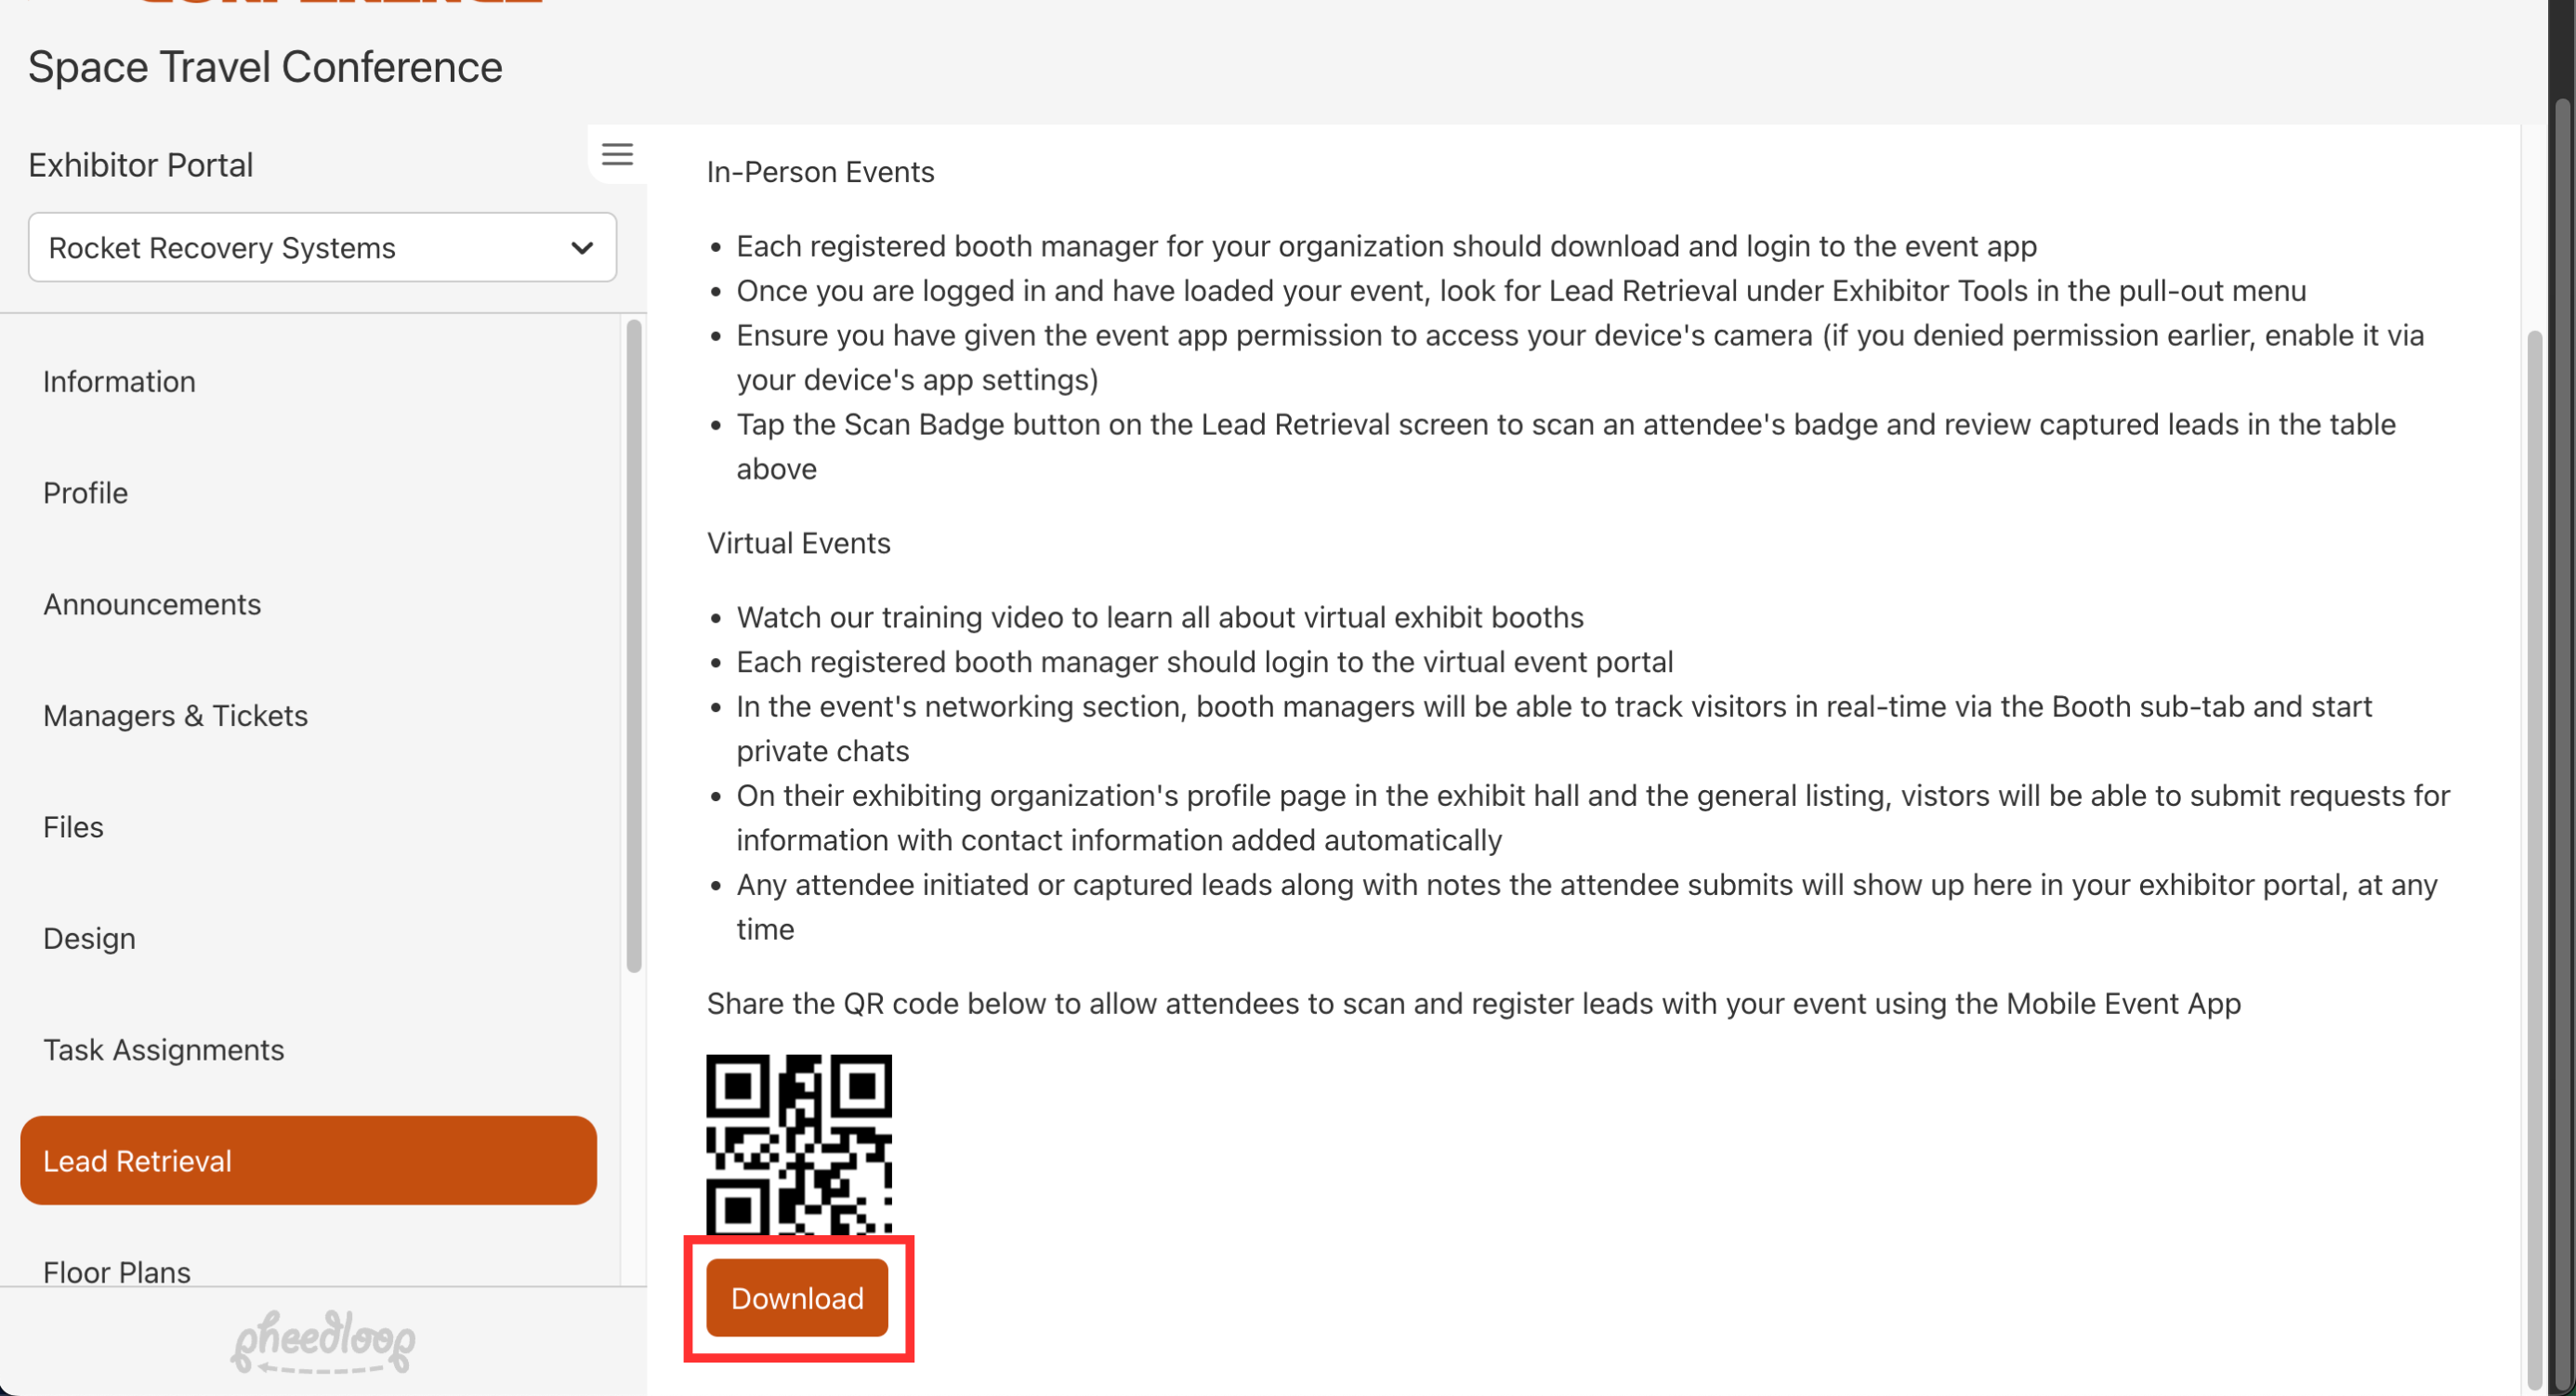

The QR code can now be printed out and displayed at your venue for Attendees to use.
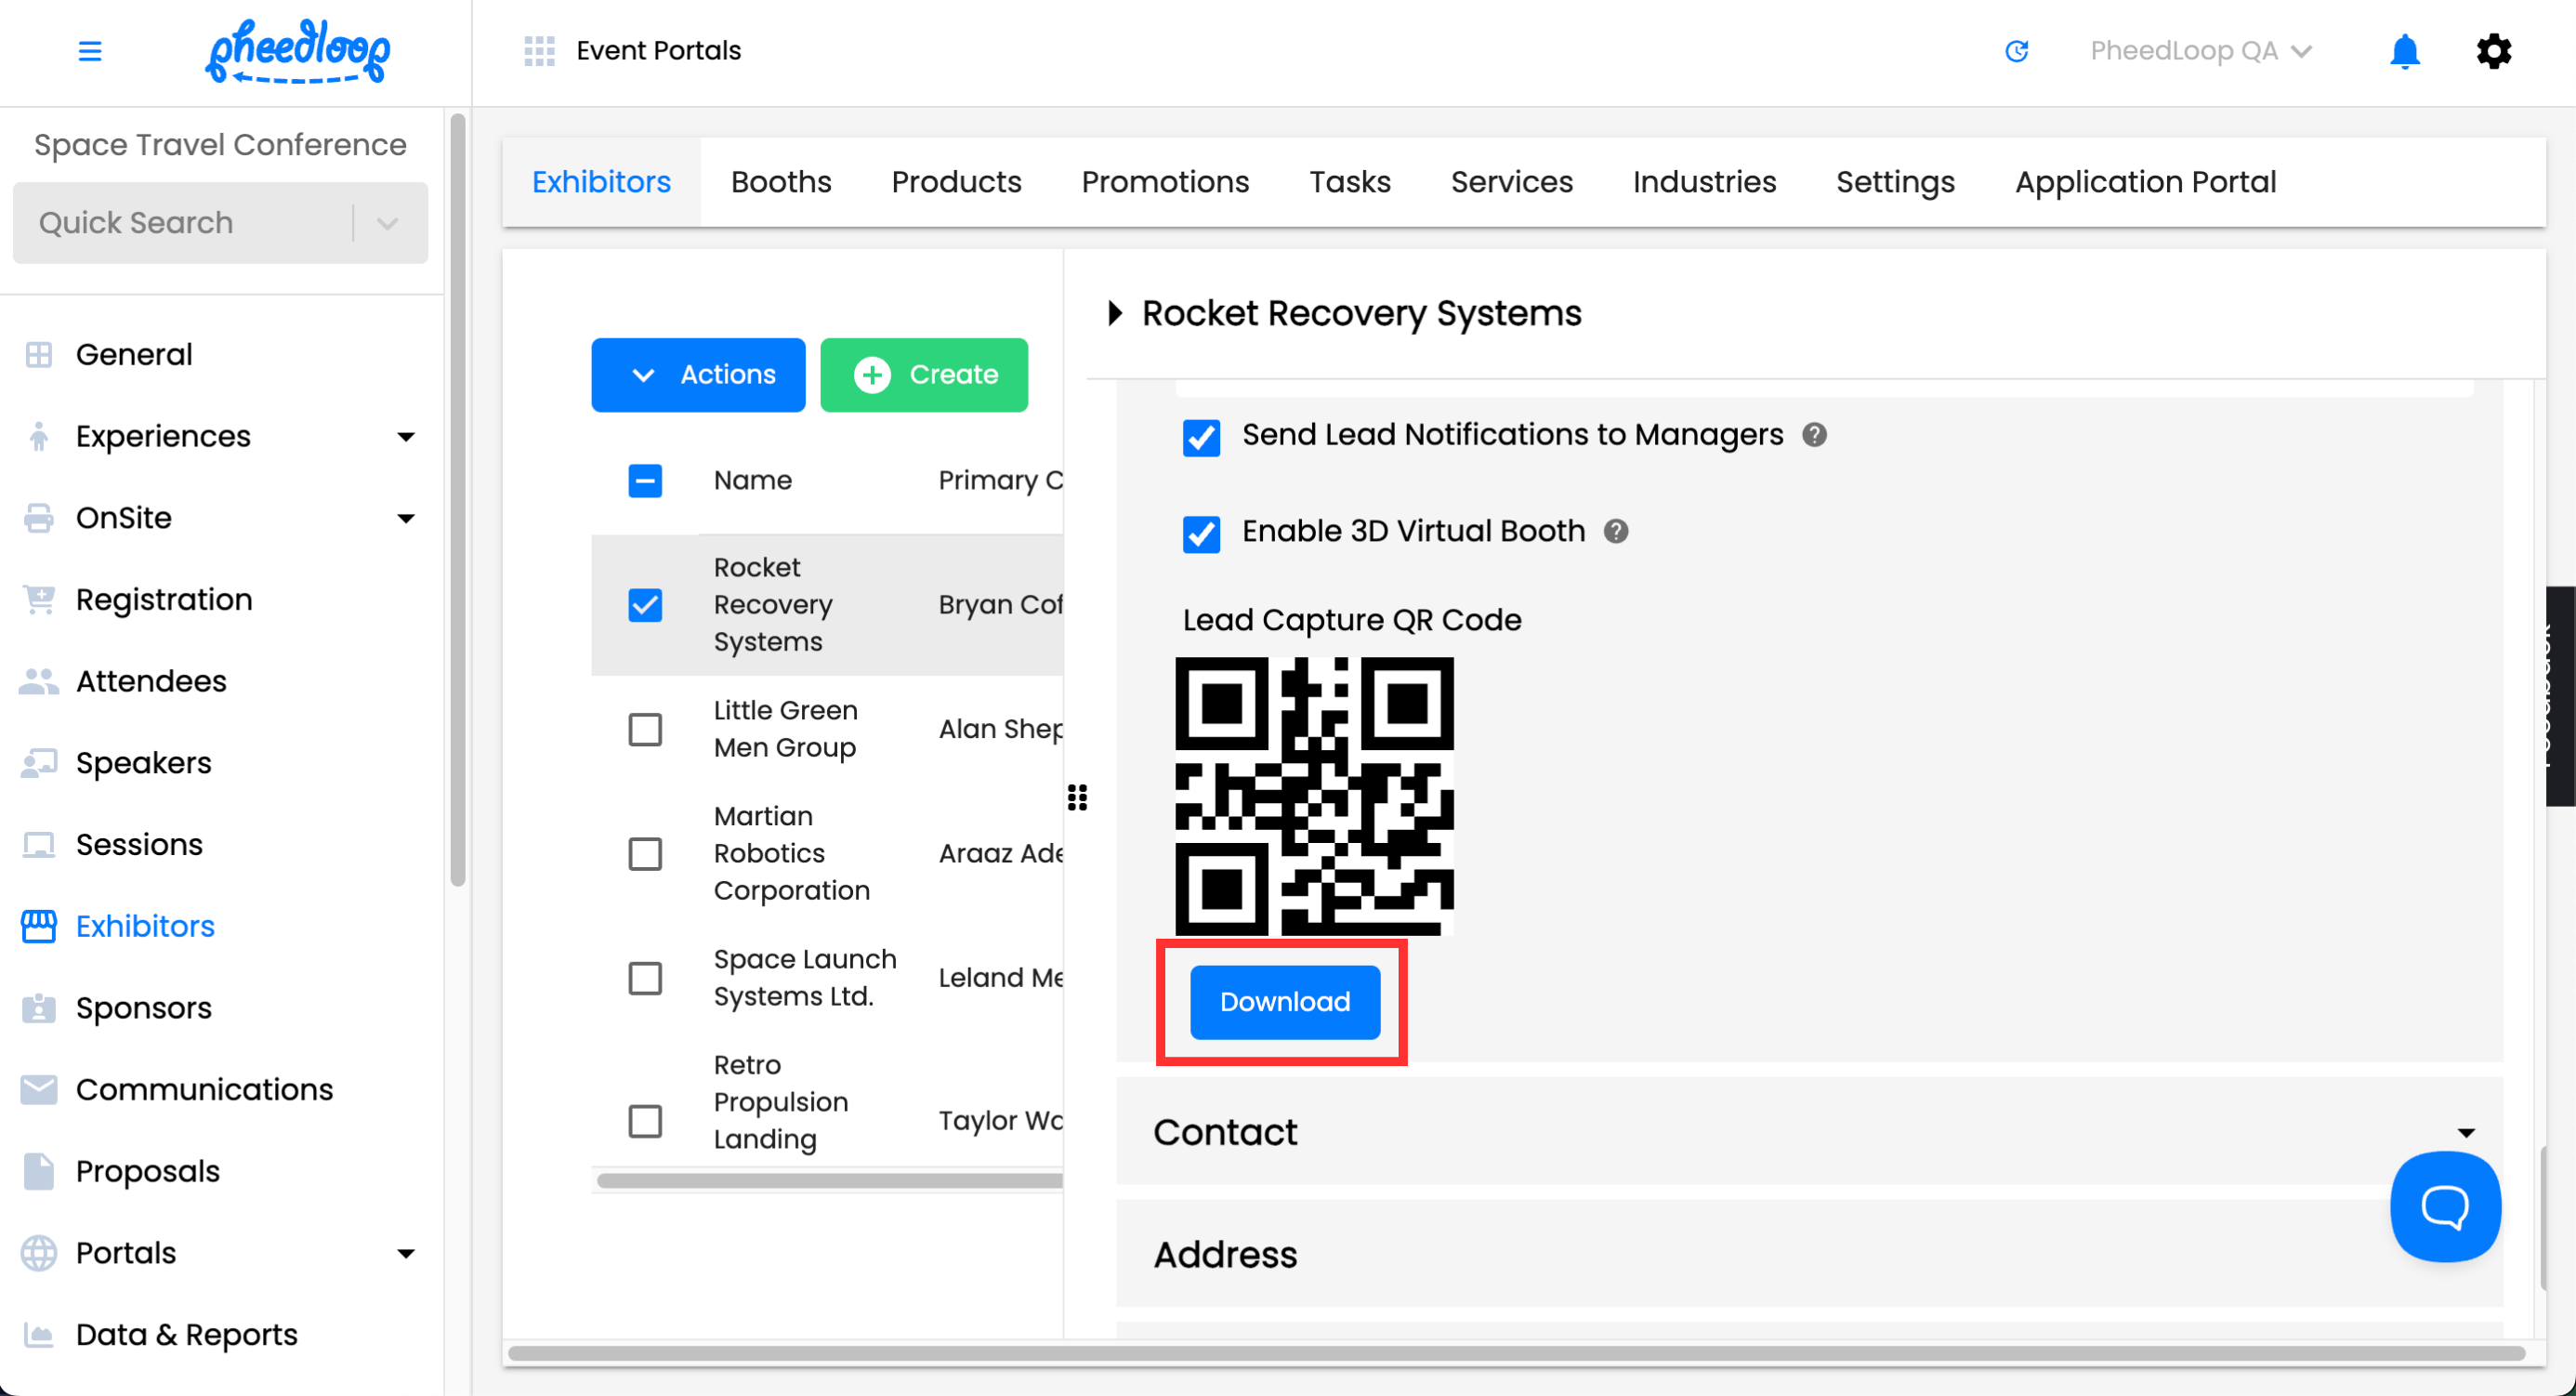
Accessing the Lead Capture QR Code from the Event Dashboard
The QR code can also be found in the Event Dashboard. This is the same QR code shown in the Exhibitor Portal.
- From the Event Dashboard, navigate to Exhibitors > Exhibitors
- Select the Exhibitor you wish to download the QR Code for
- Scroll down to Lead Capture QR Code
Select Download

Scanning the Lead Capture QR Code from the Event App
Please note, the following instructions are for Attendees and not for Exhibitors to use. Exhibitors are required to use the Lead Capture Tool outlined above or nothing will happen.
Attendees can scan the Lead Capture with PheedLoop Go! Please note, PheedLoop Go! is required to scan these QR Codes. Attempting to scan from the device’s QR Reader will not work.

- From PheedLoop Go!, access your event's home page
- Select the Camera Icon on the top right corner
- Select Launch Scanner
- Scan the QR Code

- From the Event App, navigate to Exhibitors > Exhibitors
- Select the QR Code icon next to the search bar
- Scan the QR Code
Using Lead Capture from PheedLoop OnSite
Exhibitor staff can scan attendee badges or have attendees submit their information manually from PheedLoop OnSite. The only difference is that captured leads will be in the Exhibitor Portal and not the app. This security measure ensures attendees can scan themselves in without accessing additional information.

- From PheedLoop OnSite, navigate to Lead Retrieval
- Select the Exhibitor to submit results to
- Select either Form or Scan
- Form will require the attendee to type in their first name, last name, and email address
- Scan will require the attendee to display their attendee badge to the camera
Once set, Attendees can share their information if interested.
Form
Attendees can be checked in manually by entering their first name, last name, and email address. This is ideal if your event will not be making use of attendee badges.

- From the Lead Retrieval page, select Form
- Fill out the First Name field
- Fill out the Last Name field
- Fill out the Email Address field
- If multiple results appear, select the correct attendee from the list.
- Select Submit
If the exhibitor has a Lead Retrieval form set up in their Exhibitor Portal, the form will appear at this point, allowing the staff member to fill out the form and select Submit to record their response. In addition, the business card option will appear, allowing attendees to take a picture of their business card along with a title and personal note.
Scan
Selecting this option will use the tablet’s camera to scan attendee badges.

- From the Lead Retrieval page, select Scan
- Hover the camera over the attendee badge, the attendee information will be automatically added
- If the attendee was already scanned, the app will display an error message confirming as such.
If the exhibitor has a Lead Retrieval form set up in their Exhibitor Portal, the form will appear at this point, allowing the staff member to fill out the form and select Submit to record their response. In addition, the business card option will appear, allowing staff to take a picture of the attendee's business card along with a title and personal note.
Utilizing the Lead Retrieval Dashboard in the Exhibitor Portal
As an event admin or an Exhibitor Manager, submitted Lead Retrieval information can be obtained from your Event Dashboard or Exhibitor Portal.
Accessing Lead Retrieval from the Exhibitor Portal
Anyone who is a manager associated with the Exhibitor Profile will be able to access the Exhibitor Portal. Simply navigate to the Lead Retrieval page to access all of the attendees your team has captured. All information for leads, including personal information such as email address, will be shown on the Lead Retrieval page. You will also be able to see any notes taken by the scanner.

Quick Tip - to send exhibitor their Exhibitor Portal, navigate to Exhibitors > select an exhibitor > select Actions > Send Welcome Email
The Lead Retrieval Dashboard will display all captured leads along with the manager or staff member who scanned them. There are four tables in the dashboard.
Top 5 Lead Owners

The Top 5 Lead Owners table displays the 5 managers or staff members who scanned the most leads. Leads entered by the attendee will not count towards this table. Select View All to display all managers and the number of leads they have captured.
Lead Rating

The Lead Rating table will display all managers and staff members who have scanned a lead. Managers and staff members who have not scanned a lead will not show up in this table. A maximum of 5 managers and staff will be displayed; select View All to display all managers and staff.
Leads Over Time

The Leads Over Time table displays all leads captured throughout the duration of the event as a line graph. Only the days where leads were scanned will be displayed on this table. Selecting any of the ratings at the top of the table will filter the results to leads with that rating.
List of Leads

The List of Leads table covers all leads captured. At the top of the table, there is a search bar to look up specific leads. There are also two filter options to sort by individual ratings and owners. Selecting View All will display all leads and allow managers to export them as a CSV file. Finally, selecting More Details will open up a complete list of information captured by the lead. For more information, please review the Downloading Lead Retrieval Results section of this article.
Using Date Ranges
Date ranges can be used to filter scans by specific dates in the top right corner of the screen.
- From the Exhibitor Portal, navigate to the Lead Retrieval tab
- On the top right corner of the dashboard, select the state date
- Select the end date
- Select the Refresh button

The Lead Retrieval Dashboard will now display updated information based on the parameters you have set.
Downloading Lead Retrieval Results
All submitted leads can be exported from the Exhibitor Portal.
- From the Exhibitor Portal, navigate to the Lead Retrieval tab
- Next to the List of Leads table, select View All

- Above the Lead Retrieval Results table, select Click on Actions > Download CSV
- You may also select Update Rating to manually adjust the rating of the captured lead.

Types of Lead Retrieval Data Collected
While viewing Lead Retrieval Results within the List of Leads table, exhibitors can select More Details to view a complete list of information captured from the lead. The information that will appear is listed below.
| Name | The full name of the lead |
|---|---|
| Title | The title of the lead |
| Organization | The organization of the lead |
| The email address of the lead | |
| Phone | The phone number associated with the lead |
| Website | The personal website that is linked to the lead |
| A link to the attendee's LinkedIn account. | |
| X (Formerly Known as Twitter) | A link to the attendee's X account. |
| Address line 1 | The first line of address associated with the lead |
| Address line 2 | The second line of address associated with the lead |
| City | The city associated with the lead |
| State | The state associated with the lead |
| Zip | The zip code associated with the lead |
| Country | The country associated with the lead |
| Captured by Manager | The exhibitor booth's manager who captured the lead |
| Rating Budget | The Rating Budget that he exhibitor manager assigned to the lead |
| Rating Authority | The Rating Authority that the exhibitor manager assigned to the lead |
| Rating Need | The Rating Need the exhibitor manager assigned to the lead |
Purchasing and Enabling Lead Retrieval as an Event Admin
For Event Admins, purchasing lead retrieval is an option. This is useful for keeping the responsibility within the organization rather than putting the onus on exhibitors to purchase lead retrieval independently.
Please note that purchasing lead retrieval does not automatically enable lead retrieval for exhibitors. The process for enabling must be done manually once credits are purchased.

- From the drop-down menu at the top right corner of your Dashboard, navigate to Settings > Account & Billing > General Credits
- Enter the quantity under Add Premium Exhibit Booth Credits
- Select Pay
- Enter your credit card information
- Select Confirm and Pay

- From the Event Dashboard, navigate to Exhibitors > Exhibitors
- Select the checkbox of the exhibitor you want to adjust from the list
- Above the Exhibitors table, select Enable Premium Booth
Accessing the Lead Retrieval Receipt from the Exhibitor Portal
As an Exhibitor, you can access your receipts from your Exhibitor Portal.

- From the Exhibitor Portal, navigate to Purchases and Contact
- Select Download under the Receipt column
The PDF file will be opened on your browser, and you will have the option to download it.
Accessing the Lead Retrieval Receipt from the Event Dashboard

- From the Event Dashboard, navigate to Exhibitors > Exhibitors
- Select the Exhibitor you wish to retrieve the contract from the list
- Above the Exhibitors table, select Actions > Download Contract
Downloading Lead Data as an Event Admin
In most cases, the exhibitor's Lead Retrieval data is accessed directly by the exhibitor in their Exhibitor Portal. If the event admin wants to download leads for all exhibitors at their events, they can do so by creating an Exhibitor Leads custom report.
Creating a Exhibitor Leads Report

- From the Event Dashboard, navigate to Data & Reports > Custom Reports
- Above the custom reports table, select Create
- Under the Report Type field, select Exhibitor Leads
- Under the Name and Description fields, enter a name and description for your report
- Under the Fields field, select any fields that apply to your report such as Attendee - Full Name, Lead Rating, Lead Retrieval Form, and so on
- Under the Exhibitor field, select one or more exhibitors if you would like to limit the report to that selection
- Leave this field blank to not filter any results.
- Select Save Changes
Downloading a Custom Report

- From the Event Dashboard, navigate to Data & Reports > Custom Reports
- Select the report you would like to generate from the list
- Above the custom reports table, select Actions > Generate Report
- Once the report is generated, select Download Previous Report