Personalizing Sessions using Tracks Formats Audiences
Tracks, Formats and Audiences are a set of properties that you can associate to your sessions in PheedLoop. Using these filters will enable attendees to more easily track sessions that are suited to them or other attendees.
Tracks
This can represent a topic that is associated with your event. For example - different sessions can be related to science like physics, chemistry, or biology. Each term can be a different track and attendees will be able to filter for relevancy.
Formats
Formats and Tracks share similar use, formats can be a secondary filter when Tracks aren’t enough. For example, this can represent the way a session is being held such as a keynote, workshop, or a breakout session.
Audiences
Attendees can be categorized into several groups for events. For example, this could include students, teachers, staff, etc. This way, attendees can filter events meant for them or other categories defined in the Audience list.
We encourage you to explore these features and use them in the best way suited for you.
1. Adding Tracks
Tracks can be created and customized by event organizers.
- From the Event Dashboard, navigate to Sessions > Tracks
Select the Create button

Under Details, ensure the Track Visible checkbox is toggled on
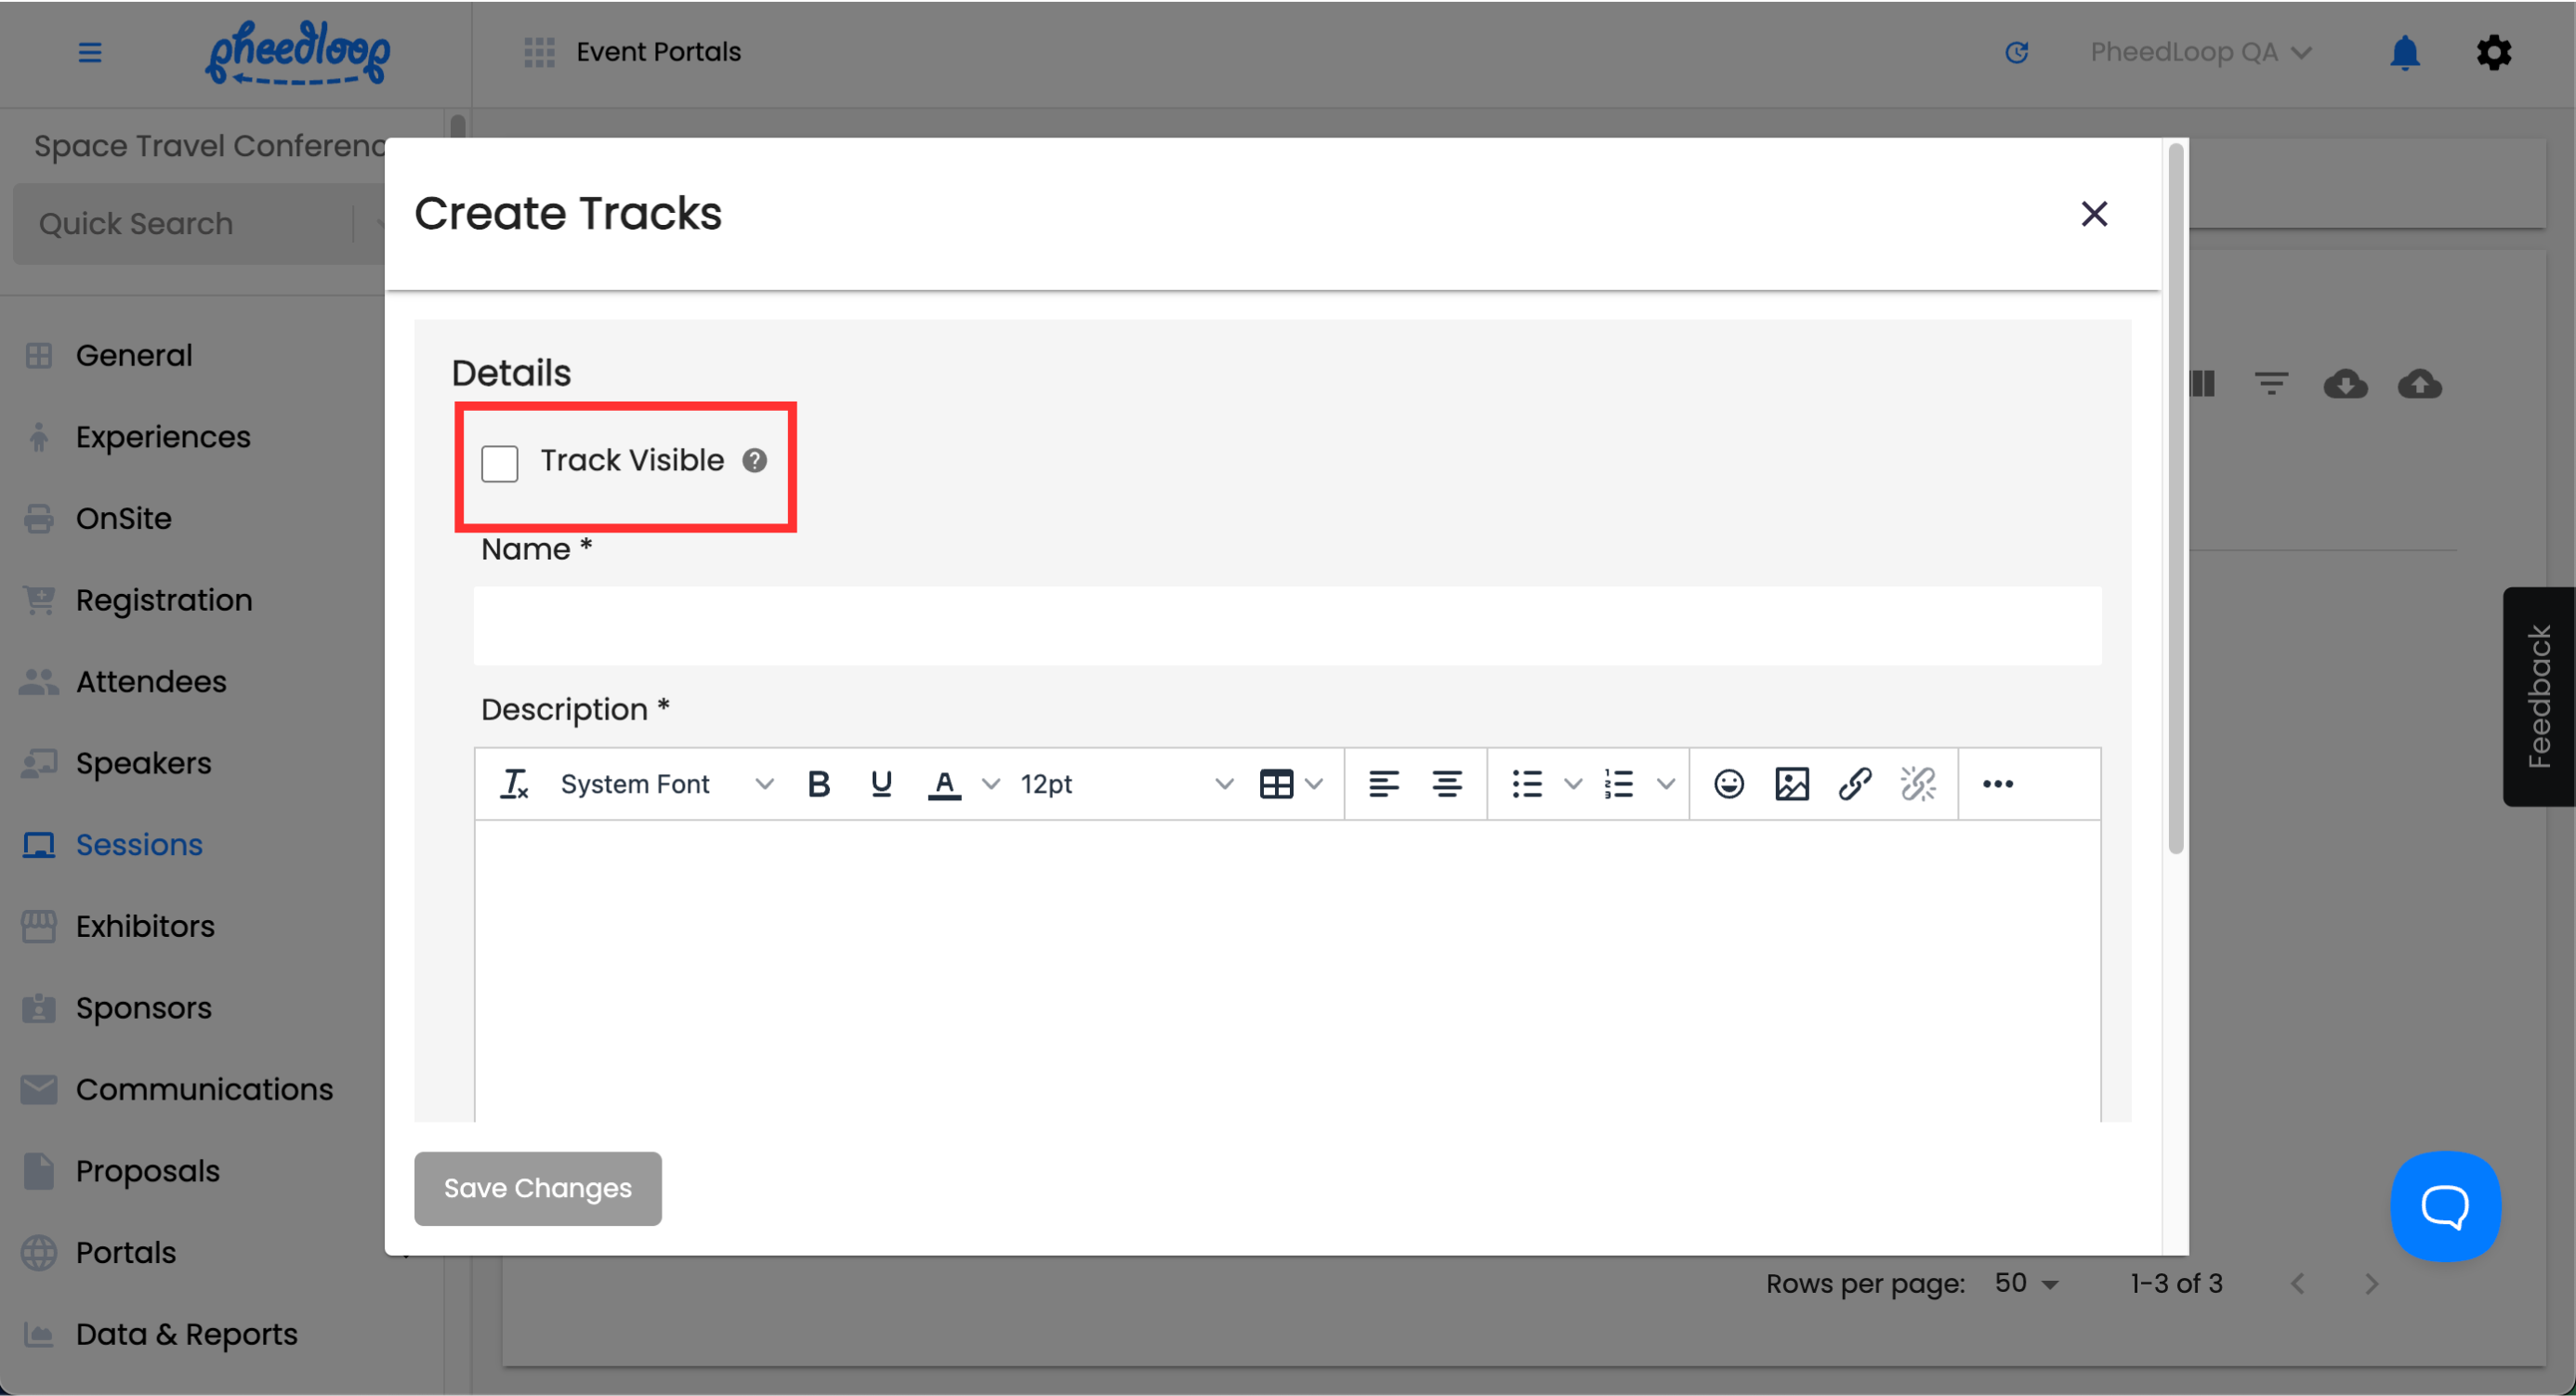
- Fill out the Name and Description fields for your Track
Designating a colour under the Color field will change the colour of the track

- Select Save Changes once all prerequisite information has been filled


Your track should now be saved and can be assigned to any session. To remove a track, select Actions above the track's waitlist and select Delete.
2. Adding Formats and Target Audiences
Both Formats and Audiences can be managed through Sessions.
- From the Event Dashboard, navigate to Sessions > Sessions
- Select the session you would like to adjust from the list
- Scroll down to Other Details
Under the Formats or Target Audiences field, select Manage

- Select Add Format or Add Target Audience (if creating a Target Audience)
Fill out the Title and Color fields and select Save

- Please note, Target Audiences do not have a Color field.
- If you would like to remove the Format or Target Audience, select Delete.
Under the Format or Target Audience fields, select the Format or Target Audience

- Select Save Changes


3. Viewing Tracks, Formats, and Audiences
Once all the filters are created and assigned, attendees will be able to use these filters from their respective experiences portals including the Virtual Event Portal, Event Website, and the PheedLoop Go! app:
For this example, we will show how to access these three filters under the virtual event portal:

- From the Virtual Event Portal, navigate to Sessions and select the Filters bar
- Select the relevant Tracks, Formats, and Audiences you would like to apply from the list
4. Bulk Editing Tracks, Formats, and Audiences
Multiple sessions can have their tracks, formats, and audiences configured simultaneously in the Sessions page of the Event Dashboard. By selecting Edit, formats and audiences can be created and deleted all in one menu.

- From the Event Dashboard, navigate to Sessions > Sessions
- Select the checkboxes of at least two sessions
- Above the Sessions table, select Actions > Edit
- Select the checkboxes of Formats, Target Audiences, and Tracks
- Select the Formats, Audiences, and Tracks you wish to update to
- Create new Formats or Audiences by selecting manage on their respective fields
- Select Add Format or Add Target Audience
- Select Save next to the newly created format/target audience
- Select Save Changes
5. Bulk Assigning Tracks, Formats, and Audiences in Sessions
Tracks, Formats, and Audiences are part of the many fields that can be uploaded in real time with the bulk upload feature. This is ideal for uploading multiple sessions at once without having to manually enter each field.
PheedLoop uses a template when uploading sessions, to retrieve this template:

- From the Event Dashboard, navigate to Sessions > Sessions
- Select the Upload button
- Select Download Template
- Enter the session information in the template
- For exact instructions, please review the How to Edit the Session Template section of our How to Add, Import and Edit Sessions article.
- Save the template file
- Upload the template file by selecting Drag and drop some files here, or click to select files
The sessions will now be added to your session page and will become visible.
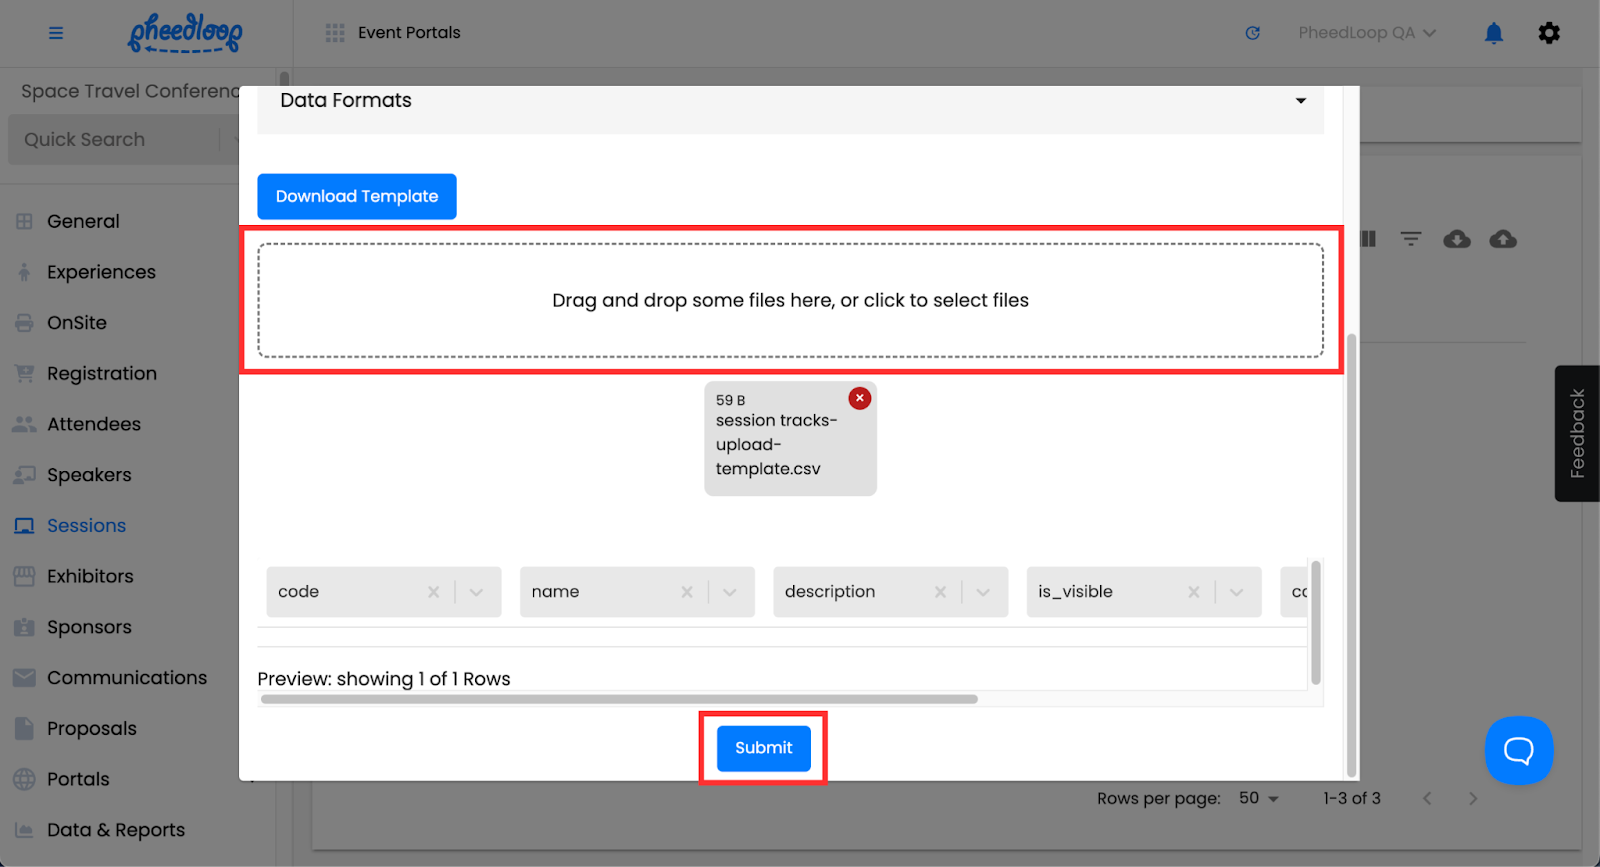
6. Bulk Uploading Session Tracks
Multiple tracks can be uploaded simultaneously in the Event Dashboard.
- From the Event Dashboard, navigate to Sessions > Tracks and above the Tracks table, select the upload button

- Select Download Template

The tracks template will now be downloaded onto your device.
- Open the Tracks template file
- Fill out the information outlined in the Headings in the Tracks Upload Template step below
- Save the document as a CSV file
- From the Event Dashboard, navigate to Sessions > Tracks
- Above the Tracks table, select the upload button
- Select the Drag and drop some files here, or click to select files to upload your template
Select Submit
Headings in the Tracks Upload Template
The tracks template has multiple columns to fill out. Below we will define each column and their purpose.
| code | This field is only necessary if you intend to edit a track. Enter the track code under this column to edit their information. Track codes can be found by navigating to Sessions > Tracks and selecting the download icon to the far right of the Create button. Leave this field blank to create new tracks. |
| name | Enter the name of the track under this column. |
| description | Enter the description of the track under this column. |
| is_visible | Enter True under this column to toggle on the Track Visible checkbox. By default this value is set to true. |
| color | Enter a hex code under this column to assign a color to the track. |
| credits_extra | Enter a number under this column to assign additional credits to attendees who complete sessions affiliated with this track. |