Creating and Managing Membership Purchases Manually in the Membership Dashboard
The Membership Dashboard is a powerful tool for managing Membership Tier purchases. In addition to managing incoming orders, the Membership Dashboard can create orders for Members manually.
Creating a Transaction
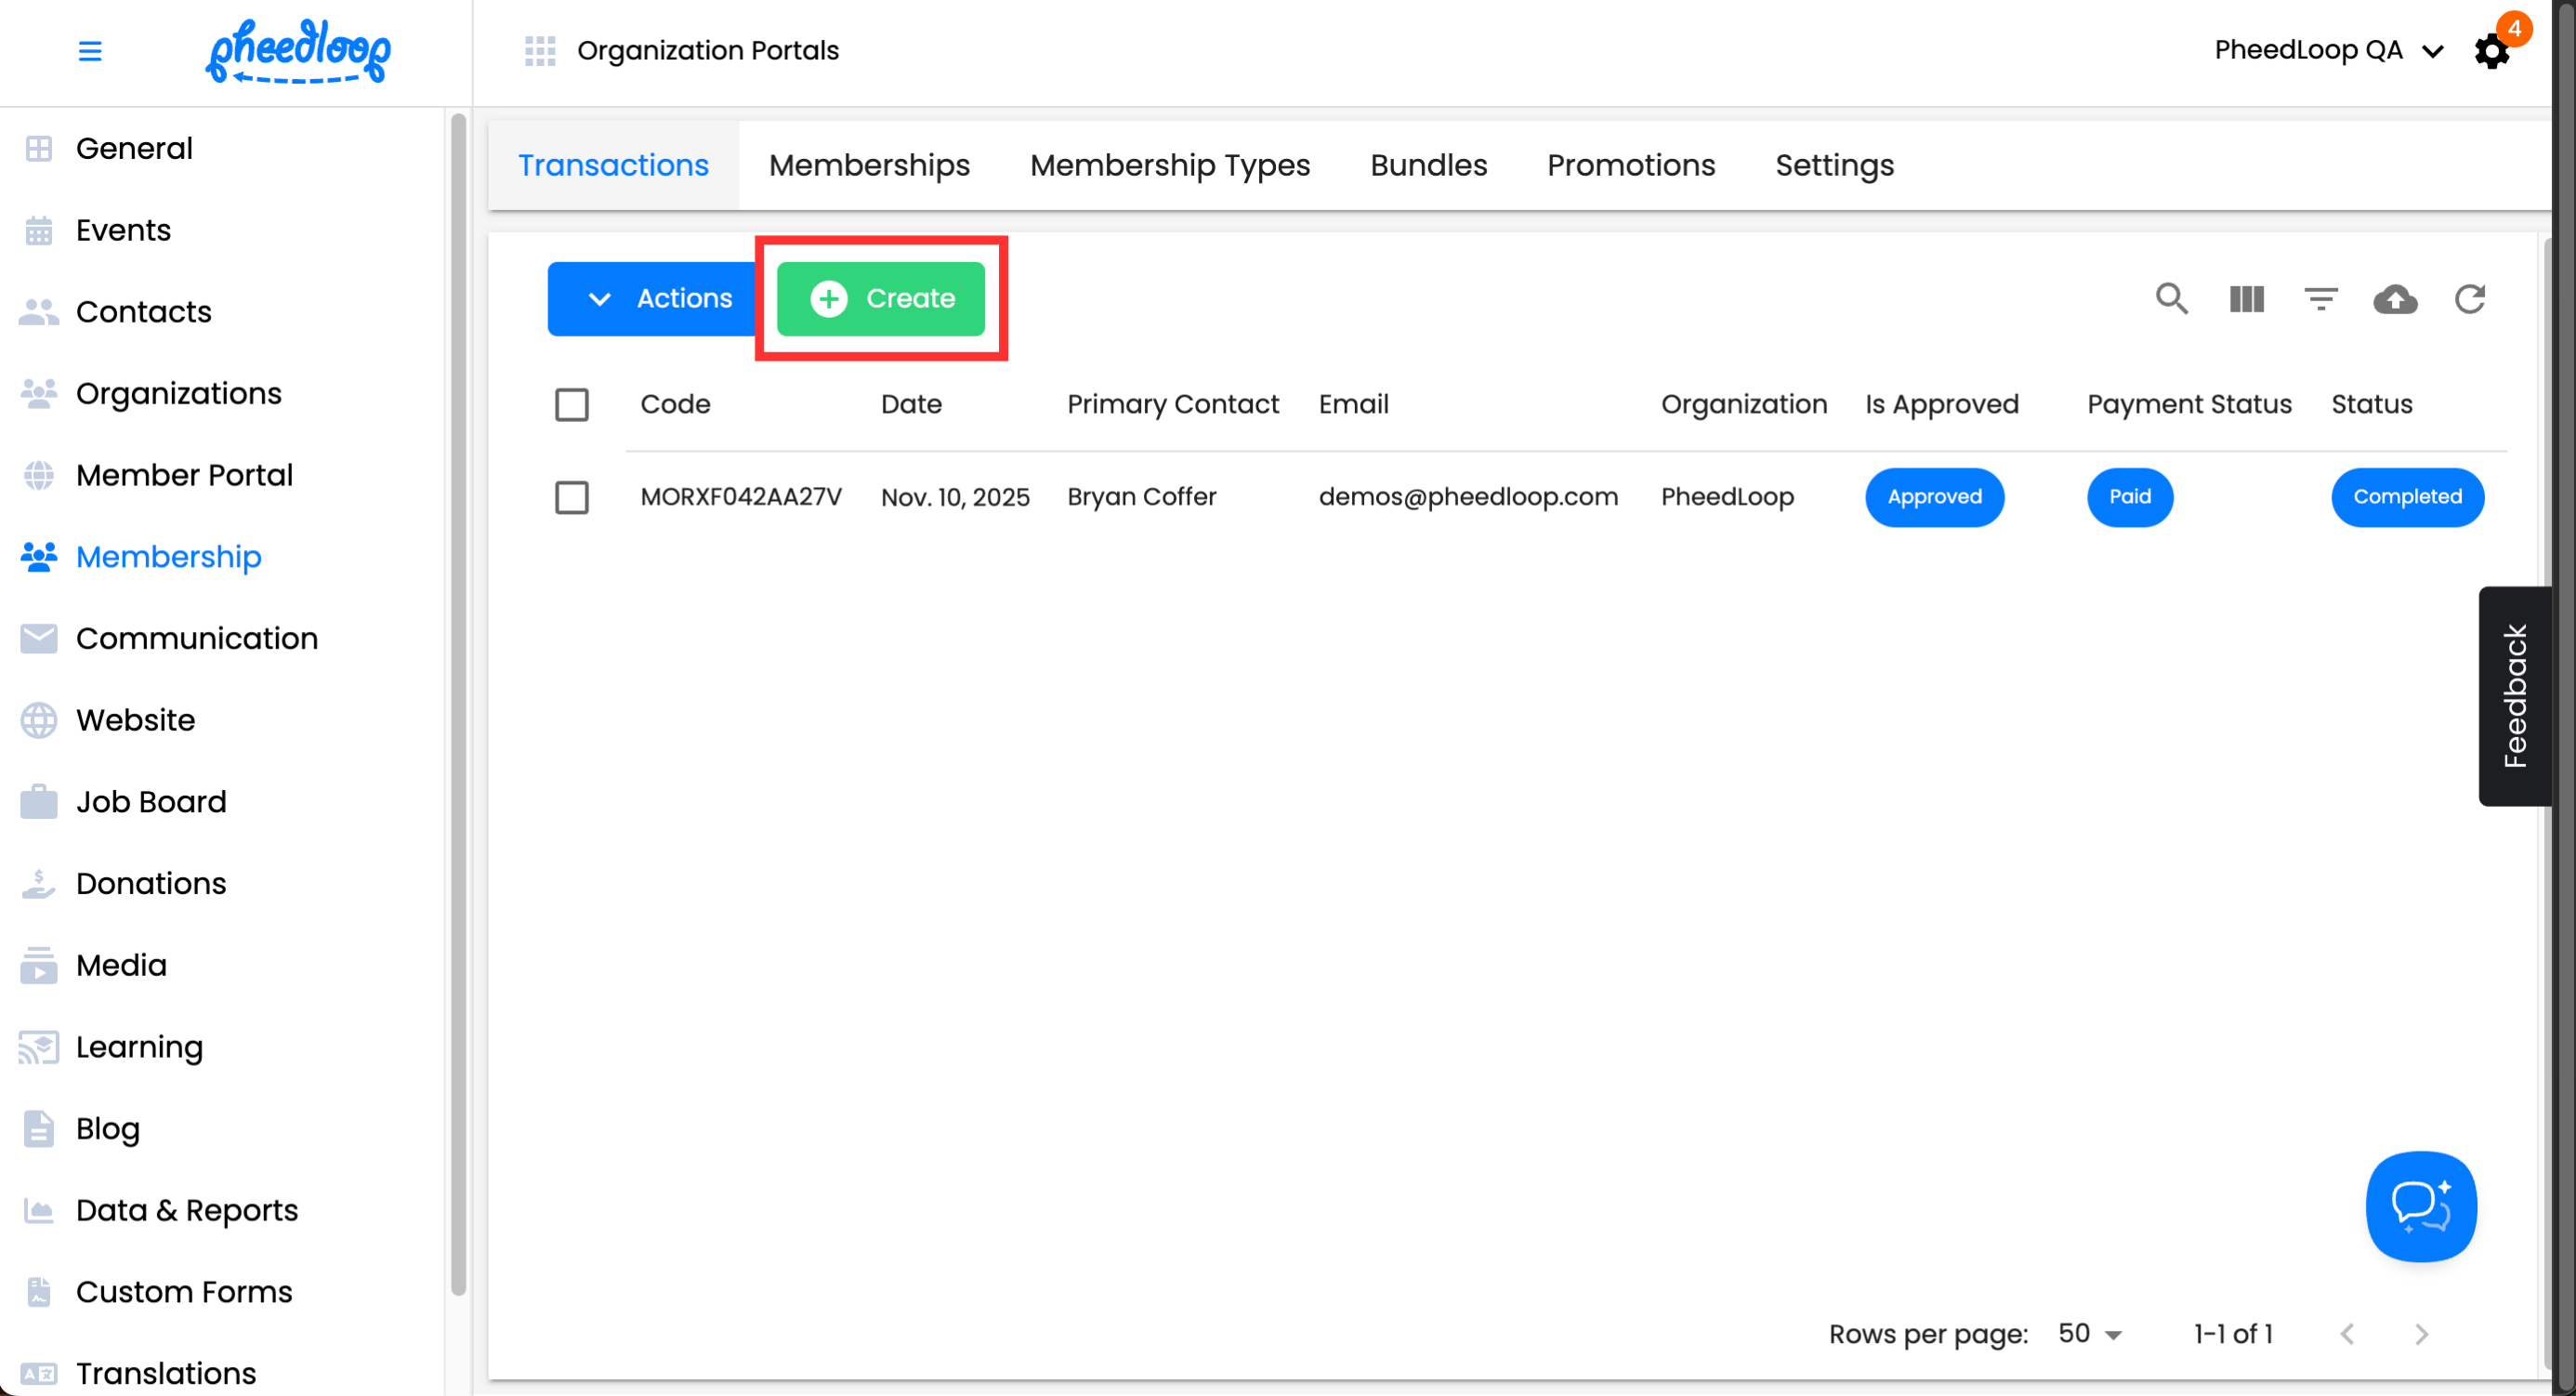
Transactions can be manually created in the Membership Dashboard.
- From the Membership Dashboard, navigate to Membership > Transactions
Above the Transactions table, select Create

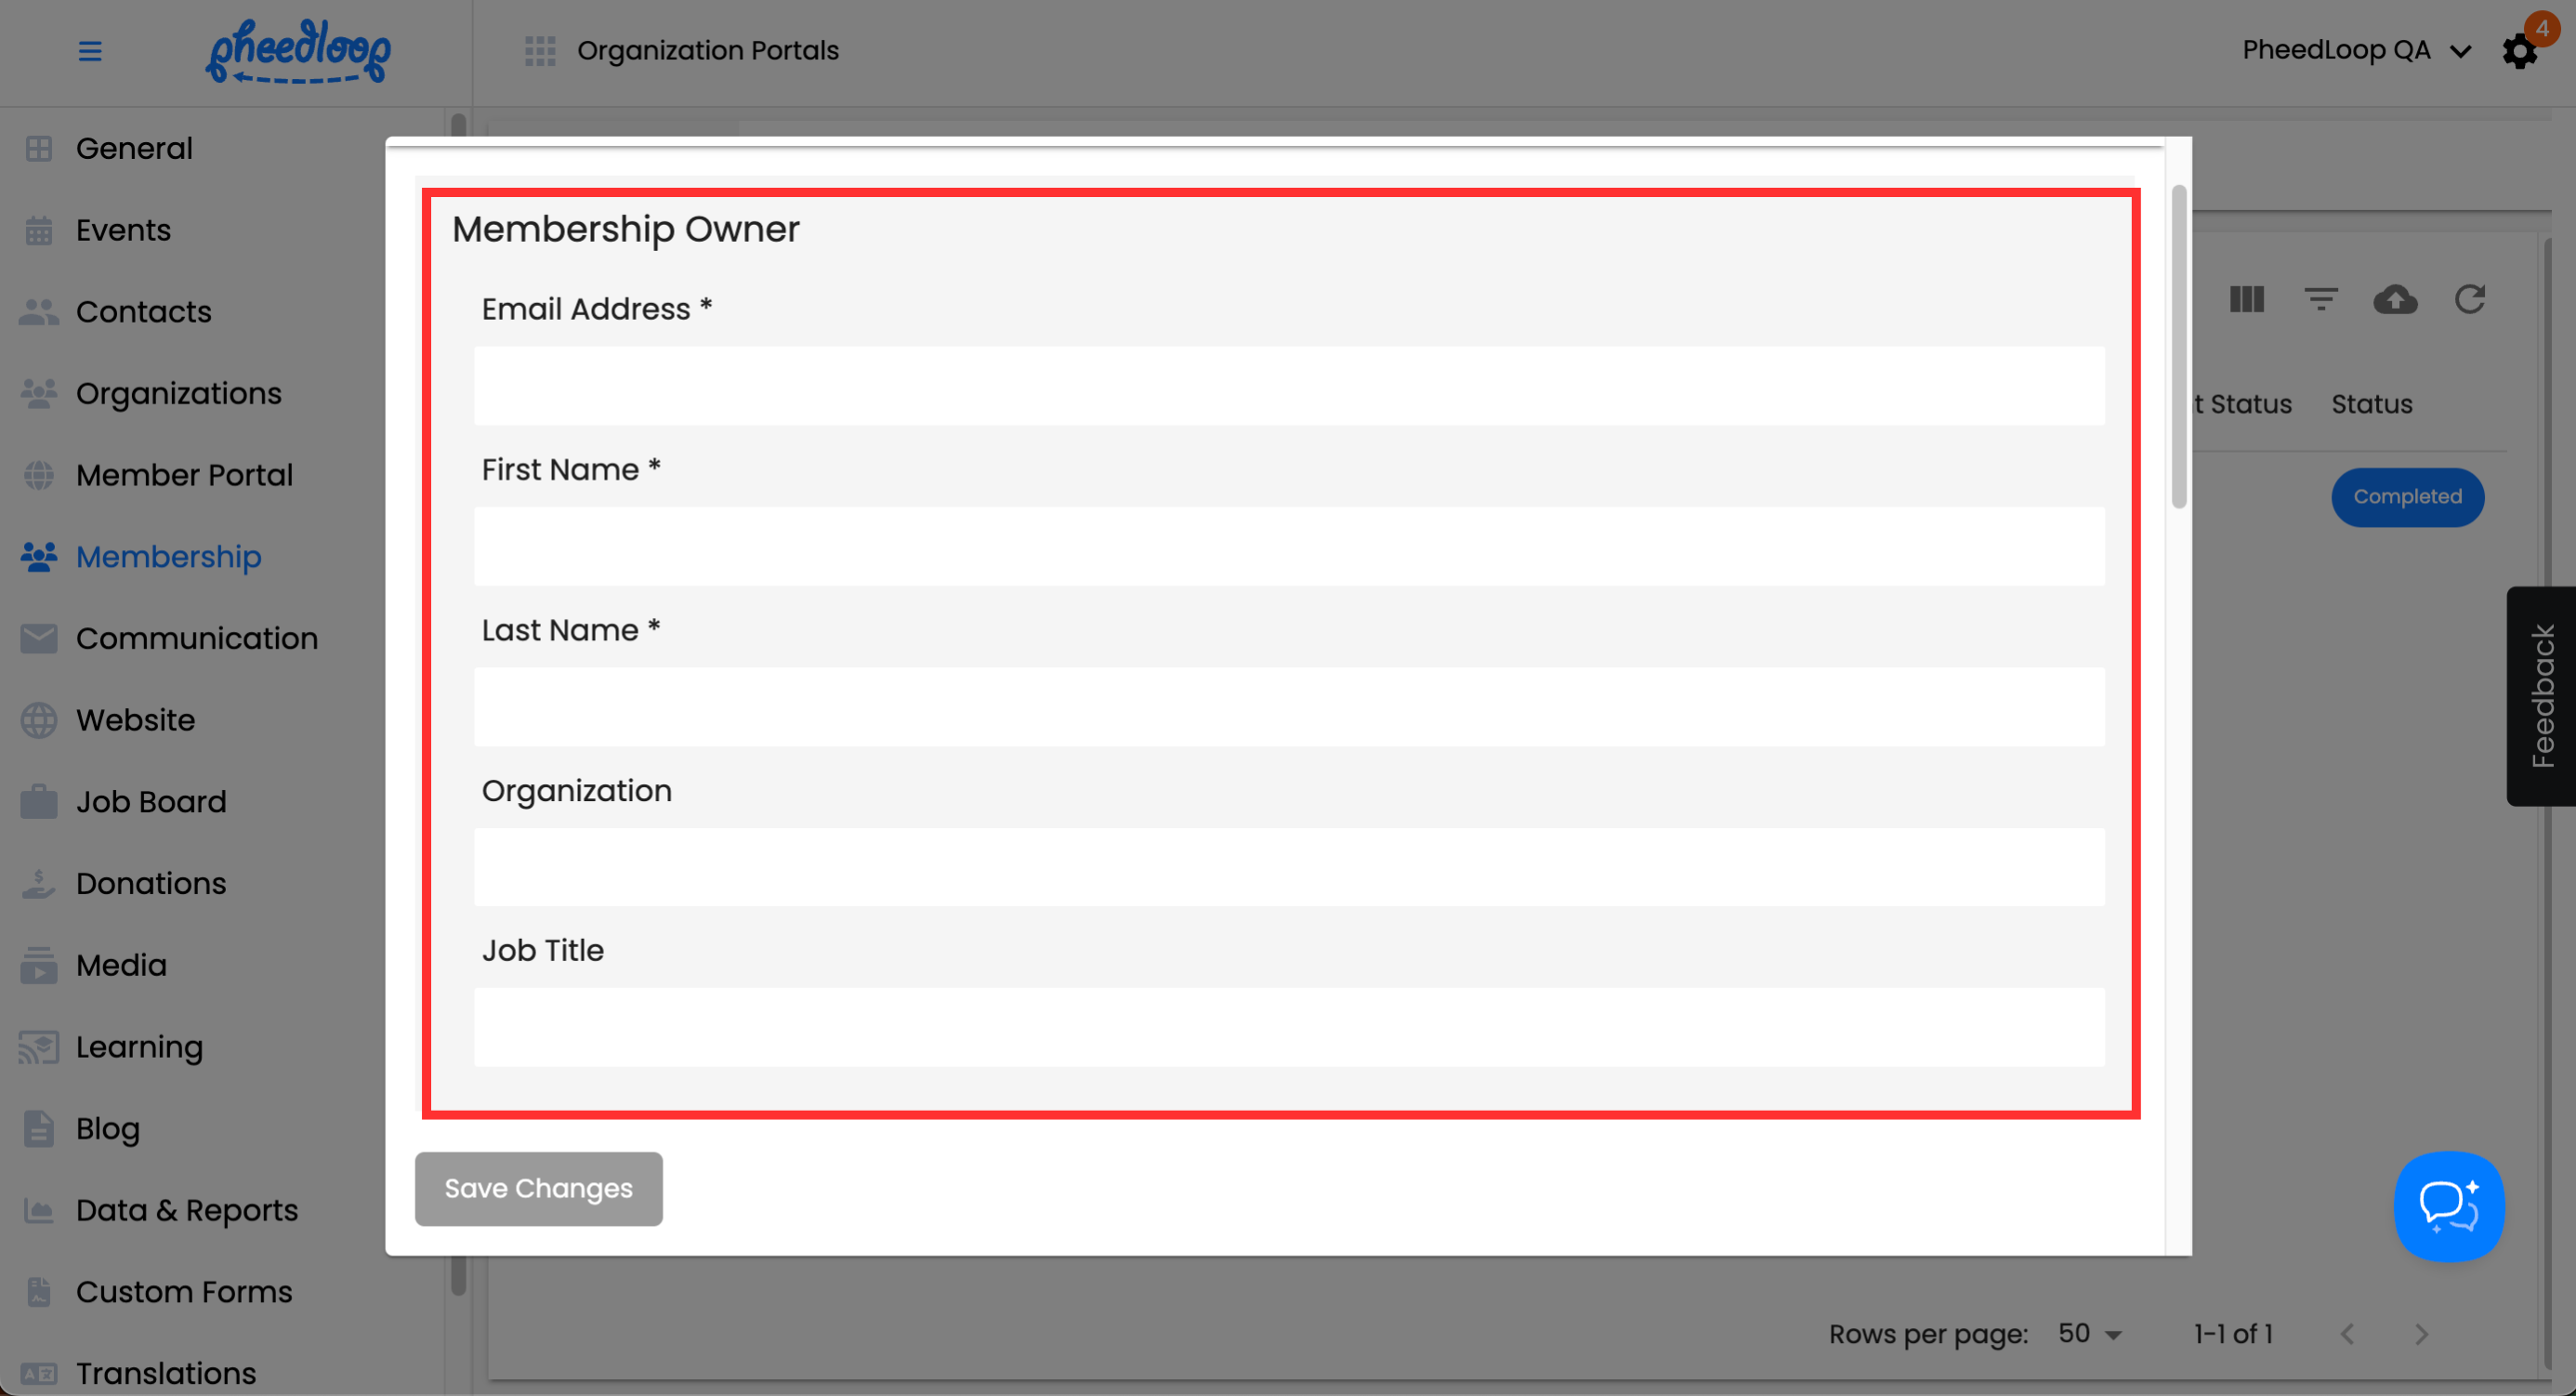
The Transaction Form will now appear and you will be able to fill out the transaction information in place of the Member.
Membership Owner
| Setting | Effect |
|---|---|
| Email Address | Enter the member’s email address in this field. |
| First Name | Enter the member’s first name in this field. |
| Last Name | Enter the member’s last name in this field. |
| Organization | Enter the organization the member belongs to in this field. |
| Title | Enter the member’s title in this field. |
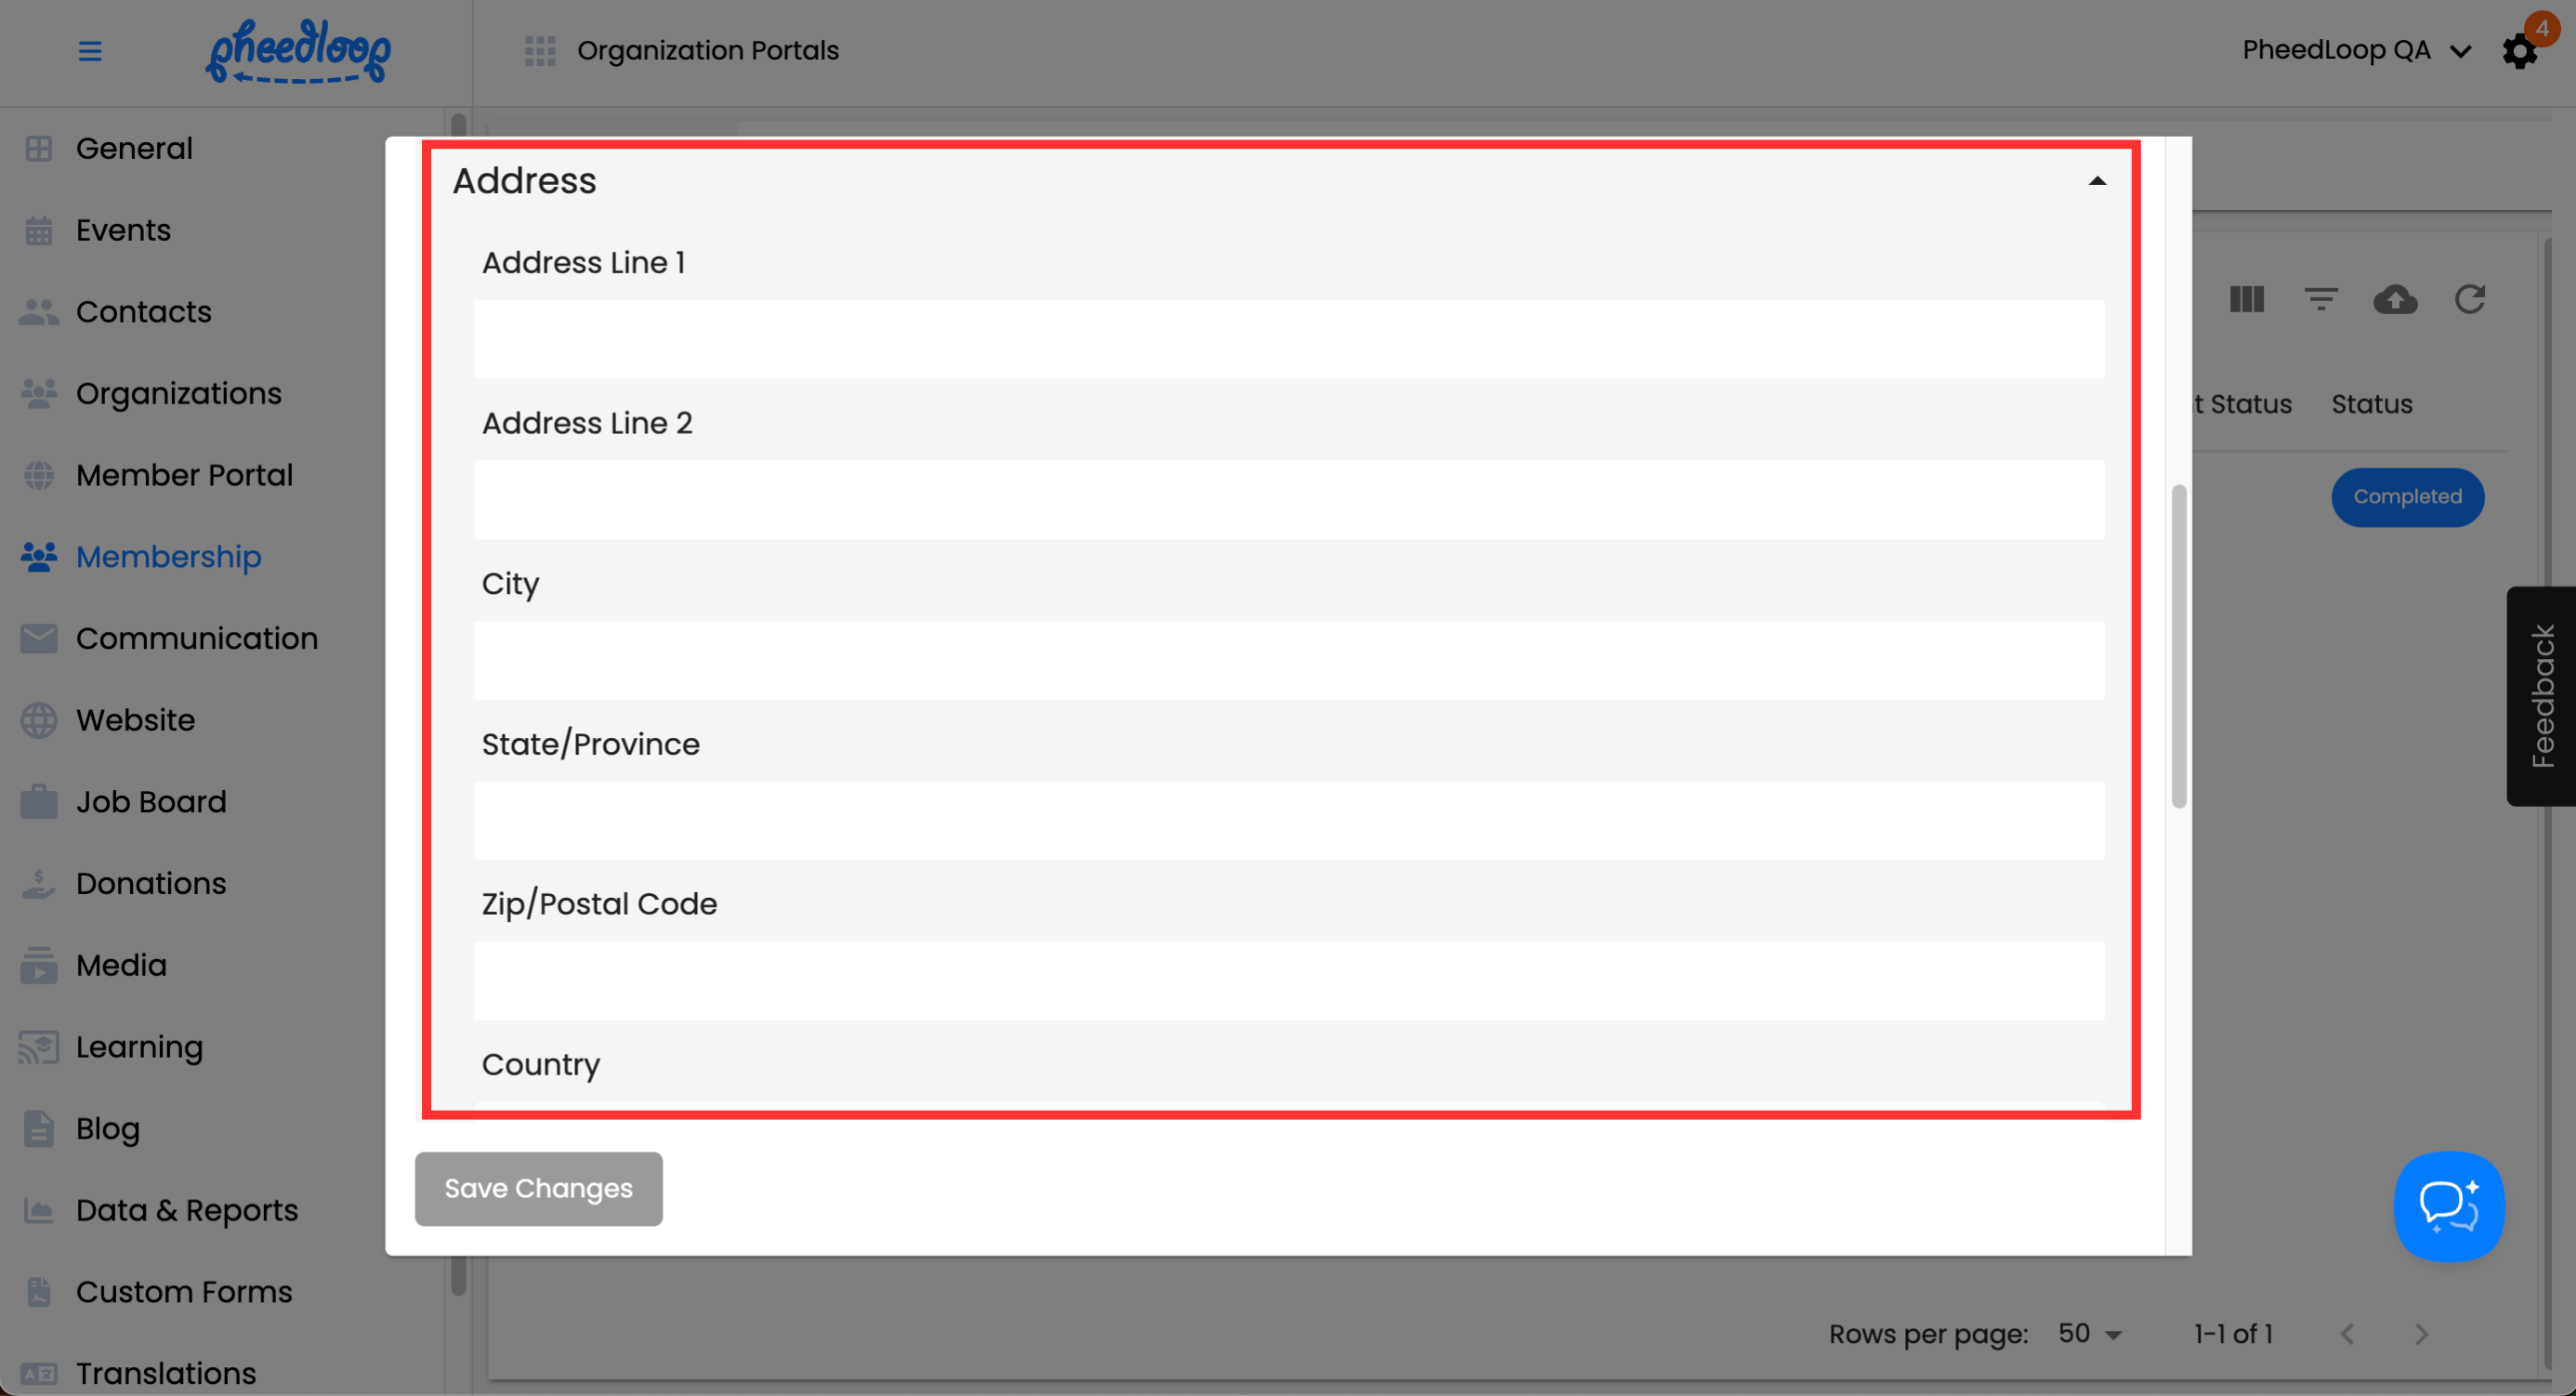
Address
| Setting | Effect |
|---|---|
| Address Line 1 | Enter the member’s primary address in this field. |
| Address Line 2 | Enter a secondary address for the member in this field, if available. |
| City | Enter the city where the member is located in this field. |
| State/Province | Enter the state or province where the member is located in this field. |
| Zip/Postal Code | Enter the postal code for the member in this field. |
| Choose a Country | Select the country where the member is located in this field. |
| Phone Number | Enter the member’s phone number in this field. |
Custom Fields

Custom fields offer convenient tags for organizing Members. This is especially useful for telling which members have a dietary restriction at a glance. This field only matters if your organization is intending to use PheedLoop's Custom Field feature. For more information, please refer to our Creating Custom Fields for Membership Management article.
Notes
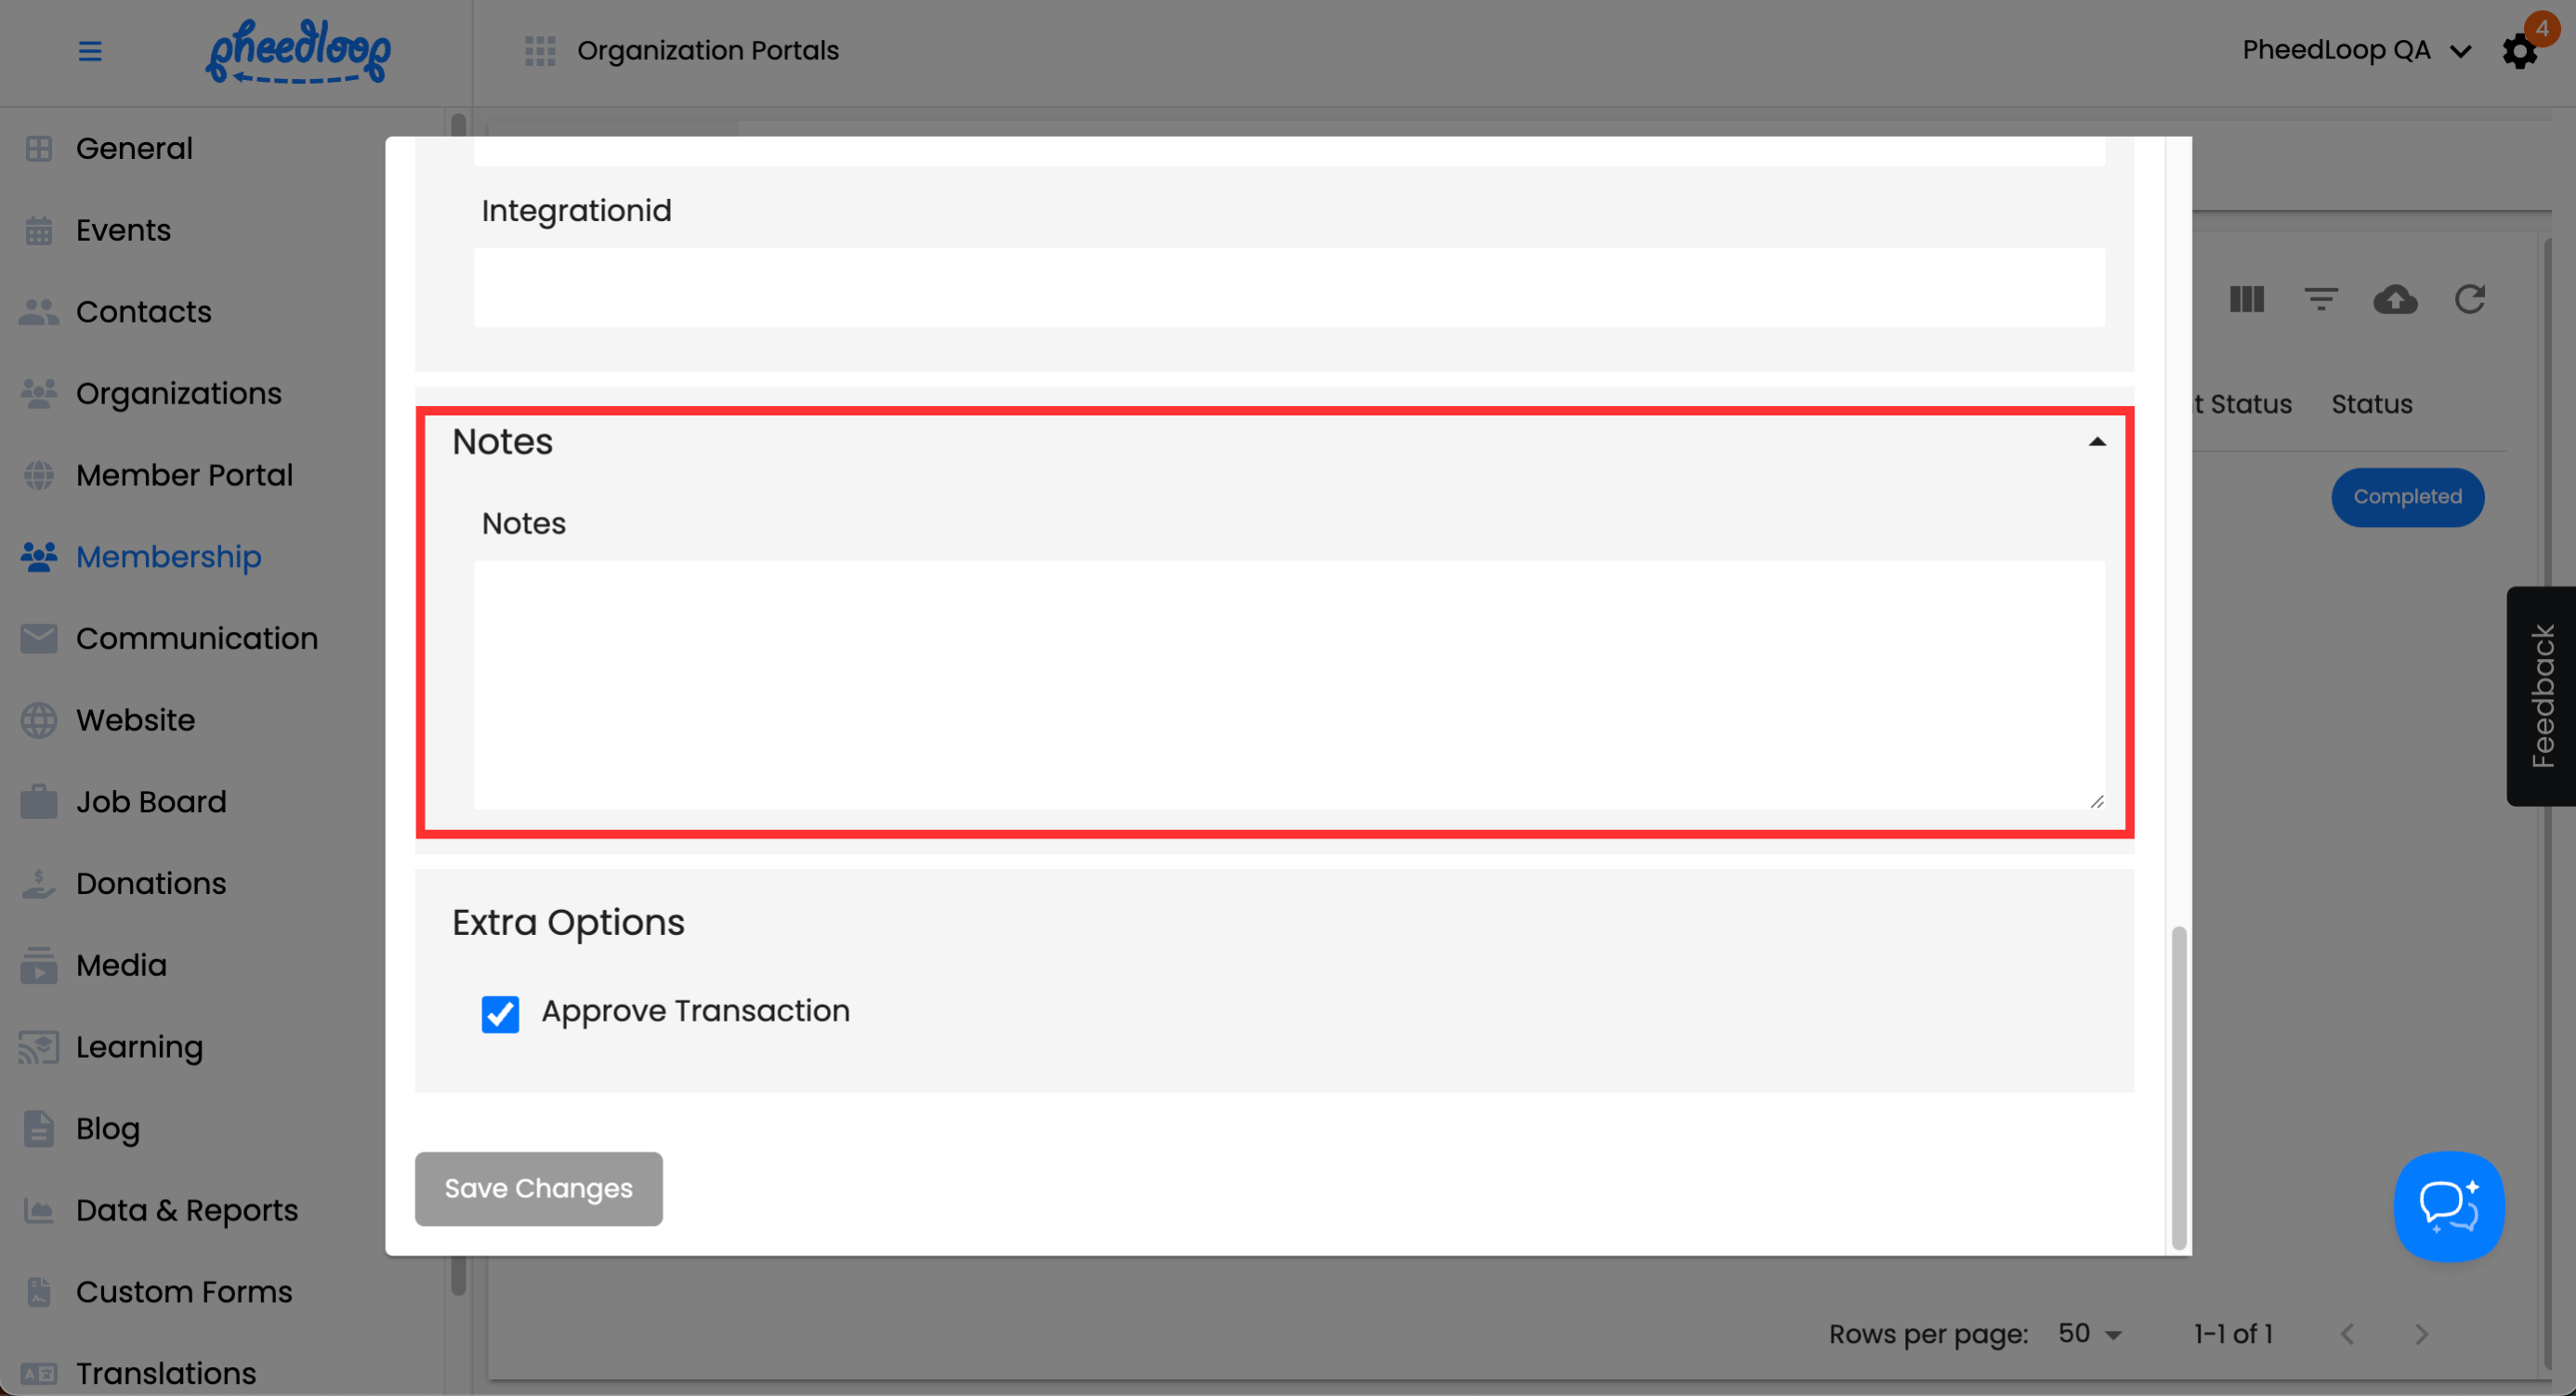
The notes field is where administrators can leave notes for internal use. The Member will not be able to see this note, nor will it appear on the front end like in receipts or invoices.
Extra Options
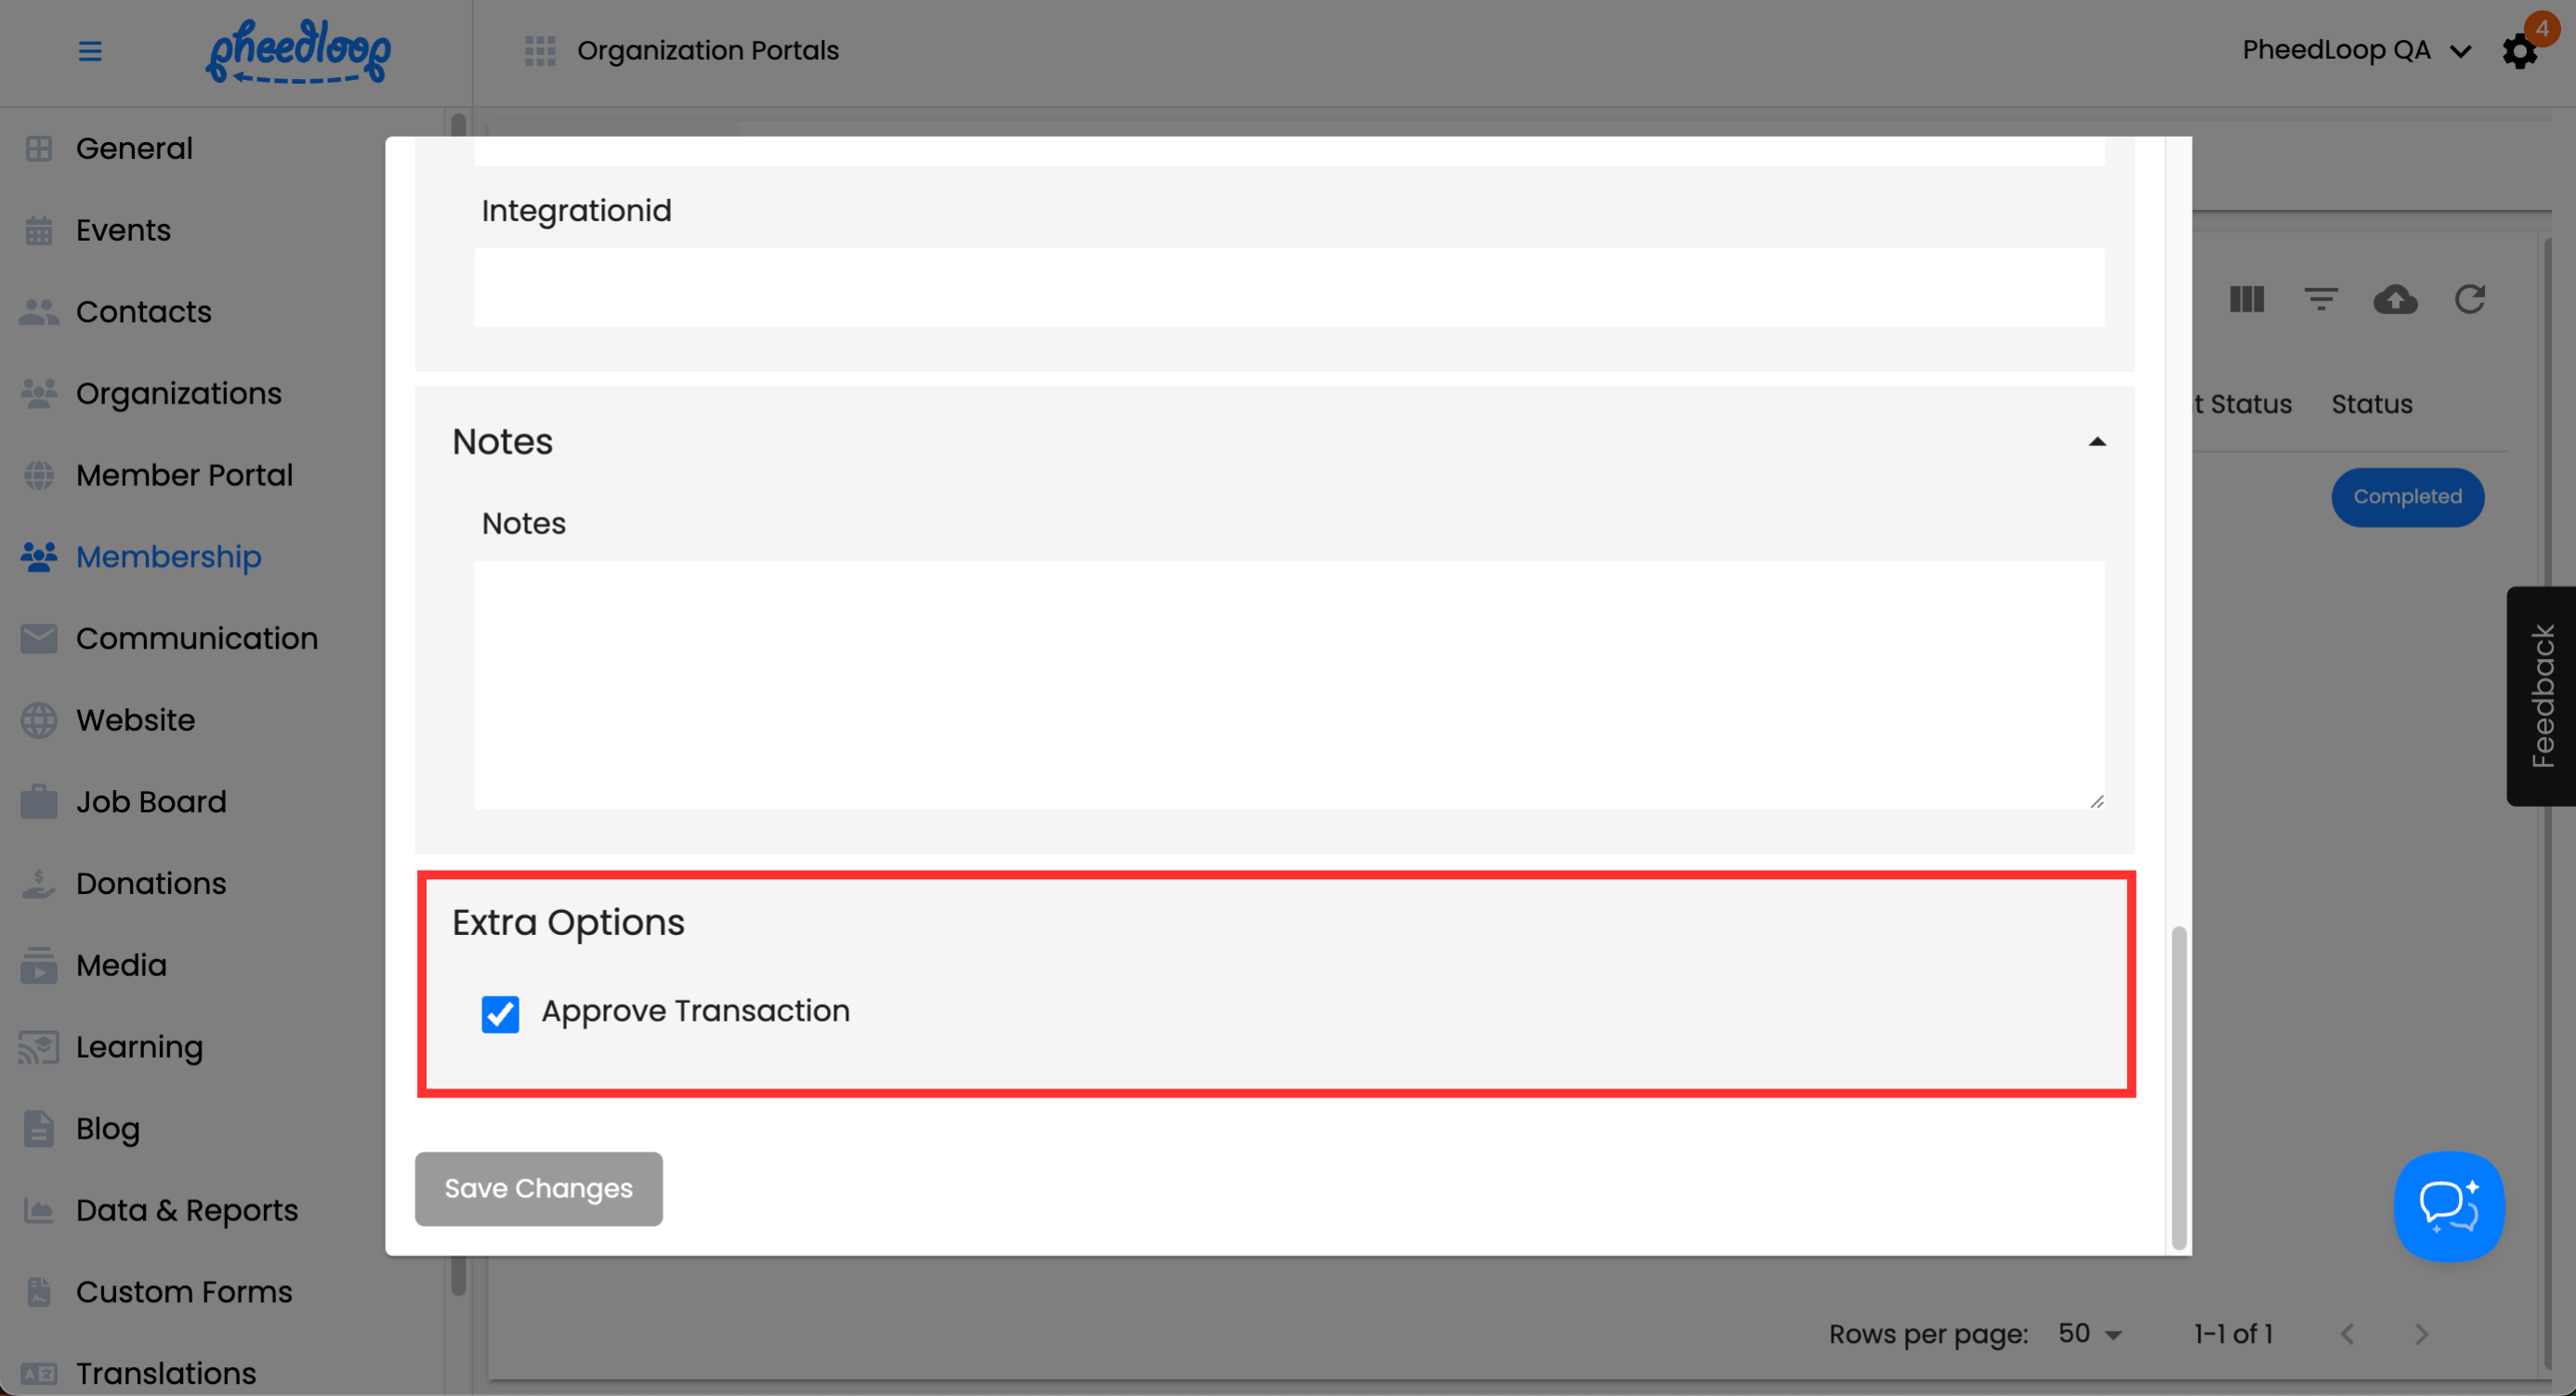
| Setting | Effect |
|---|---|
| Approve Transaction | Toggles approval of the transaction in the Membership Dashboard. If enabled, the Is Approved column will be updated to Approved. |
Once all settings have been configured, select Save Changes to create the Transaction.
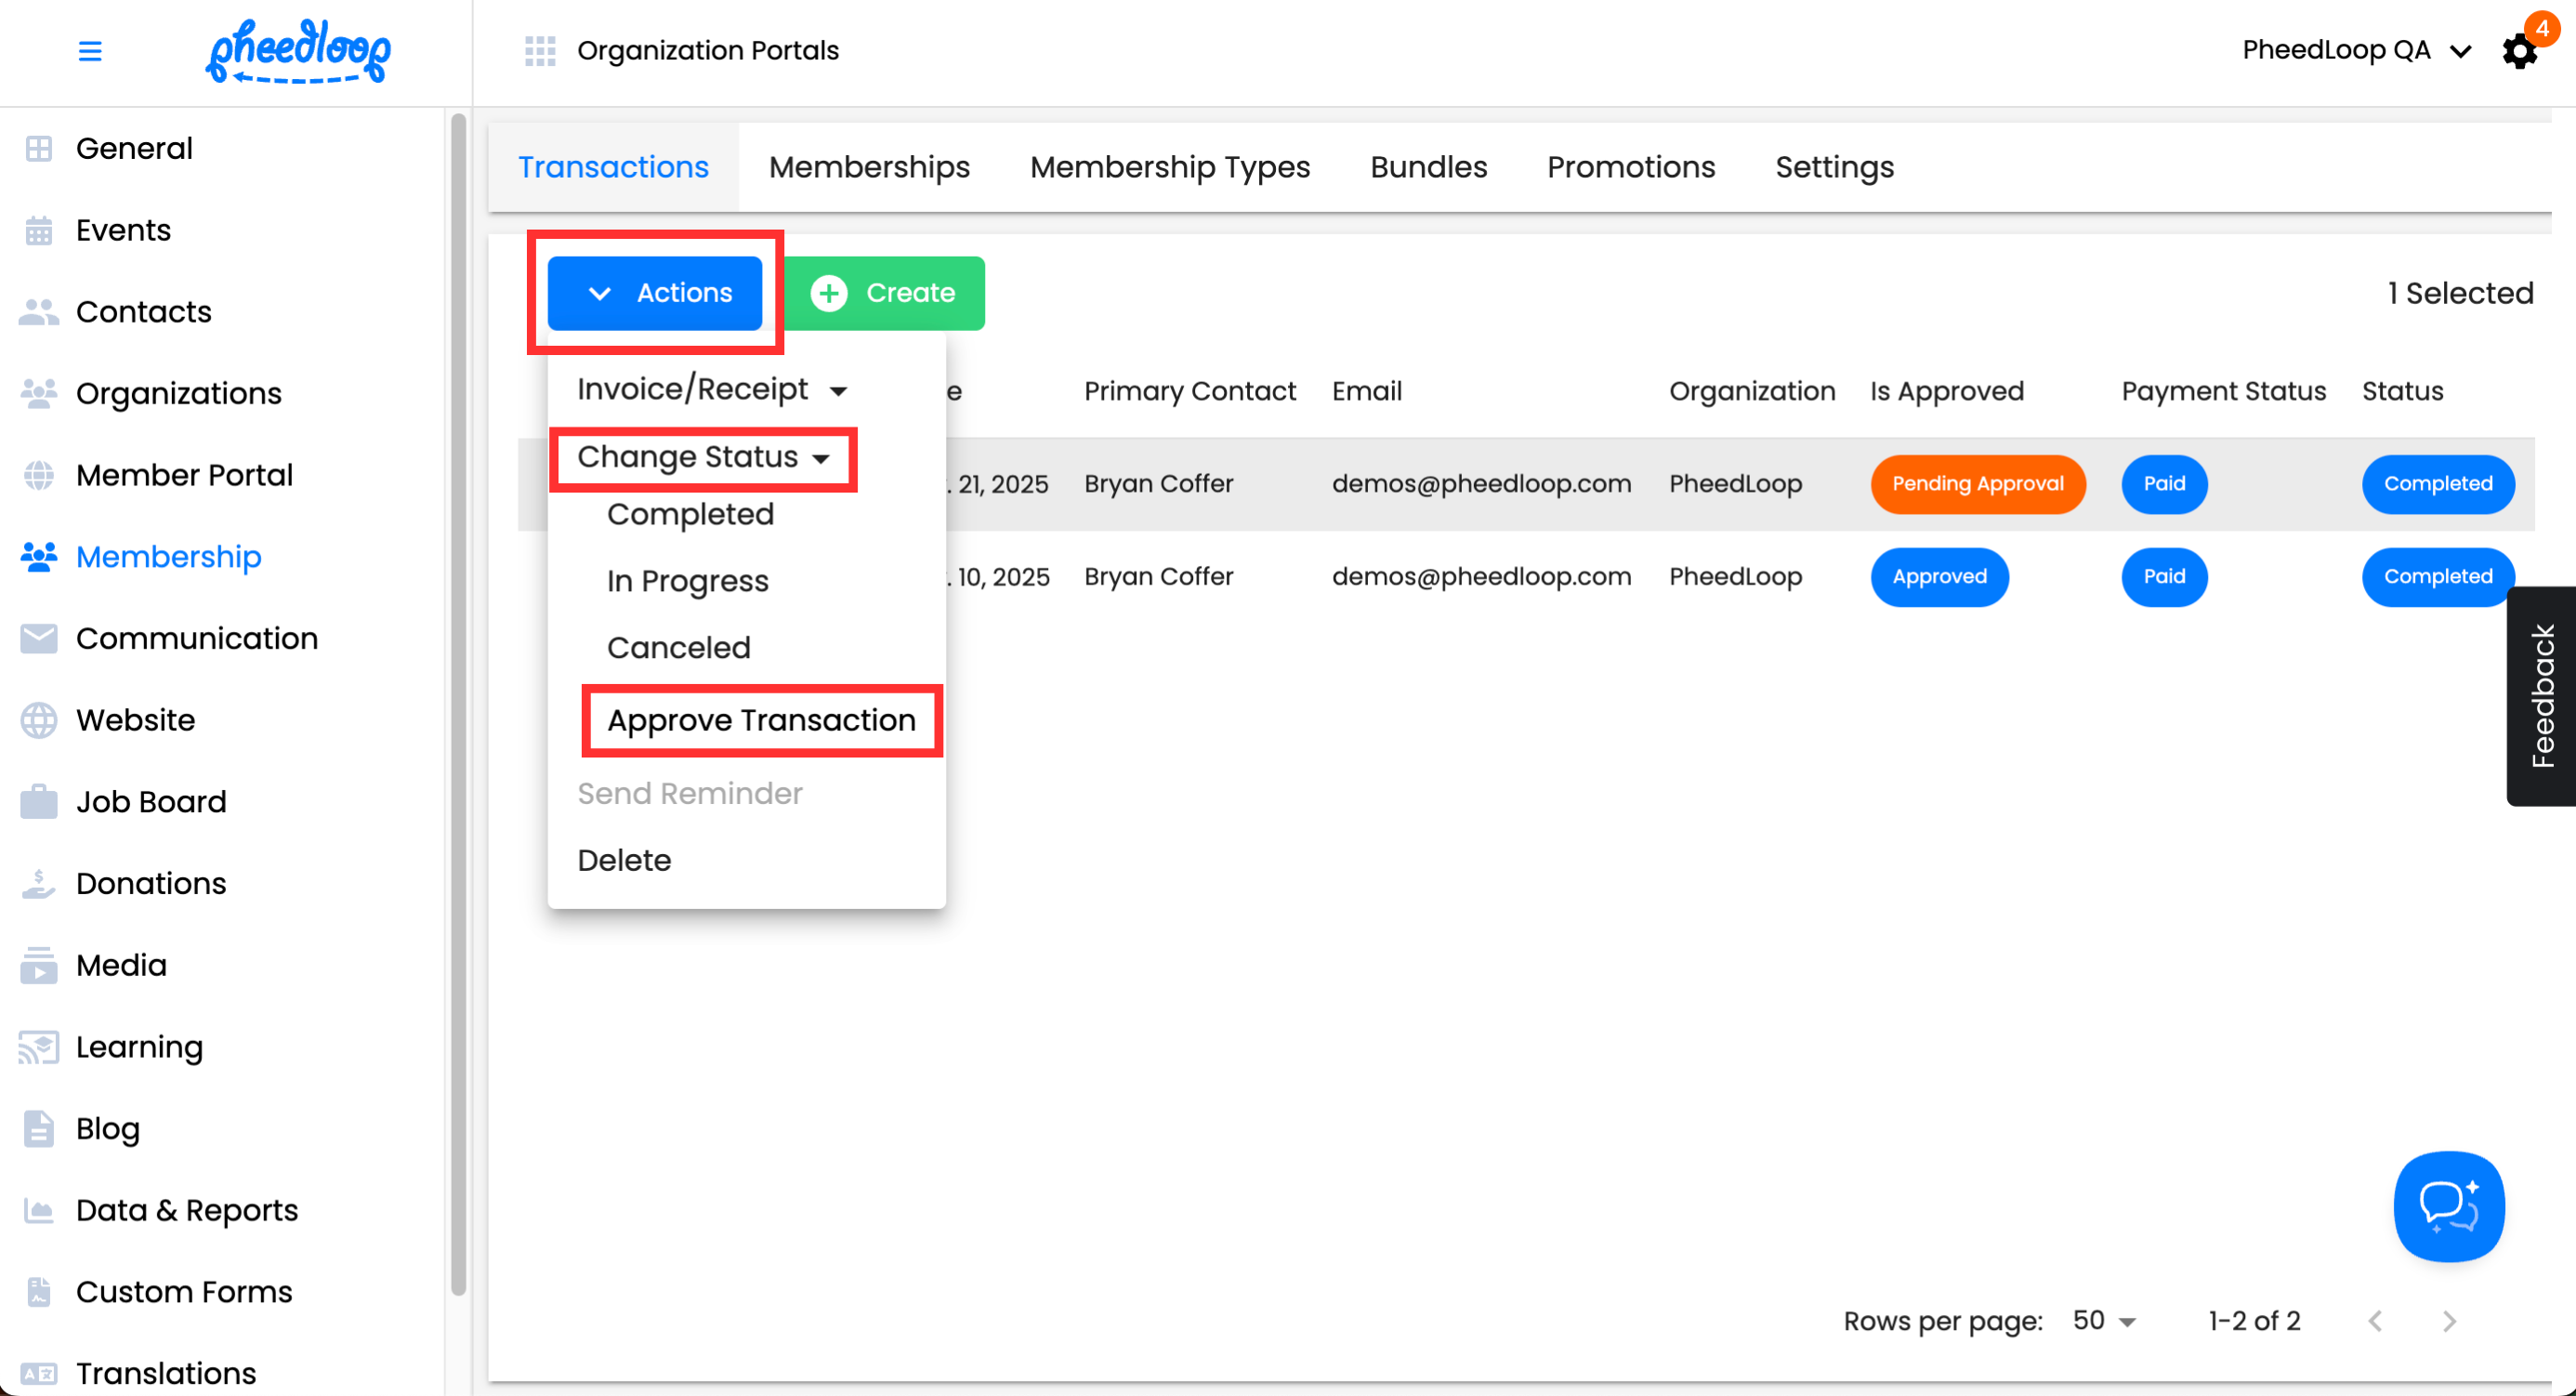
Quick Tip - Transactions can always be approved after creation by selecting the checkbox of the existing transaction and then selecting Actions > Change Status > Approve Transaction. Toggle on the Send Confirmation Email checkbox to send an email notification to the email attached to the transaction. Select Approve Transaction to finalize the approval.
Bulk Uploading Transactions
Multiple transactions can be created at once by using the bulk upload feature. By entering the information in one CSV file and uploading it into the Membership Dashboard, multiple transactions can be generated at once.
To begin, you will need to download the template file.
- From the Membership Dashboard, navigate to Membership > Transactions
Above the Transactions table, select the upload button

Select Download Template
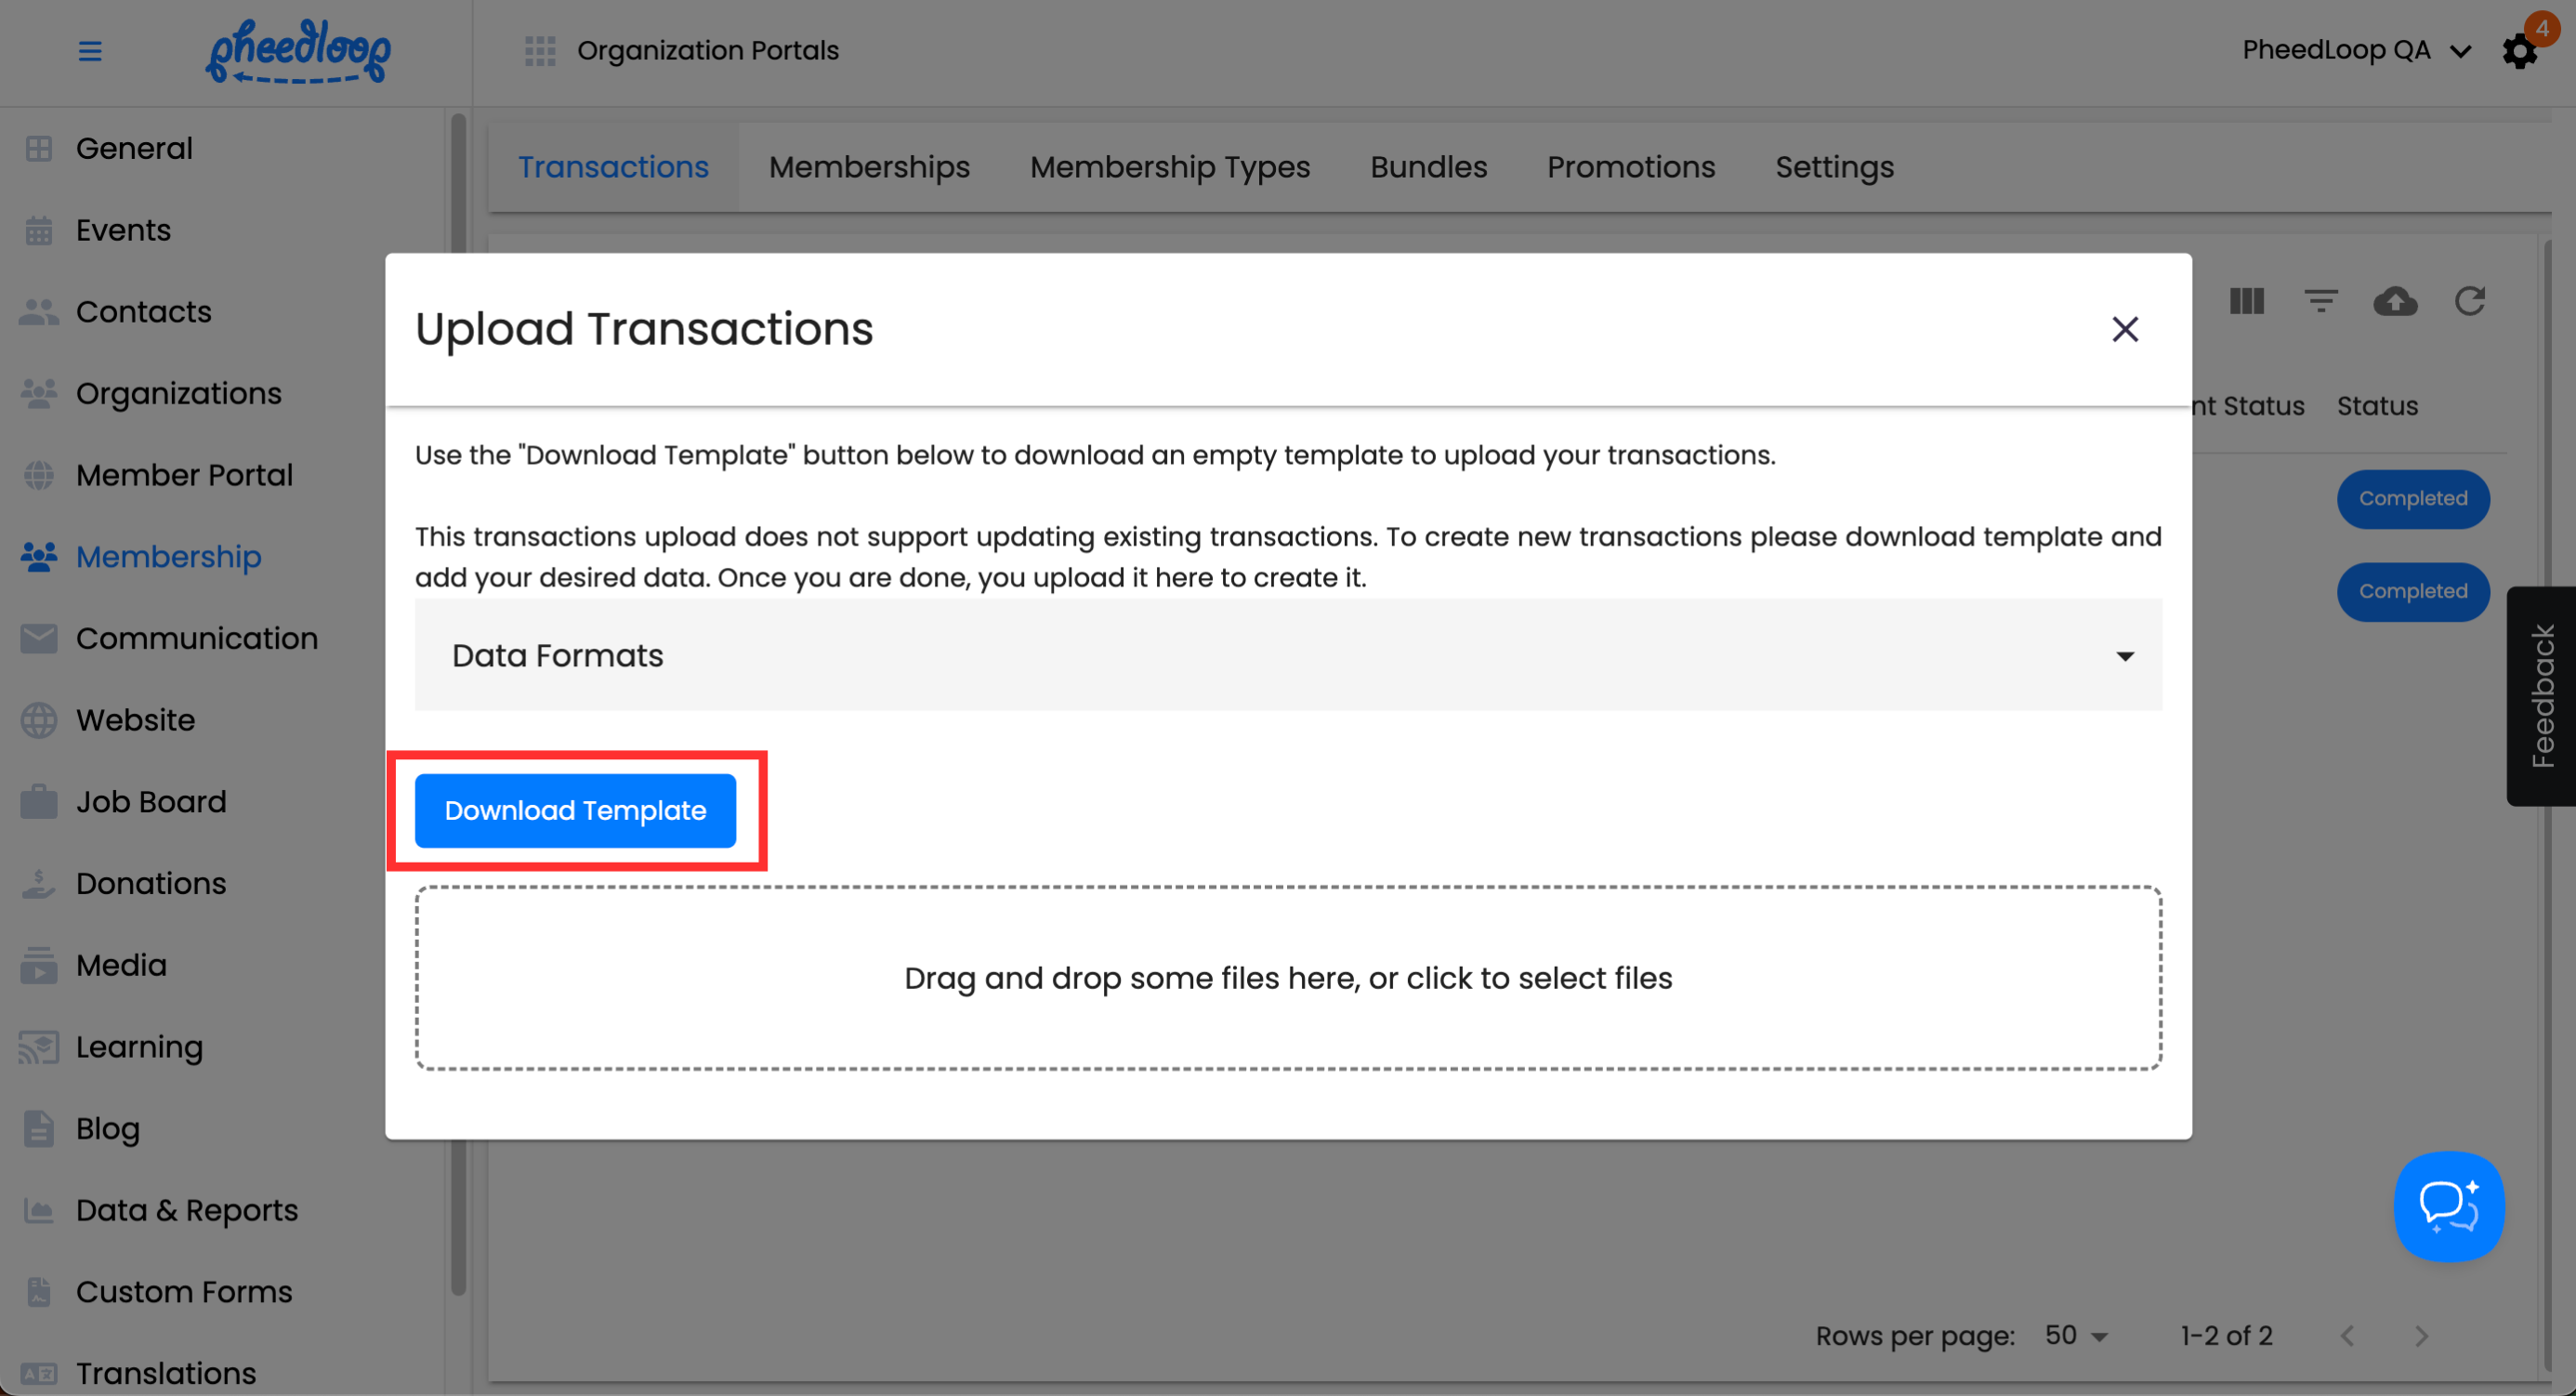


The Transaction Upload template will now be downloaded onto your device.
- Open the Transactions Upload template file
- Fill out the information outlined in the Headings in the Transaction Upload Template step below
- Save the document as a CSV file
- From the Membership Dashboard, navigate to Membership > Transactions
- Above the Transactions table, select the upload button
- Select the Drag and drop some files here, or click to select files button
Select Submit
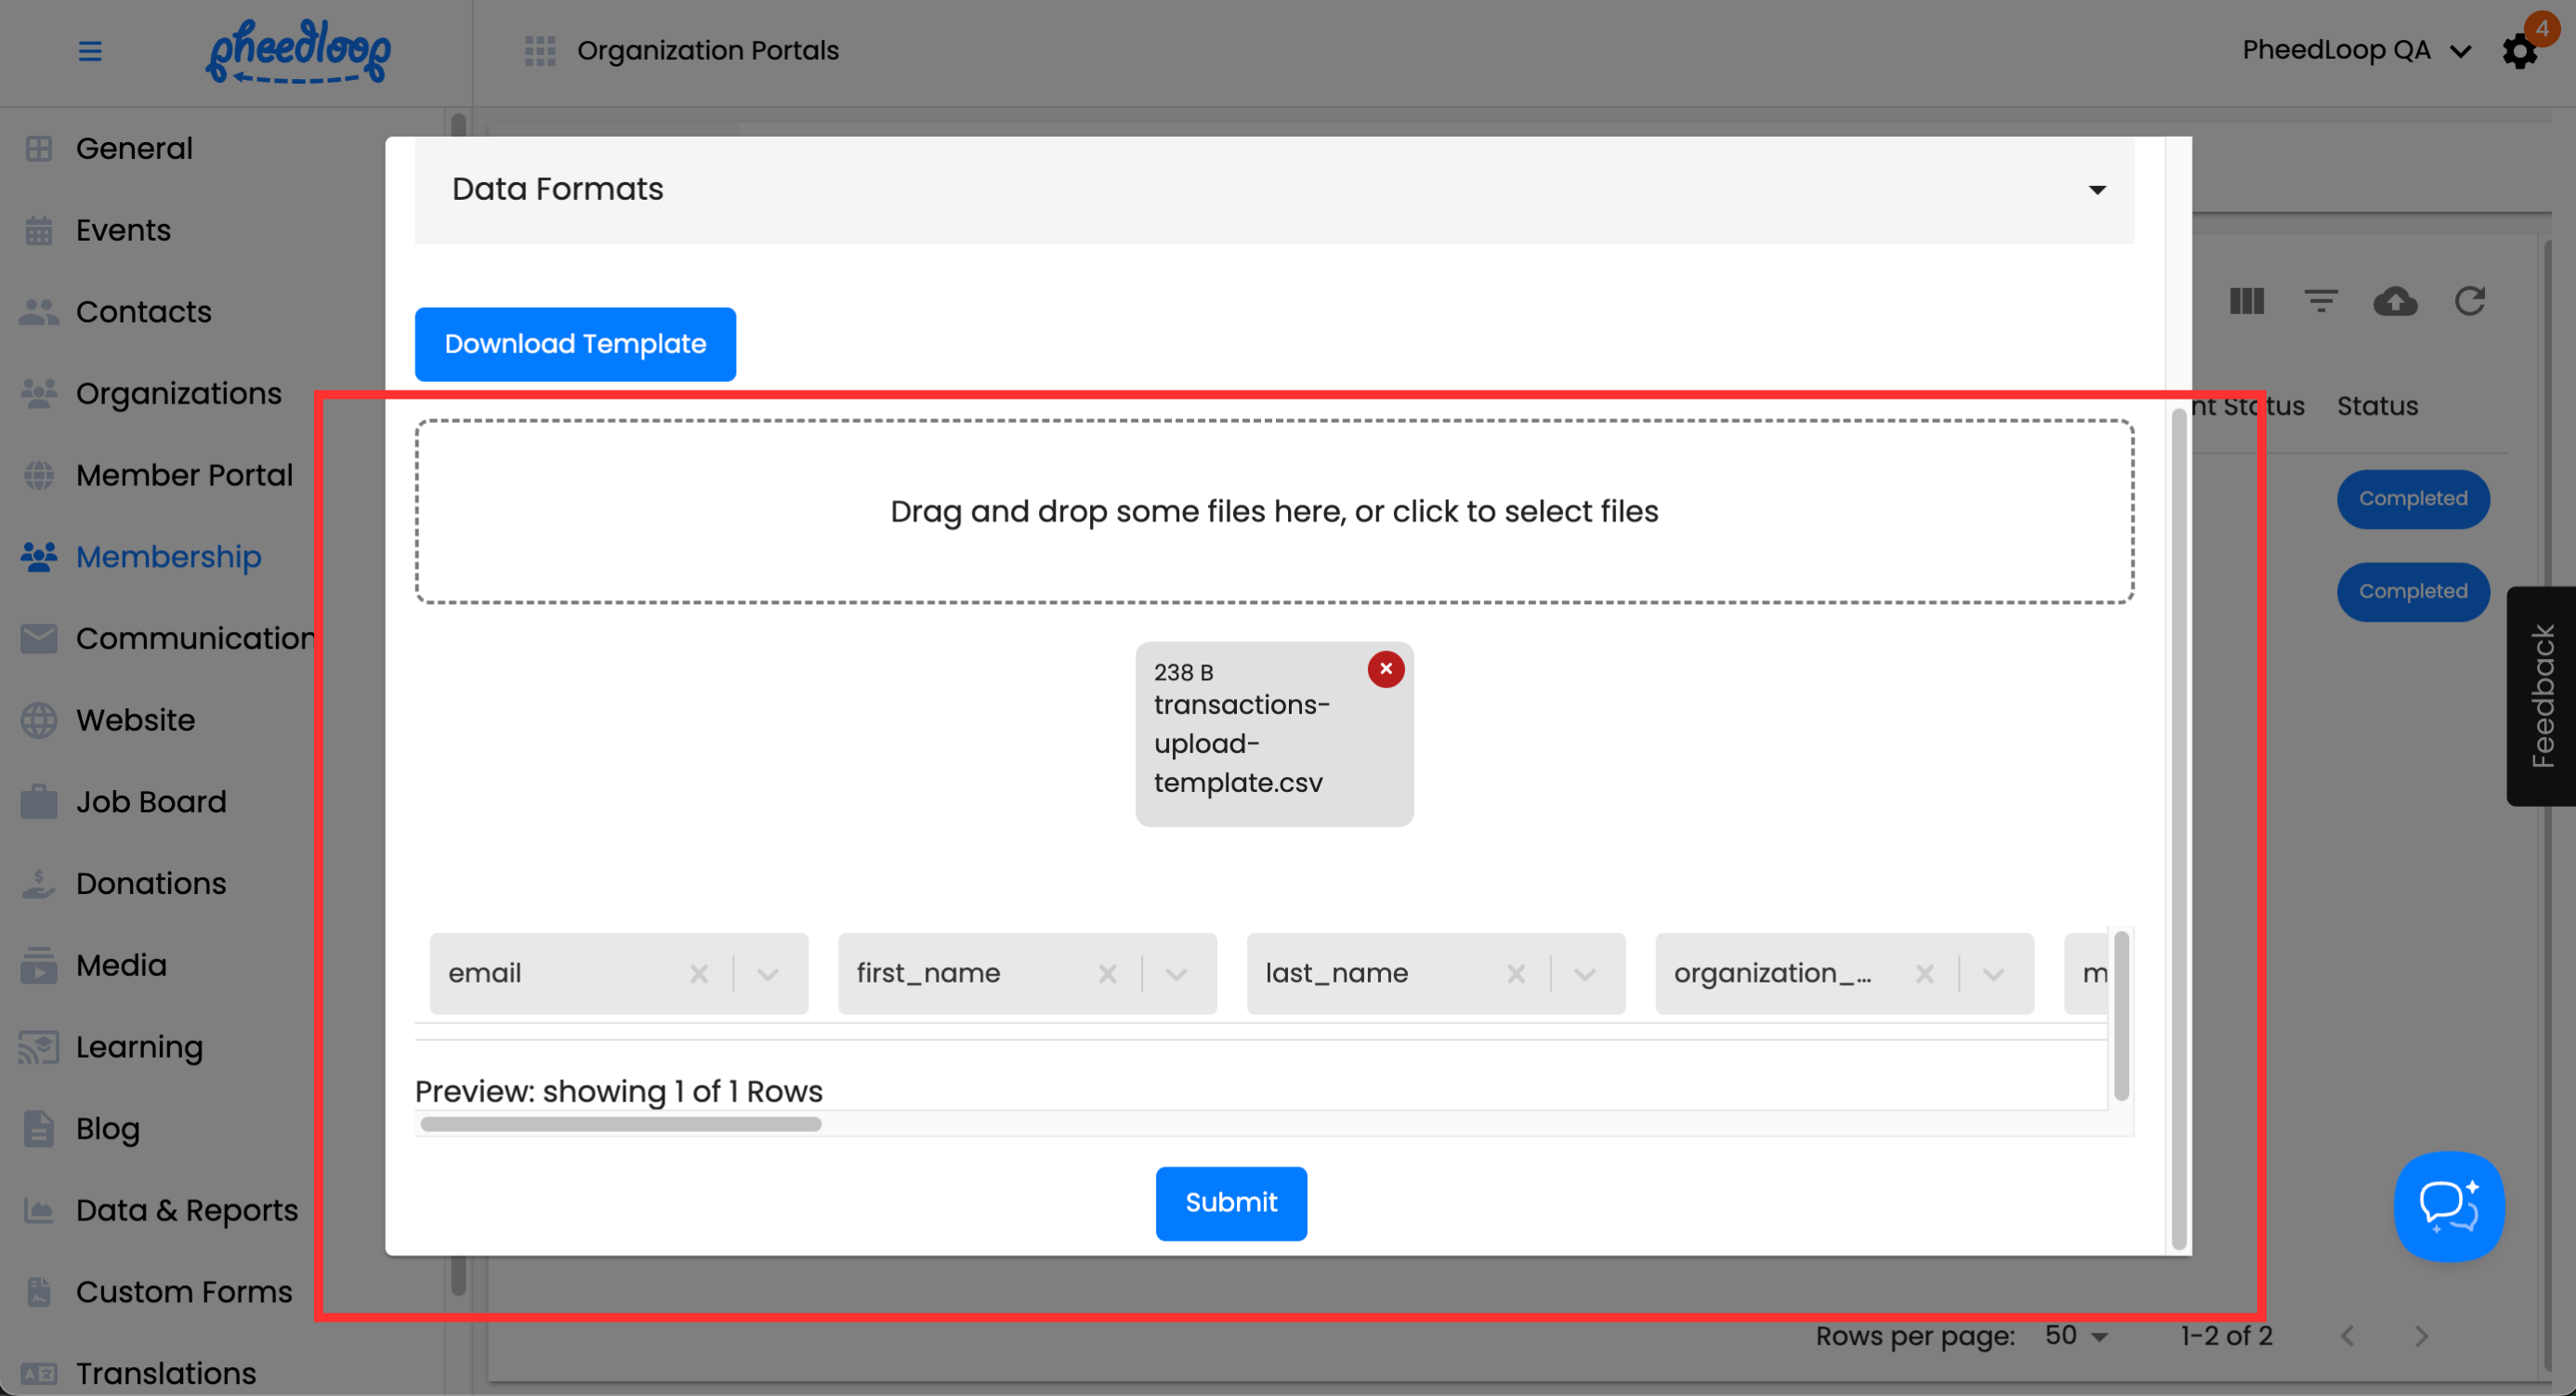

Headings in the Transaction Upload Template
The CSV file will now be downloaded onto your device. The template will contain the following columns which can be filled as part of the upload process.
| Field | Description |
|---|---|
| Enter the member’s email address in this field. | |
| firstName | Enter the member’s first name in this field. |
| lastName | Enter the member’s last name in this field. |
| organizationMember | Enter the internal code of the organization the member belongs to in this field. |
| membershipTypes | Enter the internal code for the member’s Membership Type in this field. |
| bundlePackages | Enter the internal code of the Membership Bundle for this member in this field. |
| addressLine_1 | Enter the member’s primary address in this field. |
| addressLine_2 | Enter the member’s secondary address in this field, if applicable. |
| addressCity | Enter the city for the member in this field. |
| addressState | Enter the state or province for the member in this field. |
| addressZip | Enter the postal or zip code for the member in this field. |
| addressCountry | Enter the country for the member in this field. |
| addressPhone | Enter the member’s phone number in this field. |
| Notes | Enter any internal notes for this member in this field. |
| pendingApproval | Enter Yes to approve the transaction or No to keep it pending. |
| dateStart | Enter the start date for the Membership Type to take effect. |
| dateExpiry | Enter the expiry date for when the subscription ends. |
| completed | Enter Yes to mark the transaction as completed or No to mark it as incomplete. |
| canceled | Enter Yes to mark the transaction as canceled, or No/leave blank to keep it active. |
Managing Transactions
Once a transaction has been created, additional information can be added into the transaction such as tiers, refunds, and promotions.
- From the Membership Dashboard, navigate to Membership > Transactions
Select the transaction you wish to edit
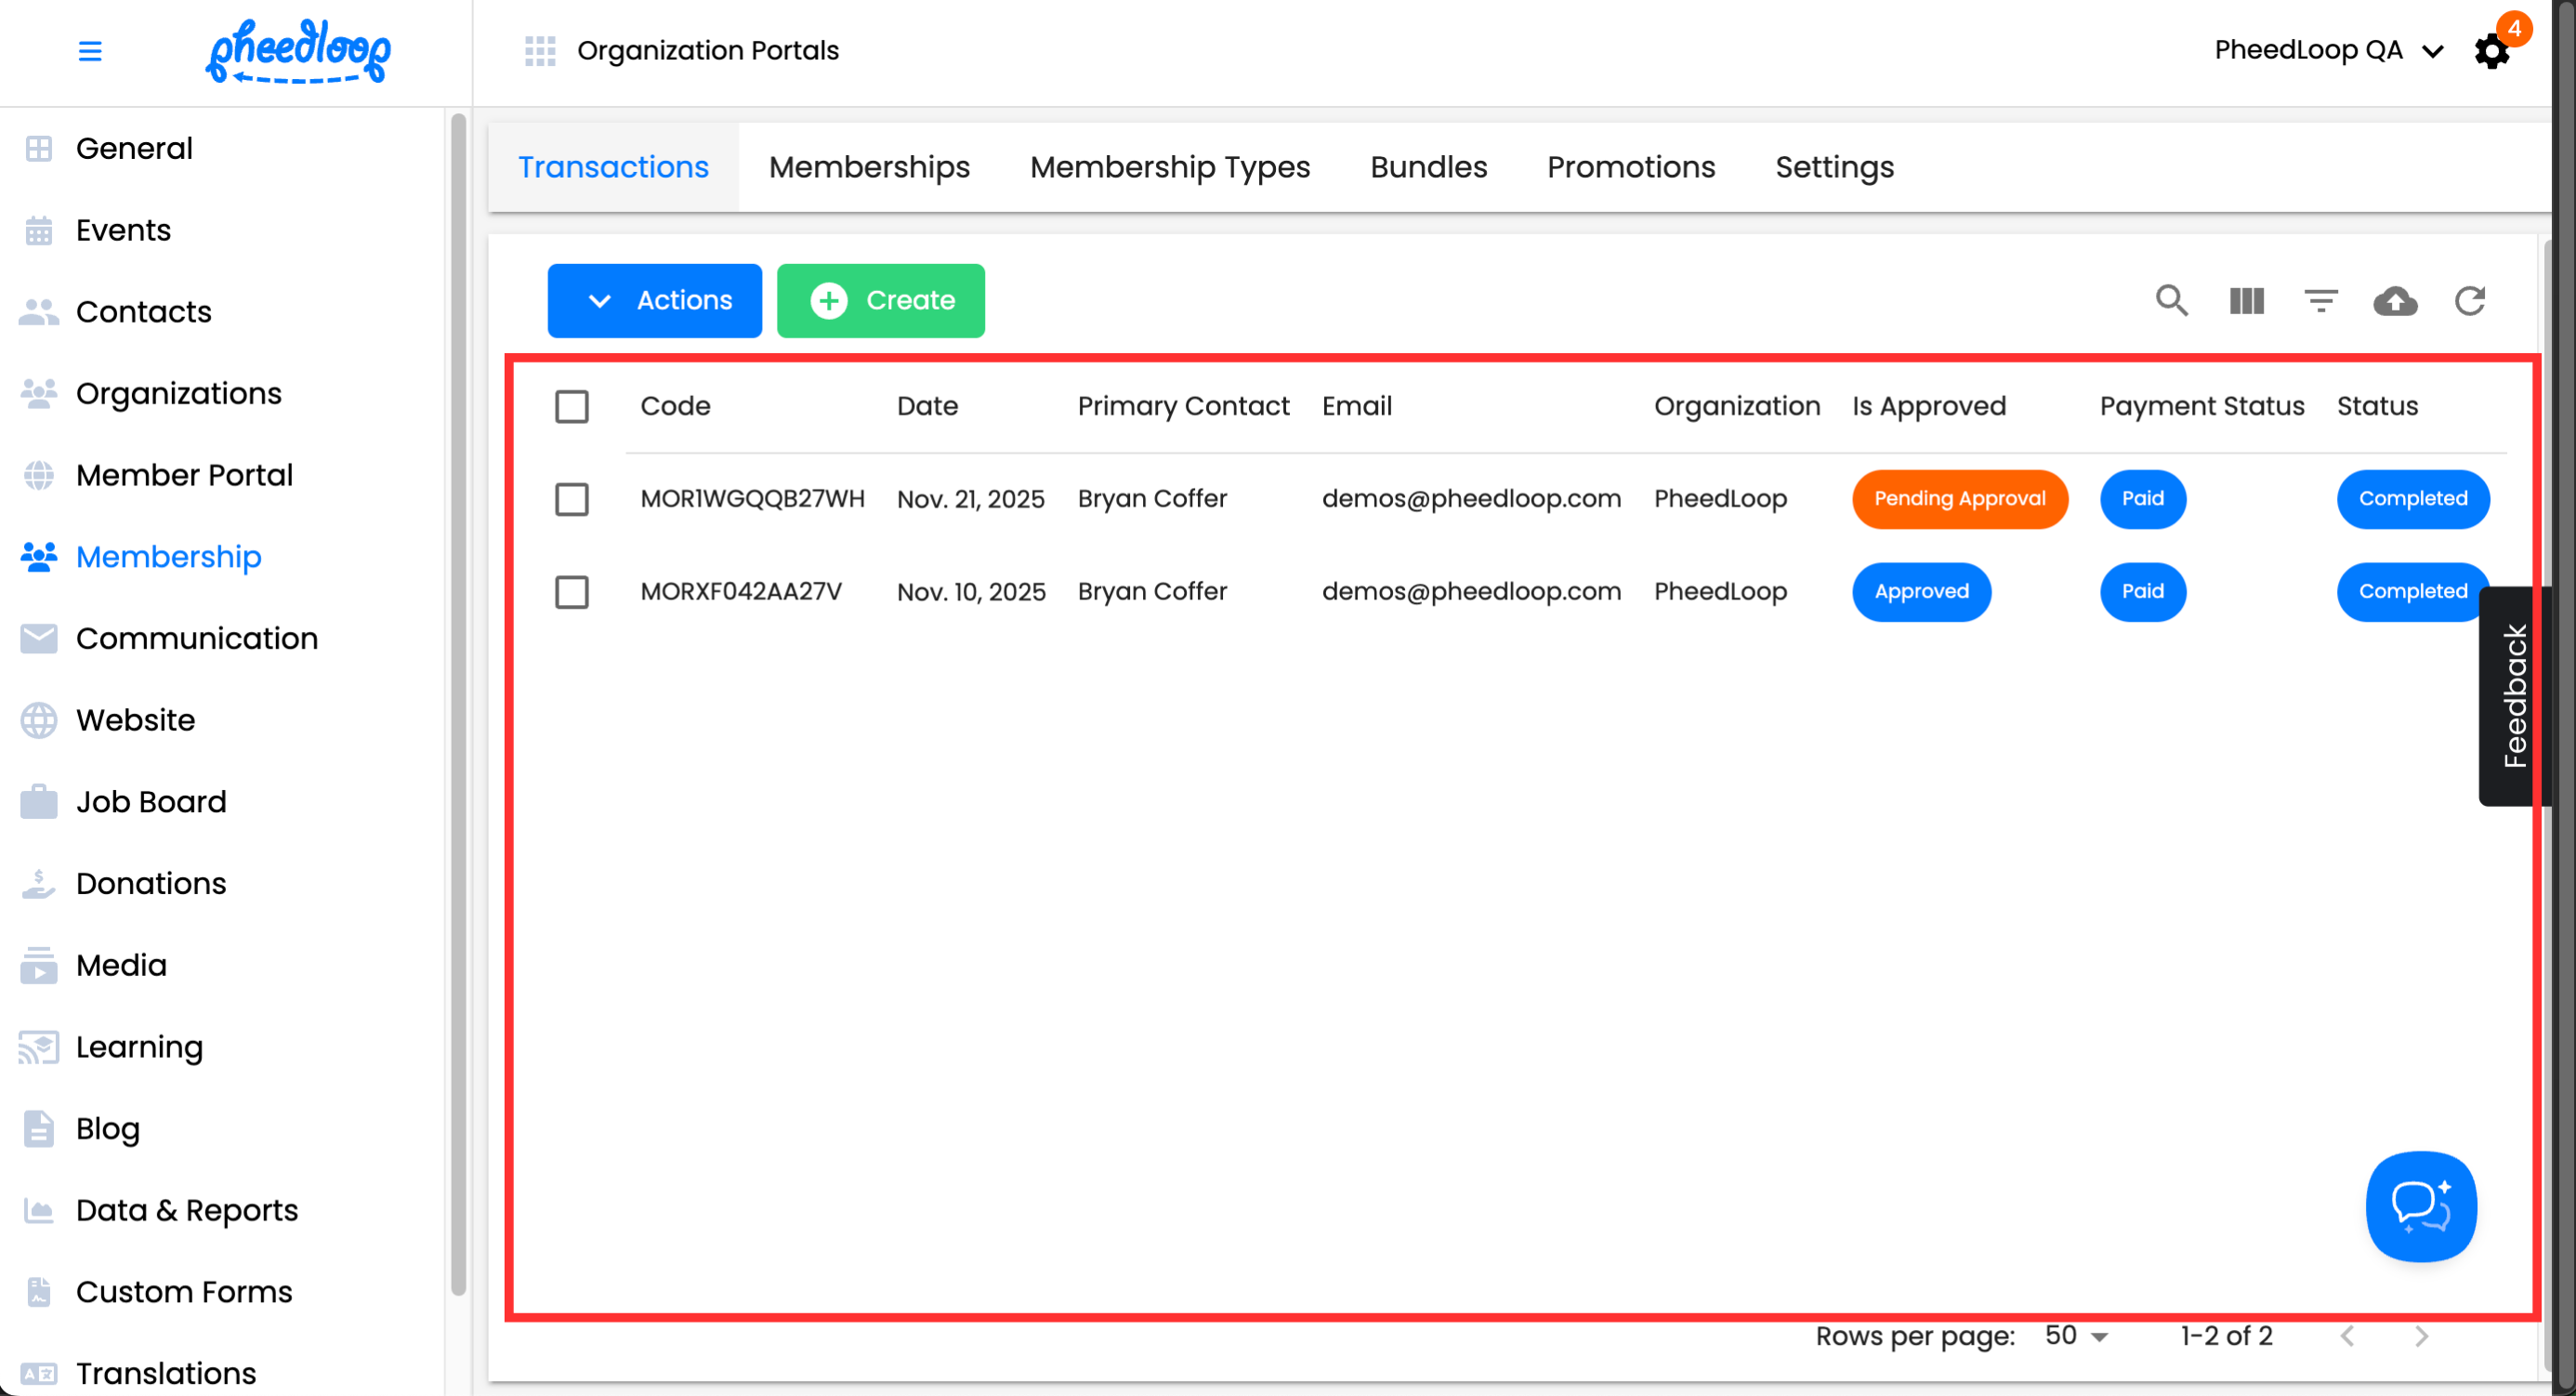

You will now see the Transaction’s editor form, where you can make edits.
Transaction(s) Details
This section contains all the details for the Member. There are no editable fields but selecting View Contracts will take you to the Member Profile under Contacts > Profiles.
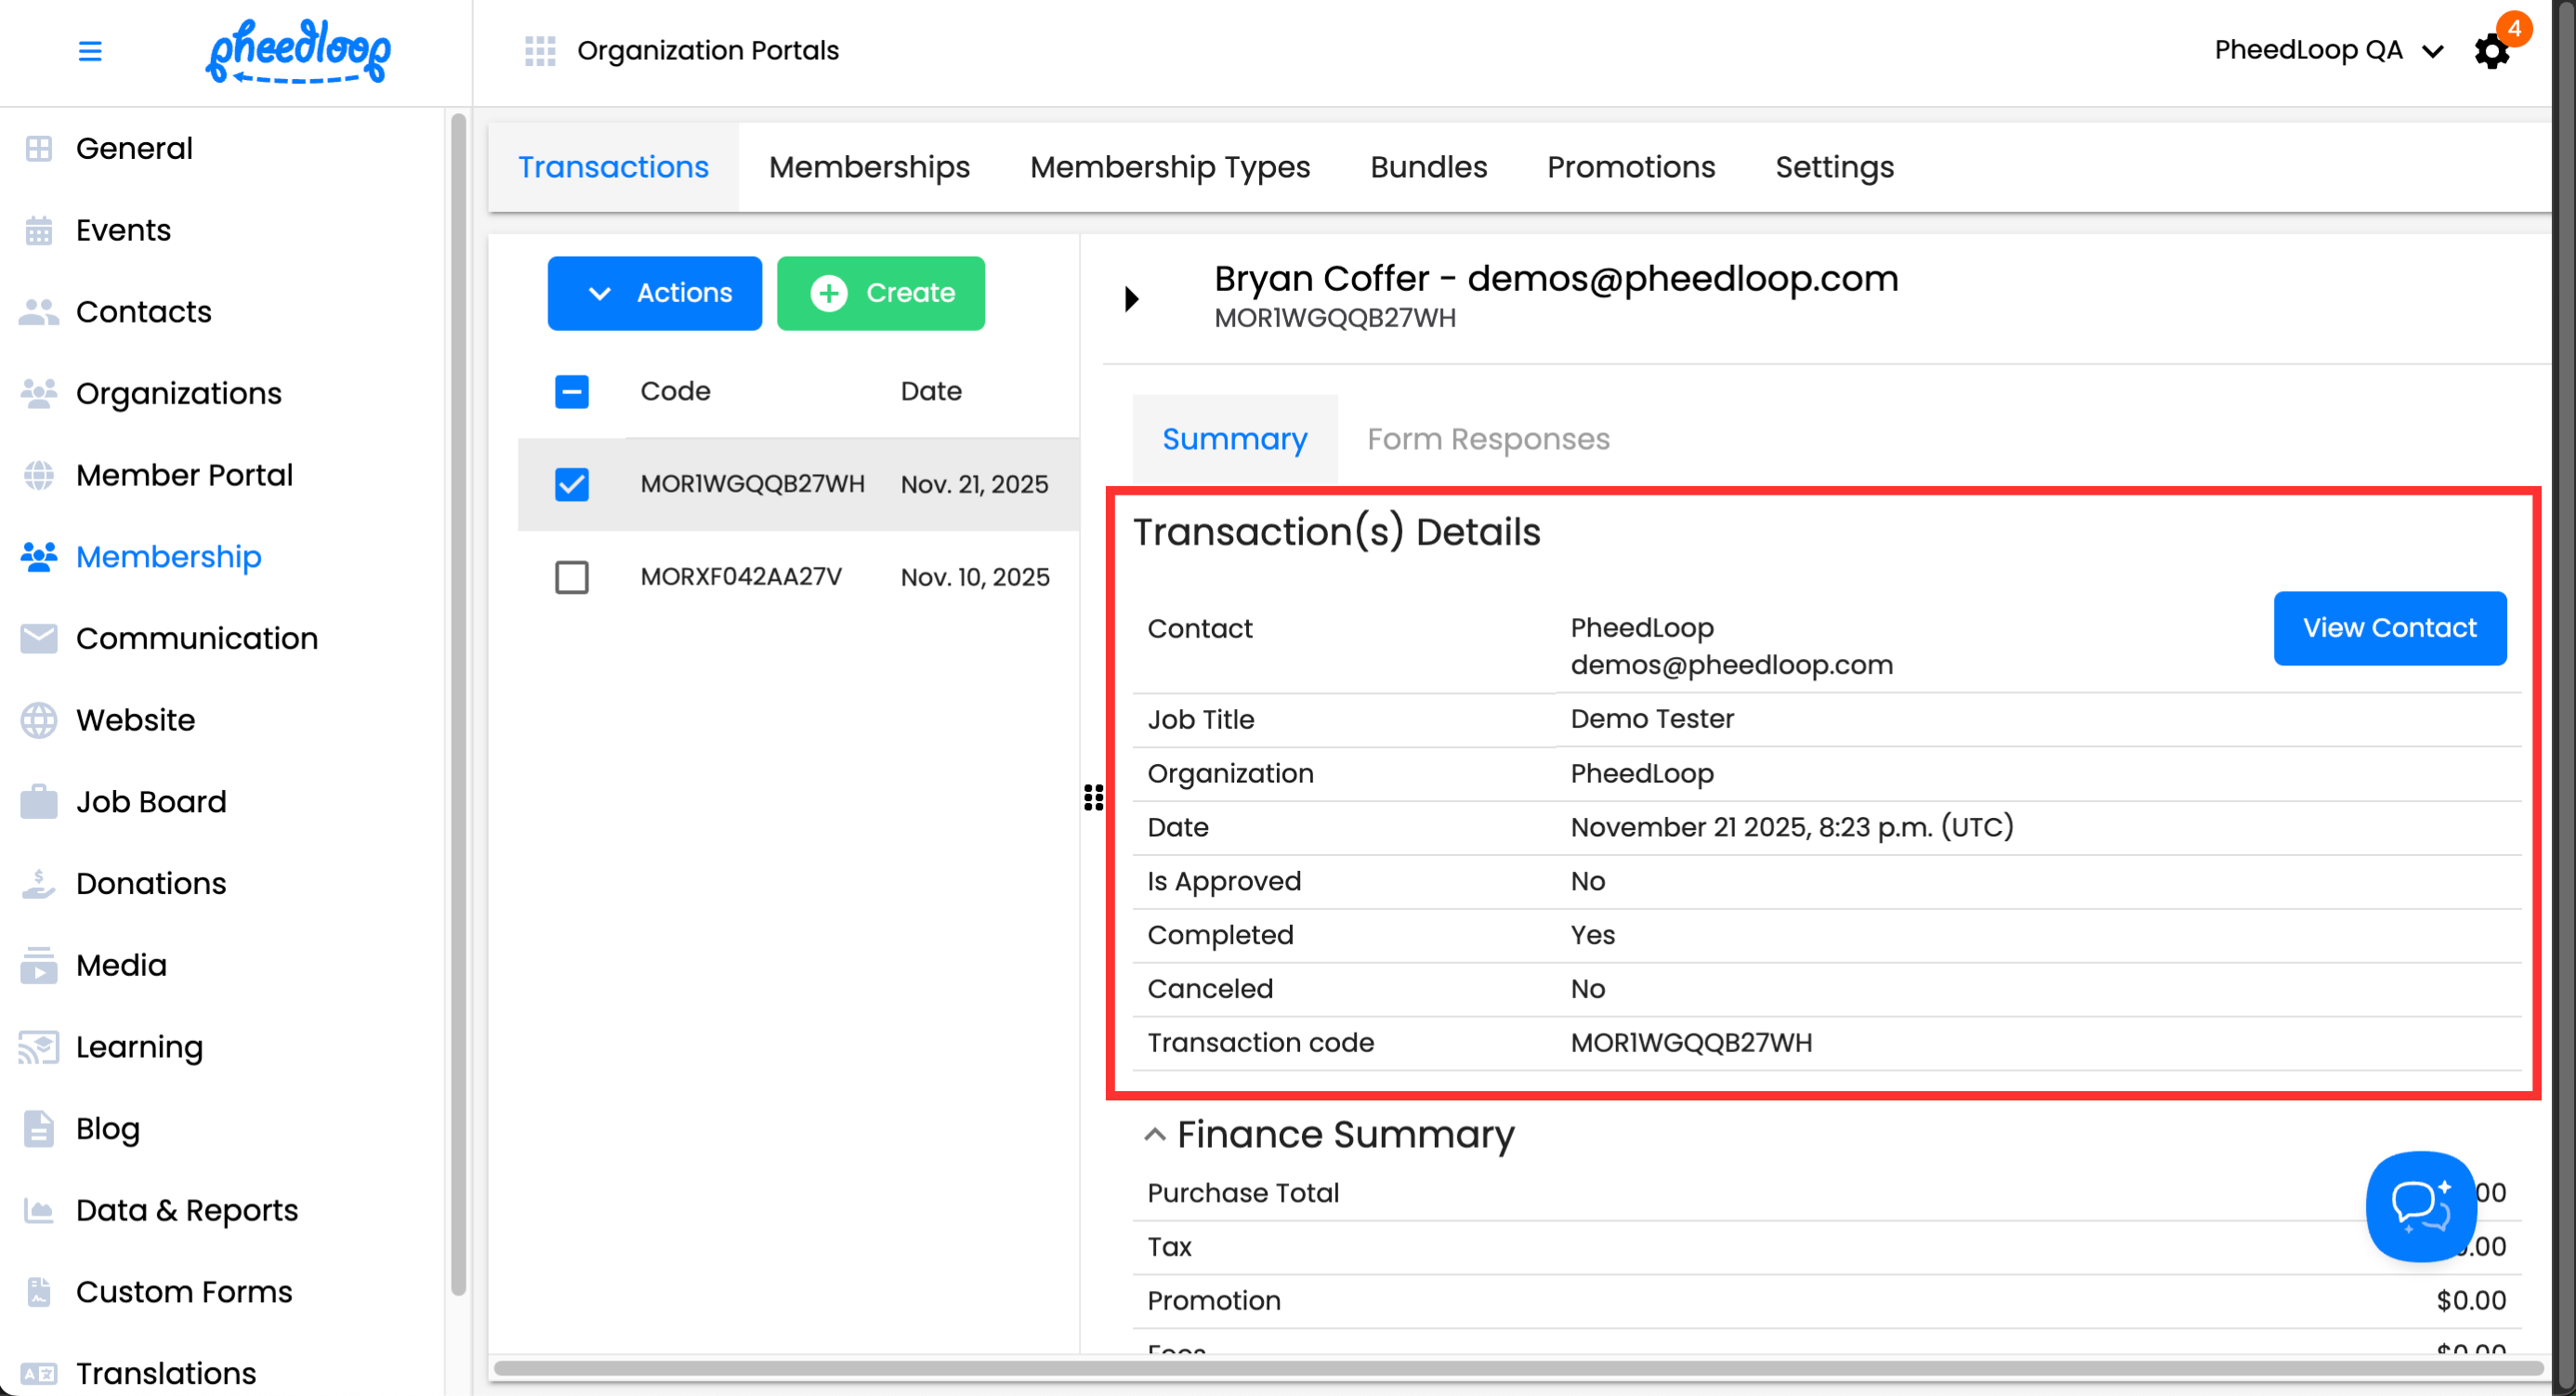
If the organization for the Member is connected to your Organization list, you will see the Go to Organization button which takes you to the Organization page under Organizations > Organizations.
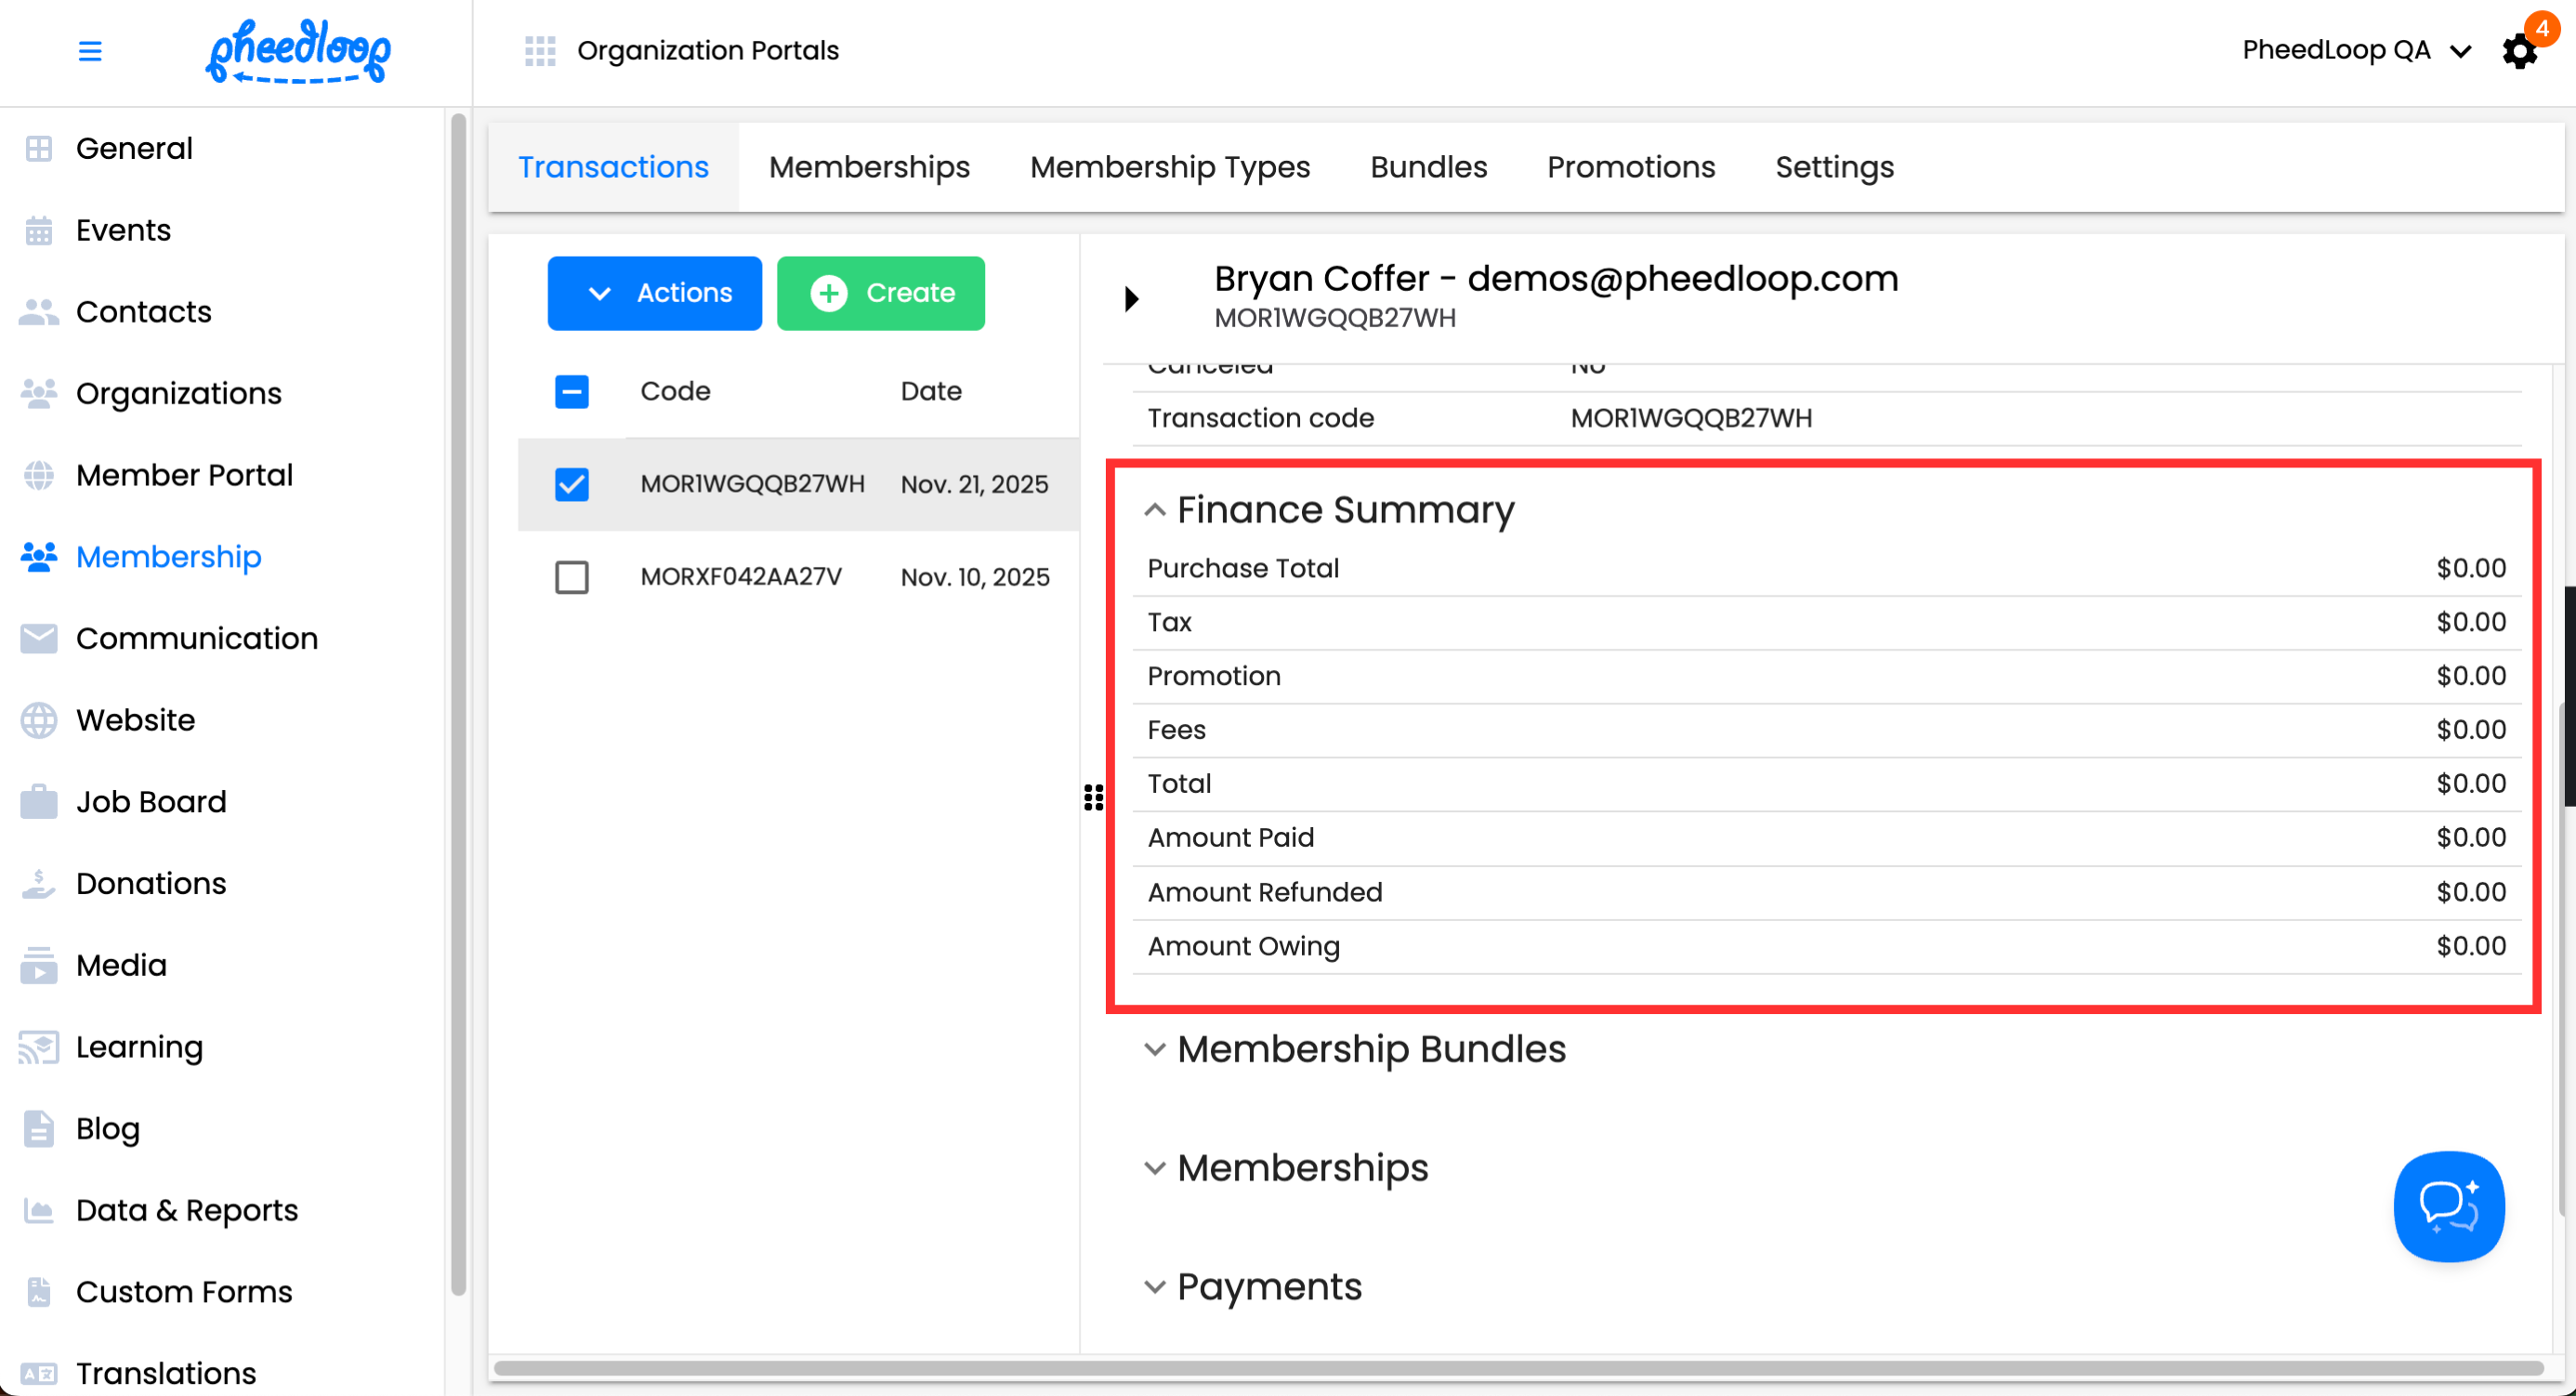
Finance Summary
The finance summary displays all monetary costs as part of the transaction. There are no editable fields in this section.
Membership Bundles
This section will display all bundles that are part of the transaction. Select Add Membership Bundles to add a new bundle.
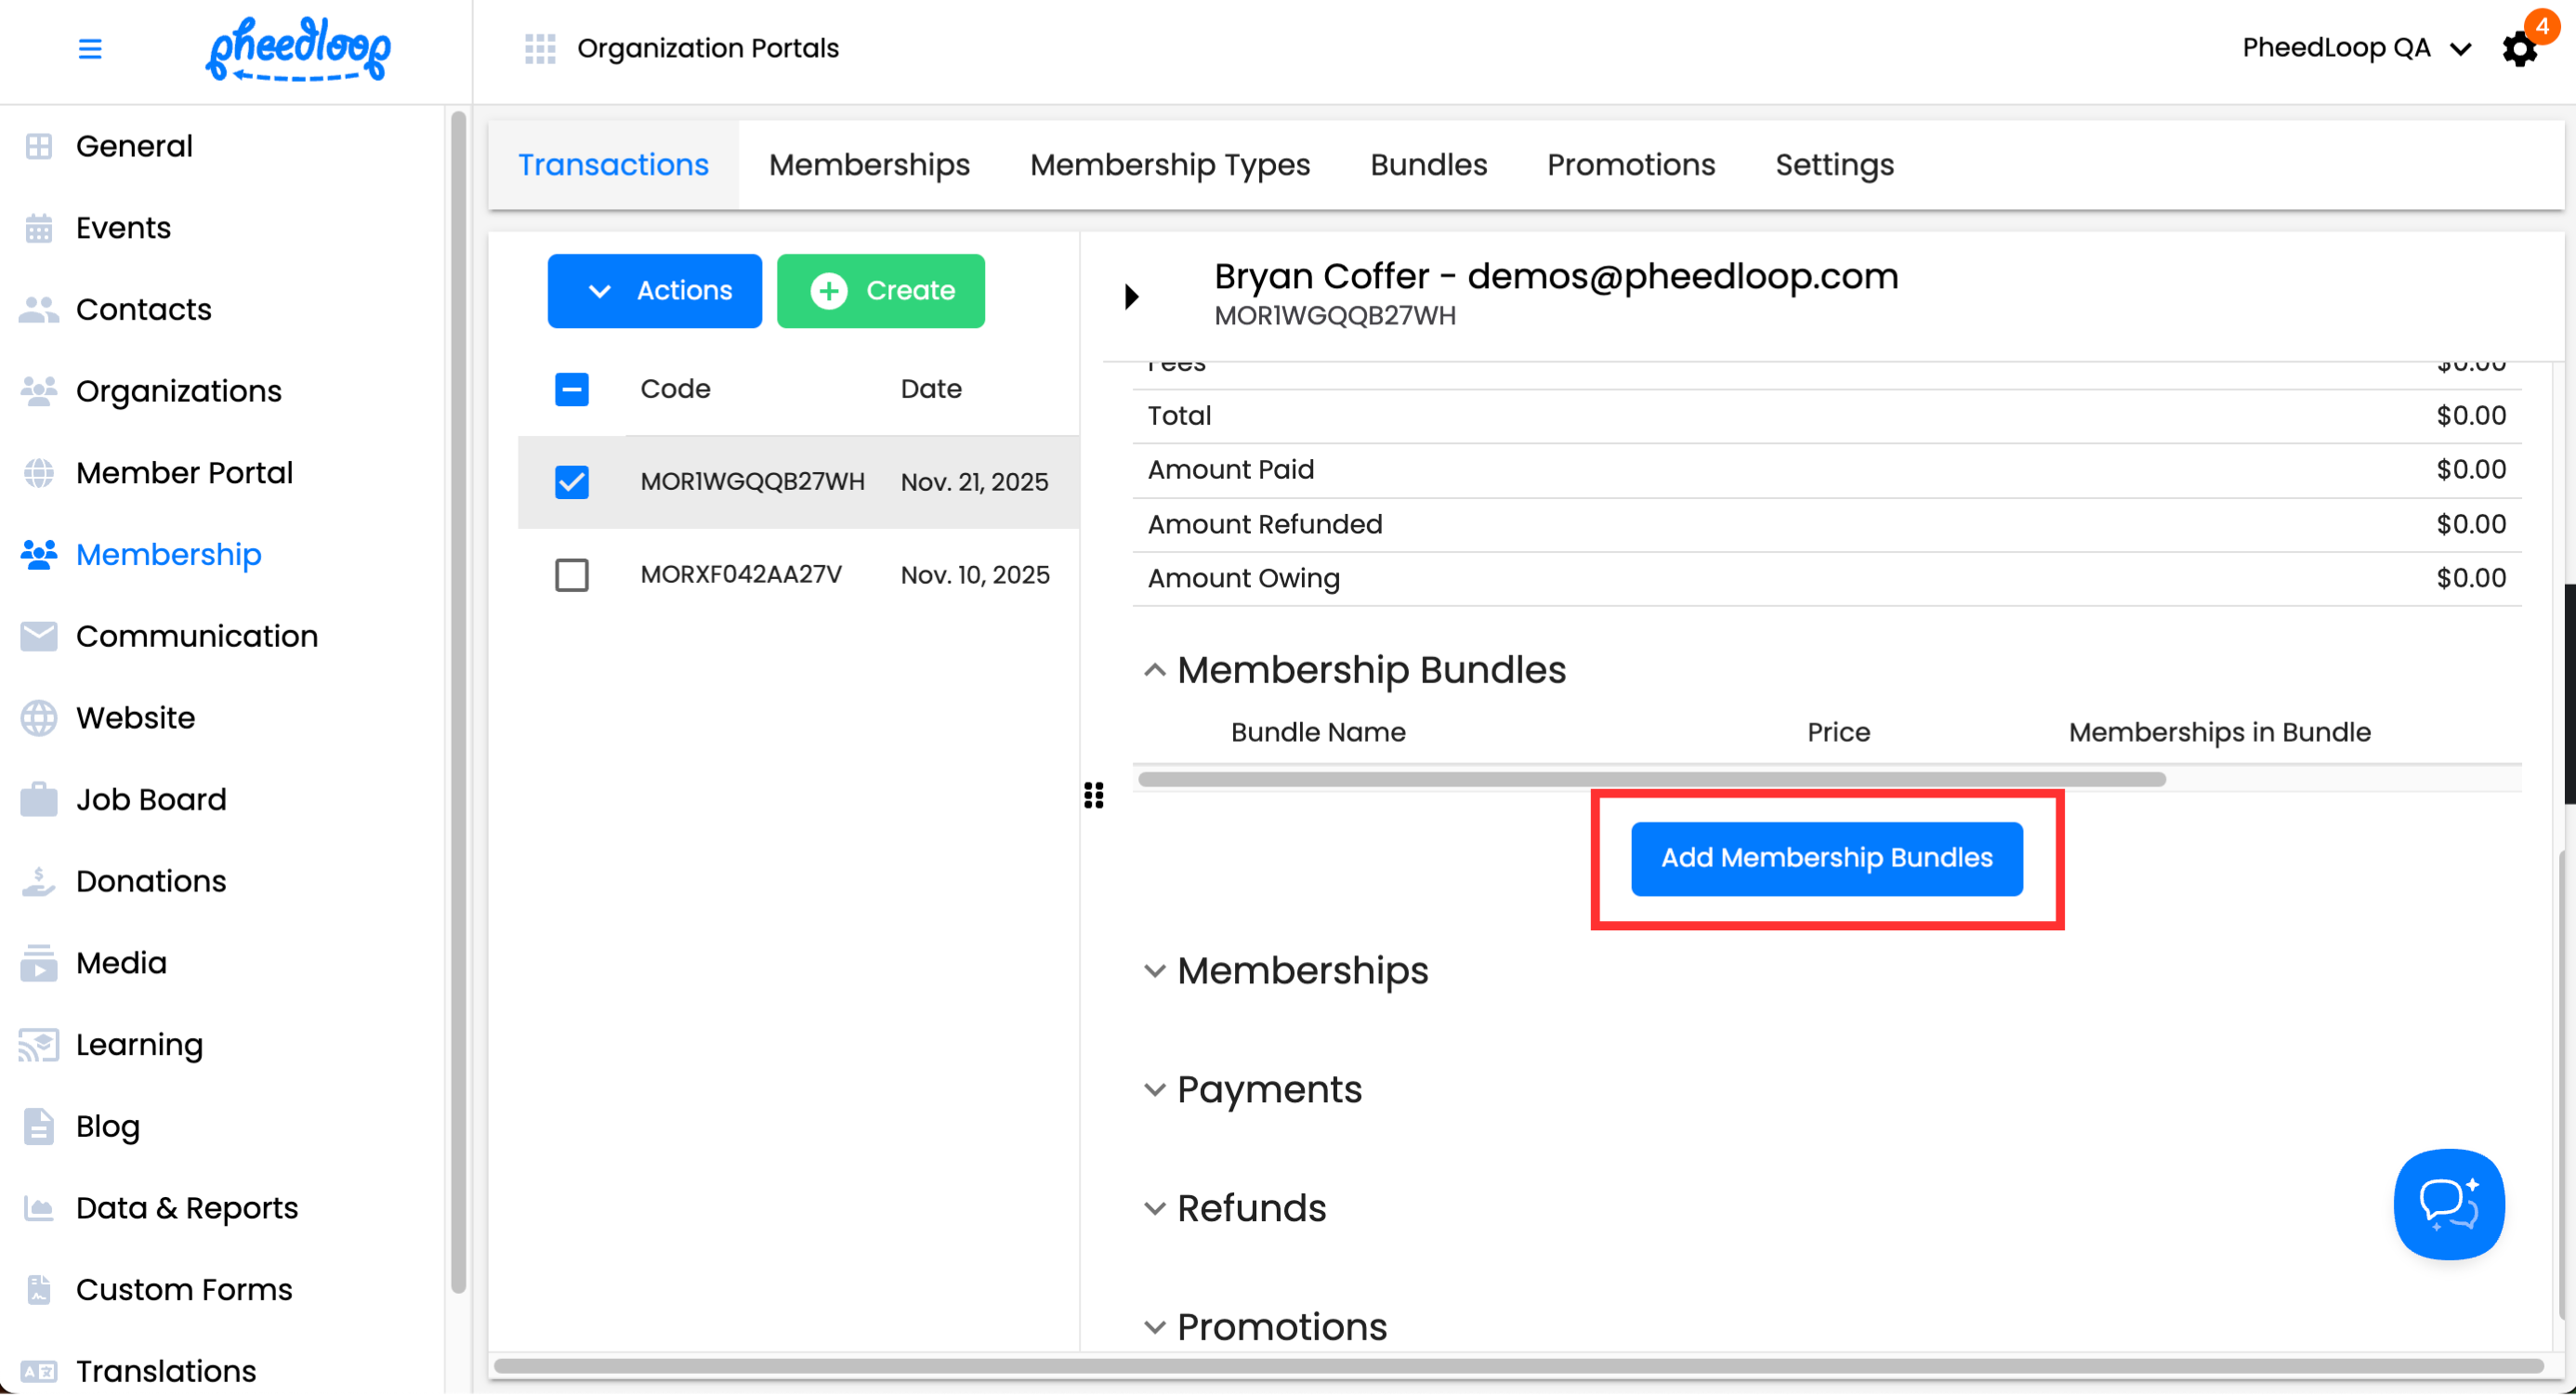
This will open a form where you can select the Membership Bundle.
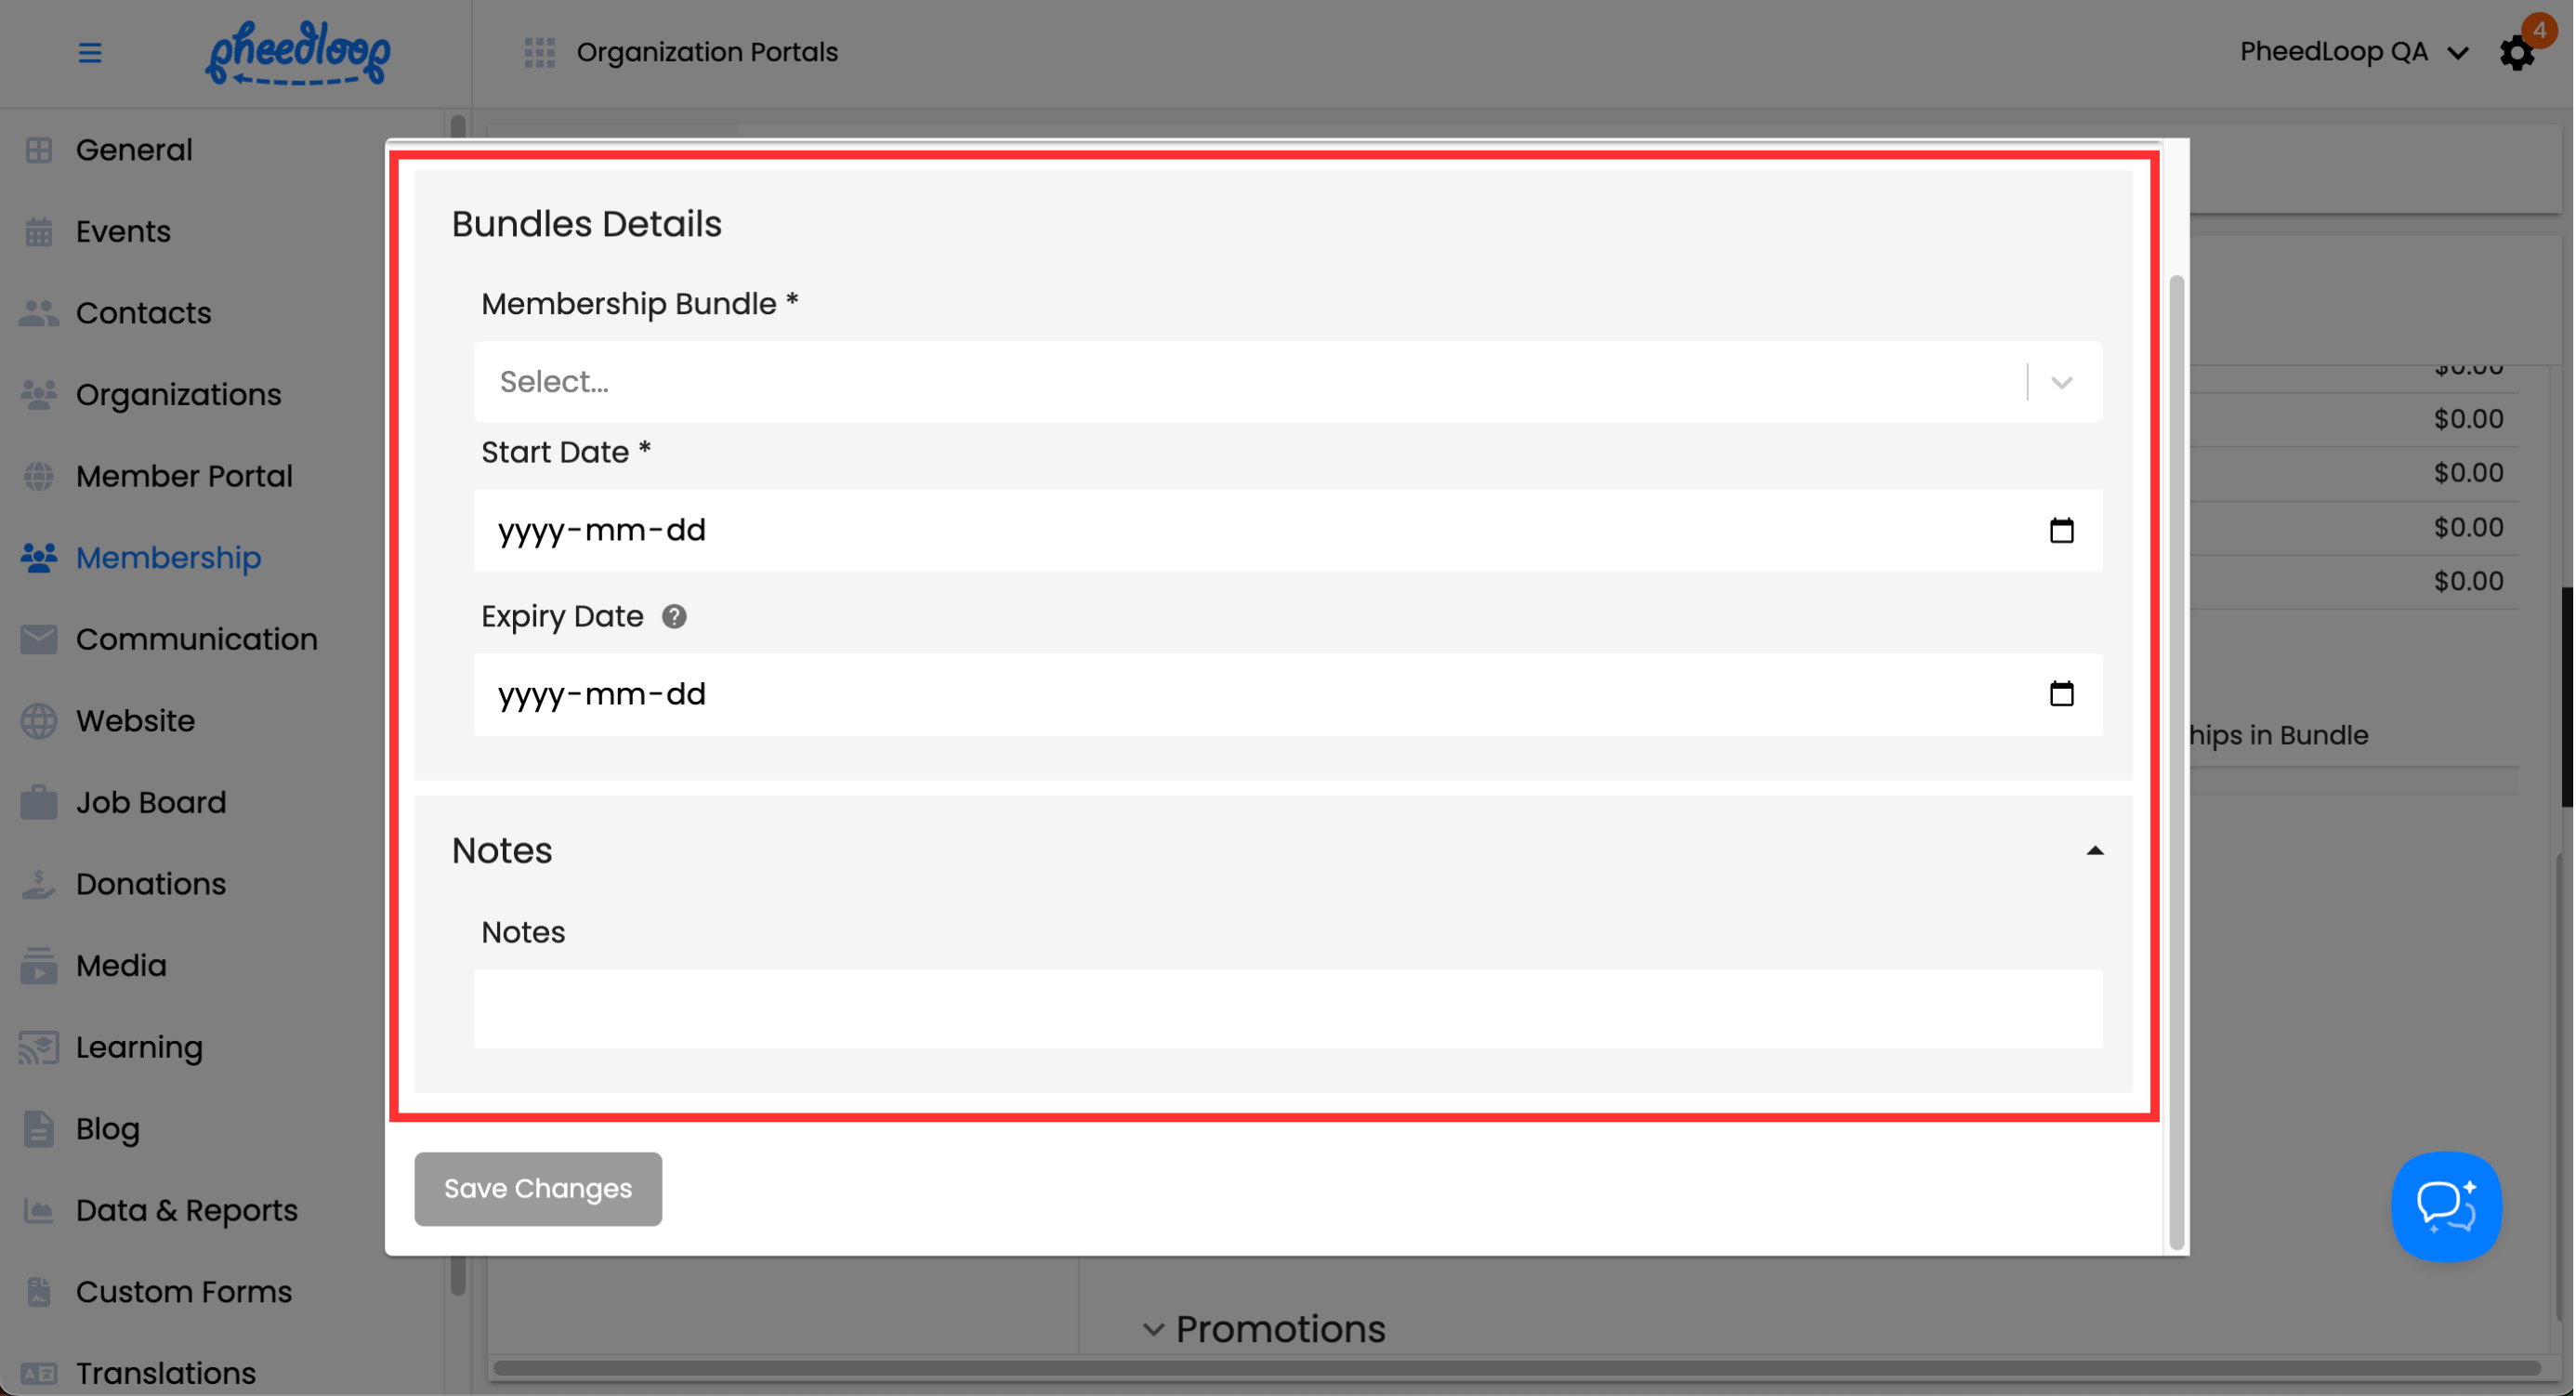
Bundles Details
| Setting | Description |
|---|---|
| Membership Bundle | Select the Membership Bundle to include in this field. |
| Start Date | Enter the start date for the Membership Type to take effect. |
| Expiry Date | Enter the expiry date for when the subscription ends. |
Notes
| Setting | Description |
|---|---|
| Notes | Enter any internal notes for this member in this field. |
Membership Bundles attached to the transaction can also be edited. Select the Actions button to begin editing the transaction.
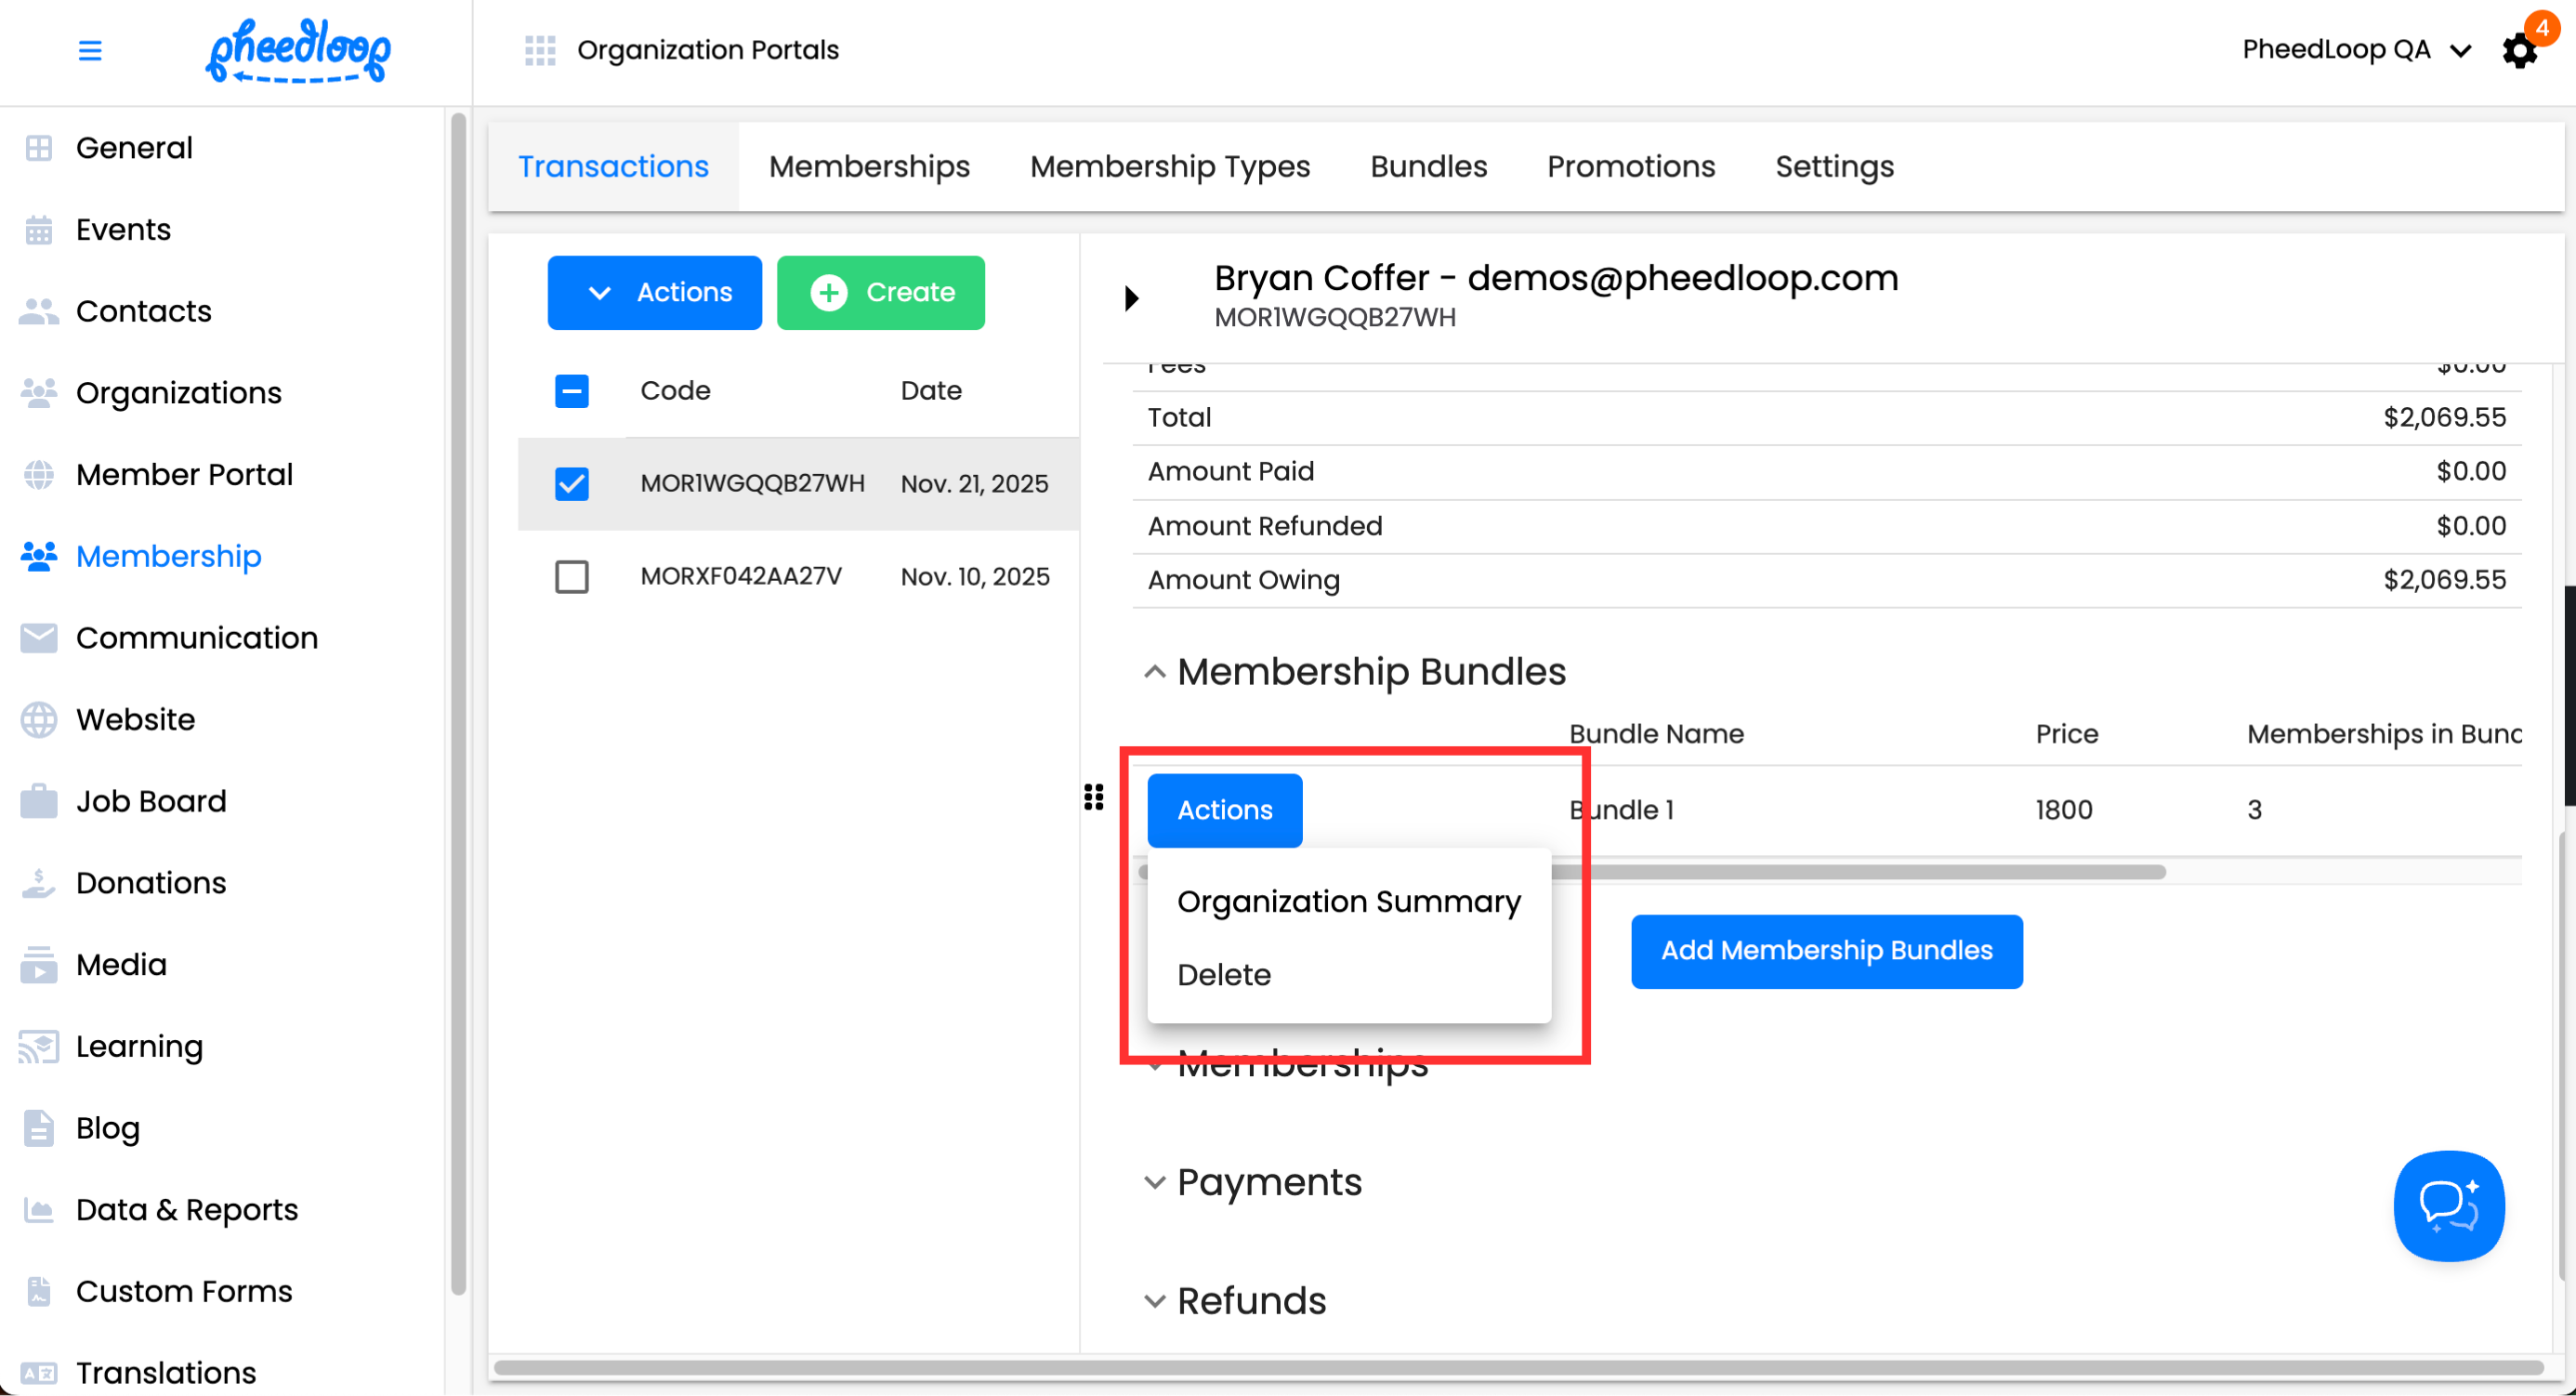
| Setting | Description |
|---|---|
| Organization Summary | Takes you to the organization the member belongs to under Organizations > Organizations. |
| Delete | Deletes the Membership Bundle from the transaction when selected. |
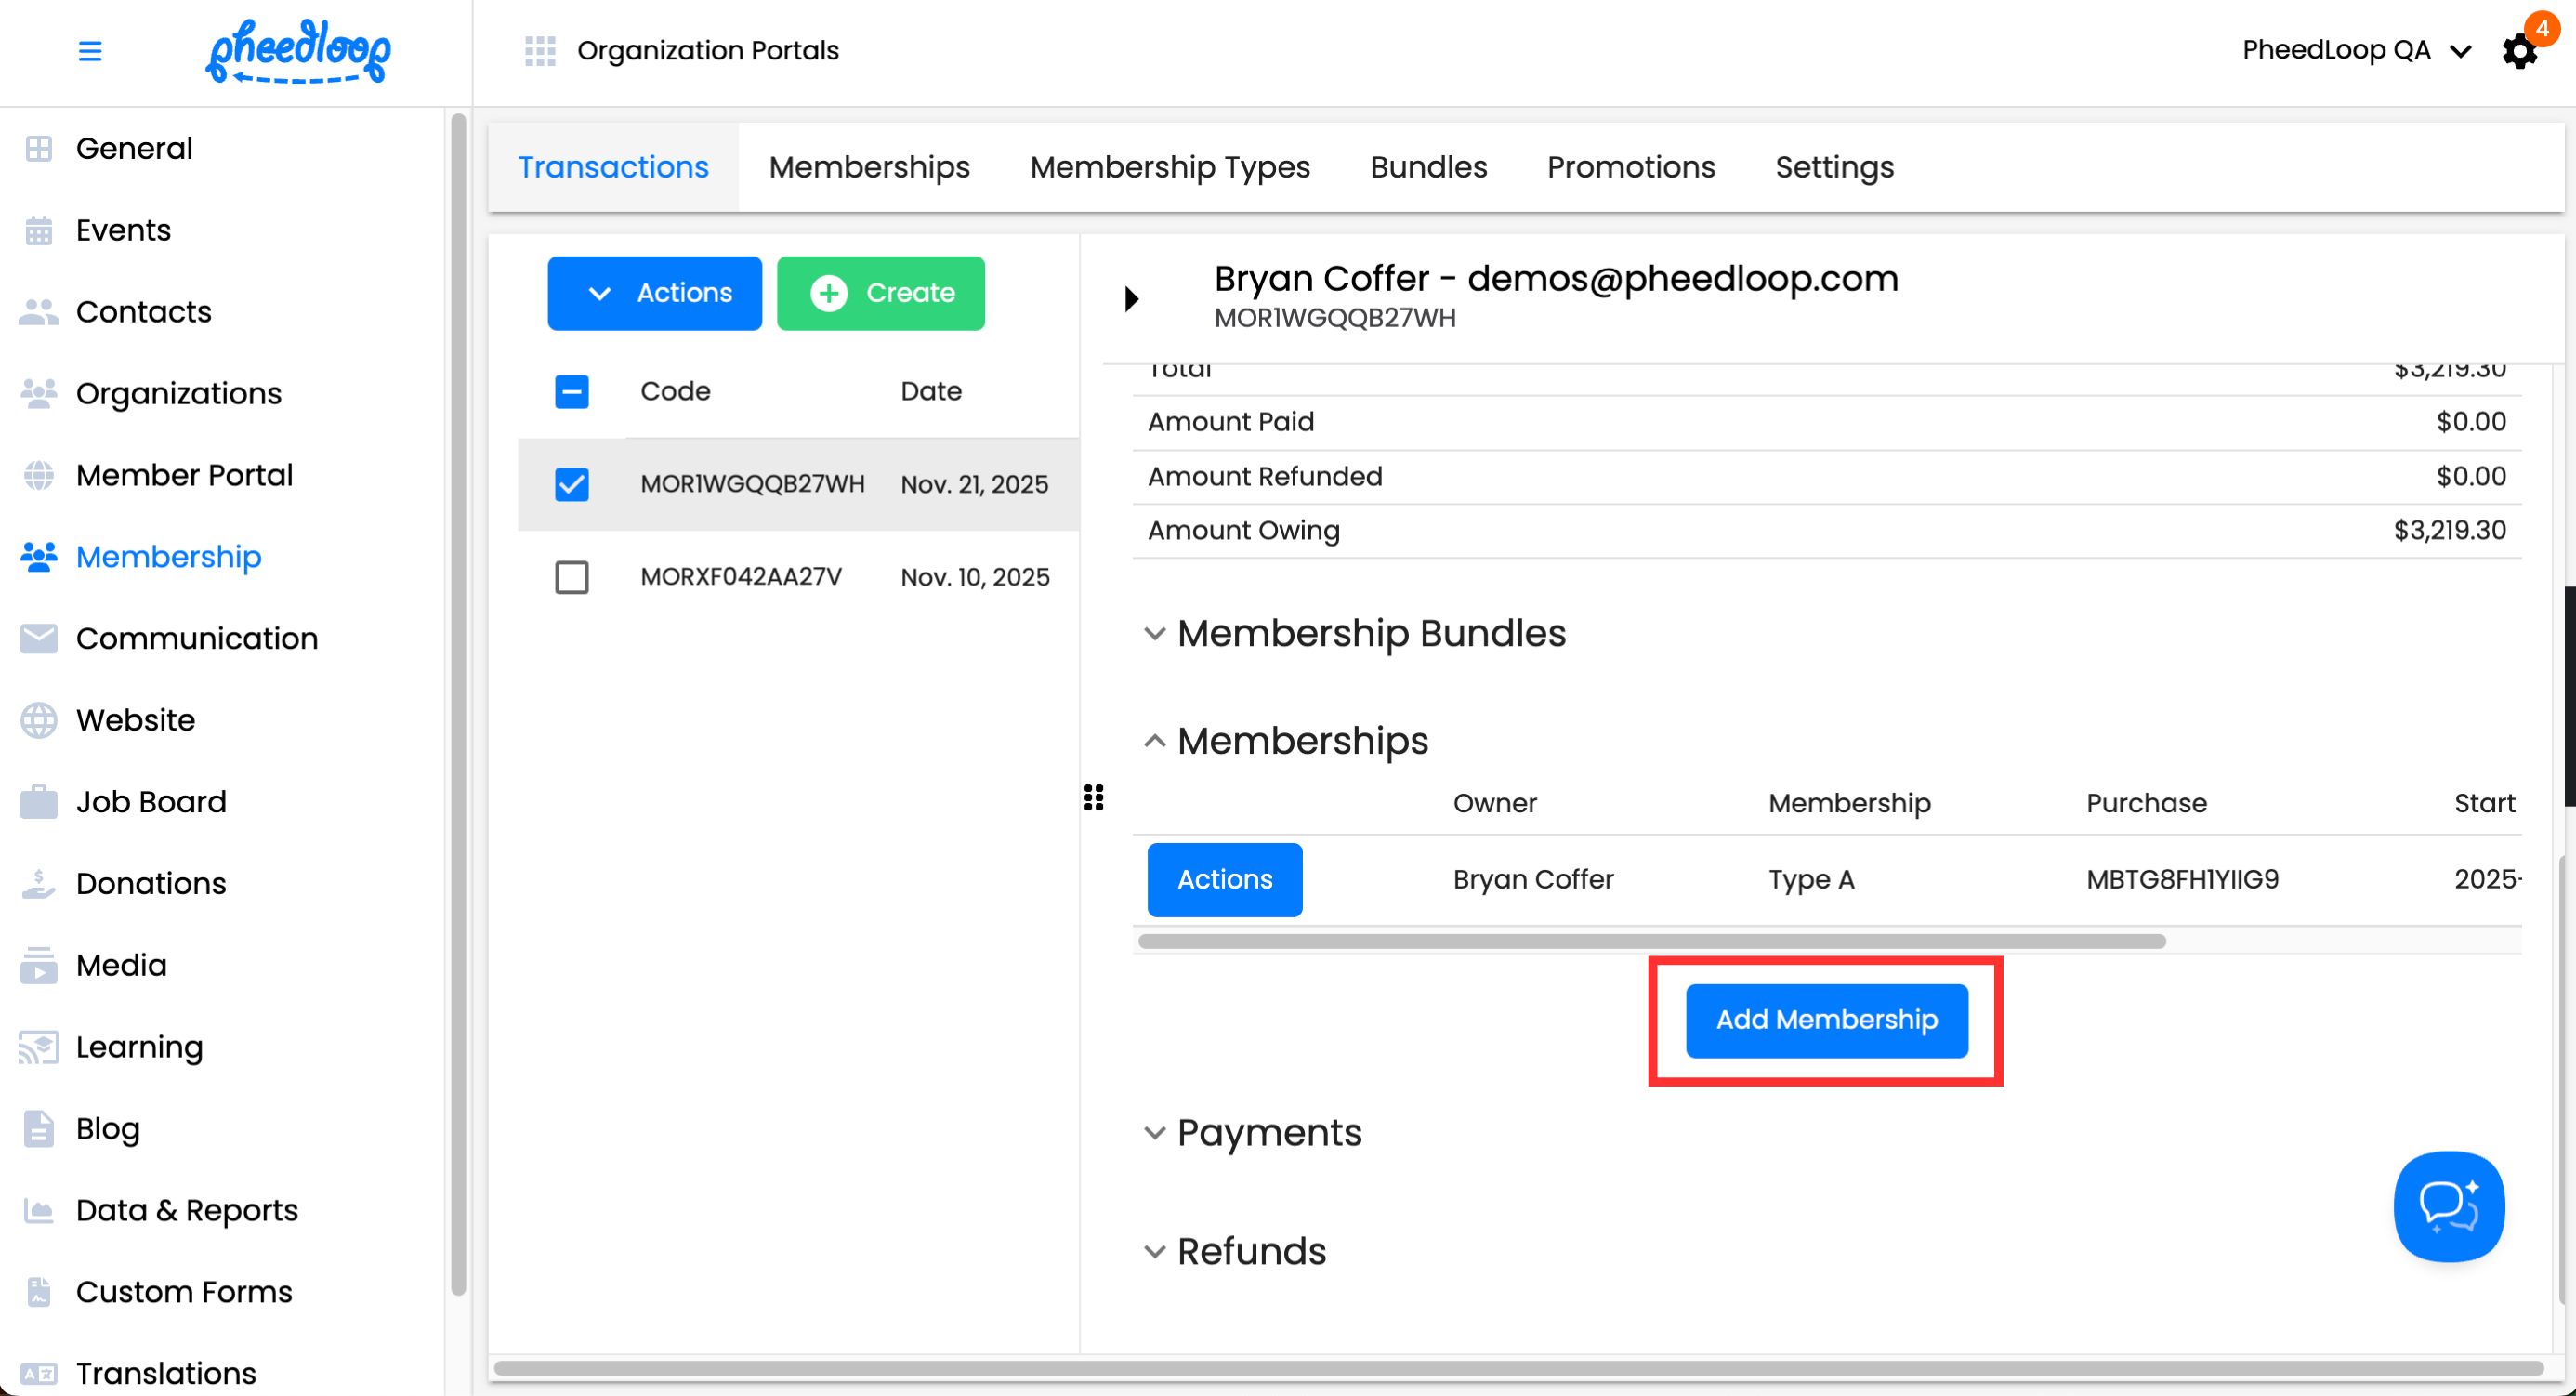
Memberships
Similar to the Membership Bundles section, the Memberships section is where the Membership Types attached to the Transaction are listed. Select Add Membership to add a new tier in the transaction.
Select Existing Member
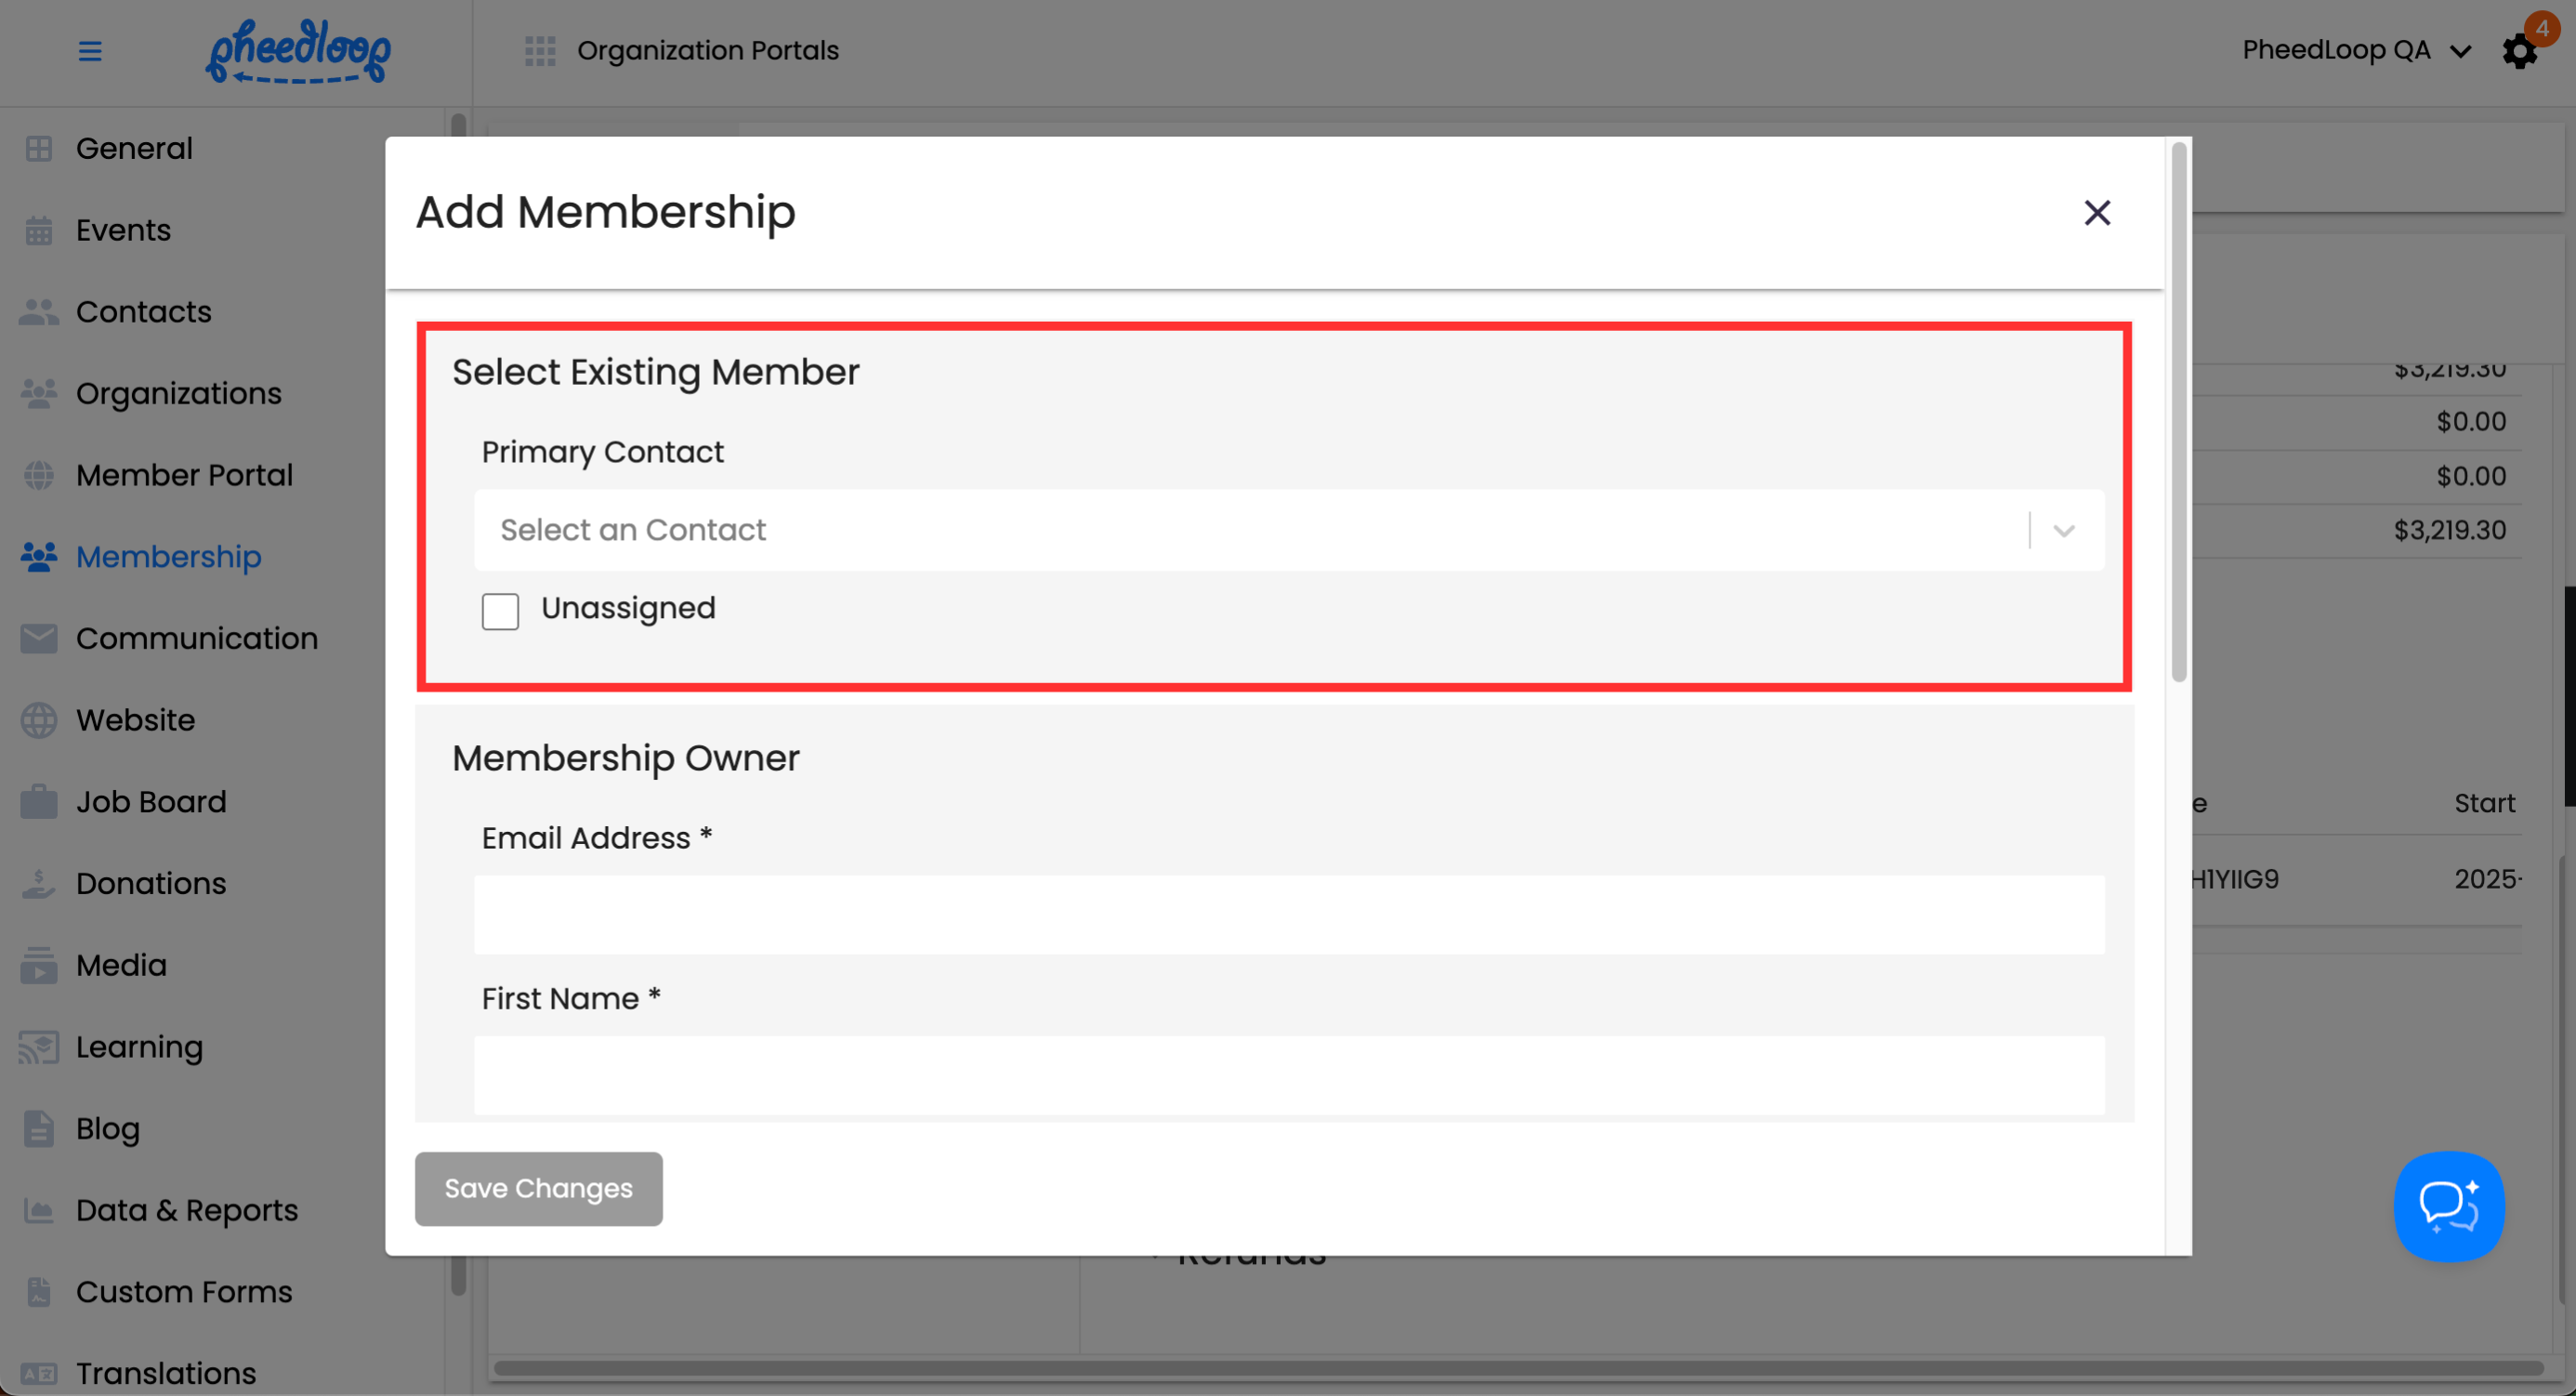
| Setting | Description |
|---|---|
| Primary Contact | Select the member who will serve as the primary contact for the tier. |
| Unassigned | Toggles the tier to have no Membership Owner. If enabled, the Membership Owner field will not be editable. |
Membership Owner
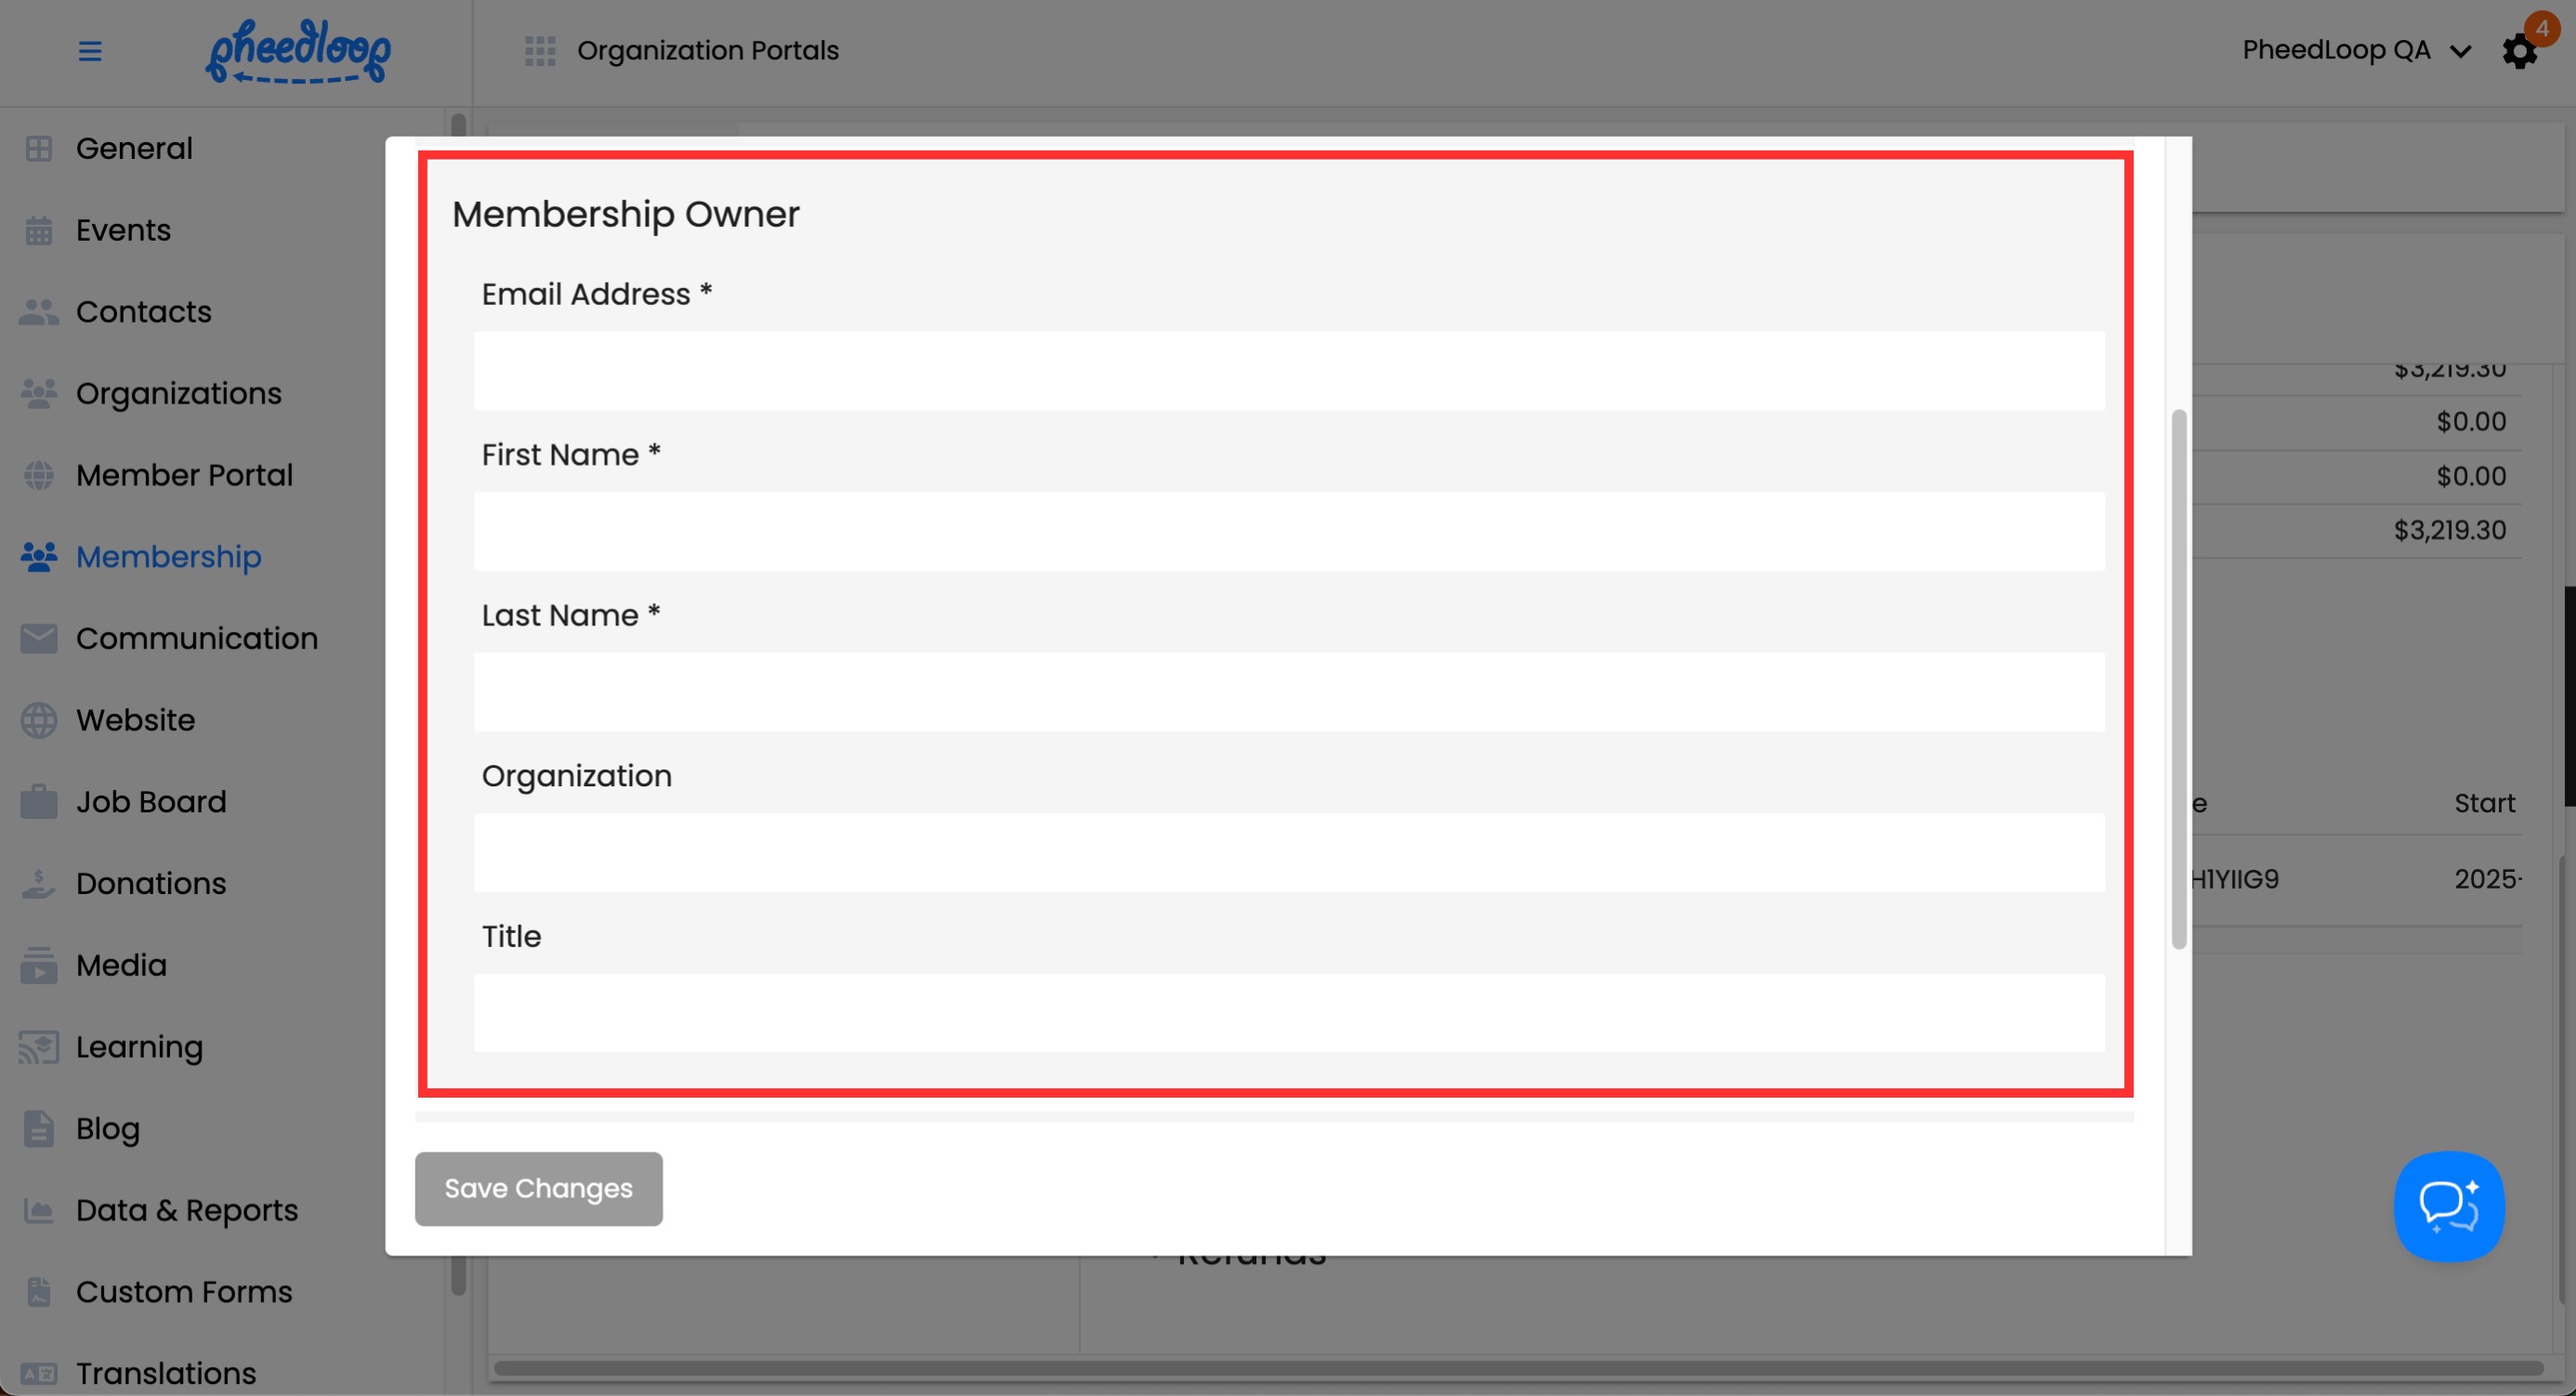
| Setting | Description |
|---|---|
| Email Address | Enter the email address of the Owner in this field. |
| First Name | Enter the first name of the Owner in this field. |
| Last Name | Enter the last name of the Owner in this field. |
| Organization | Enter the organization of the Owner in this field. |
| Title | Enter the title of the Owner in this field. |
Membership Details
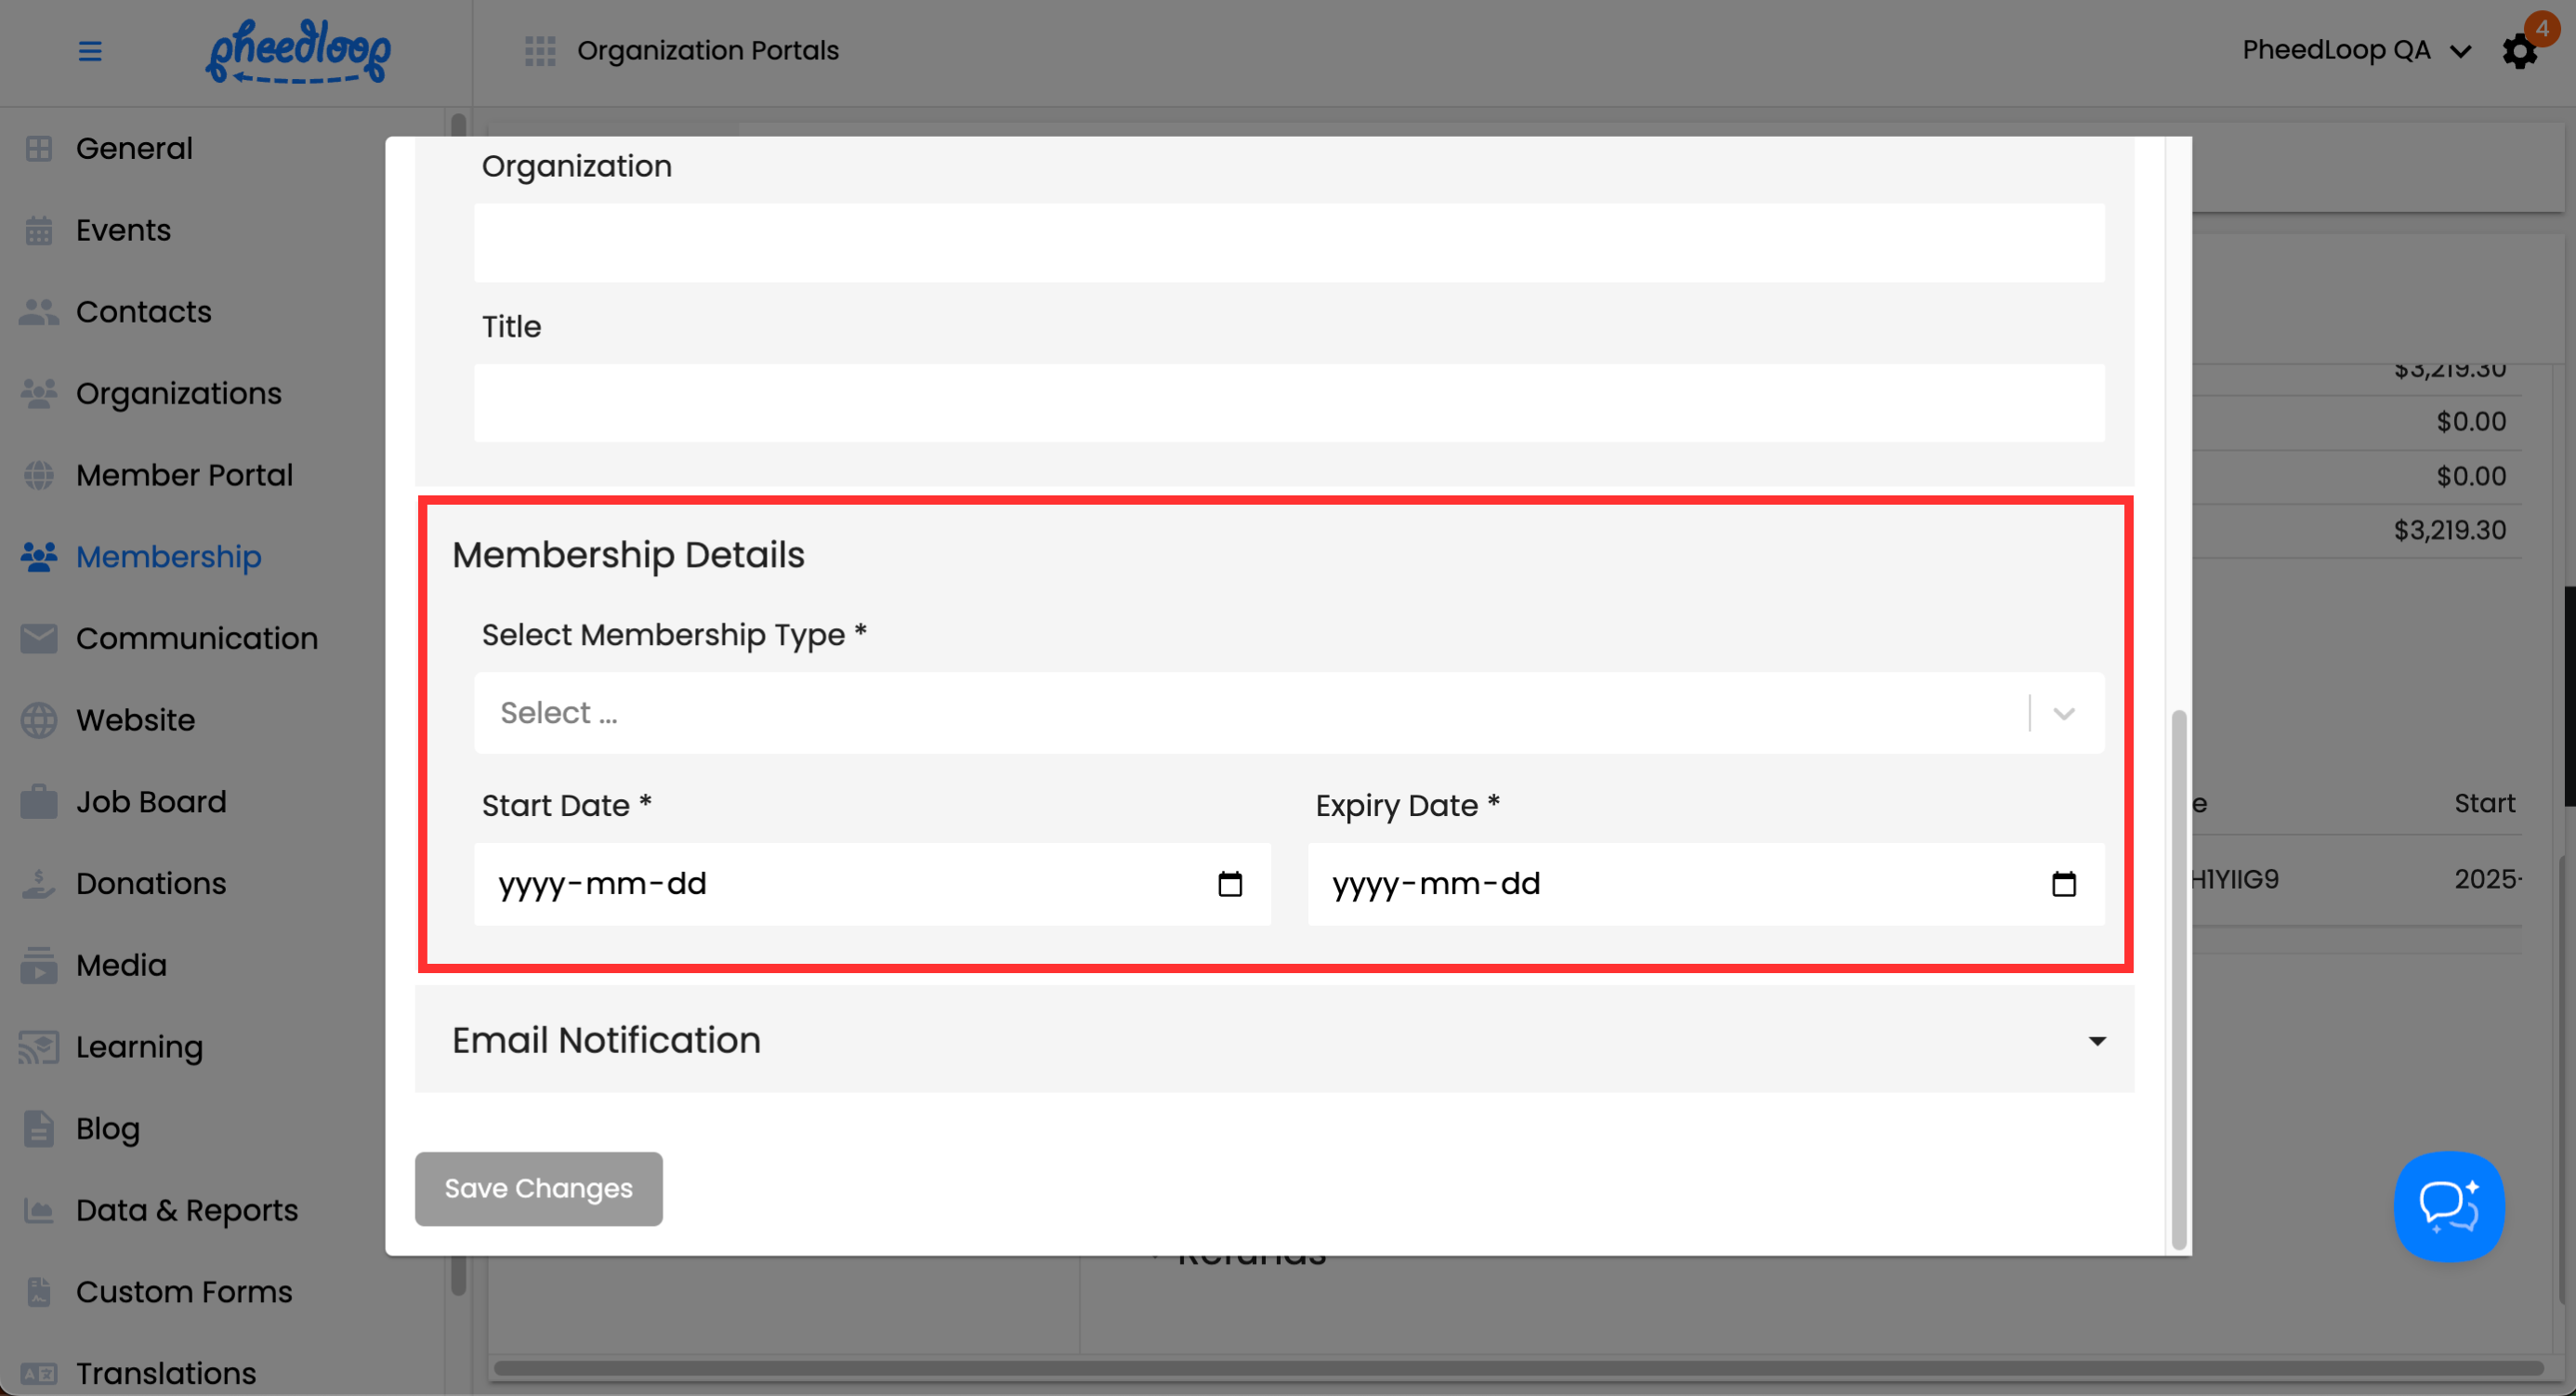
| Setting | Description |
|---|---|
| Select Membership Types | Select the Membership Type to assign to the Owner in this field. |
| Start Date | Enter the start date for the Membership Type to take effect. |
| Expiry Date | Enter the expiry date for when the subscription ends. |
Email Notification

| Setting | Description |
|---|---|
| Send Confirmation Email | Toggles sending an email notification to the Owner’s email address when enabled. |
Once all settings have been configured, select Save Changes to add the Membership Type.
Memberships attached to the transaction can also be edited. Select the Actions button to begin editing the transaction.
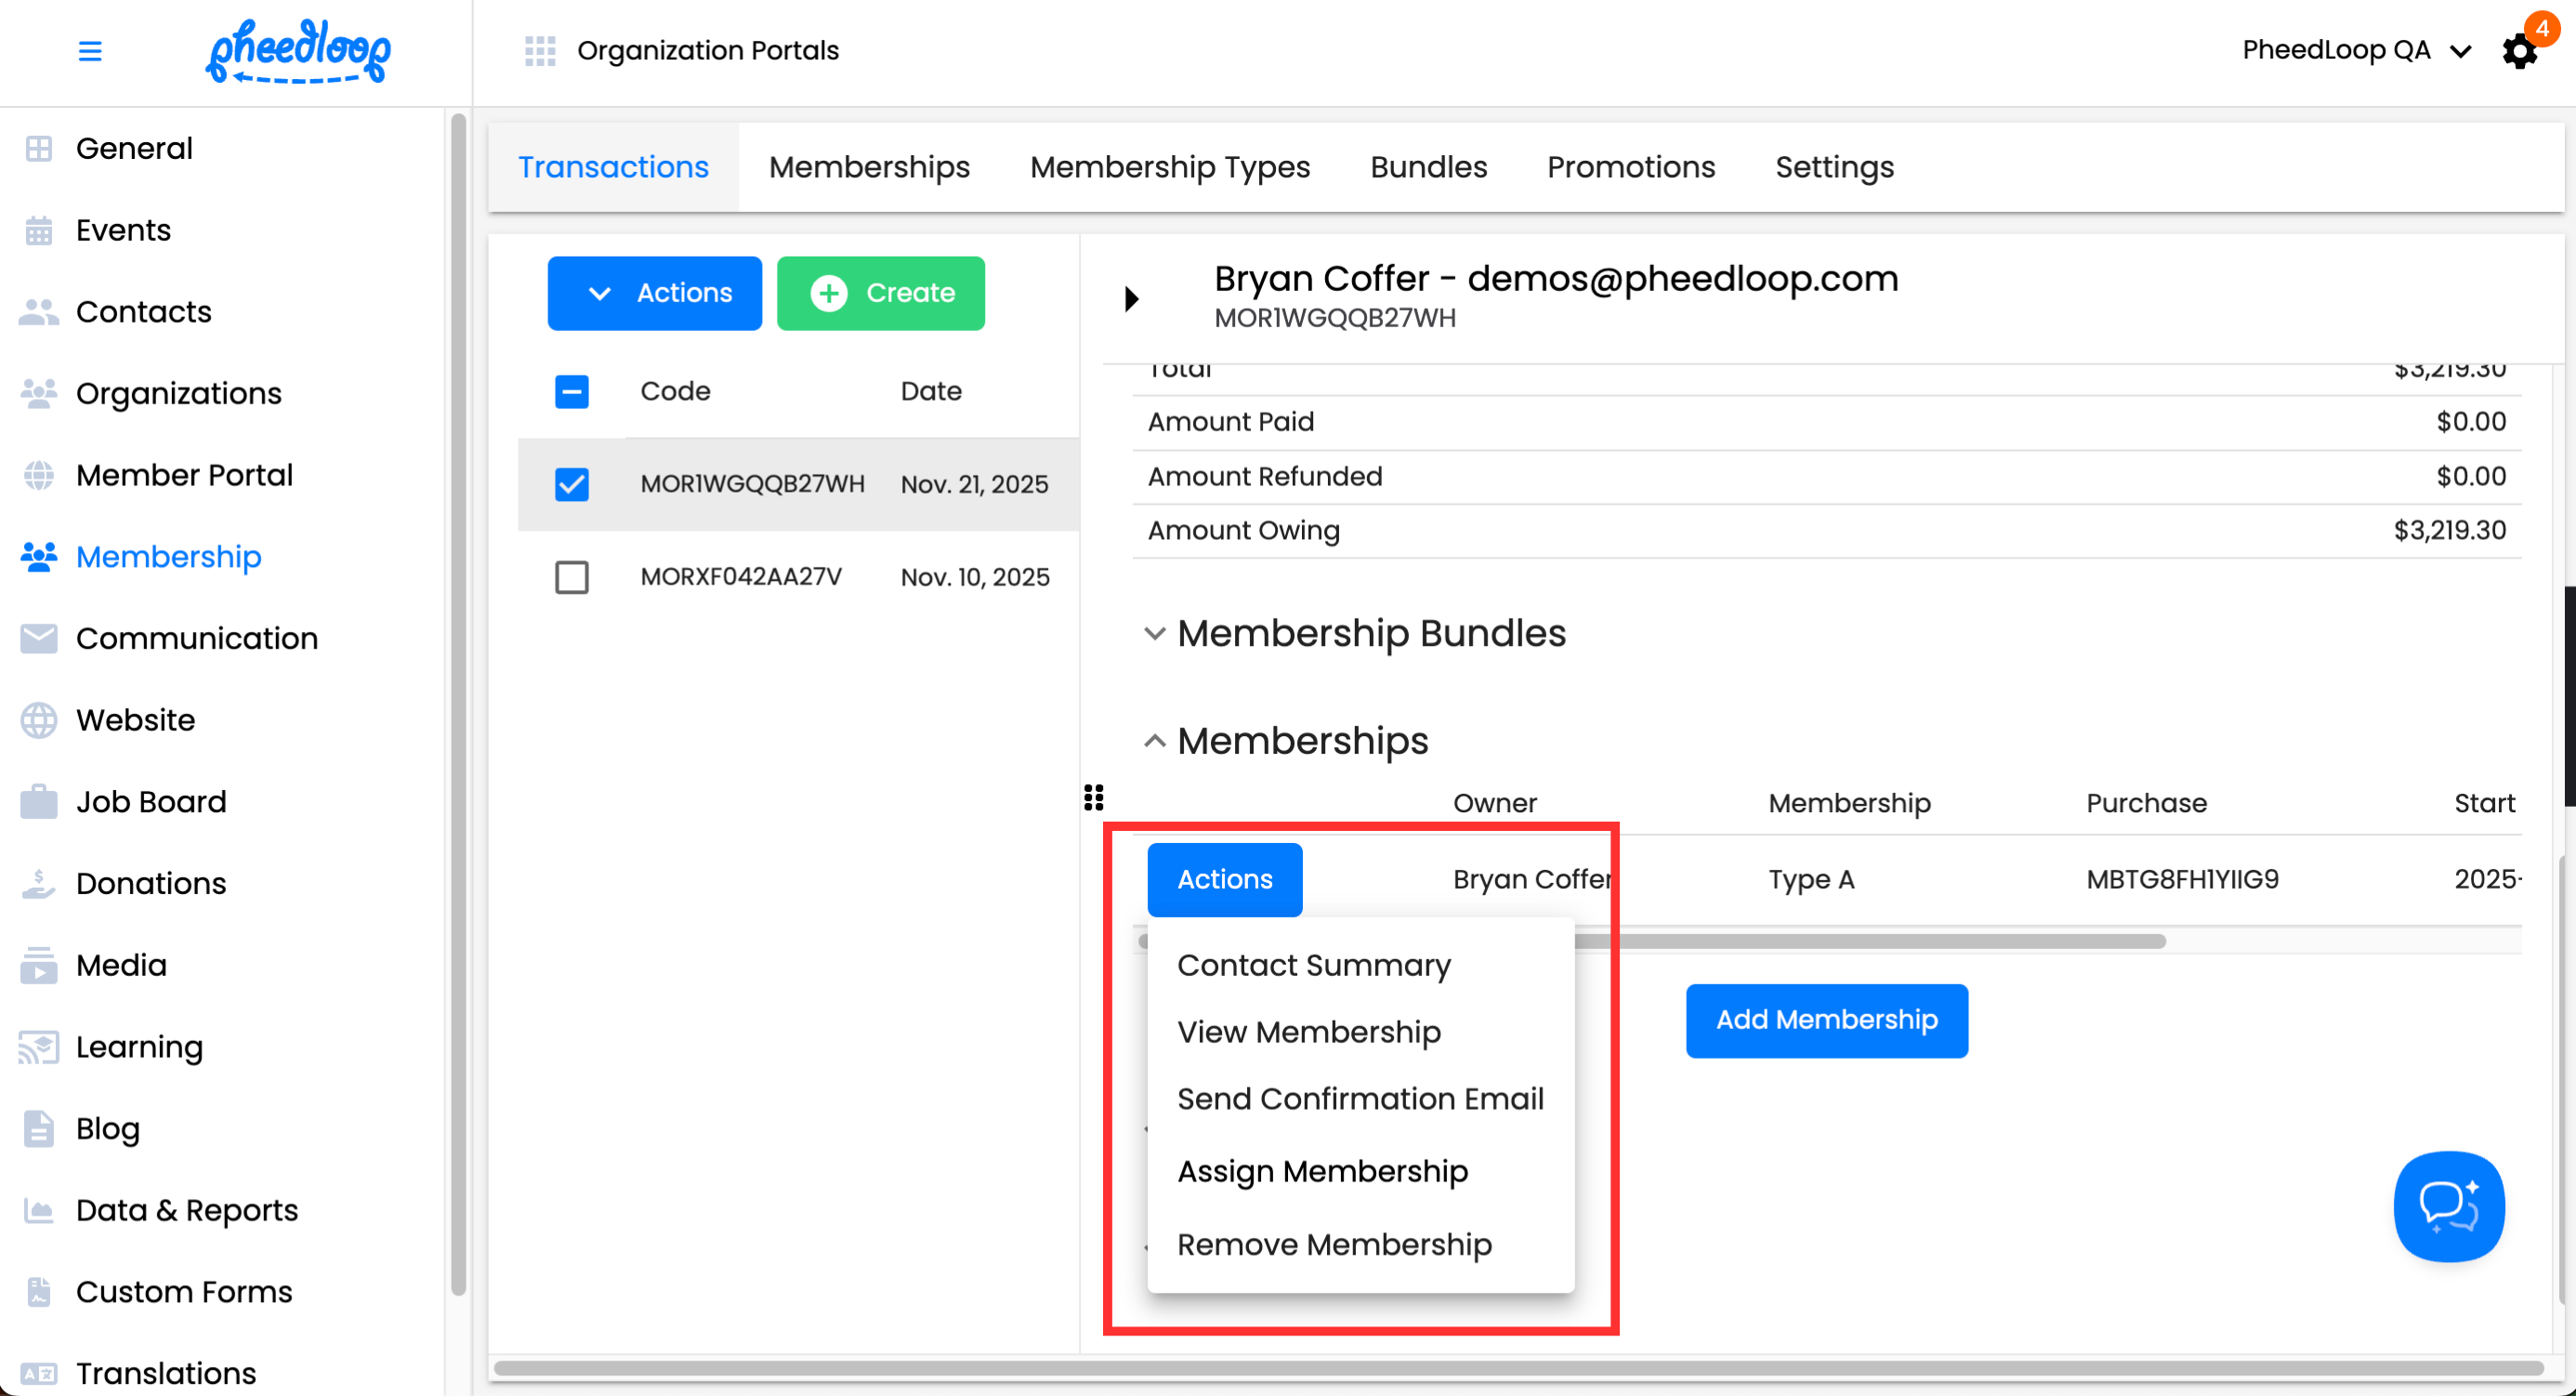
| Setting | Description |
|---|---|
| Contacts Summary | Takes you to the member’s profile in the Membership Dashboard under Contacts > Profiles. |
| View Membership | Displays the membership in the Membership Dashboard under Memberships > Memberships. |
| Send Confirmation Email | Sends an email to the member. An announcement must be attached to the membership for this feature to function. |
| Assign Membership | Transfers ownership of the membership. Select the member under the Membership Holder field and click Assign Membership to save changes. |
| Remove Membership | Removes the membership from the transaction. |
Payments
The Payments section will display all payment information made by the Member during checkout. If creating a transaction, the payment will need to be created manually. Select Add Payment to begin the process.

Transaction Owner
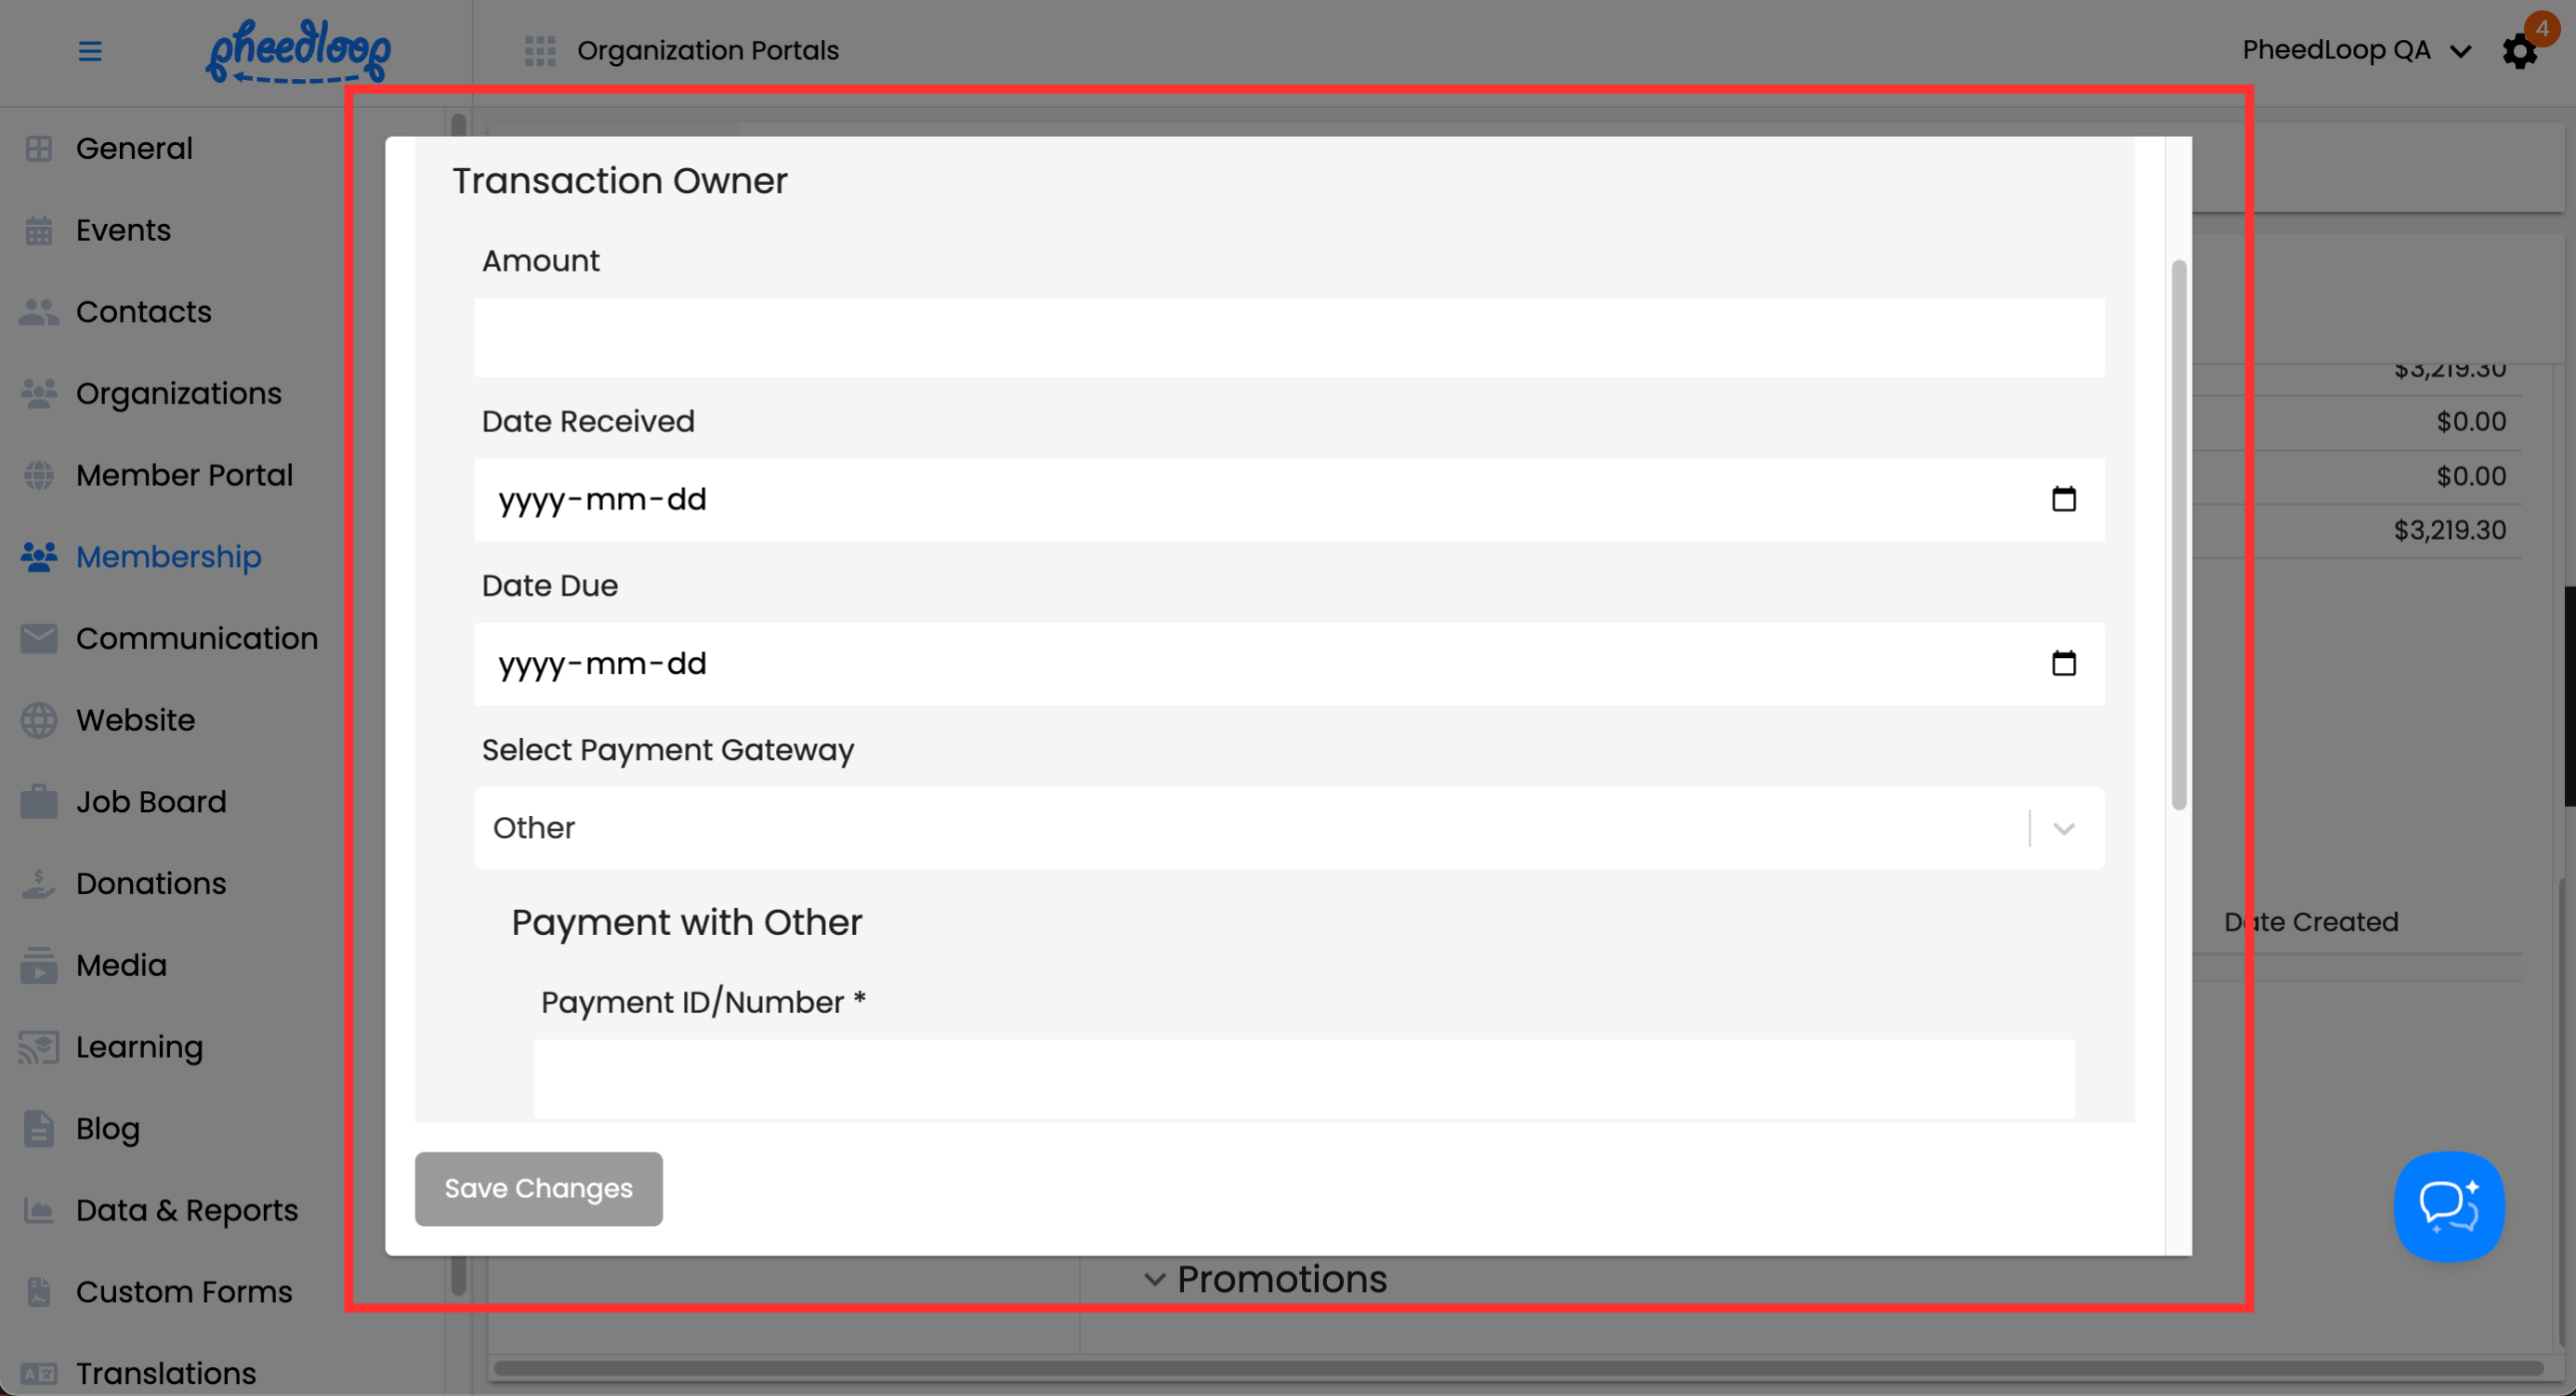
| Setting | Description |
|---|---|
| Amount | Enter the monetary amount the member is paying for their transaction. |
| Date Received | Enter the date the payment was received. |
| Date Due | Enter the date the payment is due if it has not yet been completed. |
| Select Payment Gateway | Select the payment method, such as credit card or another option. A connected payment integration (e.g., Stripe) is required for these options to appear; otherwise, only Other will be available. |
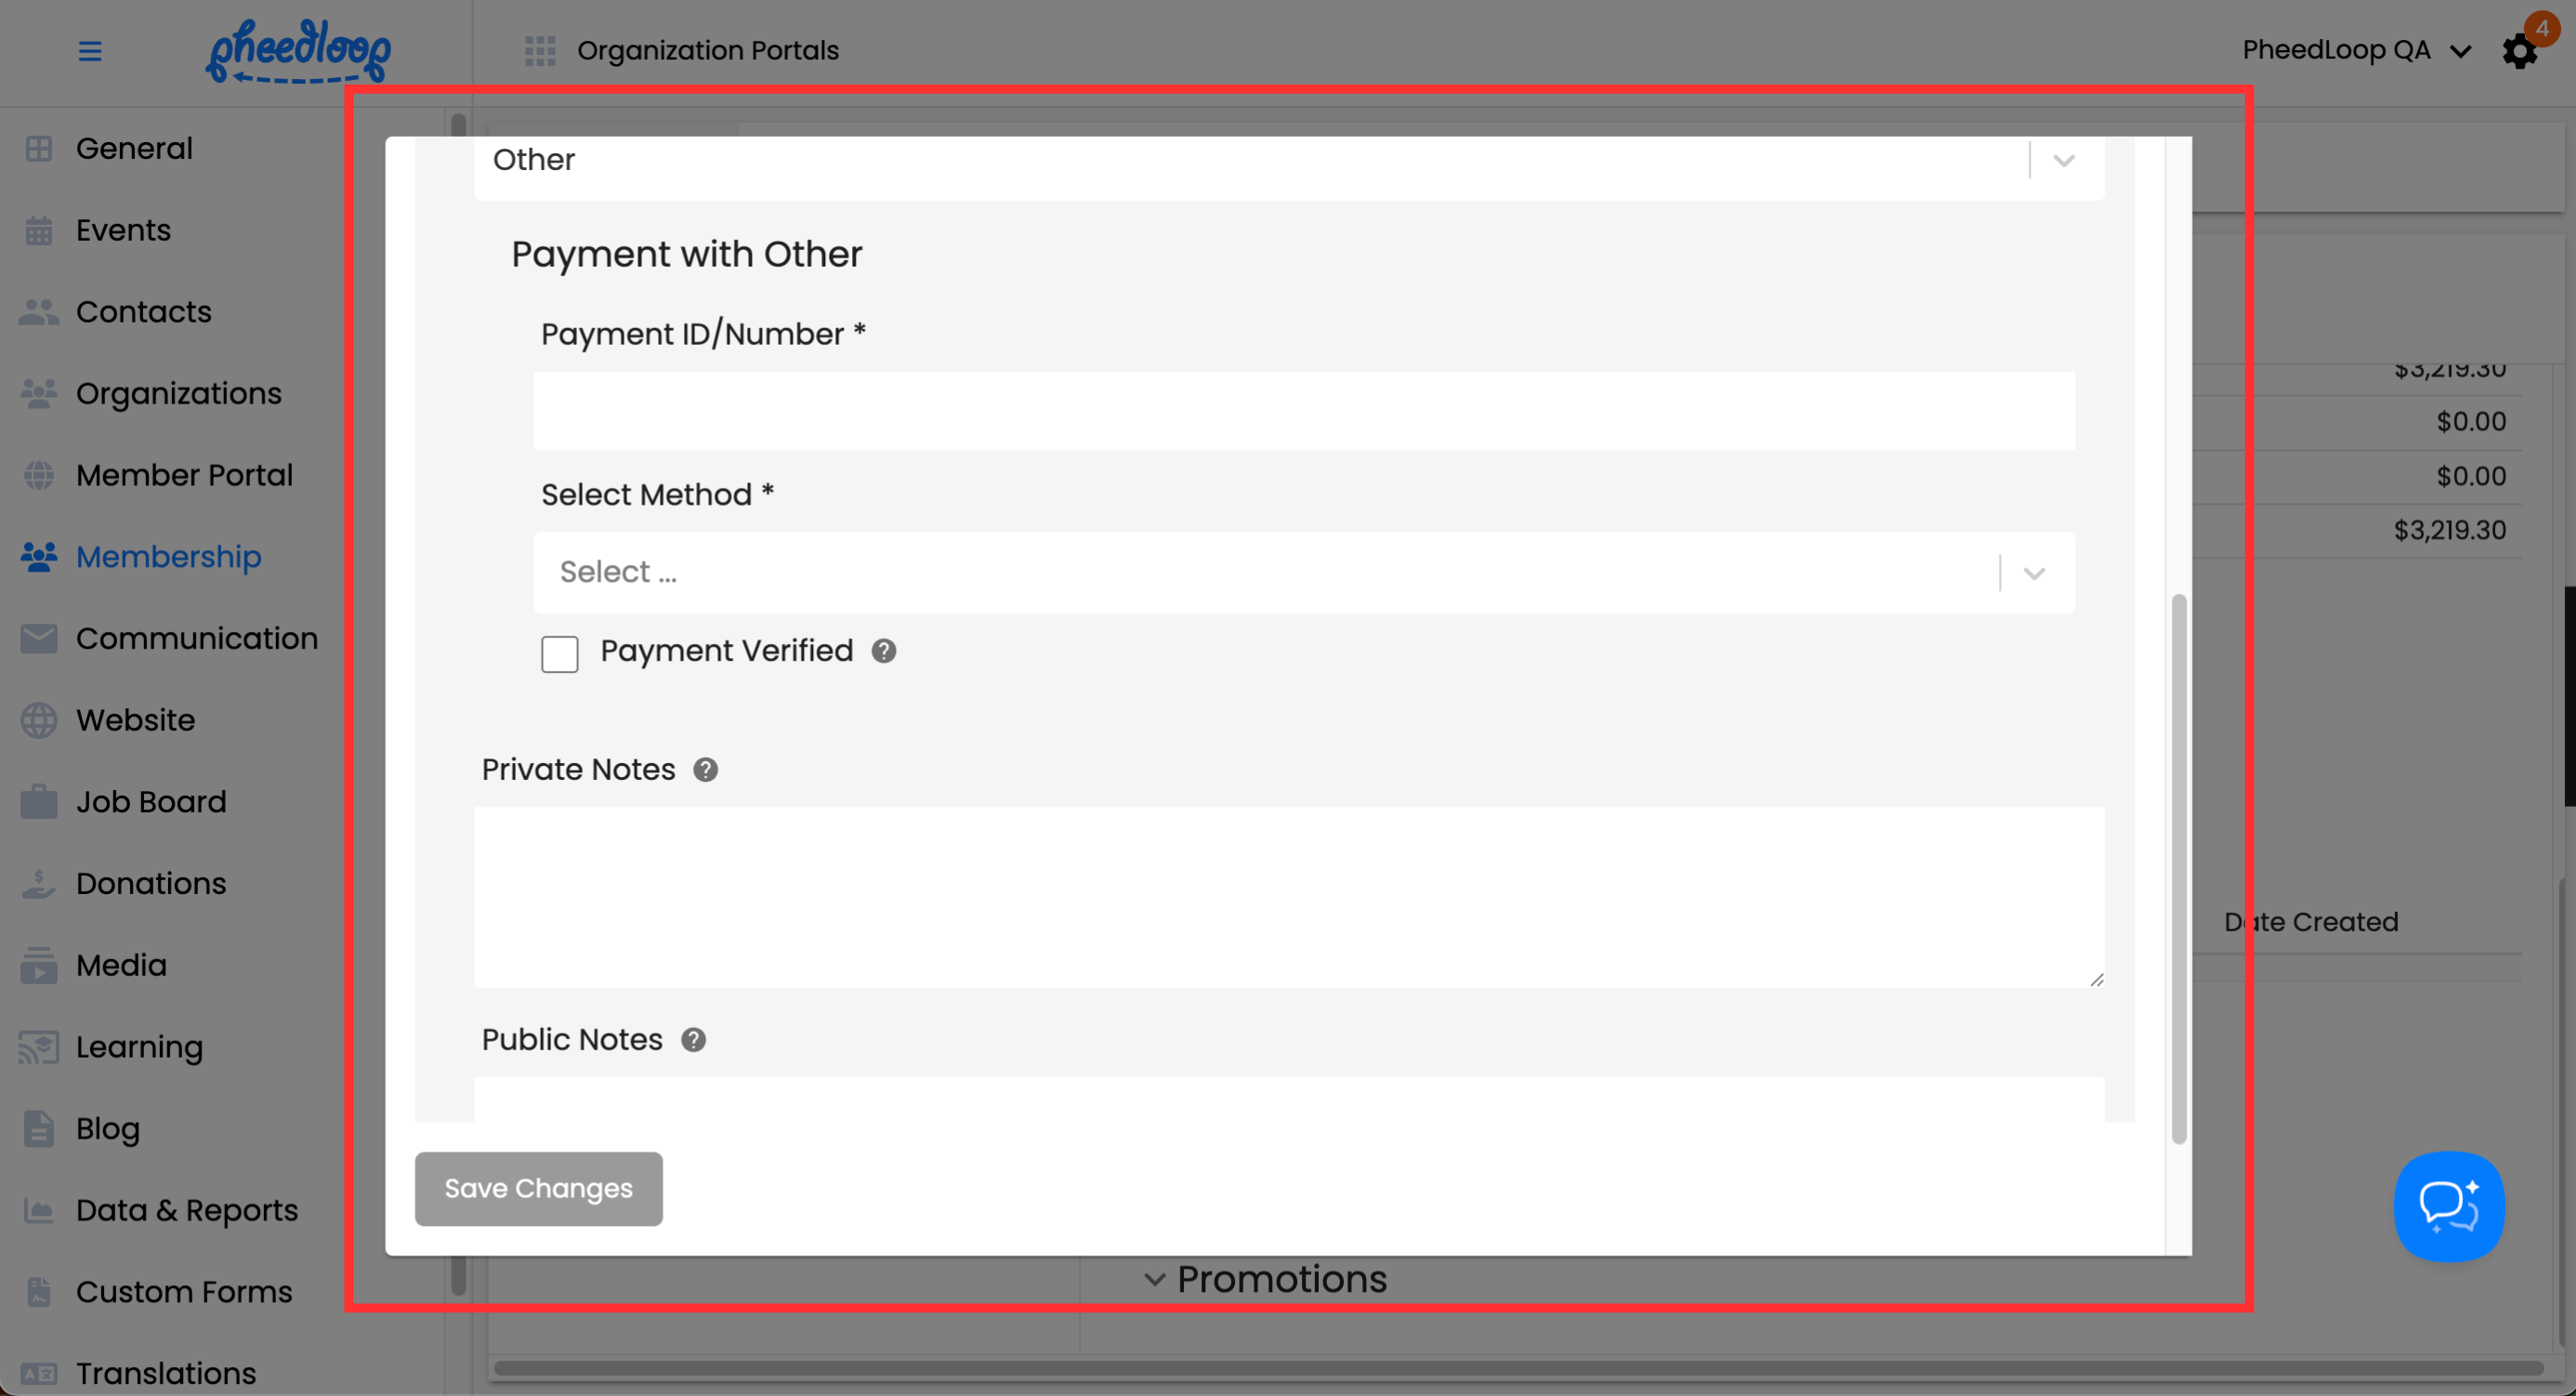
Payment with Other
The Payment with Other section is only visible if selecting Other under Select Payment Gateway field.
| Setting | Description |
|---|---|
| Payment ID/Number | Enter a unique identifier for the payment. This is for internal reference only and does not affect the payment beyond naming it. |
| Select Method | Select the method of payment: Credit Card, Check, Wire Transfer, Complimentary, or Other. |
| Payment Verified | Toggle on to indicate that payment has been received. Toggle off if payment has not yet been delivered. |
| Private Notes | Enter internal notes related to the transaction. These notes are not visible to the member. |
| Public Notes | Enter notes that will be visible to the member as part of the transaction. |
Once all settings are configured, select Save Changes.
Payments attached to the transaction can also be edited. Select the Actions button to begin editing the payment.
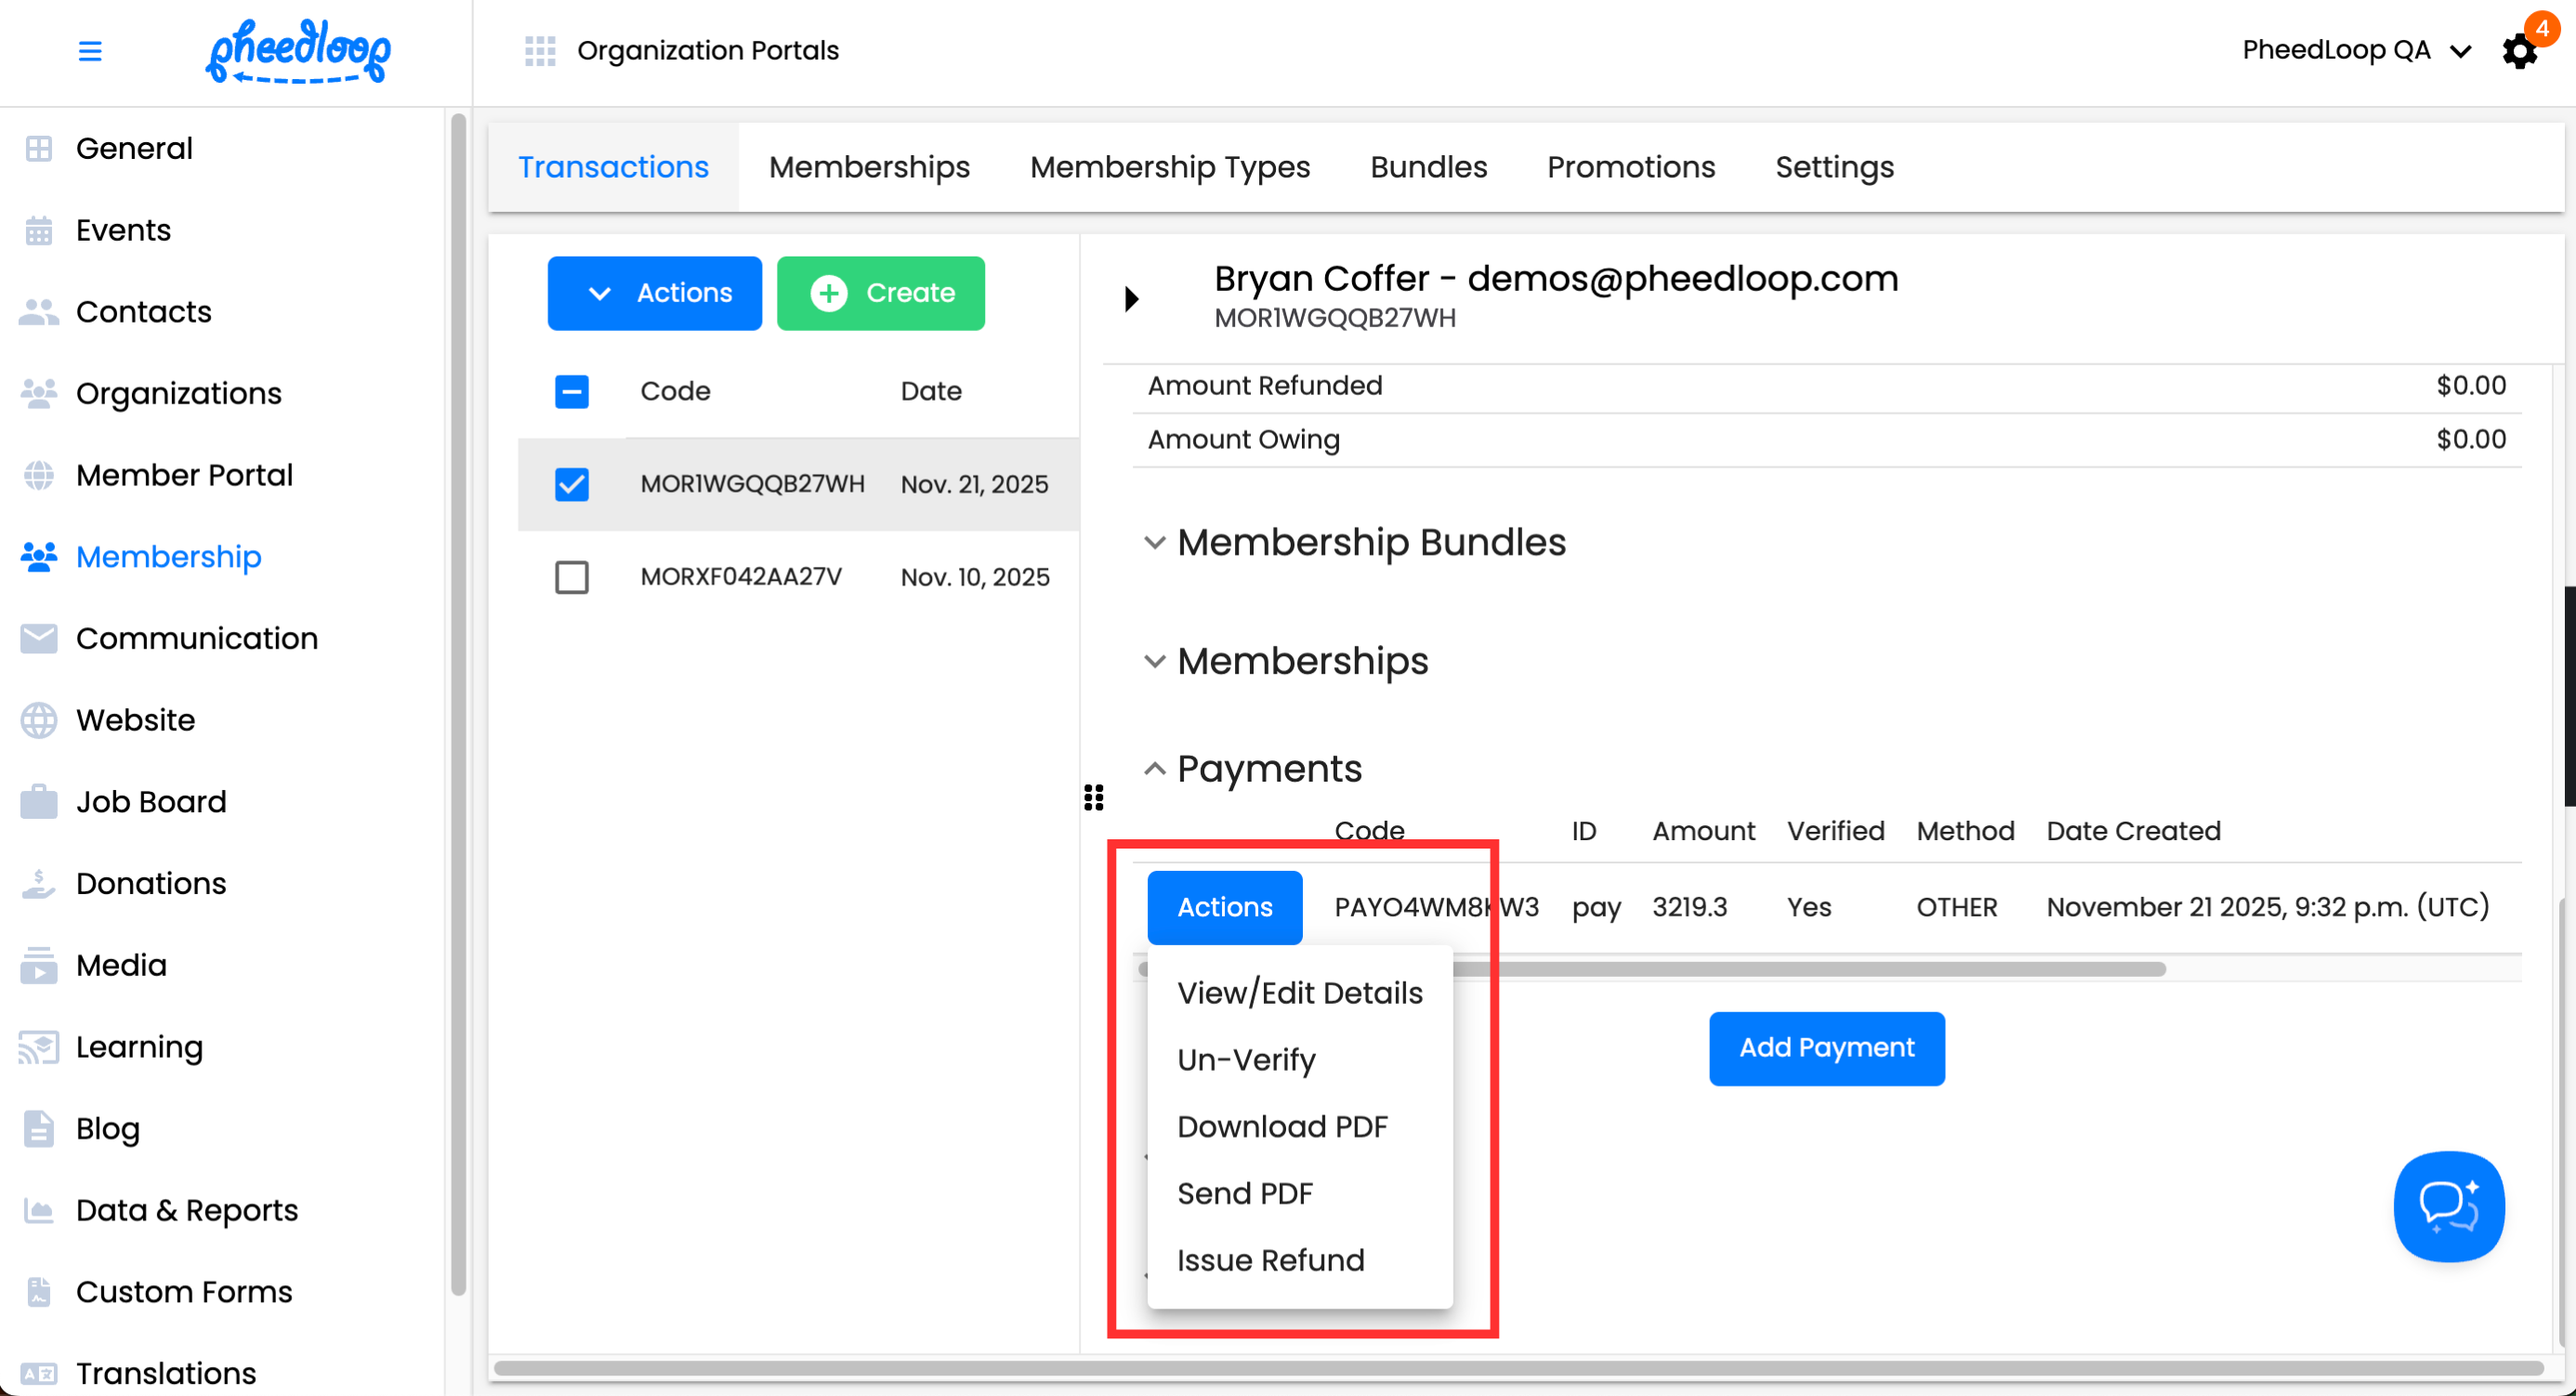
| Setting | Description |
|---|---|
| View/Edit Details | Opens the payment details for editing. |
| Verify | Marks the payment as verified once it has been received. After verification, the option changes to Un-Verify, which can be selected to cancel the verification. |
| Download PDF | Downloads a PDF file containing the payment summary. |
| Send PDF | Sends an email to the member containing the payment PDF. |
| Issue Refund | Sends a refund for a partial or full amount of the payment. |
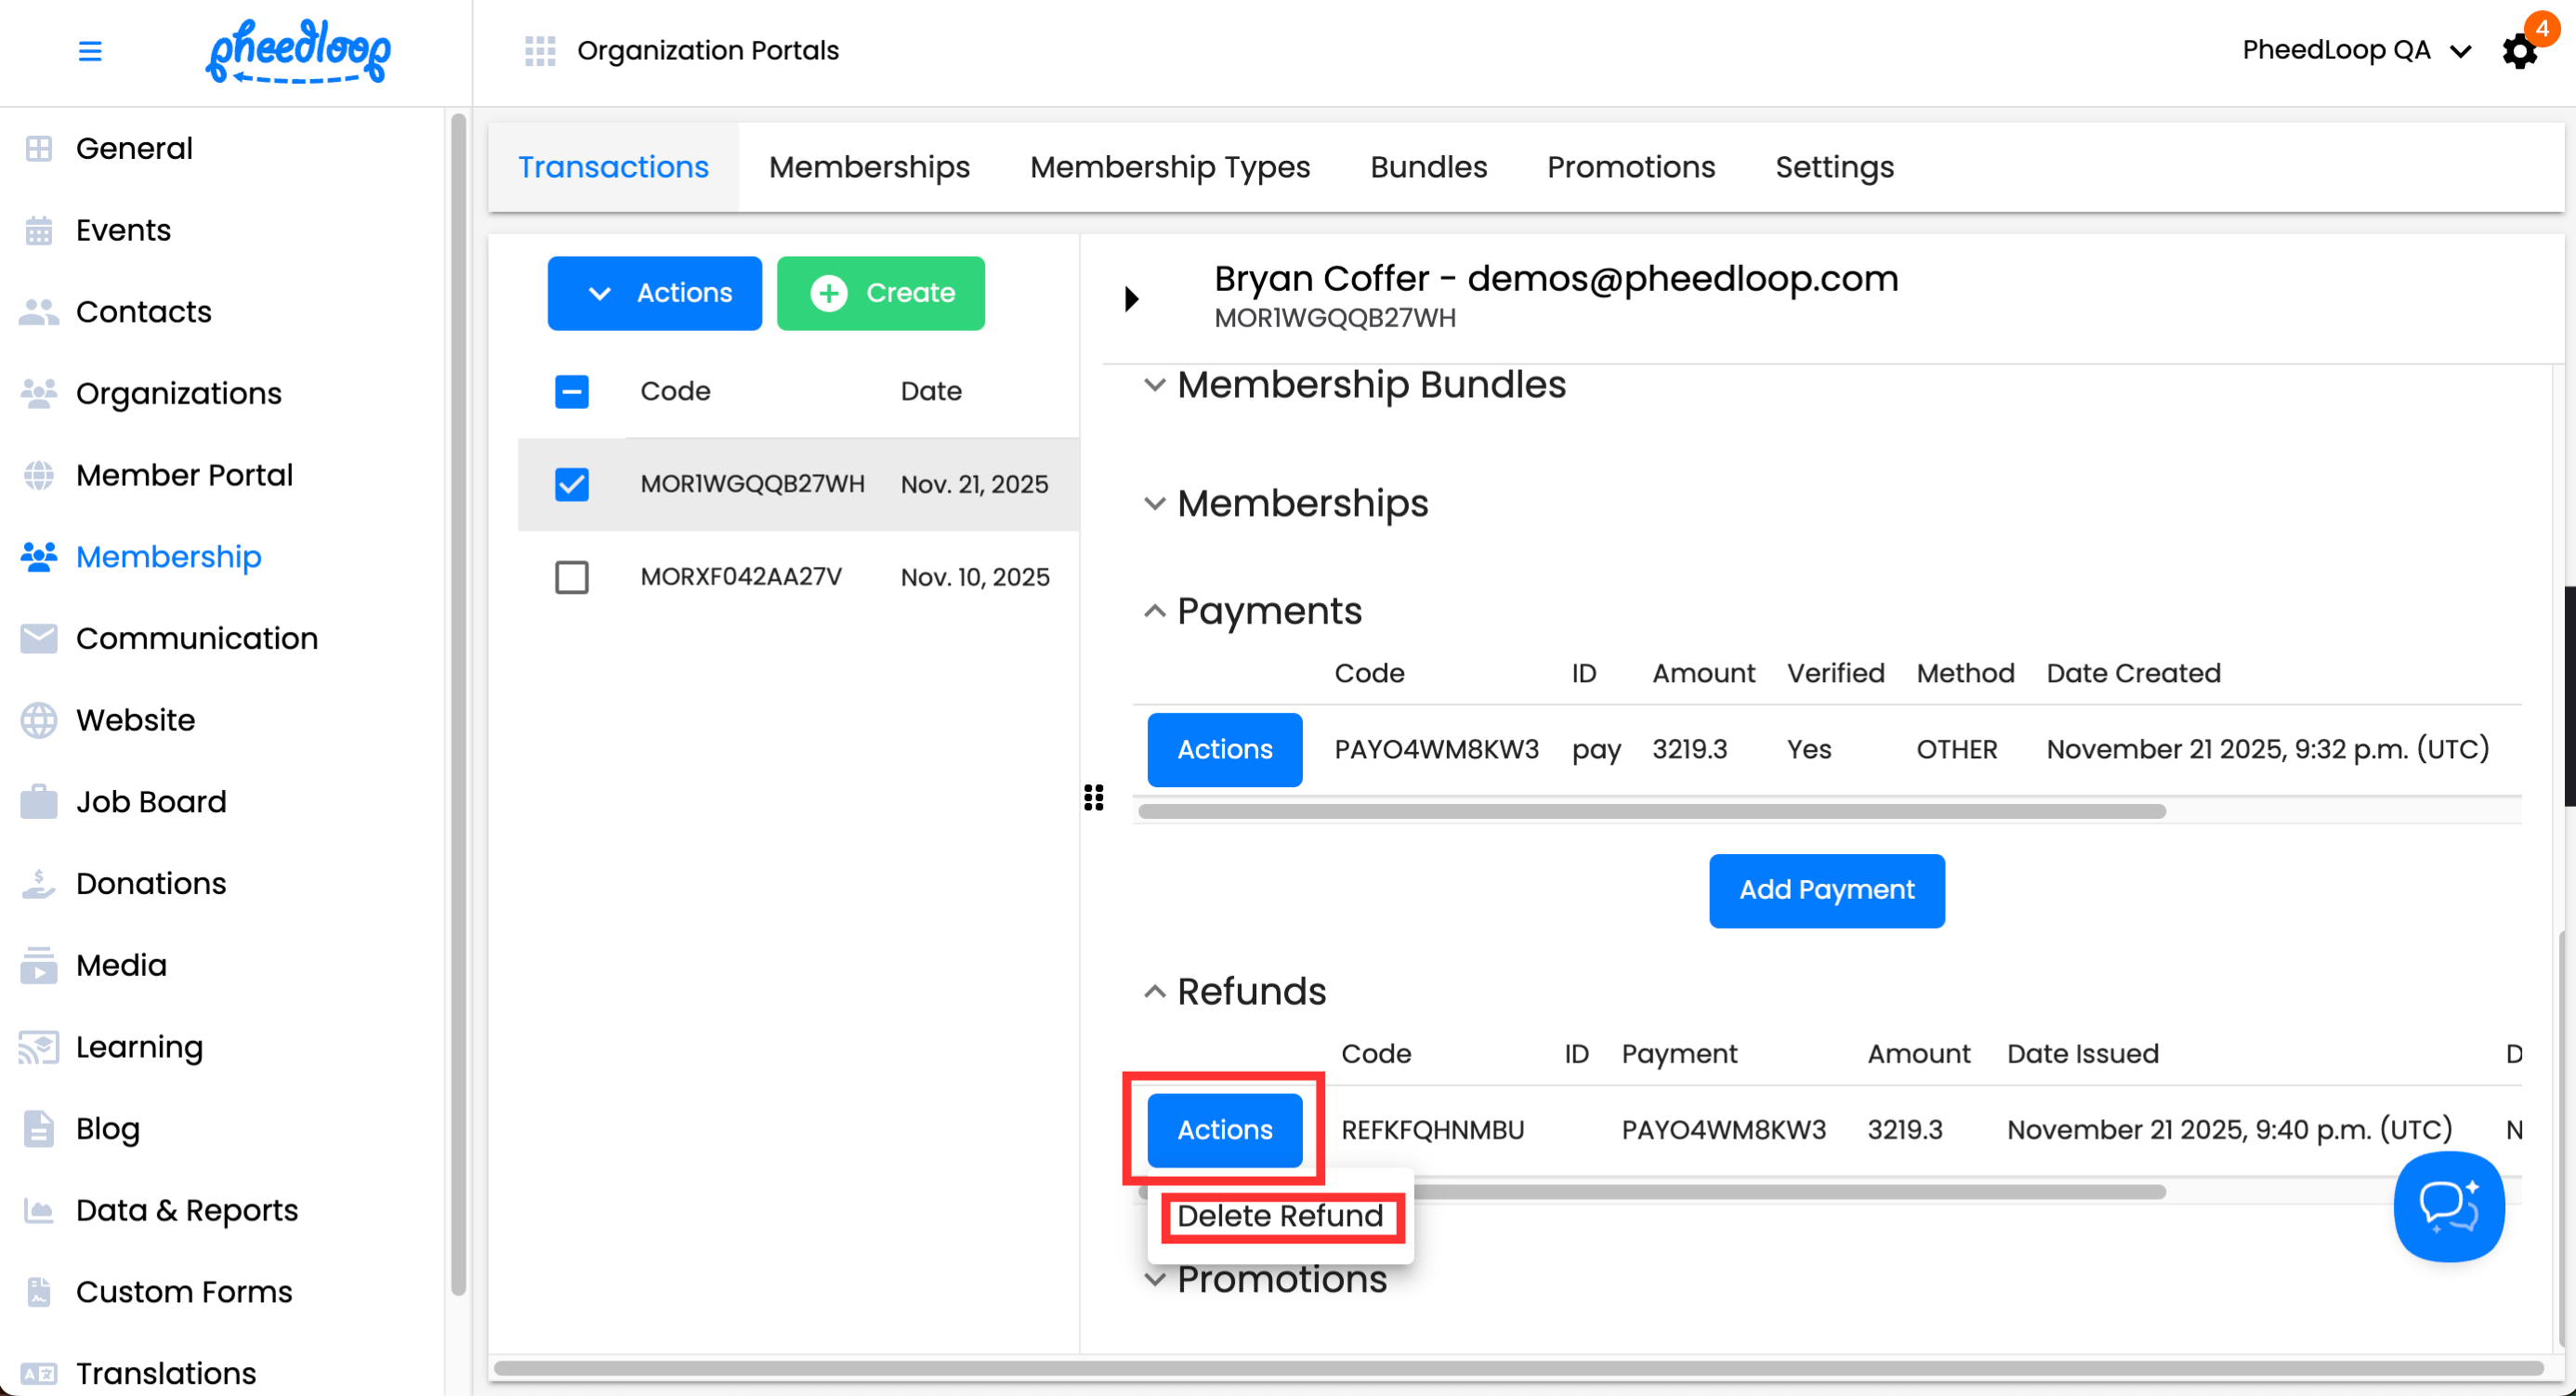
Refunds
Any refunds processed for this transaction will appear in this section. If you would like to create a refund, navigate to the Payment and select Actions > Issue refund.

A new menu will appear where you can set the amount to be refunded.
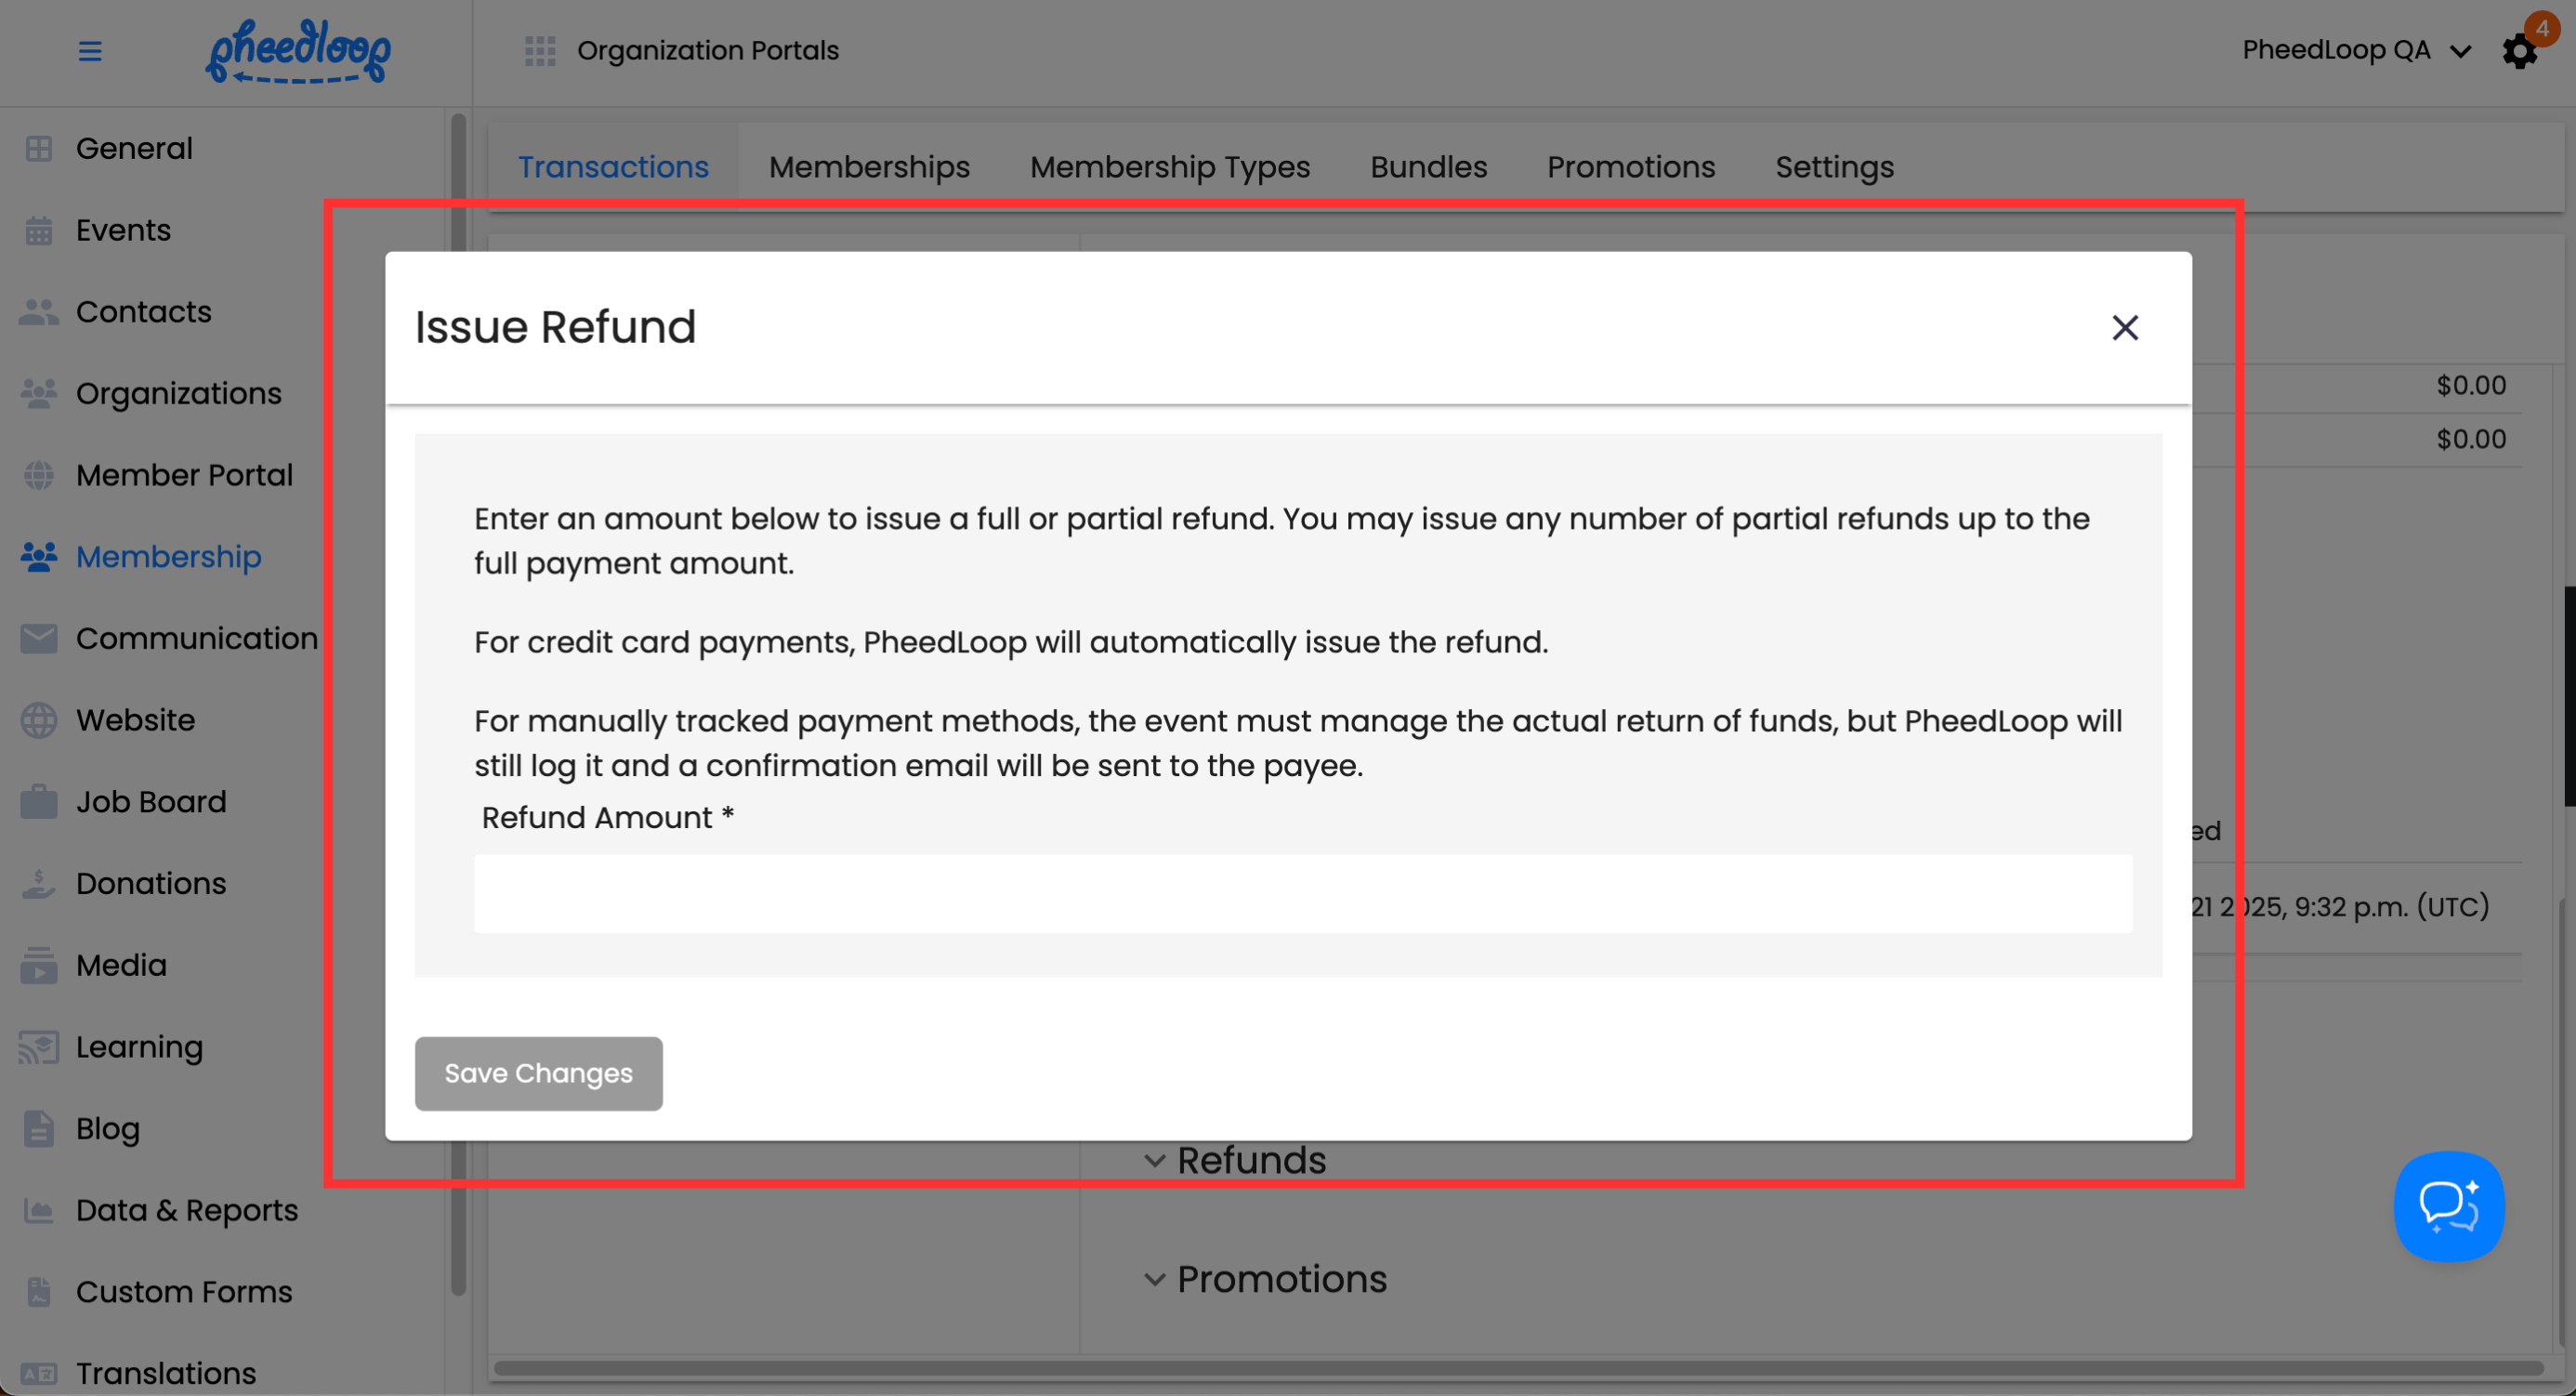
Once the refund is issued, you can choose to delete the refund by selecting Actions > Delete Refund under the refunds section.
Promotions
Promotions can be included in transactions to provide a discount in either a static amount or a percentage. To create a promotion, select Add Discount.
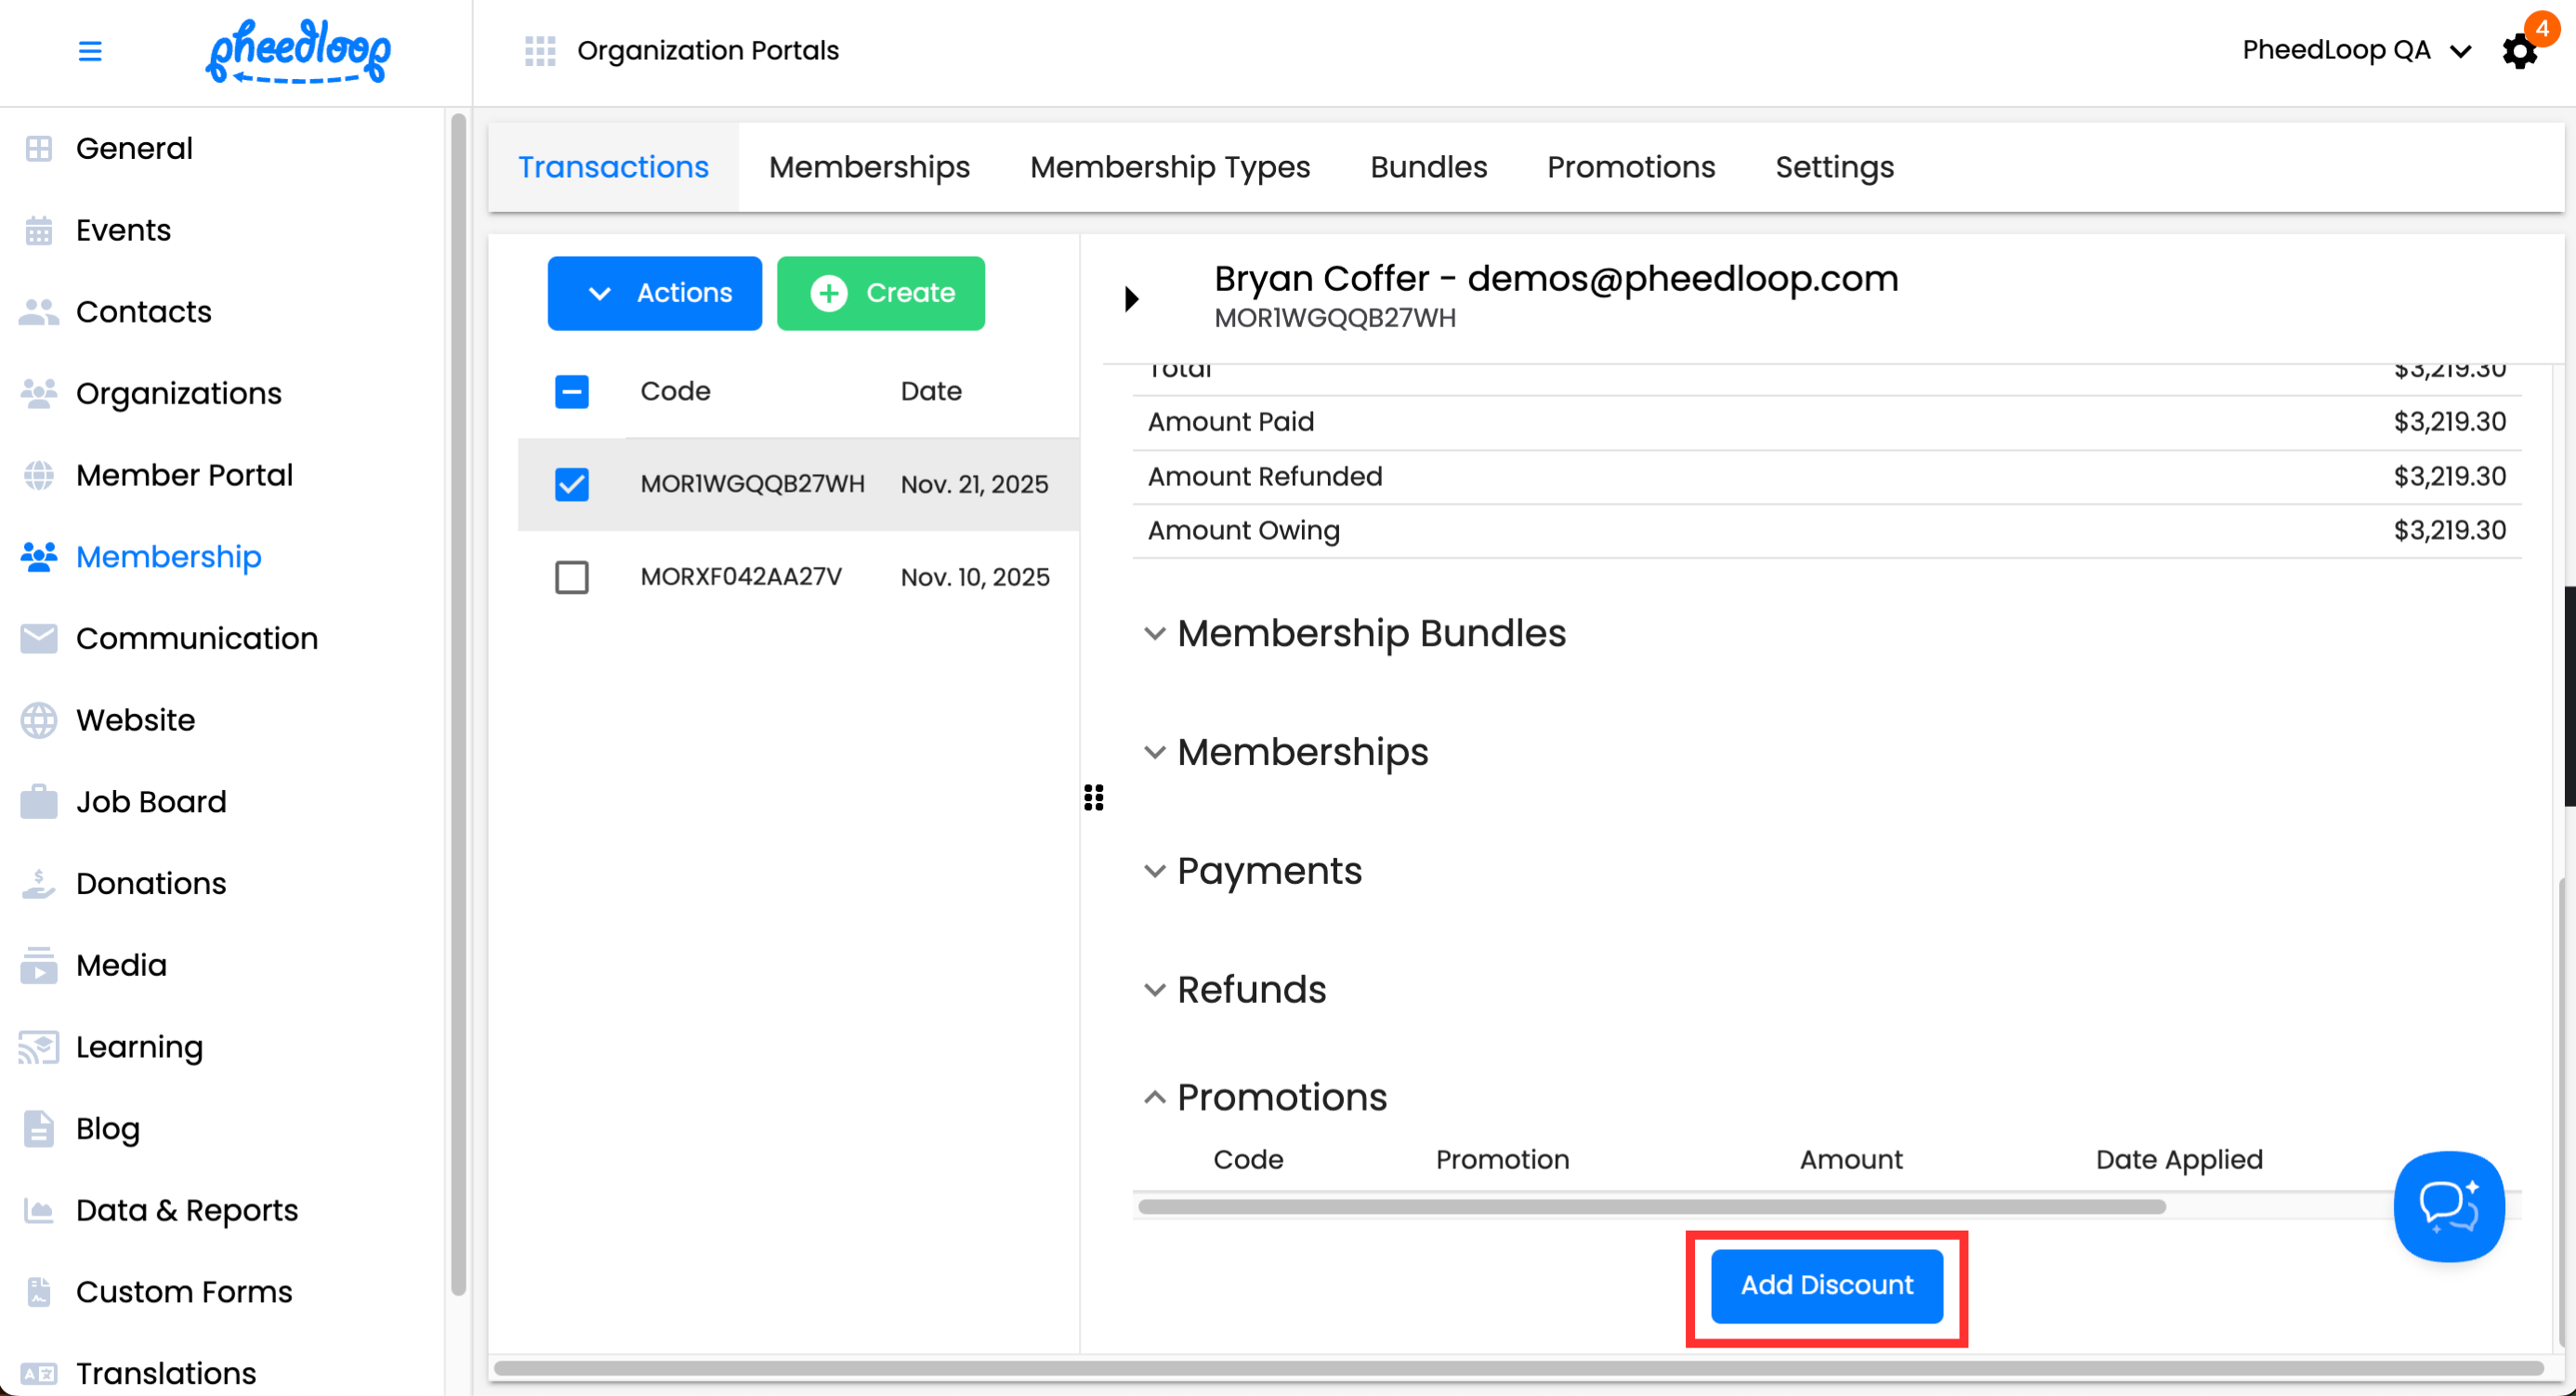
| Setting | Description |
|---|---|
| Select Promotion | Select the promotion to apply to the transaction. This field is only usable if a promotion has been created under Memberships > Promotions. For instructions on how to create a promotion, please review our Setting up Membership Promotions article. |
| Amount | Enter the monetary amount to be reimbursed. |
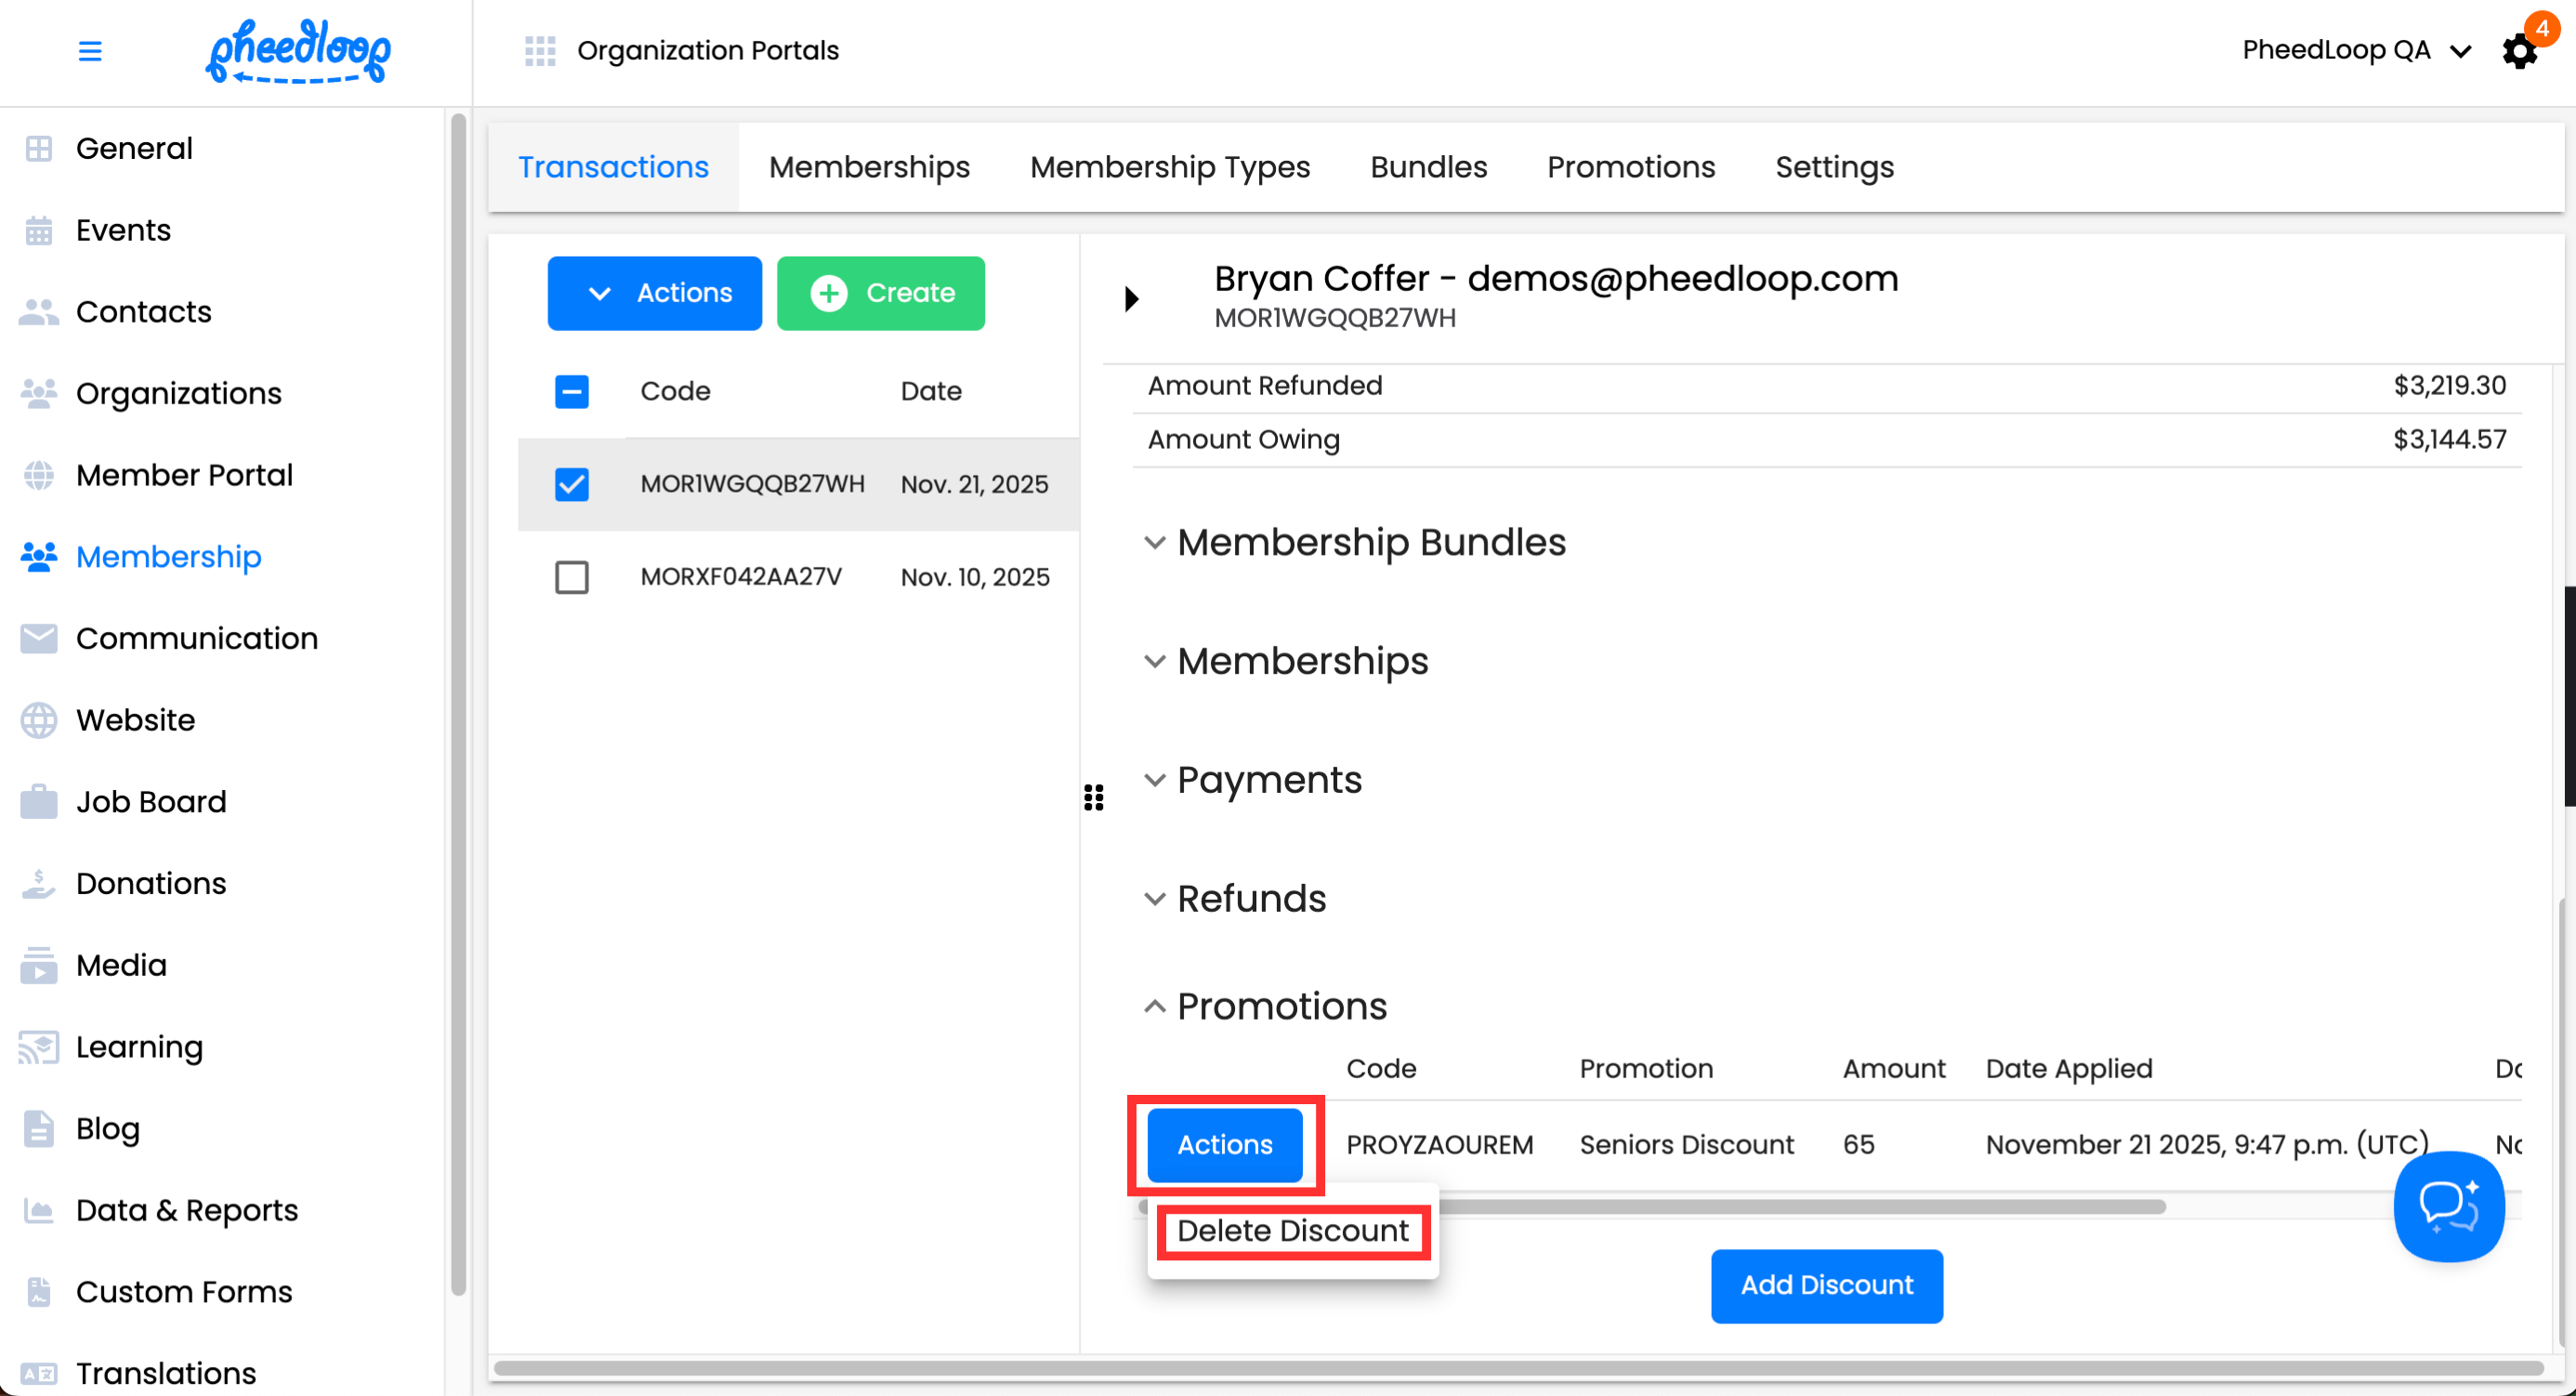
Once the Promotions are added, they can be removed if necessary by selecting Actions > Delete Discount and selecting Confirm.
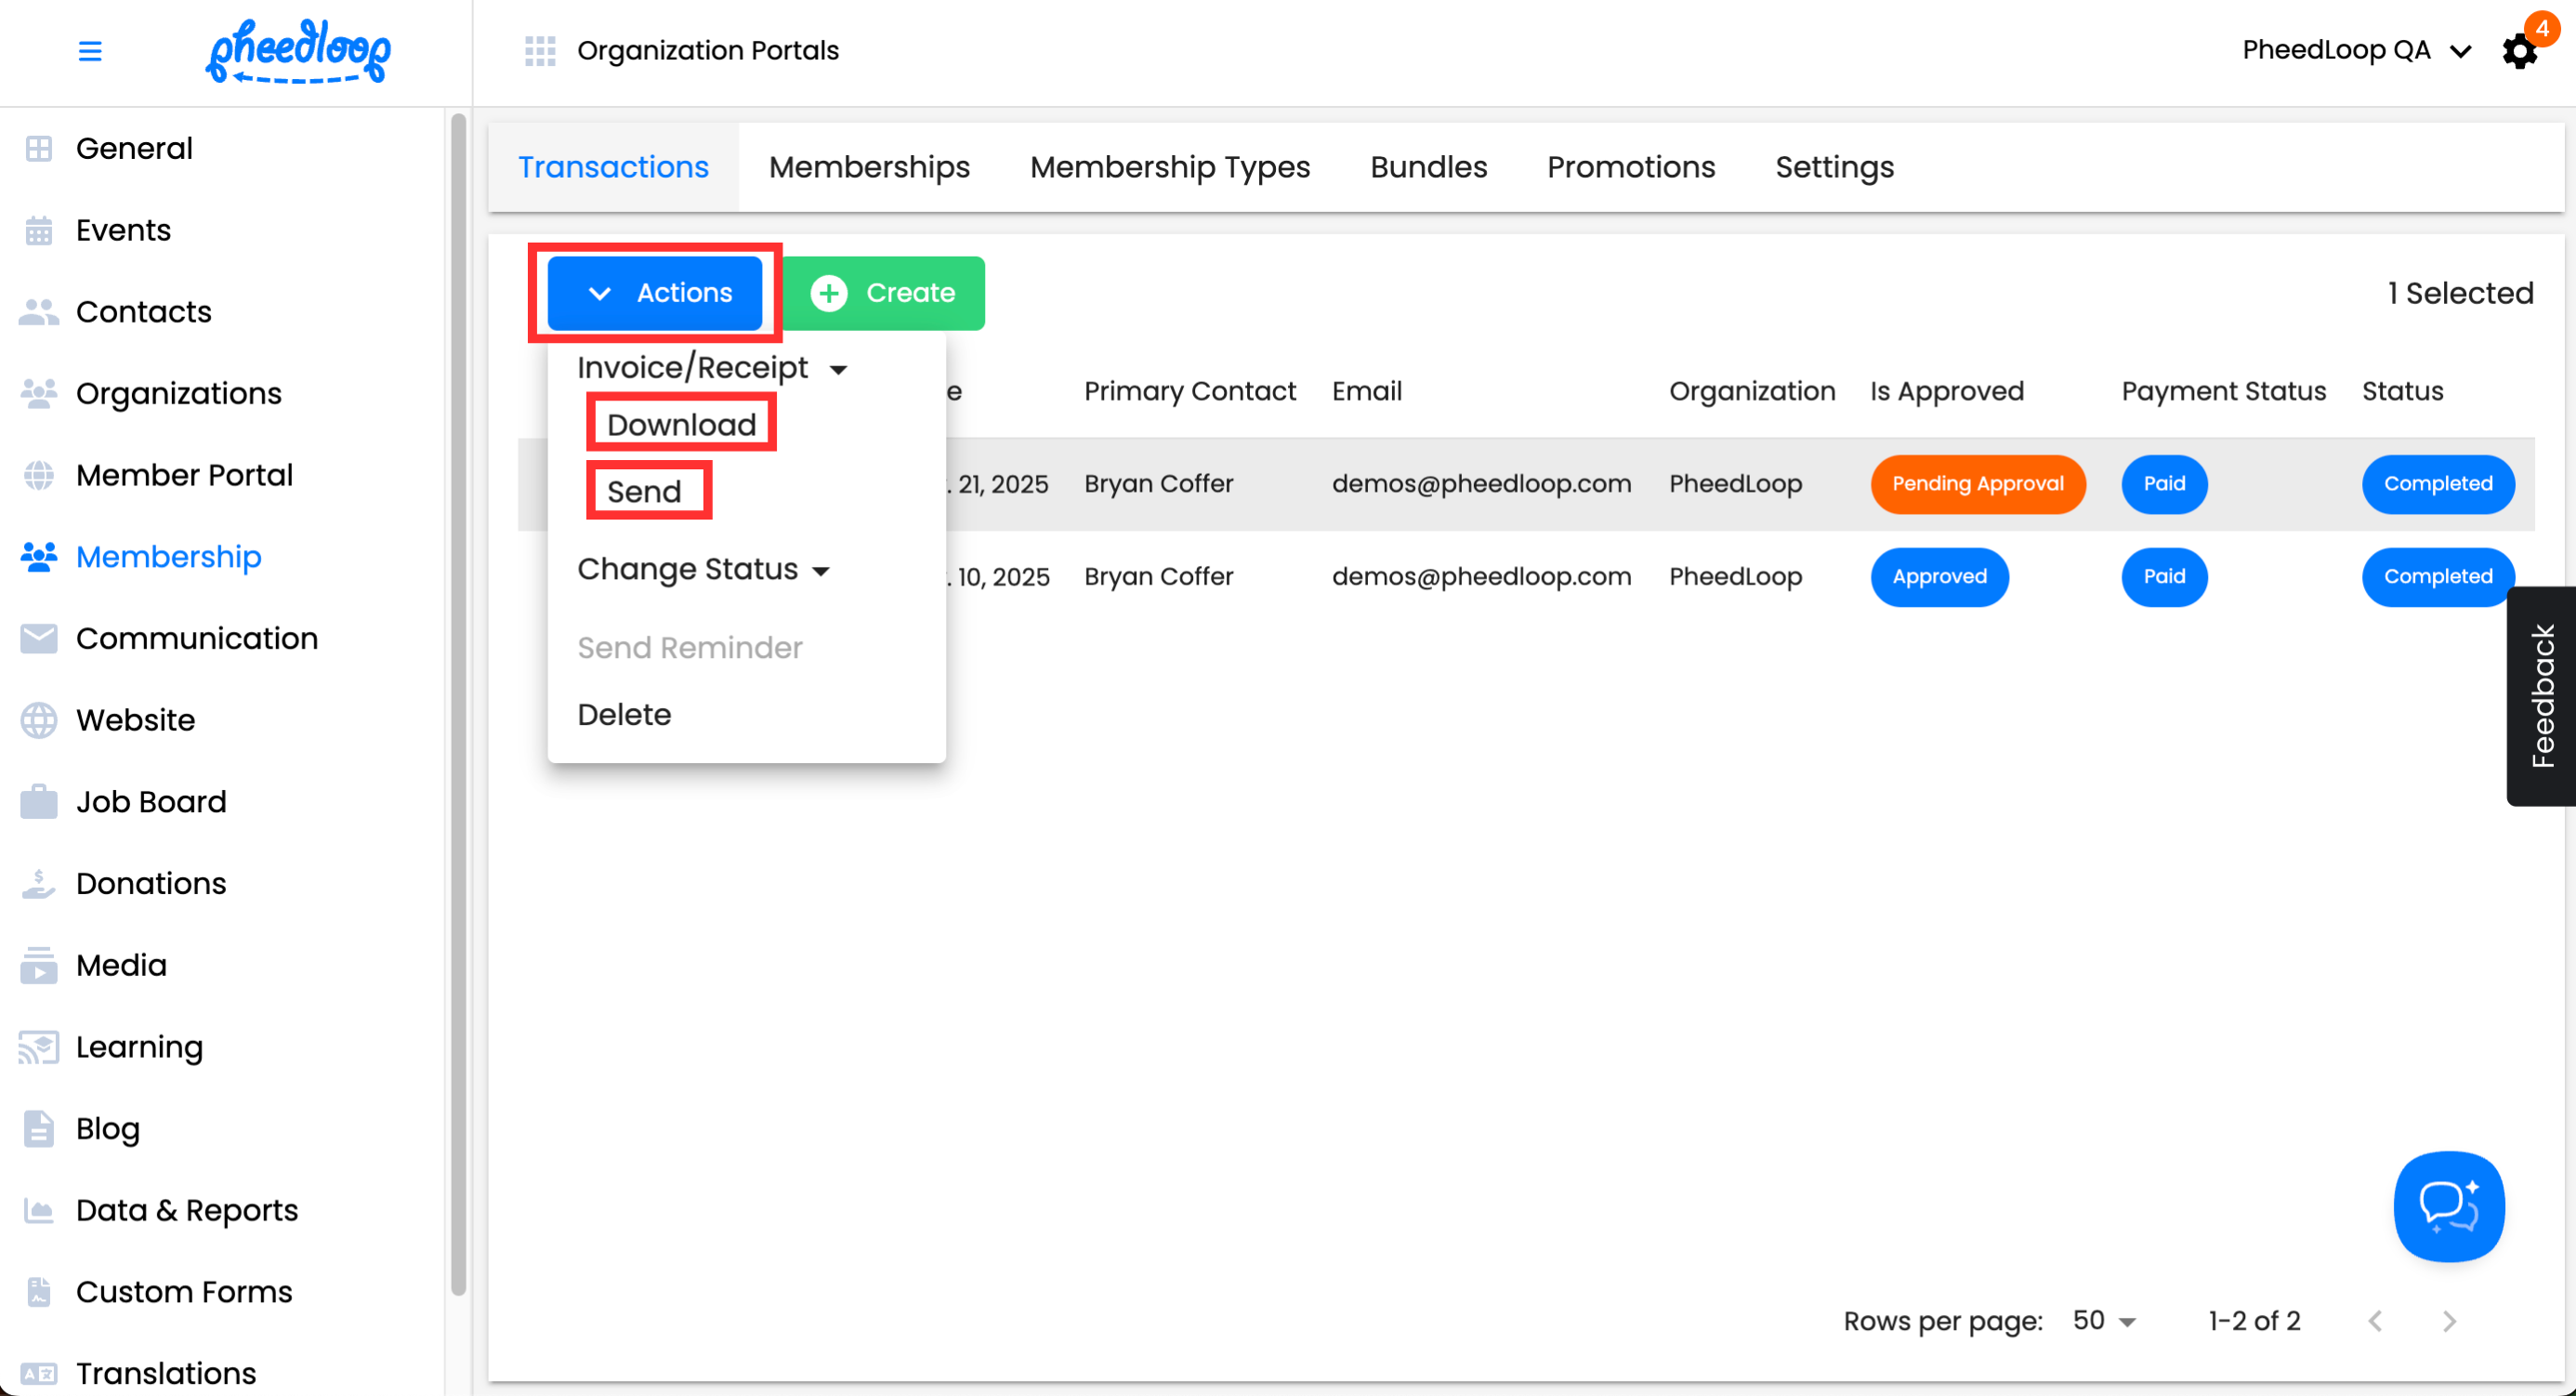
Resending and Downloading Invoices/Receipts
Invoices and receipts can be sent to the Member manually from the Membership Dashboard.
- From the Membership Dashboard, navigate to Membership > Transactions
- Select the checkbox of the transaction you wish to download or sent
- Above the Transactions table, select Actions > Invoice/Receipt
- Select Download to download a pdf file of the transaction in your device
Select Send to send the pdf file to the Member

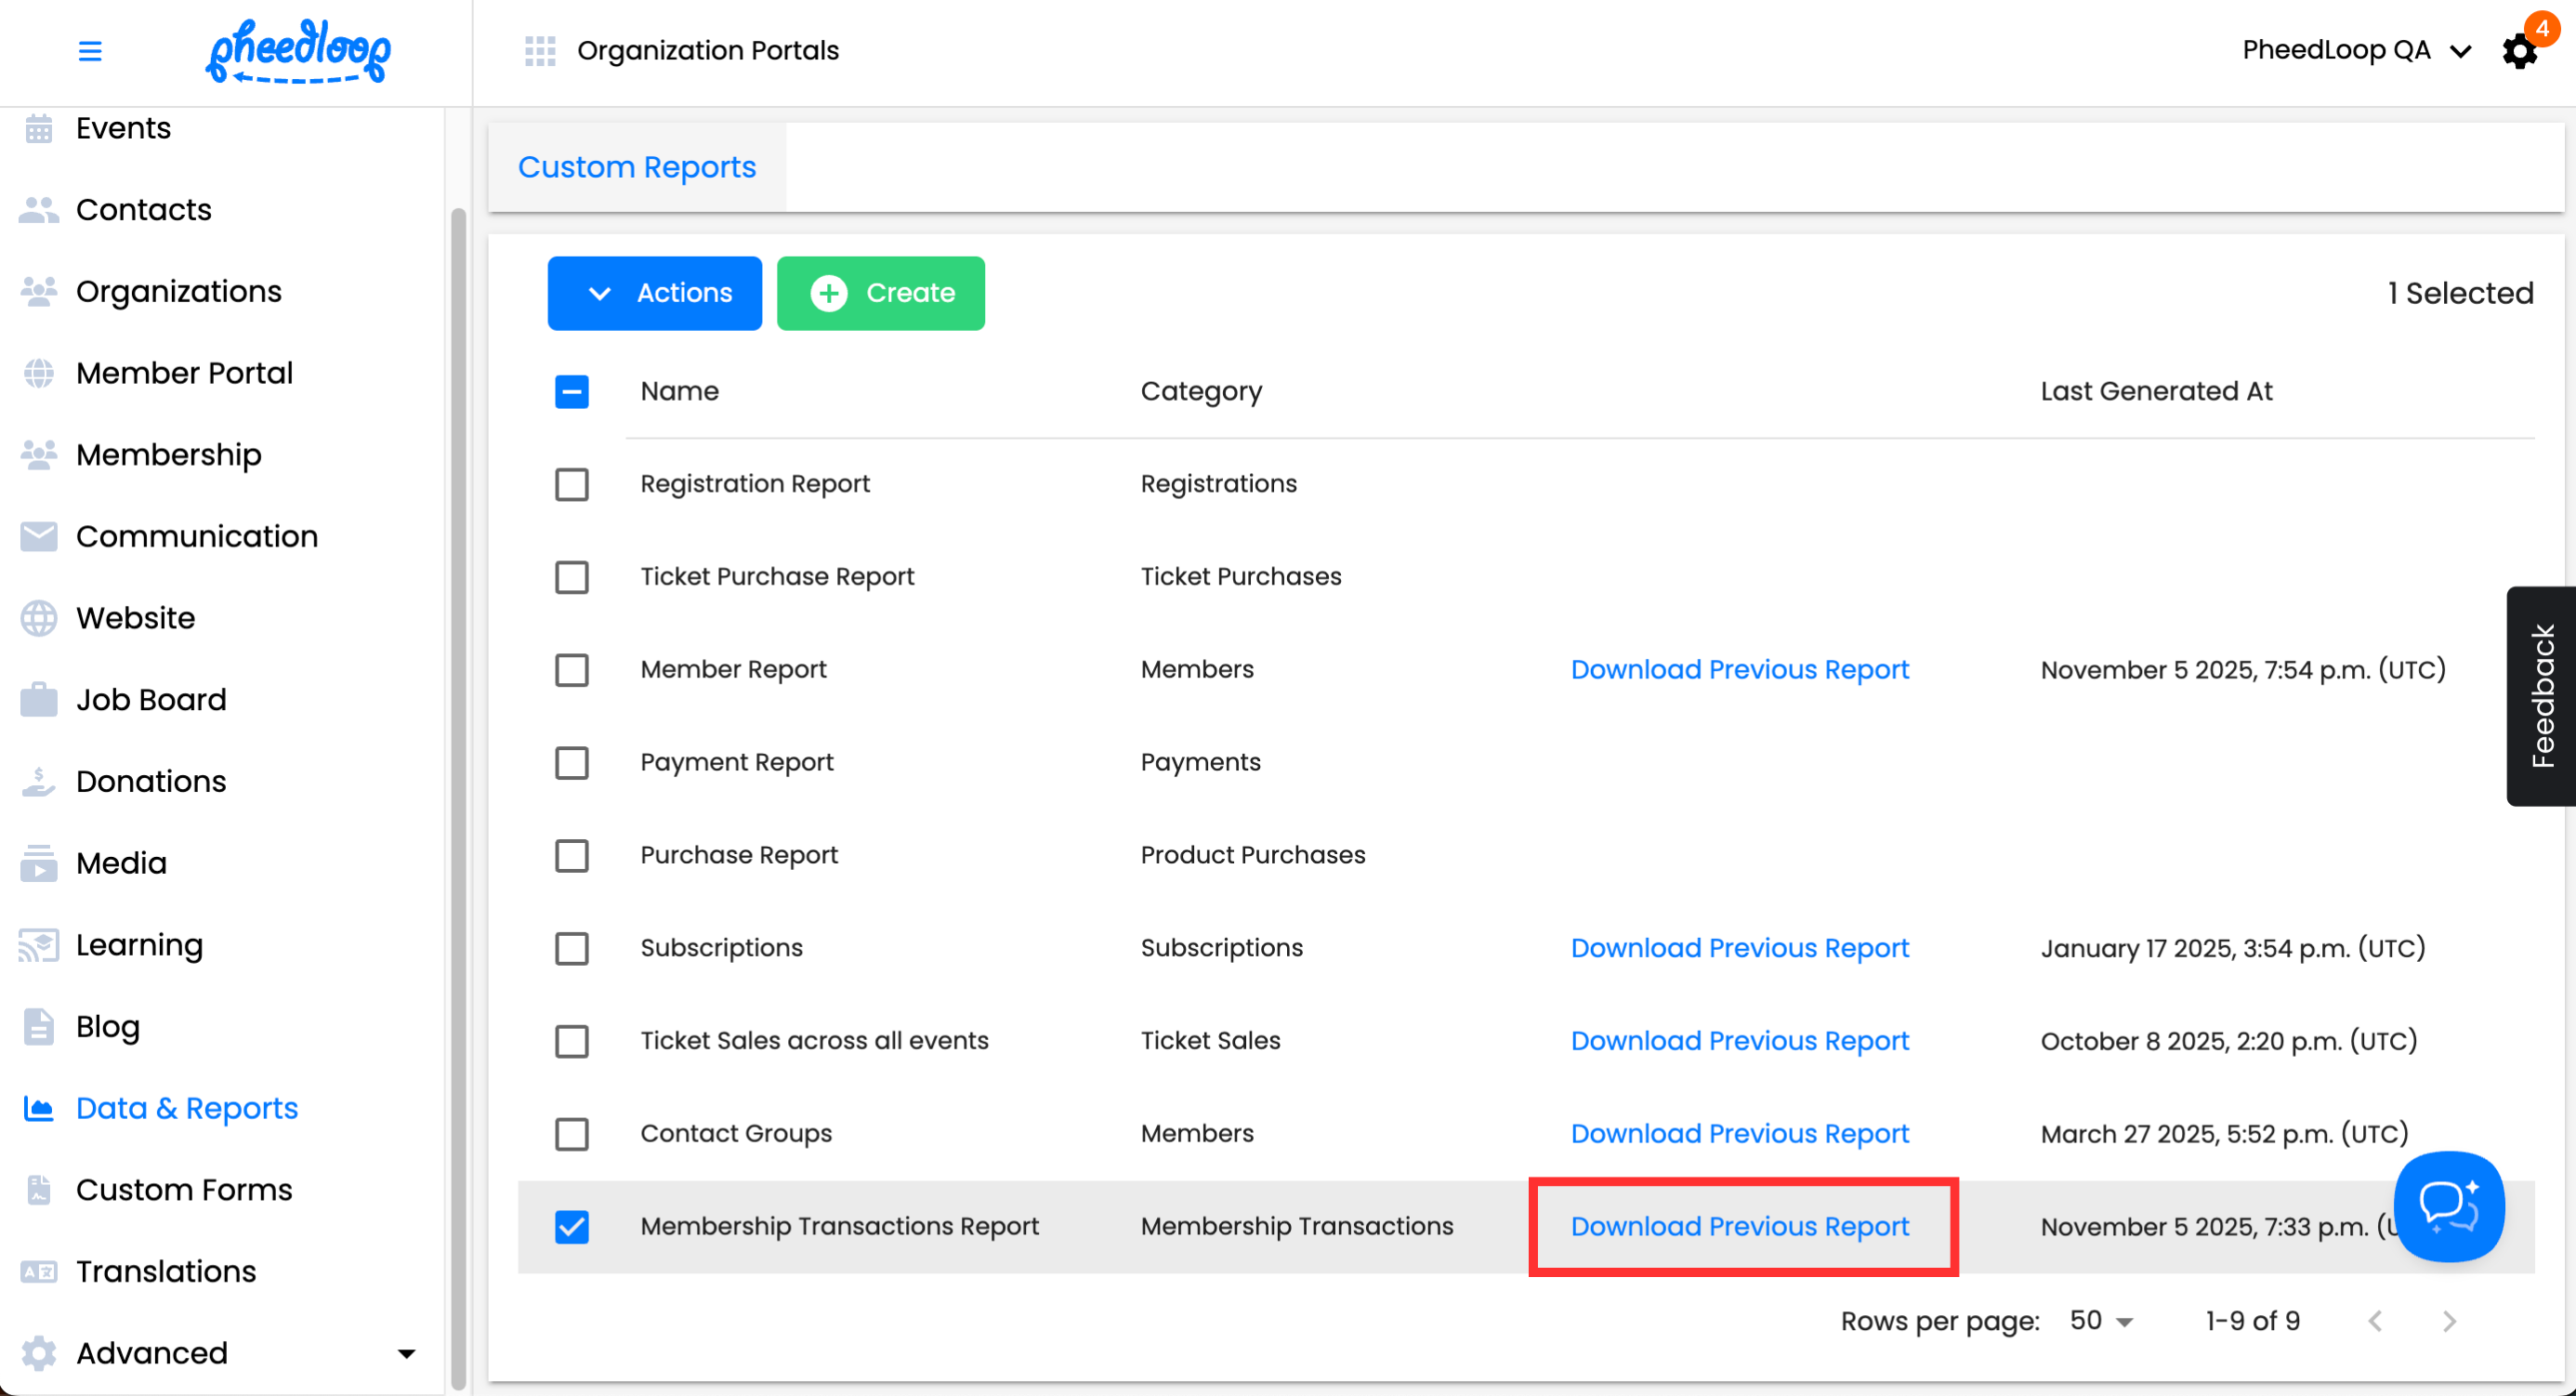
Exporting Data with the Membership Transaction Report
Custom Reports can be used to export transaction information and offer additional insight into them.
- From the Membership Dashboard, navigate to Data & Reports > Custom Reports
Above the Custom Reports table, select Create
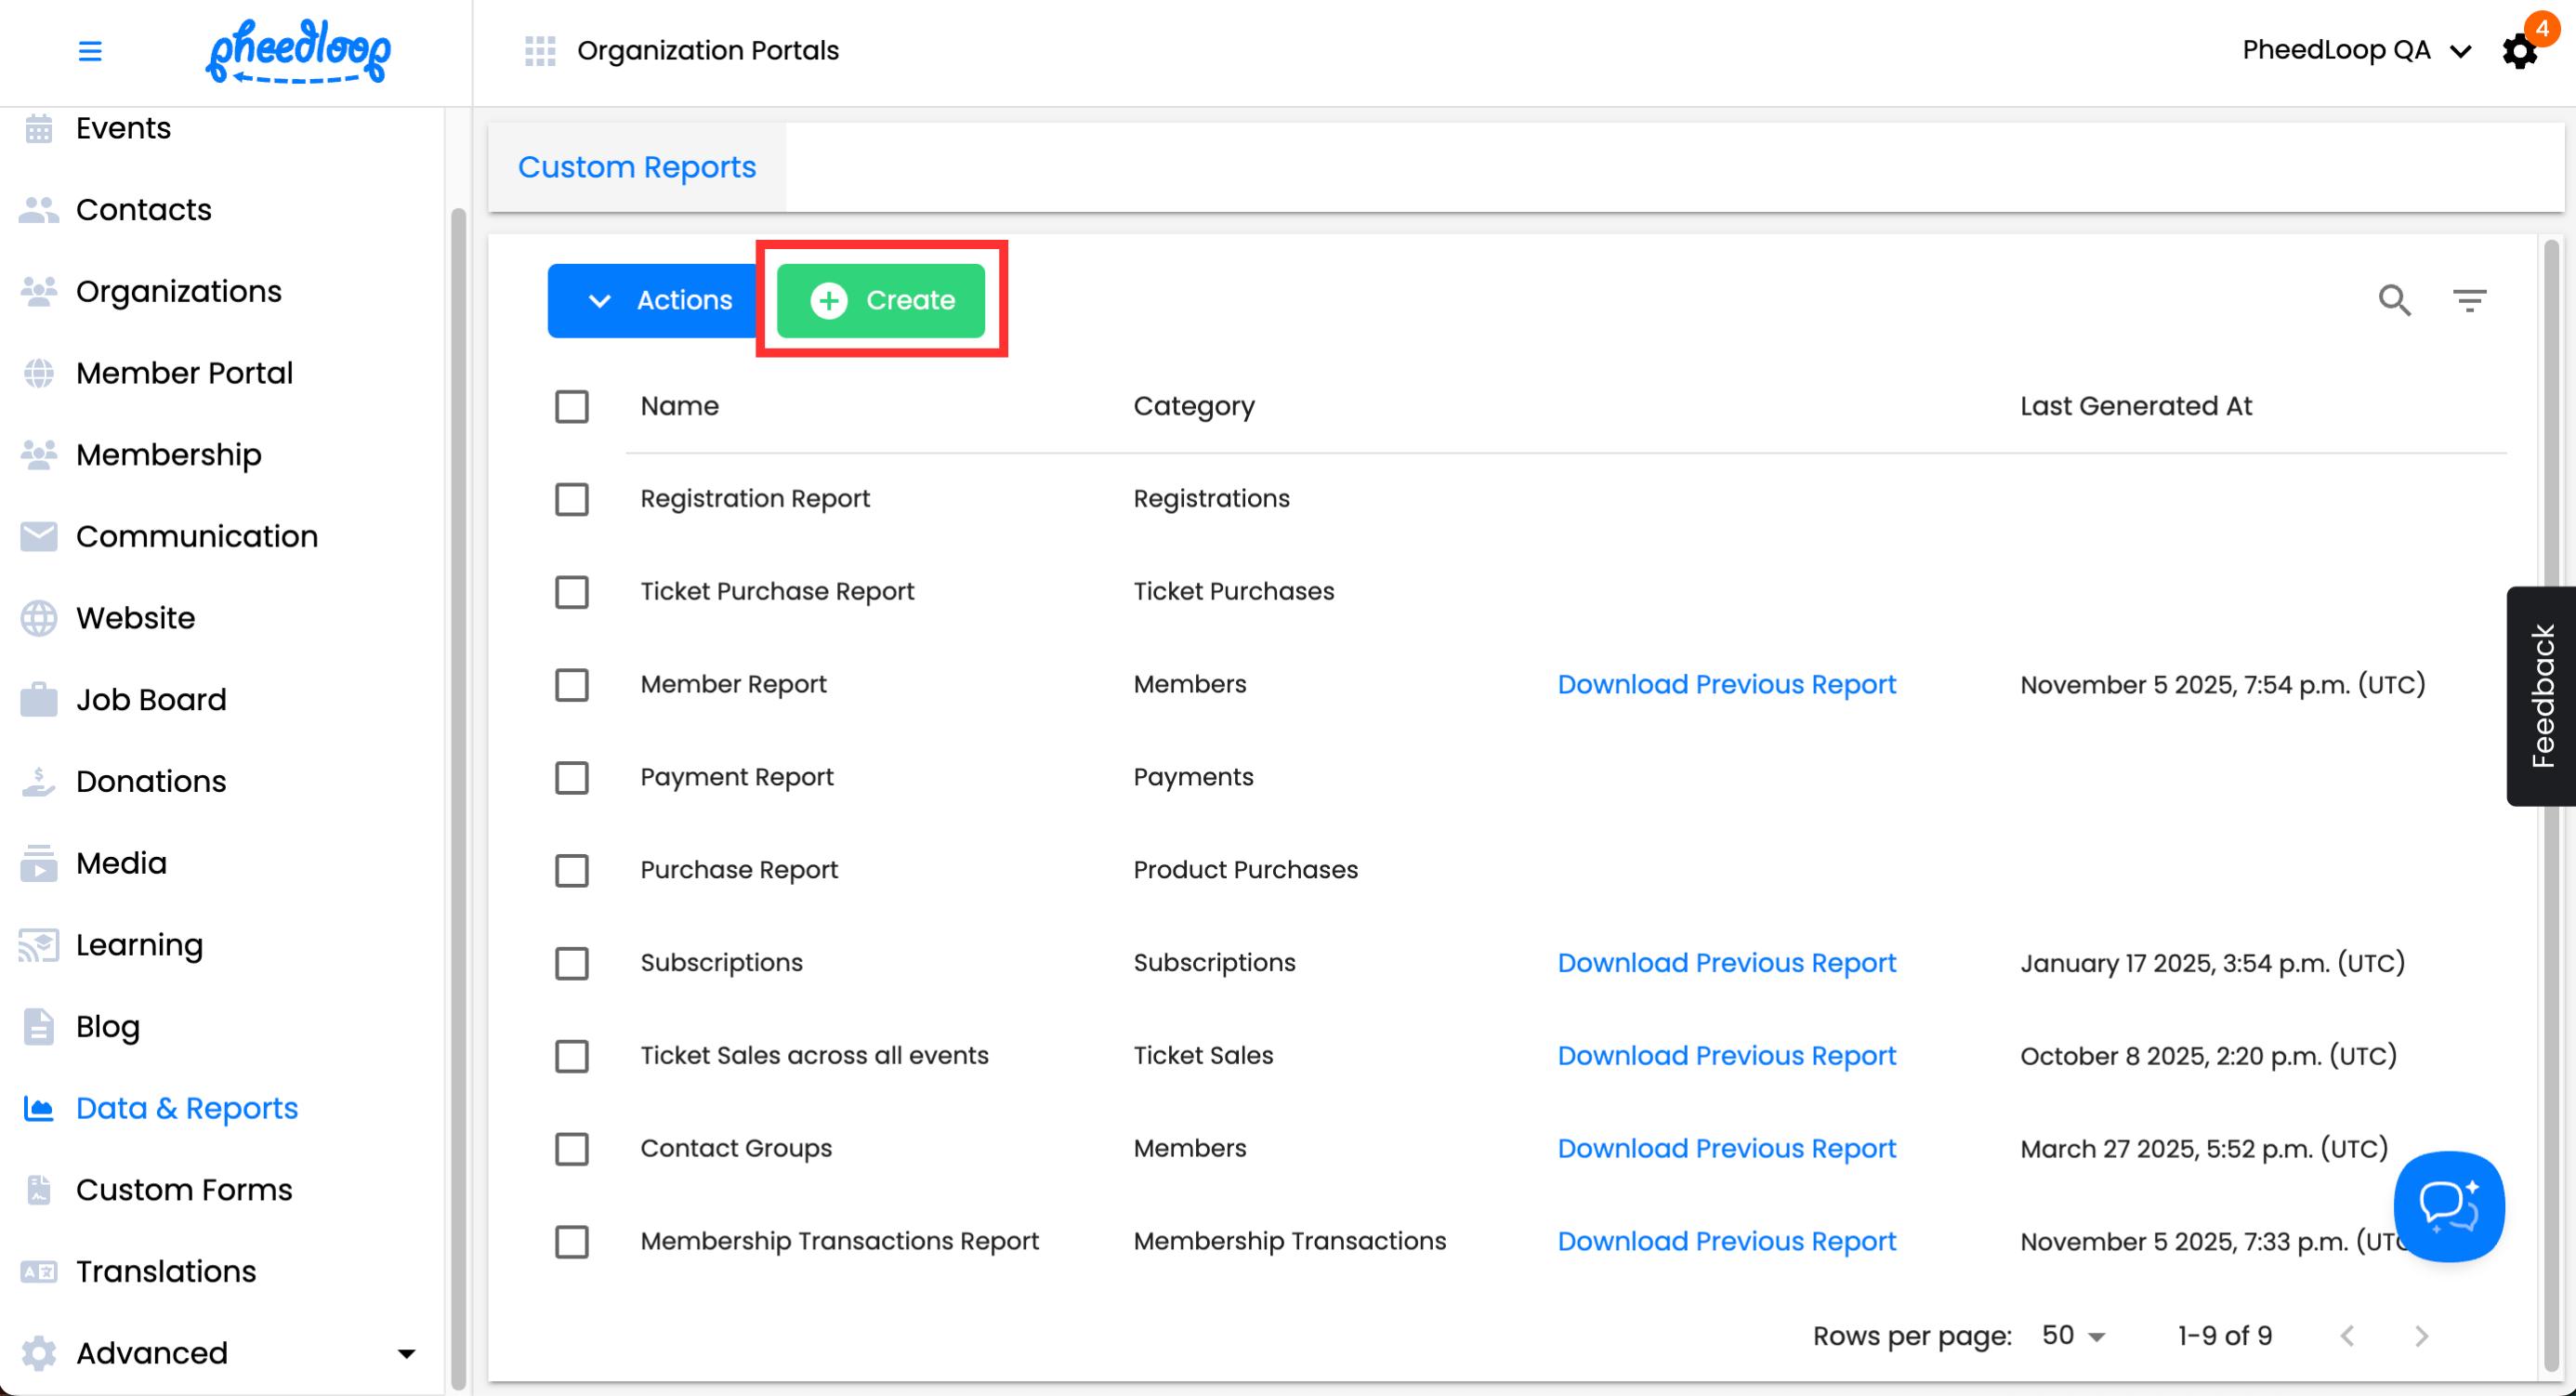
Configure the following settings as required:


| Setting | Description |
|---|---|
| Report Type | Select Membership Transactions in this field. |
| Name | Enter a name for the report. |
| Description | Enter a description for the report. |
| Fields | Enter all fields that should be included in the report. |
| Start Date | Enter the date from which the report should begin capturing information. Data before this date will not be included. Leave blank to include all historical information. |
| End Date | Enter the date on which the report should stop capturing information. Data after this date will not be included. Leave blank to include all available information. |
Once you are done, select Save Changes to create your report
Now that your report is created, you will want to generate the report in order to download it.
- Select the checkbox of your newly created report
Above the Custom Reports table, select Actions > Generate Report
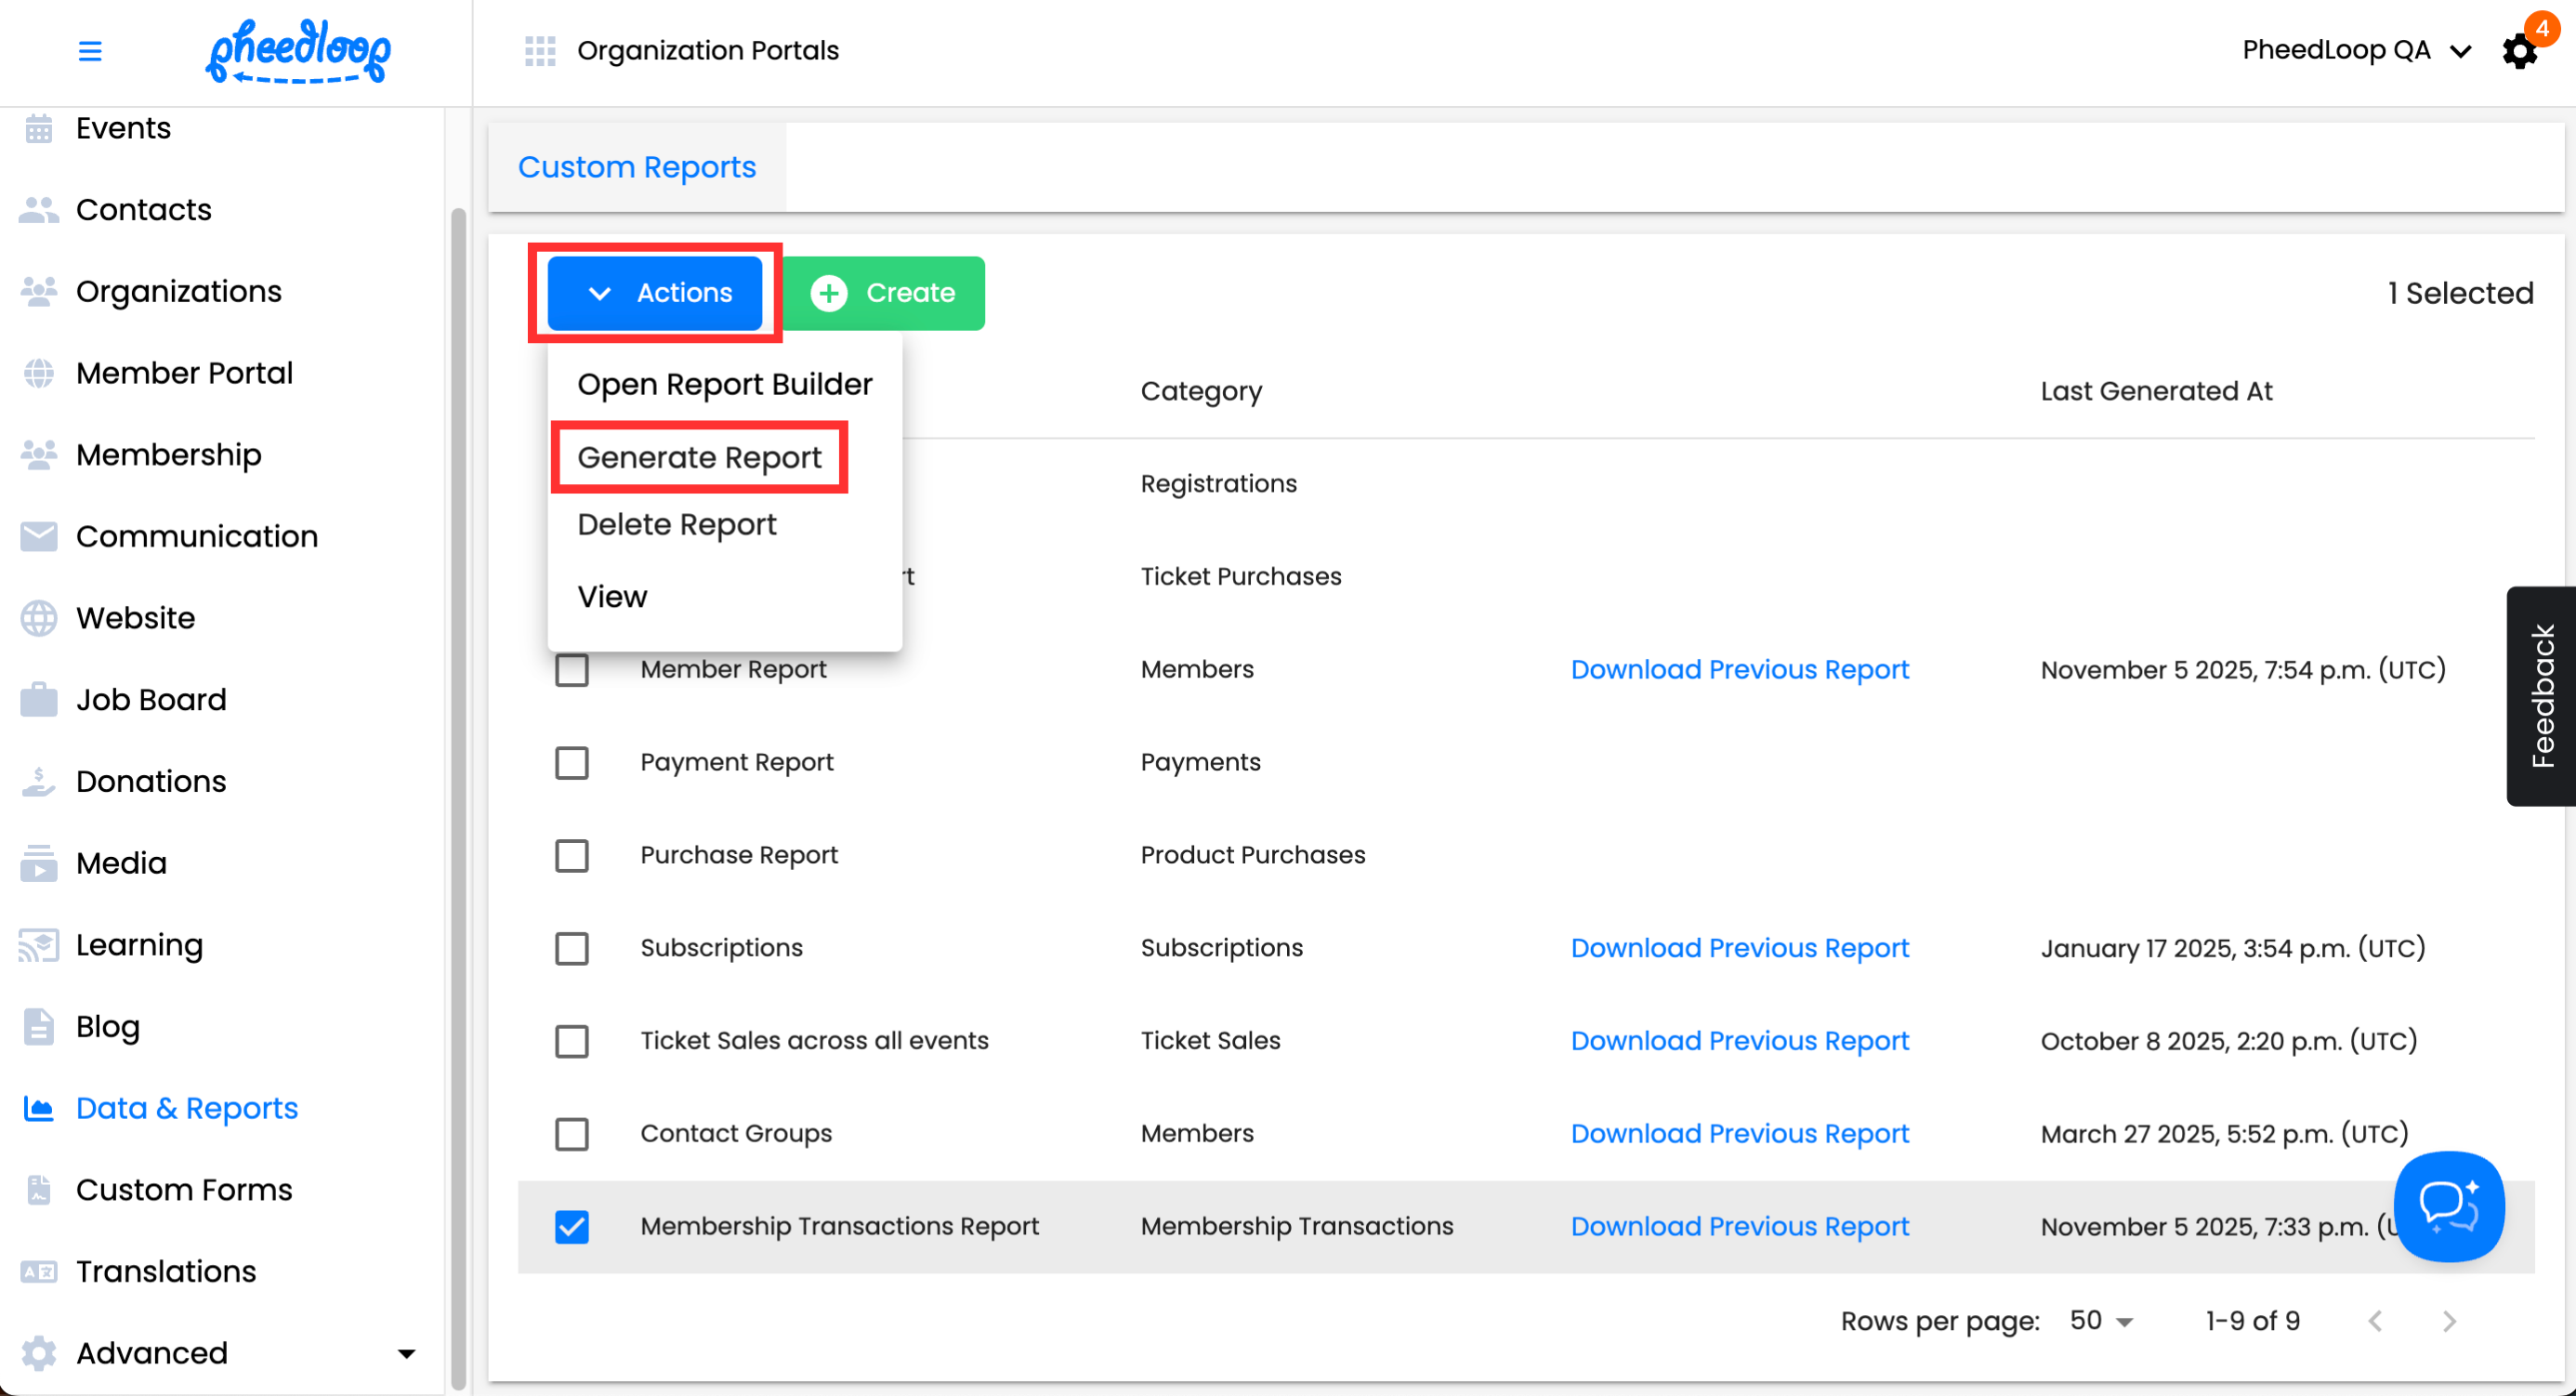
Select Download Previous Report